Sunday, July 31, 2011

The 10-Minute Notebook with Lori

Raise your hand if you've ever needed a project done, like, yesterday.  Uh-huh, I thought so.  Not that this kind of thing ever happens to me.  At least not often. Aw, who am I kidding? It's a regular occurrence. As luck would have it, the day Mandie & I were leaving for CHA I realized I should probably bring a notebook with me for a couple of the seminars I was taking. But honestly, how does it look at a craft conference if you walk in with a plain notebook?

So with 30 minutes left before I had to swing by and pick up Mandie, I pulled out a composition notebook, some Scor-Tape, a few embellishments, and a couple of sheets of paper from Graphic 45. Ten minutes later, I was ready to go with this in my bag:


Yes, I appear to be jumping the gun a little on Halloween, but I promise I'm not.  I happen to have been called the Wicked Witch of the West more than a time or two, just ask my husband.  (Honestly, I don't know where people get that idea.)  Besides, have you taken a look at that new Graphic 45 Primer paper pad?  Wouldn't that make an awesome notebook for a teacher at the beginning of the school year?

The Graphic 45 papers are perfect for a project like this.  They have lots of detail, so there's not a lot of work involved and you still get some wow factor.  I kept it all relatively flat, so as not to have something rip off while shoving it in my bag.  The ribbons are the perfect extra touch as they don't add a lot of bulk.  Note that this project requires 2 sheets of the same paper if you want the back to match the front.  I didn't think to take a picture of the back, but I used the backside of the paper on the back of the notebook, because it was the same color and a coordinating pattern.  Don't get anxious about making the edges perfect - swipe a little distress ink along all of the edges and it covers anyplace that isn't quite perfect, plus it adds dimension.

Supplies available at Cutters Creek:

Saturday, July 30, 2011

Melissa's Christmas in July


So I decided to revamp a Christmas card idea I have had for quite awhile.  I started with a snowflake border on my computer for a 5x5 card and cut it out using my Cricut.

After I cut the image, I ran the paper through my Big Shot with the Cuttlebug Snowflakes folder and again with my Lace Tree folder to soften the snowflake impressions slightly.

I used some red glitter from my stash to bring out the snowflake design.  I wouldn't recommend glitter for an area this large as it gets messy!  For future cards, I will use the American Crafts glitter card-stock.  It cuts cleanly and there is no glitter residue to be found weeks later on another project :o)

After the glitter was added I glued my embossed/cut image to the card.  It was still missing something, so I sprayed some Lily Pad glimmer mist on a tissue and ran the tissue over the raised image of my tree.  Once it was dry, I sprayed the front of the card with Dazzling Diamonds glimmer mist to add overall shimmer.  Doesn't it look pretty?


For the next step, make sure your card is completely dry!  I didn't check and noticed after the fact and had some ink running.  I used 3 different Perfect Pearls to accent "ornaments" on the tree.  What do you think??  Definitely a lot of work for a Christmas card, but you are waiting for the card to dry so much in between that it is actually pretty easy to reproduce like a production line.

thanks for looking!

Image: n/a 
Paper: Bazzill Simply Smooth 
Ink: Glimmer Mist: Lily Pad, Dazzling Diamonds
Embellishments: Perfect Pearls: Emerald Green, Ruby RedWhite Opal
Other: ATG, Big Shot, Cuttlebug -Lace Tree (retired), SnowflakesCricut
Stash: red glitter

Monday, July 25, 2011

Bling It On!!! With Laura

This "episode" of Tutorial Tuesday....is a little light on the
"tutorial"....lol. There was truly a wonderful explanation of
the I Rock and how it works early this month (HERE), and
here is another project showing the difference it can make!
The above card is pretty, but when you "bling it on", look
what you can get:

It adds so much to your card in just seconds, it's quick and easy
and these I Rock gems HOLD!!! And it's so versatile, since you
can use it on so many surfaces!

Give the I Rock "hot rocks" a try.....you won't be disappointed!

(PS....do you like the pretty paper on the card? It's a sneak peek
of the Victoria Gardens paper from EP!! Kim has this on pre-order,
so grab it before it's gone!)

Available at Cutter's Creek:

I Rock "hot rocks"
I Rock jewel tray
Echo Park Victoria Gardens (pre-order!)

Melissa's Summer Cards

 So I was looking through my Color Inspiration Magazine that came out earlier this year and I got an idea.  Not so much the colors but the layout.  If you have it, it's on page 46 - Spread Sunshine.  I just love this simplicity of it, so here are some simple birthday cards I came up with.


I really like the look of white ink on black paper, so I wanted the white to look a little messy on the embossed images.  The first card I used Flourished Frame and added the white ink and flowers after stamping my words on some Kraft paper from my scrap paper.  Who says brown and black don't go together :o)  I topped it with someCuttersCreek branded and Prima flowers.


This card I also embossed, but with one of the images from the Organic Flourish Collection.  I also used white to enhance the embossed image but no where else.  I just really like the simple feel to it.  Both cards took maybe 10 minutes total so this was perfect for a card in a hurry or  making some for your stash of birthday cards.  And they look completely different!


thanks for looking! 


Image:  Stampin' Up -retired
Paper:  stash
Ink: Memento Tuxedo Black, white ink from stash
Embellishments:  Prima Flowers: Dimmet, Aurora. CC Flowers: Aqua Marine, B, W, GOrganic Flourishes, Flourished Frame.
Other: ATG,  Glue Dots, Big Shot

Sunday, July 24, 2011

Christmas in July by Chris

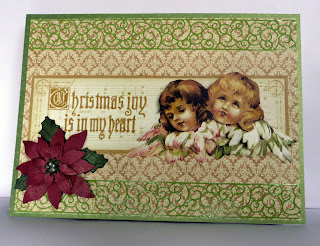
I am never one to be ahead of the game so this was quite a challenge for me to shift gears from all those summer projects that are lined up and think of Christmas. I knew I wanted to have nothing to do with SNOW! Searching through my stash I came across my Graphic 45 Christmas Past paper and fell in love with these angels. I fussy cut both sets of them out using my Cutter Bee Scissors and then I scanned it in and printed it on white cardstock so I would have a third layer to work with, and fussy cut that. I cut them apart for layers so they would have depth when I used them.


While I was waiting for the ink to dry on the scanned image, I cut an 8.5x11 piece of white cardstock down to 7.5x11 and scored it at 5.5 with my ScorPal. I then cut a piece of green shimmery paper at 7.5 x 5.5 and used ScorTape to adhere it to the card front. The gold rectangle is another piece of Graphic 45 cut to just a quarter of an inch smaller than the background (also glued with ScorTape). The lace stickers were in my stash and since the matched the green so well that I couldn’t resist adding them to frame the angels. Before I started to build up the angels, I used my Gold Spica pen and traced over the sentiment and glued it down. It really darkened the sentiment and gave it a soft glow that I just love.


Then, using pop dots I built the angels up. I followed the colors on the Graphic 45 and used my Pink and Melon Spica pens to highlight them and the Clear Spica to fill in the white with some sparkle. I hope you can see that because it makes all the difference in the card. My final touch was one of my PDC Poinsettia’s I had made at Christmas time. I used some Glue Dots to set it on the card. And gee, a Christmas card done in July! Maybe I need to be challenged more this summer so my Christmas letters will be all ready before school goes back into session—LOL.

Friday, July 22, 2011

More Christmas in July! With Laura


Do you like to get a jump on making those holiday cards? I do!!
Things get so busy, it's hard to actually find the time during the
holidays. These Ecstasy Card Kits are a wonderful way to do
just that! They have a pre-printed sheet, that you just punch
out each piece, in order (it's paper piecing by number!) and
attach it to the base piece with foam dots. Ecstasy has the
perfect foam dots for the job, which makes this craft even
easier....but it looks so amazing!

I made this card in minutes.....blinged it up a little with
Stickles (Christmas Red to the berries and Icicle to the
white berries and candle flames) and a bow, and you have
one beautiful holiday card....ready to give!!

Check out the Ecstasy Crafts section in Kim's store....and if
you have already.....check back soon.....lots of NEW coming
from CHA!!!!

Happy crafting!!

Available at Cutter's Creek:
Ecstasy Kits (3D diecut Christmas-Old Parchment)
Ecstasy crafts foam dots (lg and micro)
Ranger Stickles (Christmas Red and Icicle)

Thursday, July 21, 2011

Gingerbread House Treat Box by Deanna M


This month on the Design Team blog to help everyone start thinking about their holiday crafts we are featuring some Christmas in July project. My project today for you is this cute little treat box. A friend gave me the new Sweet Tooth Boxes project cartridge and when I saw this sweet house in the book I knew what I wanted to do.

I started with some kraft card stock and using the suggestion in the book cut my house and it's layers at 10". To make the house you have to cut 2 of the actual house. Because I wanted to dress mine up a little and add a Christmas Tree to the inside I used my Gypsy and hid the window on one side of the house so it wouldn't cut. I also hid the flowers and the flower boxes because I wasn't using them. I hope you can see the tree I added to the inside of the house. I cut the tree at 3.1" using my Imagine and the Snow Angel Cricut Imagine Cartridge. I used Scor-tape to assembly the house together. I added some clear acetate to the window of my house so it looked like glass. I cut the grass for the house out of white and ran it through my Cuttlebug and the D'Vine Swirls embossing folder.  I then ran it upside down through my Xyron and covered it with some chunky glitter and adhered to to the sides of the house.
To dress up the outside of the house I added some Polar White Flower Soft along the roof line and edge. To the front of the house, I added a brad for a door knob and using the Snow Angel cartridge and the layers feature on my Imagine I cut two pots of poinsettias to place on each side of the door. I then used my Jolly Holidays Lite cartridge to cut a wreath that I attached to the door.

I added some Christmas Red Stickles for the berries on the wreath and also the ornaments on the tree. I used some Star Dust Stickles to some of the poinsettias to help them stand out and add a little more bling. The roof slides on to the top of the box and over those two solid pieces that act as a handle. It was a lot of fun making this and I am ready to fill it later this fall with some yummy goodies!

Tuesday, July 19, 2011

I-Rock Tutorial Tuesday with Mandie

This month we are talking about one of my favorite tools to use... the I-Rock by Imaginisce! We are also making some Christmas projects to get you in the holiday crafting mood.... mine isn't exactly Christmas but you could certainly translate this idea into a fun Christmas craft!

This summer my 5 year old went to a fun Vacation Bible School and she had this really cute I Heart VBS shirt but it wasn't "girly" enough for her. So I grabbed my I-Rock and my Gem Compact and went to work!


First I did a dry fit of the stones in a pattern I liked. Then I grabbed my I-Rock and let it heat up for about 30 seconds. Then I started adhearing them. *Special Note* when you are doing a project like this make sure you have fresh batteries in your tool, it will save you a LOT of frustration! You only need to hold the tool on the stones for about 10 seconds... maybe a few extra on the big ones. You will kind of see the glue at the edges melt and you know it's done.


After I finished the front I added a few stones to the back too... the State Of Liberty's Crown, the Top of the Chrysler Building and the Taxi and got a bit of bling!


Here's a shot of the completed heart. I will say, I SHOULD have done the stones on the FABRIC of the shirt and NOT the paint. The stones on the back stayed put but the ones one the heart shed off during the day. But, my friend who also did this with me did her's around the outside of her heart and they worked perfectly!

You can wash your shirt after it is blinged, just make sure to turn it inside out and hang to dry! You can easily personalize a store bought shirt with many of the gorgeous gems available at the Cutters Creek Store!

Monday, July 18, 2011

Melissa's Copic Portfolio

So I decided to update my Copic Portfolio with an image I used quite a bit by *Princess Elemmiriel.  Using my copics I colored my image focusing on lighting.  I have the sun coming from the upper right, so the shadows would be on the right of the body and more specific areas like where her waist is bent, the arm slightly covered by her dress, where her hair covers her face and dress, her nose, and what would not be hit directly by the light.


Definitely one of my favorite images to color.  The main reason I put this image in my portfolio is because of the size.  Usually when I color this image, I tend to use a larger version and the card ends up around 5x7.  This image was printed at 2x3 so it was a challenge to color with the shading at so small a size.  I really like how it turned out.                                                                                                                        Are you working on a portfolio?  It is a good reference tool and it helps you have a comparison of how much your coloring has progressed from when you start.  It is also a good way to keep track of favorite color combos, techniques and samples you have made.  I tend to color two of every image I use as it helps me practice in a way, but also I can get two cards done at once but that also can turn out so differently from one another.

thanks for looking!


Ink: Memento Tuxedo Black, Copics, Copic Multiliner
Embellishments:
Other: ATG,
Stash: green paper

Friday, July 15, 2011

Celebrate Everything! by Deanna M

In honor of summer my project for you today is an ice cream cone card.  I started with some Kraft card and made my card a portrait card by cutting my paper at 4 1/4" X 11 and scored it at 5 1/2". I then grabbed a couple of pieces of card stock from my Echo Park Paper Pad Summer Days. I cut the red mat at 4" X 5 1/4" and the patterned paper with the ice cream cones at 3 3/4" X 5". I used my corner rounder to round the corners of all the layers and the card base. My cupcake is cut at 3" from the Cricut Sweet Treats cartridge. I used my Imagine to cut the image and the Bubblegum Stripes cartridge for the colors. For the shadow I used a black with tiny pink polka dots also from the Bubblegum Stripes cartridge. This cartridge is a special order cartridge from Cutter's Creek so if interested please be sure to contact Kim. I adhered my paper layers together and wrapped some yellow and white striped bakers twine around them and adhered the mats to my card with my ATG Gun (which I love by the way!!!) For my Ice Cream Cone I ran the cone part through my cuttlebug and embossed it with the Houndstooth Embossing Folder. I then used my Tea Dye Distress Ink to ink over the embossing to help it stand out. I layered my image and then added it to my card with some foam tape. To finish the card I added some iRock Hot Rocks Glitter Gems to add sprinkles to my cone.  To the drip I added some Glossy Accents to give it some dimension and shine so it looks wet. Finally added my sentiment stamped in some brown ink.

Thursday, July 14, 2011

A White Christmas with Lori

Welcome to Christmas in July!  This week, I'm sharing my White Christmas card with you.  I've based my card on a challenge blog I follow, and will have a total of 5 cards over on my blog over the next 5 business days if you'd like to see more ideas.  (I'm also having a giveaway during the same timeframe!)


Ooh, shiny!  I loved that this challenge included bling as one of the requirements & I went to town with this one.  Here's a detail shot of a little more bling you can't see in the main picture:


I had a lot of fun with layering on this card, and adding a few special touches.  I made my "gift bow" using ribbon from my stash and a sparkly brad.  Also, to define the edges of all that white, I sponged on a little ink all the way around.  My sentiment is embossed on its own little panel and popped up with foam adhesive dots.  I also added a few i-rock gems to my embossed snowflake centers.

Supplies I used:
 Note - that heat tool does double duty!  I use it to speed dry my Glimmer Mist as well as heat emboss my stamped sentiment.  Well worth the investment!  I also used my Glimmer Mist to spray my paper first before embossing.  Damp cardstock embosses SO much easier than dry.

Thanks for stopping by today!  I'd love if you'd hop over to my blog and check out my giveaway, and the next several days of White Christmas.

Monday, July 11, 2011

Precious Tutorial Tuesday

Continuing with our Irock Tutorial Tuesdays, I decided to make a precious little baby girl card to show you how I like to use my Irock. Here are a picture of the Imaginesce supplies I used on this card.


baby card 001 [1280x768]


In this picture you can see my Irock tool, a compact full of rhinestones, a couple of lip gloss like containers full of gems, and my little tray which lets me keep track of all my gems. In the tray you will see one of the applicators that comes in the lip gloss tubes. When you wet the end of the applicator, it can be used to pick up the gems and place them where you want them to go. This is a lot easier than trying to pick them up, especially if you have long nails.


Here is a picture of the card I made using the Irock gems and my Teresa Collins Baby Boutique Imagine cartridge.


baby card 004 [1280x768]


I like to look for obvious places in the die cuts themselves or the pattern that look like a rhinestone would fit. In this case, the middle of the wheels was perfect for a rhinestone, as well as the point of the sentiment, and I also mixed a few into the polka dot pattern on the stroller randomly. To finish the card off, I added a couple of Cutters Creek branded gardenias. The flowers come with stamens in the middle of them. I didn’t think it really went with my bling theme, so I carefully cut them out of the flowers and added an Irock rhinestone to the center of each flower.


Using the Irock is extremely simple. First, you need to place your gems where you want them using the applicator I told you about earlier. Then you place you Irock tool on top of the gem. Here is a link to a video showing you how to use the Irock. You can feel the gem move just a little bit when the glue has melted, that’s the best way for me to know it’s done. It will go a little quicker after the tool is completely warmed up. Your first few may take a little longer. If you are looking for an easy way to bling up your projects, then the Irock is the tool for you.


Cutters Creek Shopping List


Irock Tool


Irock gems


Irock tray


Teresa Collins Baby Boutique (available for special order)


Cutters Creek Branded Flowers

Friday, July 8, 2011

A Christmas in July Snow Day

I would love to have a little bit of cold weather right now. It’s been over 100 degrees so many days that nothing sounds as good as a little bit of Christmas in July. I decided to make a 2 page layout for my Christmas in July project. It was really simple and quick to do with my cricut Imagine. I used the Snow Angel cartridge to print both pages of my background paper. Snow Angel has some of the sweetest looking images on it I have ever seen. I love printing the patterns on textured cardstock, I think it gives a great look.

snow day 1 [1280x768]

snow day 2 [1280x768]

After I printed my background pages, I printed and cut a few elements to add to it. I popdotted the mom figure in the coat, but I glued the snow angel child directly to the paper. I love the dimension of the pop dots, but if you were making a snow angel, you would be flat in the snow, so I applied that one directly to the paper. The title is from Winter Woodland and filled with patterns from Snow Angel. I used the same technique on the companion page. I stuck the dear directly to the paper, but pop dotted the adorable little snowman up, so I could tuck the picture underneath it a little bit. All I needed to make this layout was my cricut Imagine, 2 cartridges, and a few sheets of white cardstock, you can’t get much easier than that!utters

Cutter’s Creek Shopping List

Cricut Imagine Snow Angel

Tuesday, July 5, 2011

Fun in the Sun Tutorial Tuesday by Mandie

Glad you could drop by for another edition of Tutorial Tuesday here on the Cutters Creek Design Team Blog! Before I get started I just want to remind you that you can sign up to subscribe to our blog posts and also subscribe to the store newsletter in the side bar!

July is going to be an exciting month for us here on the blog because we have Summer CHA coming up and that means Kim is going to be adding some great new products to the store again... This month we are going to be focusing on the i-rock gems on Tutorial Tuesday and here's the card I made:


First I stamped out the image from The Greeting Farm, Cheeky Beach, and colored her in my my Copics. I've been very slowing expanding my collection so I actually have a couple colors besides the skin tones now! I'm still learning about my Copics too... like use GOOD paper, this one got a bit runny. My coloring wasn't awful but the colors traveled in this paper. But I still thought she was cute enough to use! If you click the close up picture you can see how I added a bit of sparkle with my Stardust Gelly Roll Pen.


Next I made the sandy layer. I started with a tan cardstock for my base then used Yellow Daisy, Walnut Gold and Coffee Shop Glimmer Mist to create the sandy look. Then I grabbed my Echo Park Summer Days 6 x 6 Paper Pad and grabbed the blues for the sea and sky. I tore the paper by hand for the "waves" and I really like how they came out. Once the sea, sand and sky were in place I decided that I needed a big blingy sun! So I cut a 5/8" circle from white cardstock and used the Yellow Daisy Glimmer Mist to color it. Then I grabbed my i-rock and the Hot Rocks Compact and added the yellow rhinestones to my sun.


Finally I stamped "Fun" and "Sun" with some alphas from my stash and wrote "in the" in between for my sentiment. What a fun summery greeting to send! Thanks so much for joining us for another Tuesday! Make sure you check back often, we have a surprise filled month!

Saturday, July 2, 2011

4th of July Layout by Chris


Here’s a quick and easy 4th of July Layout. All you need is some red, white, and blue paper, Tim’s Alterations Rosette (I’m sure Kim can get you this if you need it—she got one for me), the Cricut Summer Collection: Independence Day, and ScorTape.

I first made the photo mats at 4x6 (one red and one blue) and a decorative sheet for each mat, a tad shorter and wider. I made 3 rosettes. One I completed into a full circle using the 1/8” ScorTape and stuck it to the page with a piece of the 1.5-inch ScorTape. I have found this works so much better than fussing with a liquid adhesive and waiting for it to dry. I then cut two smaller circles—5/8” and ¾”—layered them, and wrote 2011 on them with a gold pen. For the other two half rosettes, I ripped off about a 3” length from the original strips and working with the longer strip glued one fan piece to a small rectangle (.5”x3”) and then pleated the rosette. Once I got to the other end I glued that piece to the same rectangle abutting the middle part of the rosette to the rectangle. I quickly flipped it and stuck a paper scrap to hold the rosette together. Then I just tucked it under the photo mats and glued them down to a 12x12 decorative sheet (K & Company: Americana). I wanted the flag, which was on the sheet to overlap the bottom photo mat and used my Fiskars finger blade to slice along the flag, slipping the photo mat in and under. (I will still be able to use the decorated reverse side if I strategically place a photo mat over the cut.)

Finally, I cut the sentiment from the Independence Day cartridge at 3” and glued it down with my zig pen. Now all I need are two pictures and the layout is done!
Related Posts with Thumbnails