Showing posts with label Action Wobbles. Show all posts
Wednesday, July 9, 2014
Making Waves by Deanna M
Today I have a fun summer card for you! The image is an SVG file that I cut with my Silhouette. I cut him about 5" wide. My card base is white card stock folded to make a 5" X 6" card base. I added a black mat cut at 4 3/4" X 5 3/4". My patterned paper is from my stash. The blue is cut at 4 1/2" X 5 1/2". The reverse side of the blue wave paper is the brown patterned paper. I took a strip of the brown pattern paper and tore it and then cut it to 4 3/4". I then inked the paper with some Tea Dye Distress Ink.
For his glass, I added a coat of Glossy Accents to it. I then added some Stampendous Mica Pearlized fragments so his drink had some ice cubes in it. I also sprinkled some Distress Glitter in Rock Candy on the wet Glossy Accents. Once it dried I added a second coat to add some additional dimension to the glass. To add the look of sea spray I added some of the Stampendous Frantage Embossing Powder in Shabby Blue.
I stamped my sentiment in some Memento Tuxedo Black ink. To finish my card I added some rhinestones and a small shell from my stash.
To attach my surfer penguin I used an Action Wobble so he could "surf".
Thanks for visiting us today. I would love it if you could leave me a comment and let me know what you think.
Labels:
Action Wobbles,
Deanna M,
Distress Ink Pads,
Glossy Accents,
Memento Ink,
Stampendous Fran-Tage,
Stampendous Mica Fragments
Thursday, April 17, 2014
Birthday Girl with Mindy
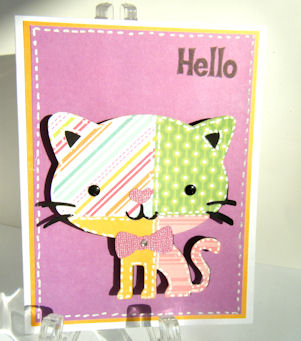
My niece has a birthday coming up and I wanted to make a cute fun card for her. I cleaned off my Cricut and found mat with a little adhesive left on it and made a quick little card. I used the create a critter 2 cartridge for the little cat and an Imagine cartridge for the papers.
I attached this sweet little kitty with an action wobble to give it some movement. I also used some pink stickles for her nose and a little on her dress. I hope my niece enjoys her card and her birthday.
Cutters Creek supplies
Thursday, February 6, 2014
Hogs and Kisses by Mindy
February is a busy month for me. We have gymnastics meets almost every weekend and I feel like I barely have any time for crafting. When I do get some time to myself to craft, I have to make something quick and easy before I get interrupted. This project is a super simple Valentine's card. I used the print and cut feature on my cameo so no layering was involved.
Monday, January 20, 2014
Box Card by Deanna M
Today I have a unique card for you. I call it a Box Card. I first saw this card here. There is a link on the blog to a YouTube video tutorial. Isn't this just the cutest thing ever???
To make the card, I started with a piece of Kraft card stock cut to 8 1/4" X 9". On the 9" side score your card stock at 2 1/8", 4 1/4" 6 3/8" and 8 1/2". Then turn the card stock so are scoring on the 8 1/4" side and score your card stock at 2 3/4". With the 2 3/4" score line to your left you want to cut your card stock to 6".
From the piece you just cut off, you want to cut a piece that is 3 1/8" wide, then cut that piece in half lengthwise. From there it gets a bit tricky. Still an easy card, but I would suggest you watch this tutorial video. This helps explain where to cut the card stock and how to assemble the box part of the card.
Back panel (does not get folded) red base mat is 5 7/8" X 8" and the white mat is 5 3/4" X 1 7/8". I stamped the white mat with my sentiment using Love Letters Memento ink. The heart flowers were cut using my Silhouette. I used Glossy Accents on the two heart flowers and covered the smaller on in Picked Raspberry Distress Glitter and the larger on with Festive Berries Distress Glitter. The Distress Glitters are a special order item just ask.
To cover the bottom panels cut your red mats at 2" X 3 1/8" and the patterned paper at 1 7/8" X 3". To cover the top panels cut your red mats at 2" X 2 5/8" and your patterned paper at 1 7/8" X 2 1/2".
Then decorate and embellish as you wish. I used some print and cut images cut with my Silhouette. I used the Spica Red Glitter pen to add some sparkle to my Bear Lady Bug's antenna's and to the word love on my word label. I used the Blossom Spica Pen to add sparkle to the words Never Ends.
My lady bug bear is attached to the back panel with an Action Wobble. I used my Scotch Quick Dry Adhesive and ATG gun to put the card together.
Now so you can see all sides of my card, I have a quick video for you.
Labels:
Action Wobbles,
ATG,
Copic Atyou Spica Glitter Pen,
Deanna M,
Distress Glitter,
Memento Ink,
Scotch Quick Dry Adhesive
Thursday, June 14, 2012
Center Step Card Tutorial By Deanna M
I have a fun new card for you today. At least new to me. It is called a Center Step Card or Front Panel Card. The card will fit in an A2 size envelope and was a lot of fun to make. All of my papers are from Echo Park. I apologize for the dark picture a big gray cloud decided to cover up the sun just as I started taking pictures. I attached all of my paper down with my ATG Gun.
My cupcake was cut from the Straight From the Nest cartridge (which Kim can order for you if you want it) at 2 3/4". Because the little holes for the sprinkles were so small I opted to add some liquid pearls in Hydrangea and Key Lime to them instead. I attached my cupcake to my card with an action wobble.
I did a short video for you to help explain how I made this card. I first saw this idea on SplitcoastStampers. I hope the video helps you understand how this card works.
Here is a side picture of the finished card.
I sure hope you will give this a try. If you do let me know what you think. Thanks for visiting.
My cupcake was cut from the Straight From the Nest cartridge (which Kim can order for you if you want it) at 2 3/4". Because the little holes for the sprinkles were so small I opted to add some liquid pearls in Hydrangea and Key Lime to them instead. I attached my cupcake to my card with an action wobble.
I did a short video for you to help explain how I made this card. I first saw this idea on SplitcoastStampers. I hope the video helps you understand how this card works.
Here is a side picture of the finished card.
I sure hope you will give this a try. If you do let me know what you think. Thanks for visiting.
Labels:
Action Wobbles,
ATG,
Deanna M,
Echo Park Paper,
Liquid Pearls,
Video Tutorial
Wednesday, June 6, 2012
Birthday Card by Chris
I couldn’t resist. Remember Lori’s sweet numeral 3 card
using her Gypsy and Hello Kitty cart? Well, I have a grandson who loves
Superman and has a 3-year birthday coming up, so I decided to adapt her card. I
used SCAL3
with my Black Cat and made one numeral 3 at approximately 4 7/8 x 4 ¼. (The
font was Cooper Black.) I then made a
shadow layer which I duplicated, flipped vertically and unioned into a topfold
card. I cut the cardbase from blue cardstock and the top layer from red and
used my ATG to put them together. I
trimmed the bottom of the 3 a fraction of an inch so it would stand and then
colored the superkid with my Copics.
I just love my paint
dauber, which was just the perfect size for coloring in the yellow circle
with Mustard
Seed Distress Ink. I added the “g” with a mini stamp I have and attached
him with an action
wobble. Another birthday card done with many thanks to Lori for the
original idea.
Labels:
Action Wobbles,
Copic Markers,
distress ink,
Paint Daubers,
SCAL
Sunday, February 19, 2012
An Action Wobble Birthday Card with Chris
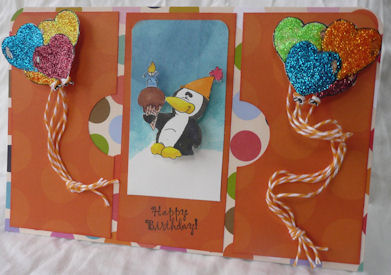
I’m into easy lately and this card is no exception. I started with a 8.5x11 piece of white cardstock and folded it in half. I layered a 5.5x8.5 piece of patterned cardstock on top. Then I took a third piece and cut it into three pieces. One was 5.25x2.5 and the other two were 5.25x2.75 inches. The two sidepieces had a half of a 1.5-inch circle punched out of their “center” sides. All the orange pieces were edged with Ripe Persimmon Distress Ink. I used my ATG to glue all the layers down and my ½ inch corner rounded to clip the two top corners.
The balloons on the outside panels were a digi image that I painted with Stickles (Picket Fence, Firefly, Orange Peel, Ruby Slippers, True Blue, Yellow) and fussy cut out. I then used some mini and macro Glue Dots to hold the pieces of twine to the back of the balloons, knotted the other end and adhered that with another Glue Dot. An Action Wobble backs each balloon cluster.
The center panel has a 2 1/8x4 inch white cardstock that was brayered with Broken China and Faded Jeans Distress Inks, had its top two corners rounded with the ¼ inch rounder, and was glued down. The penguin (another digi image) was colored with my Copics: R35, Y17, Y06, Y15, E11, E23, E25, E27, B32, B34, C9, and W8. He is also mounted on a Wobble. (I attached it to the digi first and trimmed around the image so you wouldn’t see the Wobble.) Finally, a Happy Birthday stamp and the card is good-to-go.
Pin It
Labels:
Action Wobbles,
Chris,
Copics,
distress ink,
Stickles
Thursday, February 16, 2012
Happy Birthday!
We have so many February birthdays in my family, it seems that's the only kind of card I can even think of during this time. For this card I broke out my trusty Cricut Imagine . This is my go to machine when I need something done quickly. The octopus is from Birthday Bash, but I filled it with colors and patterns from one of my Imagine cartridges.

I thought this little octopus was perfect for a peachy keen face stamp, so I added one and I think she looks so sweet. Cutters Creek sells a couple of different face stamp assortments from Peachy Keen and they're perfect for adding just the right facial expression to your die cuts. To finish my octopus off and give her some style, I added some faux stitching with one of my copic spica pens. I wish you could see the shimmer more in the picture it's just the right amount of bling. I also went over her face to give that a little more shine too. No self respecting octopus would head off to a birthday party without the perfect accessory and I though she would look adorable with a flower on her head. This little lily from Cutters Creek's own brand of flowers was just the perfect touch. The final element for my octopus was to attach her to the card with an action wobble so she can move like a real octopus. I finished the card off with some more faux stitching and a sentiment and it's ready to be sent off!
Tuesday, January 17, 2012
Hello Kitty Action Wobble Card
So I heard that Cutters Creek was getting in more Action Wobbles and thought it would be fun to share I card I made this afternoon using an Action Wobble.
I started with a piece of what Bazzill Card stock cut and scored to make a 4 1/4" X 5 1/2" card base. I added a hot pink mat cut at 4" X 5 1/4" and then the patterned paper mat cut at 3 3/4" X 5". I cut the Hello Kitty Image at 4" and adhered it to my card front with an Action Wobbles. I added some Glam Pink Stickles to the heart. Finally I stamped my sentiment with the Festive Berries Distress Ink that was part of the Winter Limited Edition colors released in November. It is a great red.
Not sure what an Action Wobble is? Let me show you.
They have a little spring in them that allows movement on the object they are attached to. Here is a quick video (my first) of the action wobble in action. Aren't they fun.
I started with a piece of what Bazzill Card stock cut and scored to make a 4 1/4" X 5 1/2" card base. I added a hot pink mat cut at 4" X 5 1/4" and then the patterned paper mat cut at 3 3/4" X 5". I cut the Hello Kitty Image at 4" and adhered it to my card front with an Action Wobbles. I added some Glam Pink Stickles to the heart. Finally I stamped my sentiment with the Festive Berries Distress Ink that was part of the Winter Limited Edition colors released in November. It is a great red.
Not sure what an Action Wobble is? Let me show you.
They have a little spring in them that allows movement on the object they are attached to. Here is a quick video (my first) of the action wobble in action. Aren't they fun.
Tuesday, September 6, 2011
Patchwork Kitty-By Deanna M
So for Tutorial Tuesday I wanted to give you an idea on how to use some of those scraps building up in your scrap bin. If you are like me, you hate to recycle a piece of paper that you just might be able to use on another project. Here is what I have for you.
To make my patchwork kitty, I started with a 4" X 6" piece of regular bond, printer paper and ran it through my Xyron. You could also use a large adhesive label but I didn't have any so had to improvise and it worked beautifully. I then cut 2" X 2" squares from some of my scrap paper. My paper for this project is from several Echo Park Paper Pads.
I then randomly picked up my squares and attached them to my paper using the adhesive applied by the Xyron. Here is how it looked.
I then selected my image which was the Kitty from Create-a-Critter. I cut the base layer out of black card stock (another scrap) and then the top layer from my patchwork paper I made. I grabbed a scrap of pink for the bow and the kitty's nose. My card base is 4 1/4" X 5 1/2" white card stock. The yellow and purple paper are from the Echo Park Summer Days Paper Pad. I used my white gel pen to add some faux stitching around the outside of the card as well as to "stitch" all the seams and along the outside of the kitty. I added some black nail head embellishments from my stash for her eyes and a silver rhinestone from the new Want2 Scrap embellishments, to the kitty's bow. I used some Memento Tuxedo Black Ink to stamp my Hello. I attached my kitty to my card front with an Action Wobble I hope I have inspired you to trying something new with those scraps. Thanks for stopping by. Be sure to come visit us again as we will be featuring projects using the Echo Park Paper Pads all month.
Labels:
Action Wobbles,
Deanna M,
Echo Park Paper,
Memento,
Want2Scrap
Thursday, June 30, 2011
Chris' Fab Five
No matter what project I do, I know at least one of these products will be used: Scor Pal or Scor Buddy, Scor Tape, Graphic 45 paper, Tim Holtz Distress Ink, and a Spellbinders die. To make this easel card I used all five plus some Stickles (another go-to item).

The card is a 5.5-inch square, which means I cut the easel base at 5.5 x 11 inches, and scored the base at 5.5 and 2.75 inches. I used the Le Cirque Graphic 45 for all the embellishments and fancy cut the majordomo, the Le Cirque banner, and the clown with my Cutter Bees. All edges were rubbed with distress inks (either Aged Mahogany or Black Soot). I cut the aerialist out ((2.75 x 3) and layered her over a 3.5 x 3 inch rectangle (red paper) and a 3 inch square (yellow paper). I covered the front part of the base with another Graphic 45, layered on the clown, and then attached the top square to my base. (Of course, I used Scor Tape to adhere everything.)
The top was trimmed that with Golden Rod Stickles and the yellow square with Black Diamond. (Some day I will develop a steady hand so it goes on perfectly straight!) I also added dots of Golden Rod Stickles on the background to glitz it up some more. Setting that aside to dry, I worked on my Kusudama flower (an origami floral shape). I started with five 2-inch squares and followed a tutorial by Folding Trees, inking the paper edges with Aged Mahogany and Black Soot Distress Inks. When the flower was done, I needed to trim off the bottom so I could have a flat surface and used my Fiskars finger tip blade to slice it. I covered the center with a button and two gems over the thread holes.
The next piece I made was the sentiment and for that I used Spellbinders Fancy Tags 2. I printed the sentiment (a quote from Water for Elephants) on cream cardstock and then ran the cardstock through my Xyron Sicker Maker. I adhered the sentiment to a piece of blue foam and then ran both through the Xyron together. I then cut the tag, inked it with Aged Mahogany and Black Soot Distress Inks and laid it over the cut out clown.

The banner was folded along the lines of the image to give it a bit more of a realistic look and attached with Pop Up Dots. I decided the Majordomo needed his own piece of pizazz and attached him with an Action Wobble. I know you can’t see it in the photo, but boy does he look great when he wobbles--looks like he is really drawing your attention to the aerialist! To finish the card I cut a square of Scor Tape and used it to adhere my flower as the stopping point inside the card. While it took me a while to dream this card up, it was probably one of the easiest to put together. Now I just need to make a box to deliver it in.
What are your Fab Five products? I bet you can find them at Cutters Creek!
The card is a 5.5-inch square, which means I cut the easel base at 5.5 x 11 inches, and scored the base at 5.5 and 2.75 inches. I used the Le Cirque Graphic 45 for all the embellishments and fancy cut the majordomo, the Le Cirque banner, and the clown with my Cutter Bees. All edges were rubbed with distress inks (either Aged Mahogany or Black Soot). I cut the aerialist out ((2.75 x 3) and layered her over a 3.5 x 3 inch rectangle (red paper) and a 3 inch square (yellow paper). I covered the front part of the base with another Graphic 45, layered on the clown, and then attached the top square to my base. (Of course, I used Scor Tape to adhere everything.)
The top was trimmed that with Golden Rod Stickles and the yellow square with Black Diamond. (Some day I will develop a steady hand so it goes on perfectly straight!) I also added dots of Golden Rod Stickles on the background to glitz it up some more. Setting that aside to dry, I worked on my Kusudama flower (an origami floral shape). I started with five 2-inch squares and followed a tutorial by Folding Trees, inking the paper edges with Aged Mahogany and Black Soot Distress Inks. When the flower was done, I needed to trim off the bottom so I could have a flat surface and used my Fiskars finger tip blade to slice it. I covered the center with a button and two gems over the thread holes.
The next piece I made was the sentiment and for that I used Spellbinders Fancy Tags 2. I printed the sentiment (a quote from Water for Elephants) on cream cardstock and then ran the cardstock through my Xyron Sicker Maker. I adhered the sentiment to a piece of blue foam and then ran both through the Xyron together. I then cut the tag, inked it with Aged Mahogany and Black Soot Distress Inks and laid it over the cut out clown.
The banner was folded along the lines of the image to give it a bit more of a realistic look and attached with Pop Up Dots. I decided the Majordomo needed his own piece of pizazz and attached him with an Action Wobble. I know you can’t see it in the photo, but boy does he look great when he wobbles--looks like he is really drawing your attention to the aerialist! To finish the card I cut a square of Scor Tape and used it to adhere my flower as the stopping point inside the card. While it took me a while to dream this card up, it was probably one of the easiest to put together. Now I just need to make a box to deliver it in.
What are your Fab Five products? I bet you can find them at Cutters Creek!
Subscribe to:
Posts (Atom)