Showing posts with label Glimmer Mist. Show all posts
Friday, November 15, 2013
Thanksgiving Rosette Wreath by Deanna M
I wanted to make a Thanksgiving Wreath for my house but wanted something a little different. So, I decided to make a Rosette Wreath! I love how it turned out.
For my wreath, I started with six sheets of 8 1/2" X 11" card stock. I chose to use two different colors for my rosette wreath. Using my Scoreboard I scored on the paper every 3/4" of an inch on the 11" inch side. Once I had all my paper scored, I folded it accordion style.
To adhere my rosette together I used some 1/2" Kool-Tak. It is very similar to scor-tape. I then cut two 6" circles and hot glued them to the front and back of the rosette to hold it in place.
My turkey is from the Silhouette Store and was cut using my Cameo and some brown card stock. I used the offset feature in the Design software to create a shadow for my turkey and cut that out of some light rusty orange paper. I sprayed the brown layer of my turkey with some Coffee Shop Glimmer Mist.
My letters were cut from the A Child's Year Cricut Cartridge at 4". I cut these out of the same card stock as the turkey's shadow. I applied some Glossy Glue and Seal to each letter and sprinkled them with some of the Rusty Hinge Distress Glitter. The distress glitter is a special order item, so just ask if you want some.
I finished the wreath with a bow at the bottom. I made a loop out of the ribbon and hot glued it to the top of the wreath so I could hang it.
The wreath actually went together really quickly so this is something you could put together for just about any occasion. You could also use patterned paper for an entirely different look. I thought these colors just gave the appearance of the turkey's tail all fanned out. Let me know what you think, I would love it if you left me a comment.
Labels:
Deanna M,
Distress Glitter,
Glimmer Mist,
Glue and Seal,
Kool Tak
Tuesday, November 5, 2013
Thanksgiving Card by Jearise
Hello all my Cutter's Creek friends. I am getting into the Thanksgiving spirit even though I feel Halloween came and went to fast and I still have lots of Halloween ideas running through my head. I love sending out Thanksgiving cards to friends and family and that is what I would like to show you today.
All the paper is from the 6 x 6 paper pad from Remembrance by Authentique. You can inquire to Kim if you are interested in it. It's beautiful paper and lovely for cards.
I also used:
Stickles in Diamonds for the middle of the flowers and the border in the middle of the card.
Glimmer Mist in graphite metallic for the flowers to tone down the yellow and give them an aged look.
Cuddle Bug embossing folder for the embossed design.
Tim Holz Distress ink in ted dye color for the edges.
ATG glider to hold it all together.
Thank you for stopping by today and taking a peak at my Thanksgiving card. I really do appreciate it.
All the paper is from the 6 x 6 paper pad from Remembrance by Authentique. You can inquire to Kim if you are interested in it. It's beautiful paper and lovely for cards.
I also used:
Stickles in Diamonds for the middle of the flowers and the border in the middle of the card.
Glimmer Mist in graphite metallic for the flowers to tone down the yellow and give them an aged look.
Cuddle Bug embossing folder for the embossed design.
Tim Holz Distress ink in ted dye color for the edges.
ATG glider to hold it all together.
Thank you for stopping by today and taking a peak at my Thanksgiving card. I really do appreciate it.
Wednesday, September 25, 2013
Happy Halloween by Deanna M
Today I have for you a Halloween card that I made using the new Tim Holtz Stamps and Framelit dies.
For my card I started with a 4 1/4" X 5 1/2" black card stock base. I used my Graphic 45 Steampunk Paper for my card as well. The rust color mat is cut at 4" X 5 1/4" and the black dotted paper is cut at 3 3/4" X 5". (the dotted paper is the reverse of the rust paper, got to love two sided paper)! Even though it is sold out in the store, just ask, and Kim can order you some and there are some other great pads, check out the 12 Days of Christmas paper pad.
For my web, I embossed each layer with some WOW! embossing powder in Black Glint embossing powder. The spider was embossed with the Black Ebony embossing powder. I stamped and cut the web out of white card stock. To age it just a bit I sprayed it with some Old Lace Glimmer Mist.
I layered the cuts of the web with some foam dots between the layers. I then added a foam dot to the very center of my layered spider web and then adhered it to my card front with some Scotch Quick Dry Adhesive. To finish the spider I added some purple stickles to his body. My sentiment is from the same stamp and die set. I stamped it with some Memento Tuxedo Black ink.
I used my eBosser and the Magnetic Shim to cut my die images out. One of Kim's customers asked if we could do a video showing how to use this shim and the embossing mat. So while working on this project I shot a short video to show you how I use the shim. I hope it will help answer some of your questions.
For my card I started with a 4 1/4" X 5 1/2" black card stock base. I used my Graphic 45 Steampunk Paper for my card as well. The rust color mat is cut at 4" X 5 1/4" and the black dotted paper is cut at 3 3/4" X 5". (the dotted paper is the reverse of the rust paper, got to love two sided paper)! Even though it is sold out in the store, just ask, and Kim can order you some and there are some other great pads, check out the 12 Days of Christmas paper pad.
For my web, I embossed each layer with some WOW! embossing powder in Black Glint embossing powder. The spider was embossed with the Black Ebony embossing powder. I stamped and cut the web out of white card stock. To age it just a bit I sprayed it with some Old Lace Glimmer Mist.
I layered the cuts of the web with some foam dots between the layers. I then added a foam dot to the very center of my layered spider web and then adhered it to my card front with some Scotch Quick Dry Adhesive. To finish the spider I added some purple stickles to his body. My sentiment is from the same stamp and die set. I stamped it with some Memento Tuxedo Black ink.
I used my eBosser and the Magnetic Shim to cut my die images out. One of Kim's customers asked if we could do a video showing how to use this shim and the embossing mat. So while working on this project I shot a short video to show you how I use the shim. I hope it will help answer some of your questions.
Monday, August 12, 2013
One Day at a Time by Deanna M
I just recently received the 6 new stickles colors from Cutters Creek, and oh my are they ever beautiful. If you haven't ordered yours yet, you do not want to miss out on these. The colors are beautiful and will be great for the upcoming holiday crafting season. Now just to tempt you just a bit more, I made a color chart for you so you could experience the colors yourself.
Aren't they beautiful???? Now, are you ready for a project that uses some of these colors? Great because I have one for you!
I started with a piece of kraft card stock cut and folded to make a 4 1/4" X 5 1/2" card base. My patterned paper is from a My Minds Eye Bluebell paper pad that I received from the 6" x 6" paper pad club that I belong to through the Cutters Creek Yahoo Group. Kim usually has several clubs running at once. She does her best to keep the cost down to around $20. They are billed the same day each month and at the end if you have paid on time you receive a free gift. Just join the Cutters Creek Yahoo Group to find out more. I will spill a secret and let you all know that Kim has just opened sign ups for the new Distress Glitter club. Interested??? Join the group for details.
Now back to the card! I used a scalloped chipboard oval from Want 2 Scrap (a free gift from a club!). I stained it with some Broken China Distress Stain (another club product!). I then sprayed it with some Sea Glass Glimmer Mist. Once it was dried I used the Ice Blue Stickles on the lacy scallop edges. I stamped the images with Memento Tuxedo Black Ink. They were colored with Copic and Spectrum Noir markers. I used the Ice Blue Stickles for the center of my flowers and to add some sparkle to my butterfly. The heart on the flower pot I used the Cranberry Stickles. I used some Scotch Quick Dry Adhesive to adhere my scallop to my card and to adhere my images to the oval. My tickets are inked with some Tim Holtz distress ink in Faded Jeans and Tumbled Glass. To finish the card I stamped my sentiment with some Memento Tuxedo Black Ink and added some rhinestone bling.
Now don't forget to join the Cutters Creek Yahoo Group to find out more about the clubs and all the products in the store. You won't regret it. It is a great way to add to your crafting supply without breaking the budget!!
Aren't they beautiful???? Now, are you ready for a project that uses some of these colors? Great because I have one for you!
I started with a piece of kraft card stock cut and folded to make a 4 1/4" X 5 1/2" card base. My patterned paper is from a My Minds Eye Bluebell paper pad that I received from the 6" x 6" paper pad club that I belong to through the Cutters Creek Yahoo Group. Kim usually has several clubs running at once. She does her best to keep the cost down to around $20. They are billed the same day each month and at the end if you have paid on time you receive a free gift. Just join the Cutters Creek Yahoo Group to find out more. I will spill a secret and let you all know that Kim has just opened sign ups for the new Distress Glitter club. Interested??? Join the group for details.
Now back to the card! I used a scalloped chipboard oval from Want 2 Scrap (a free gift from a club!). I stained it with some Broken China Distress Stain (another club product!). I then sprayed it with some Sea Glass Glimmer Mist. Once it was dried I used the Ice Blue Stickles on the lacy scallop edges. I stamped the images with Memento Tuxedo Black Ink. They were colored with Copic and Spectrum Noir markers. I used the Ice Blue Stickles for the center of my flowers and to add some sparkle to my butterfly. The heart on the flower pot I used the Cranberry Stickles. I used some Scotch Quick Dry Adhesive to adhere my scallop to my card and to adhere my images to the oval. My tickets are inked with some Tim Holtz distress ink in Faded Jeans and Tumbled Glass. To finish the card I stamped my sentiment with some Memento Tuxedo Black Ink and added some rhinestone bling.
Now don't forget to join the Cutters Creek Yahoo Group to find out more about the clubs and all the products in the store. You won't regret it. It is a great way to add to your crafting supply without breaking the budget!!
Labels:
Deanna M,
Glimmer Mist,
Memento,
Scotch Quick Dry Adhesive,
Stickles,
Tim Holtz Distress Ink Pads
Tuesday, July 30, 2013
All Occasion Card by Deanna M
I recently signed up for Kim's 6 X 6" paper pad club and received this gorgeous Authentic paper pad called Remembrance. It is filled with lots of dark deep purples and light lavenders and greens. I absolutely love it!!
So today I have a card I made using several papers from that paper pad. In fact the only paper not from the pad, is the white card stock card base. I hope you love it as much as I do.
I started with a white card base cut and scored to make a 4 1/4" X 5 1/2" card base. I then cut a dark purple mat also 4 1/4" X 5 1/2" and adhered it to my card. I wanted the dark purple to show but not the white card base. I then picked 4 patterned papers from the pack and cut them at 2 1/2" x 1 7/8" and adhered them to my purple mat. I used my ATG gun to adhere the mats down.
I was browsing through the silhouette store and came across this lacy butterfly and flower cut out which I fell in love with. Of course I had to use it for my card. I cut the top layer out of more of the dark purple paper from the paper pad. The cut did not come with a back layer so I used the offset feature in the software to create a back layer which I cut out of white card stock. I used my Scotch Quick Dry Adhesive to adhere these two layers together. I allowed it try and then sprayed it lightly with some Iridescent Glitter Dust. (Another favorite product of mine!).
I had this little wooden butterfly in my stash so I painted it with some Seedless Preserves Distress Stain. (This is a special order item, contact Kim through the store customer service link for information on how to order). Once that dry I spritzed it with some Lavender Fresh Glitter Mist spray. I attached the circle to the center of my card using some foam pads I received from Kim as a gift for being in her Adhesive club. (That was an awesome club to be a part of. Be sure to sign up for the Cutters Creek Yahoo group to get the inside scoop on the clubs.) I used some small glue dots to attach my butterfly to the circle.
I haven't added a sentiment to my card because I think it could be used for many different occasions, like Birthday, Thinking of You, Get Well, or even a Sympathy card.
So today I have a card I made using several papers from that paper pad. In fact the only paper not from the pad, is the white card stock card base. I hope you love it as much as I do.
I started with a white card base cut and scored to make a 4 1/4" X 5 1/2" card base. I then cut a dark purple mat also 4 1/4" X 5 1/2" and adhered it to my card. I wanted the dark purple to show but not the white card base. I then picked 4 patterned papers from the pack and cut them at 2 1/2" x 1 7/8" and adhered them to my purple mat. I used my ATG gun to adhere the mats down.
I was browsing through the silhouette store and came across this lacy butterfly and flower cut out which I fell in love with. Of course I had to use it for my card. I cut the top layer out of more of the dark purple paper from the paper pad. The cut did not come with a back layer so I used the offset feature in the software to create a back layer which I cut out of white card stock. I used my Scotch Quick Dry Adhesive to adhere these two layers together. I allowed it try and then sprayed it lightly with some Iridescent Glitter Dust. (Another favorite product of mine!).
I had this little wooden butterfly in my stash so I painted it with some Seedless Preserves Distress Stain. (This is a special order item, contact Kim through the store customer service link for information on how to order). Once that dry I spritzed it with some Lavender Fresh Glitter Mist spray. I attached the circle to the center of my card using some foam pads I received from Kim as a gift for being in her Adhesive club. (That was an awesome club to be a part of. Be sure to sign up for the Cutters Creek Yahoo group to get the inside scoop on the clubs.) I used some small glue dots to attach my butterfly to the circle.
I haven't added a sentiment to my card because I think it could be used for many different occasions, like Birthday, Thinking of You, Get Well, or even a Sympathy card.
Labels:
ATG,
Deanna M,
Foam Pads,
Glimmer Mist,
Glitter Dust,
Glue Dots,
Scotch Quick Dry Adhesive,
Tim Holtz Distressed Stains
Tuesday, June 4, 2013
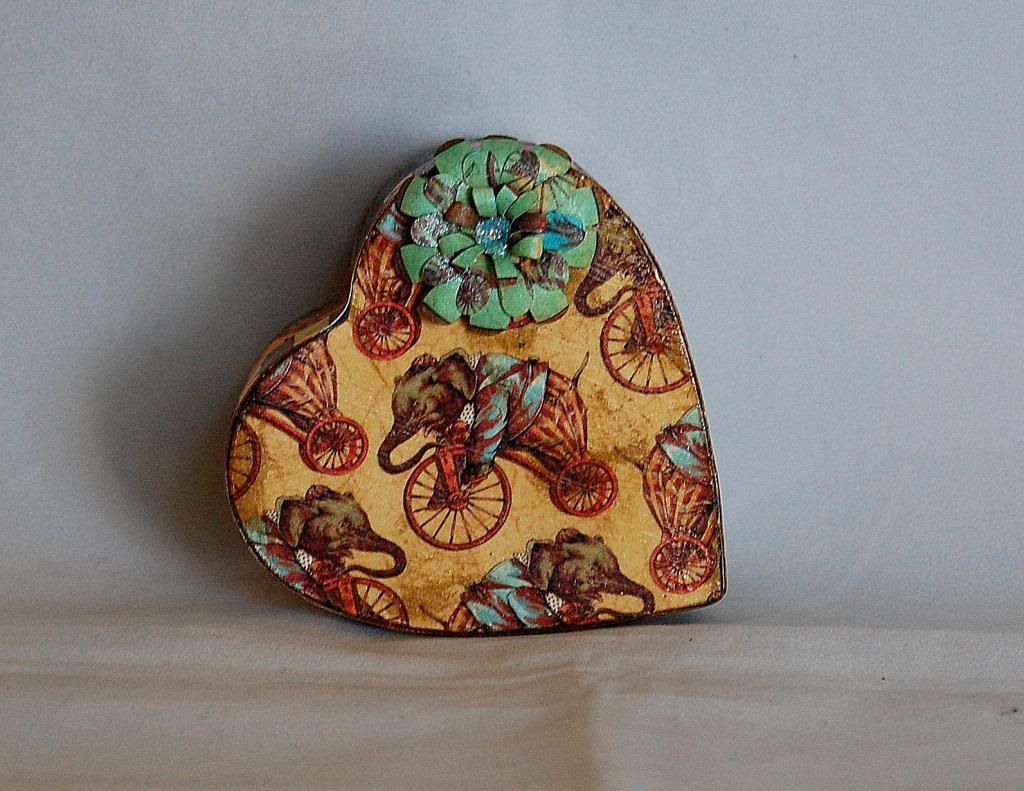
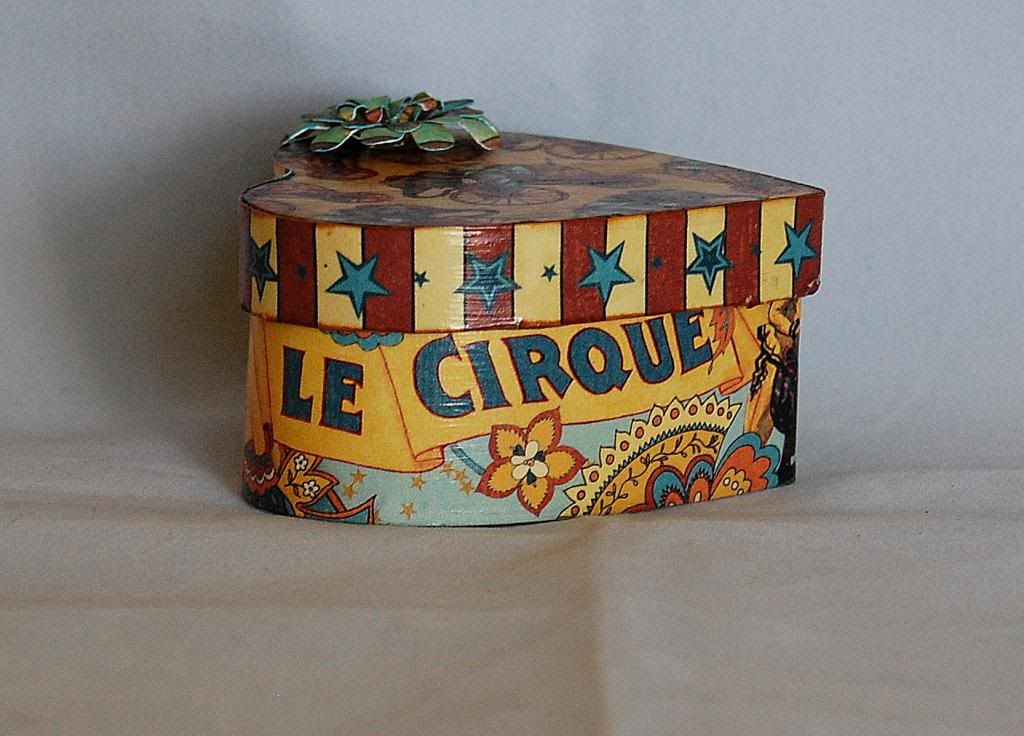
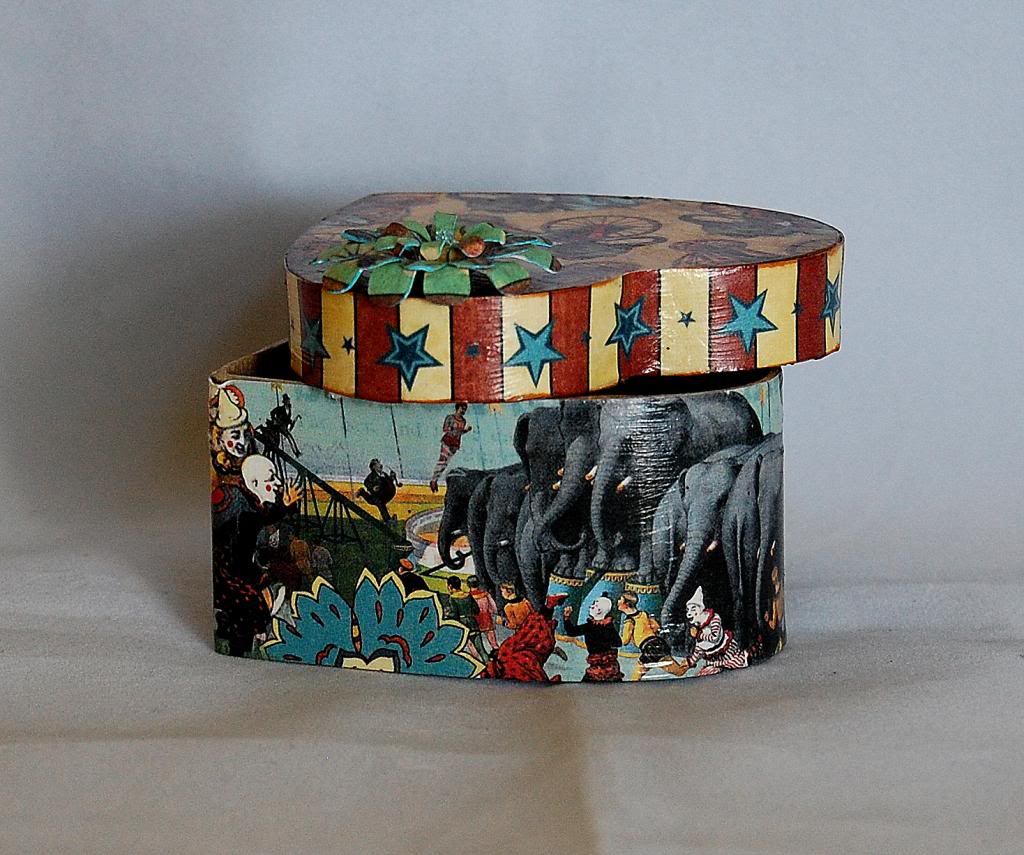
Le Cirque Graphic 45 tricket box by Jearise
Today I am showing off a paper mache ticket box I decorated using the Le Cirque Double-Sided Paper Pad from Graphic 45. I discovered that Mod Podge works perfecting for attaching the paper and bringing out bright colors. Please contact Kim if you would like to order some Mod Podge.
Here are the directions on how I decorated this box.
First, I measured the sides of the boxes height and then I cut out the strip and played with wrapping it around the box to show different scenes. I decided I liked the elephants on one side and words on the other so I brought the paper together in the middle of the heart and made sure it overlapped some before cutting. It's important to have it over lap in case you cut it shorter than you thought you were.
Once I had the paper Mod Podged on, I went back and trimmed it down to the edge of the top of the box using my utility knife and scissors.
Then on to the top....
I centered my elephant in the middle of the box and trimmed around the outside edge using my utility knife and scissors and then I Mod Podged the paper on.
I did the same thing with the trim for the top sides that I did with the bottom sides of the box.
I then went back and inked all the edges and added a touch of ink to the paper on the top and sides as well using the Tim Holtz Distress Ink Pad-Tea Dye.
I added some of the Tattered Angle's glimmer mist and a flower I made using the Cricut Cartridge Flower Shoppe. I used some Stickles in Baby Blue for the center of the flower. I attached the flower using Scotch quick dry adhesive.
There you have it in a nutshell, an easy project that is fun to do and doesn't take a lot of time. I even let my 8 year old decorate her own box using my paper scraps.
Have a great day! Jearise
Here are the directions on how I decorated this box.
First, I measured the sides of the boxes height and then I cut out the strip and played with wrapping it around the box to show different scenes. I decided I liked the elephants on one side and words on the other so I brought the paper together in the middle of the heart and made sure it overlapped some before cutting. It's important to have it over lap in case you cut it shorter than you thought you were.
Once I had the paper Mod Podged on, I went back and trimmed it down to the edge of the top of the box using my utility knife and scissors.
Then on to the top....
I centered my elephant in the middle of the box and trimmed around the outside edge using my utility knife and scissors and then I Mod Podged the paper on.
I did the same thing with the trim for the top sides that I did with the bottom sides of the box.
I then went back and inked all the edges and added a touch of ink to the paper on the top and sides as well using the Tim Holtz Distress Ink Pad-Tea Dye.
I added some of the Tattered Angle's glimmer mist and a flower I made using the Cricut Cartridge Flower Shoppe. I used some Stickles in Baby Blue for the center of the flower. I attached the flower using Scotch quick dry adhesive.
There you have it in a nutshell, an easy project that is fun to do and doesn't take a lot of time. I even let my 8 year old decorate her own box using my paper scraps.
Have a great day! Jearise
Wednesday, May 29, 2013
Thank you dad by Jearise
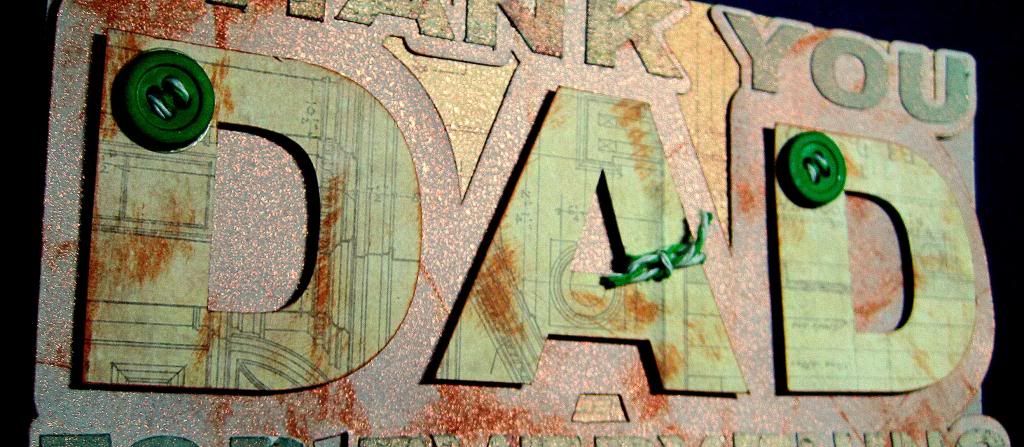
Father's Day is a special time to say thank you dad for all you do and that is why I put together this special Father's Day card.
I used the Tim Holtz Idea-Ology Paper Stash Paper Pad-Kraft Resist to make the card. This paper is great for making masculine projects.
I have to show you a close up side view so you can see the Glimmer Mist I used. I just love this stuff and find I spray it on almost all my projects now just to give them that little extra touch. Also, these mist that add a touch of glimmer and glitz to your projects come in almost every and any color you can think of.
(I must add that my letters are more of the yellowish color like in the first picture but every time I tried to get a good picture of the Glimmer Mist, the letters would turn out more green in color.)
Here's a close up of the "D" and the "A." You can see how I used Tim Holtz Distress ink pad in Tea Dye to give them a distressed look.
My final touch came with the buttons and twine. I used Doodle Twine in the Primary Colors Pack - green.
I used my go to glue - Scotch Quick-Dry Adhesive and my go to tape gun - Scotch Advance Tape Glidder to hold it all together.
Thanks for taking a peek today and I hope I've given you some Father's Day inspiration.
Jearise from Lorby's World saying so long for now and looking forward to next time.
I used the Tim Holtz Idea-Ology Paper Stash Paper Pad-Kraft Resist to make the card. This paper is great for making masculine projects.
I have to show you a close up side view so you can see the Glimmer Mist I used. I just love this stuff and find I spray it on almost all my projects now just to give them that little extra touch. Also, these mist that add a touch of glimmer and glitz to your projects come in almost every and any color you can think of.
(I must add that my letters are more of the yellowish color like in the first picture but every time I tried to get a good picture of the Glimmer Mist, the letters would turn out more green in color.)
Here's a close up of the "D" and the "A." You can see how I used Tim Holtz Distress ink pad in Tea Dye to give them a distressed look.
My final touch came with the buttons and twine. I used Doodle Twine in the Primary Colors Pack - green.
I used my go to glue - Scotch Quick-Dry Adhesive and my go to tape gun - Scotch Advance Tape Glidder to hold it all together.
Thanks for taking a peek today and I hope I've given you some Father's Day inspiration.
Jearise from Lorby's World saying so long for now and looking forward to next time.
Monday, September 3, 2012
Fall Banner by Deanna M
So Kim recently added some great products from Canvas Corp to the store and of course I had to try some out.
I got some of the mini Burlap Mini Triangles. These are just so cute and versatile. I decided I had to make a Fall Banner out of them. I started by spraying them with some glimmer mist. I used Rum Punch, Sugar Maple, Sun Sisters, and a little Coffee Shop.
I then used the Tim Holtz Tattered Leaves die to cut my leaves. (Kim doesn't have this die in the store but I bet she can get it for you.) I used my awesome new eBosser to die cut my leaves. (love that machine!!!) I used some of the Tangerine My Minds Eye paper to cut my leaves. I inked my leaves with some distress inks in fall colors.
For the word FALL I used the Birthday Bash Cricut Cartridge and the Tim Holtz Kraft Core Paper (Kim can get this for you). I cut each layer 4 times so I has some thickness to my letters. I then embossed them using the Clear Gloss WOW! embossing powder. I did embossed my letters twice. I then attached everything to my burlap triangles. I then painted some of the natural mini clothes pins with some Indian Summer Glimmer Glaze (a special order item from the store).
I then outlined the leaf on each end with my Spica Glitter Pen in Orange. To finish my banner I used some gold colored hemp and hung each triangle from the hemp with the clothes pins.
Labels:
Canvas Corp,
Deanna M,
Glimmer Glaze,
Glimmer Mist,
My Minds Eye,
Tim Holtz Distress Ink Pads,
WOW Embossing Powder
Friday, August 24, 2012
1 Sketch + 1 Paper Pad = 2 Looks with Lori
Do you ever wonder how you're going to use a single paper pad and manage to get a variety of looks from it? Luckily, the 6" x 6" pads from My Minds Eye make it easy, and I have a few additional tips for you to carry it through.
I started with the Miss Caroline Dilly Dally paper pad and this weeks sketch from Mojo Monday. --Just an FYI, I am the Queen of Sketches! I love to take a sketch or pattern and use it to make my own creations. Sometimes I will just use it for the basic idea and completely change things up, but other times I will use it pretty much as is to make my life easier. So, as I was recovering this week from a self-inflicted foot injury, I decided the easier my life, the better! Here's the sketch I used for my two cards:
Using this sketch, I decided to make one masculine and one feminine card. I left them sentiment-free for now so I can use them for whatever in the future. Since the MME papers are double-sided, I used a single sheet of paper for each card (plus a small scrap for my flower center). I made my cards 5" x 7", as I prefer the larger size, and cut each panel to 3" x 5". So, here are my two cards:
Even with the same overall design, kraft base, and distressing, I think they look pretty different. The difference is all in the pattern paper I chose from the pad and the additional supplies I chose to use with them.
For a more masculine look, I chose a more graphic paper, with a fairly simple pattern on the other side. I added metal embellishments, which I distressed with a W5 Copic Marker.
I added trims in basic neutral colors, leaving frayed ends on the ric-rac and tying a simple knot in the hemp cord. My additional embellishments were basic tickets, repeating the graphics from the paper without adding anything frilly.
For the more feminine look, I chose a floral pattern with a happy polka dot on the back side. I added some vintage crochet trim, sparkly glitter tape, and some paper flowers colored with Glimmer Mist. The flower center is a clear button backed with a paper scrap and a few Kaisercraft Pearls in the center. To enhance the feminine look even more, you could leave off the distressing and sponge the ink around the edges of the papers rather than the direct-to-paper techniques I used. But I love a vintage look, especially paired with sparkly bling, so I kept the distressing. It reminds me a bit of my grandmother's kitchen!
I hope you enjoyed today's cards! If you decide to follow my lead, I'd love to see your cards too. You can snap a pic and send them through to the Cutters Creek Yahoo Group where we can all ooh and ah over them!
Supplies used for these two cards:
I started with the Miss Caroline Dilly Dally paper pad and this weeks sketch from Mojo Monday. --Just an FYI, I am the Queen of Sketches! I love to take a sketch or pattern and use it to make my own creations. Sometimes I will just use it for the basic idea and completely change things up, but other times I will use it pretty much as is to make my life easier. So, as I was recovering this week from a self-inflicted foot injury, I decided the easier my life, the better! Here's the sketch I used for my two cards:
Using this sketch, I decided to make one masculine and one feminine card. I left them sentiment-free for now so I can use them for whatever in the future. Since the MME papers are double-sided, I used a single sheet of paper for each card (plus a small scrap for my flower center). I made my cards 5" x 7", as I prefer the larger size, and cut each panel to 3" x 5". So, here are my two cards:
Even with the same overall design, kraft base, and distressing, I think they look pretty different. The difference is all in the pattern paper I chose from the pad and the additional supplies I chose to use with them.
For a more masculine look, I chose a more graphic paper, with a fairly simple pattern on the other side. I added metal embellishments, which I distressed with a W5 Copic Marker.
I added trims in basic neutral colors, leaving frayed ends on the ric-rac and tying a simple knot in the hemp cord. My additional embellishments were basic tickets, repeating the graphics from the paper without adding anything frilly.
For the more feminine look, I chose a floral pattern with a happy polka dot on the back side. I added some vintage crochet trim, sparkly glitter tape, and some paper flowers colored with Glimmer Mist. The flower center is a clear button backed with a paper scrap and a few Kaisercraft Pearls in the center. To enhance the feminine look even more, you could leave off the distressing and sponge the ink around the edges of the papers rather than the direct-to-paper techniques I used. But I love a vintage look, especially paired with sparkly bling, so I kept the distressing. It reminds me a bit of my grandmother's kitchen!
I hope you enjoyed today's cards! If you decide to follow my lead, I'd love to see your cards too. You can snap a pic and send them through to the Cutters Creek Yahoo Group where we can all ooh and ah over them!
Supplies used for these two cards:
- My Minds Eye 6" x 6" paper pad, Miss Caroline Dilly Dally
- Tim Holtz Distress Ink, Tea Dye, Fired Brick and Evergreen Bough (Winter LE set)
- American Crafts Glitter Tape (currently a club-only item)
- Stampers Anonymous - Tim Holtz stamps, At The Movies
- Glimmer Mist, Patina
- Copic Marker, C5
- Glue Dots
- ATG adhesive
- Kaisercraft Pearls in Yellow
- Scotch Pop-up Foam Squares
Friday, July 6, 2012
Quick and Easy Backgrounds by Chris
Get out your glimmer mist and regular card stock or
watercolor paper and spray away. I used at least six different glimmer mists on
each of these papers and sprayed till they pooled.
Then, take a piece of
plastic wrap (just a tad larger than the paper), crunch it up, and then decide
how you want to blend colors.
Lay the plastic across the paper pushing the mist
puddles together. When you like what you’ve blended, pull up the plastic so it
isn’t completely smooth in places to
create a abstract design (see photo). Now walk away and let it dry. I let mine
dry overnight. When I pulled the plastic off, I had these gorgeous papers with
a lovely webbed design. Both papers have a gorgeous shimmer. The watercolor
paper is bumpier, but that is how it started.
| Card Stock |
| Watercolor Paper |
Products from Cutters Creek
Wednesday, May 30, 2012
Altered Box by Pebbles
My first wooden box!
I was in my local Dollar Tree, and I came
across a couple of little wooden boxes. They measure a little over 3.5x3.5, and
they have hinges on them as well as a little small magnet to keep it closed. I
grabbed them up and figured I would eventual do something with them...couldn't
leave them there, especially only costing a $1.00 a piece! Sorry for all the pics, but I wanted to capture as
much detail as possible. :)
This is the natural box when I bought it.
Nice and clean!
I used some alcohol ink to kind of stain the box.
As you can see, my fingers were pretty orange by the time I was done! I'm a
hands on kind of girl! :)
I used my Prima
Paper Pad-Annalee collection on the top and both layers all around the box.
I used some Color
me Crazy flowers on the top of the box for the start of my embellishment
process. I inked the bottom flower with Glimmer
Mist. I inked the second one lightly with a orange
ink pad and then adorned it with a small crochet flower and added a pearl
bead in the center. The rest of my embellishments, are from my stash from
previous projects.
Trying to be a little more creative, I added some
large beads to the bottom as feet! I had a ball creating this! Thanks for
looking!
Labels:
Alcohol Ink,
Altered Box,
Glimmer Mist,
Pebbles,
Petaloo Color Me Crazy,
Prima
Tuesday, May 29, 2012
Tutorial Tuesday: Enhance Your Embossing by Laura C
The project today is a tag I made using an embossing folder, and I've got a short video on how I enhanced the simple embossed look with different products to get the final result here:
Hope you got a few ideas on some fun things to play with when you use your embossing folders!

I apologize the video
has a "strange" ending....we had some technical
difficulties....lol....and then couldn't "merge" the final video. But
the finished project is, of course, in the pic above! So here is the
video on adding texture with an Embossing Folder, Distress Ink, Paint Daubers, and Glimmer Mist and how different each of these looks can be:
So in the end, my "whitewashed" wooden tag, is finished off with a few touches of a die cut border a little Stickles bling, a stamped sentiment, and a second tag of acrylic layered on top, a stamped floral image with Staz-On ink,and brushed around the edges with more paint dauber.
Hope you got a few ideas on some fun things to play with when you use your embossing folders!
Friday, May 11, 2012
Mother's Day Card by Deanna M
I recently received my new Tim Holtz Spring Distress Inks. Wow, are they beautiful. I love them. I decided to make my own background paper using some Adirondack Acrylic Paint Dabbers. I started with a piece of white card stock cut to 3 3/4" X 5". I used a flourished background stamp from Hero Arts (yes, Kim can get this for you, just let her know) and inked it generously with the Snow Cap acrylic paint. Once the paint dried I used my sponge applicator to apply the ink to my paper. I love how it turned out.
For my card, I started with a piece of white card stock cut and folded to 4 1/4" X 5 1/2". I added a gold patterned paper mat from My Minds Eye. Then I added the background paper I made. To finish the card, I added one of the Kaisercraft Dress Forms. I painted my dress form with Eggplant Paint Dabber. I then spritzed it with some Dragonfly Glimmer Mist. Once that dried I spritzed it lightly with some Pearl Glimmer Mist.
I cut a mat for my sentiment from the Elegant Edges cartridge at 1 1/4". I used the same ink colors to ink up my shadow mat and then inked the edges with the Lilac color and stamped my sentiment with the lilac color. I added some pearls to finish my card.
Here is a short video showing you how I did the background paper.
Labels:
Aidrondack Acrylic Paint Dabbers,
Deanna M,
Glimmer Mist,
Kaisercraft,
Tim Holtz Distress Ink Pads
Friday, May 4, 2012
Glimmer Mist Background by Chris
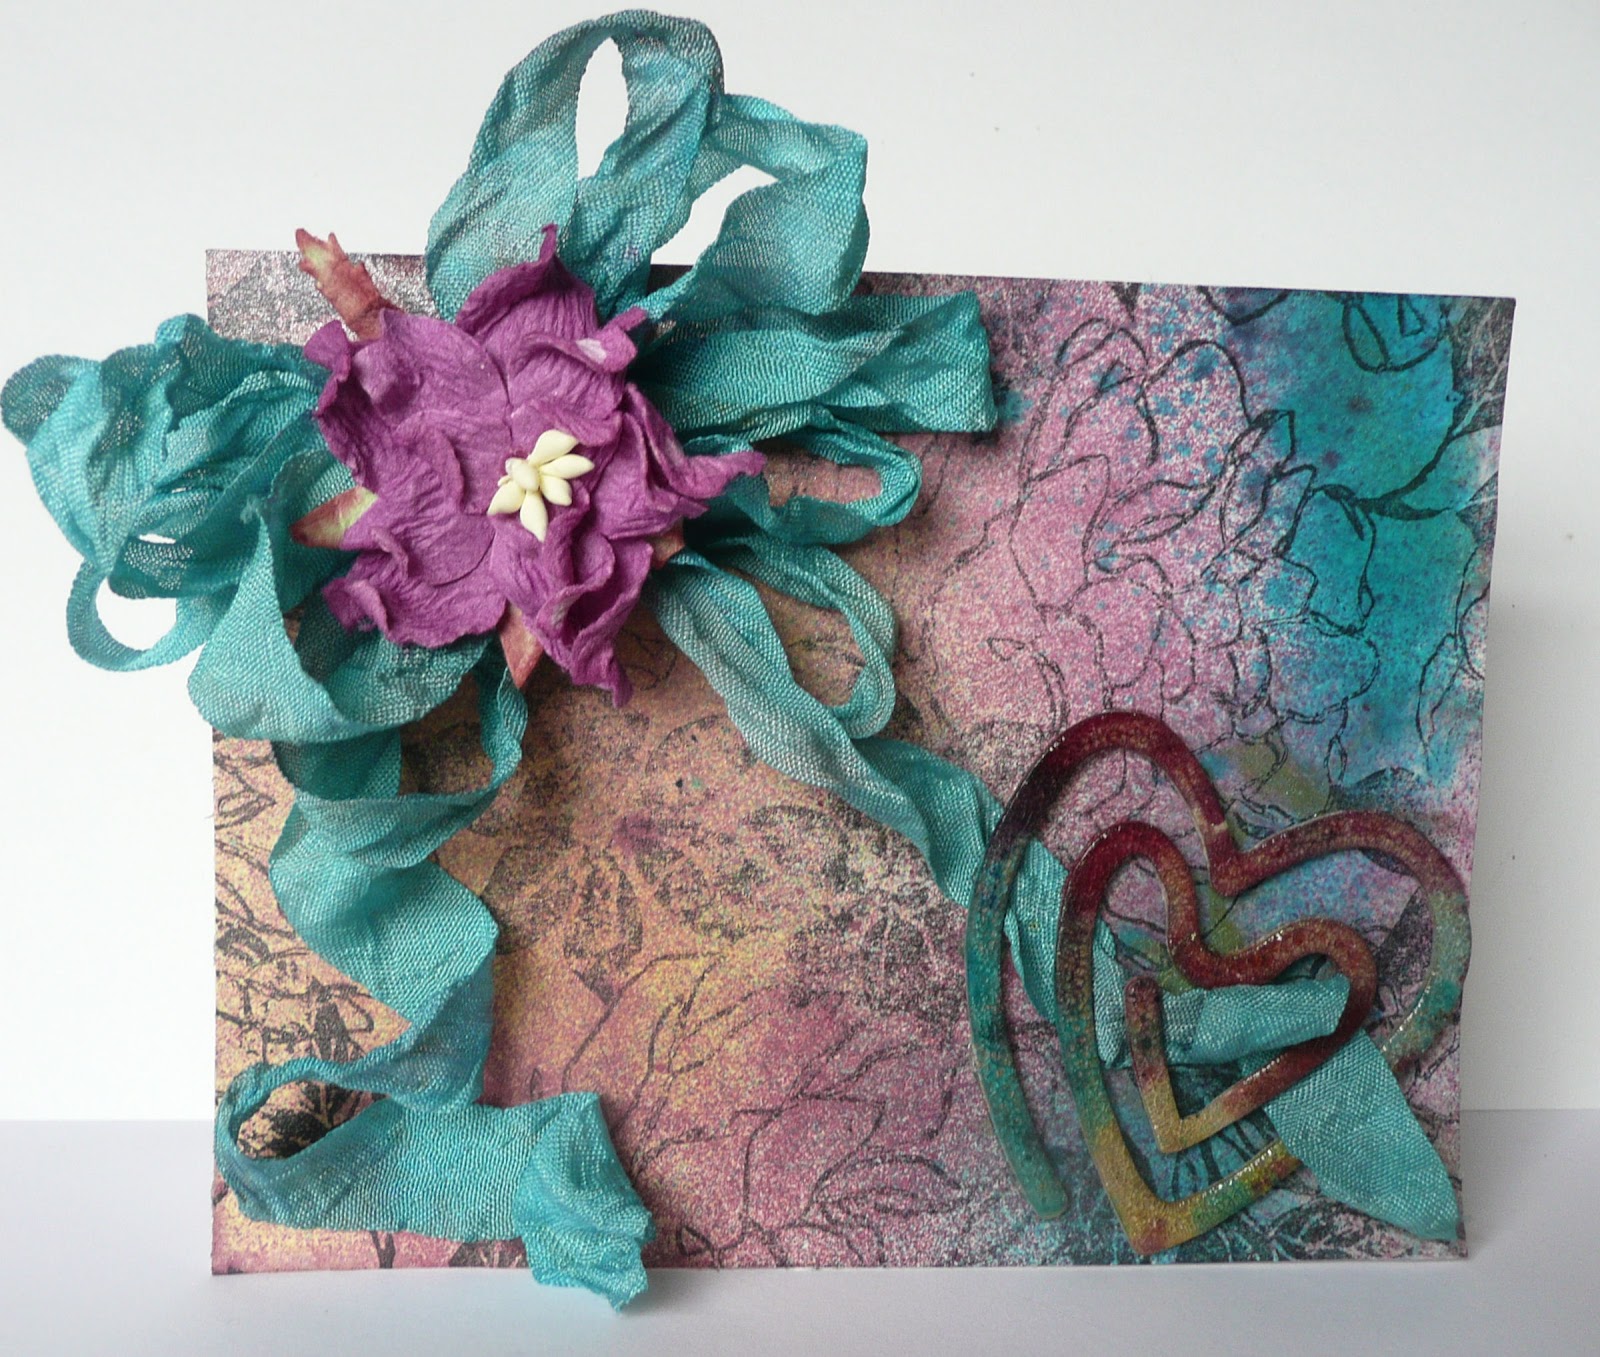
The
background was done on a 4.25 x 5.5 inch piece of cardstock. I pooled several
different colors of Tattered
Angels (Electric
Blue, Pomegranate,
Dragonfly,
Sun
Sisters) on the cardstock—no soft sweeping here--and used my heat gun to dry
them. Once the background was dried, I stamped the image using Staz-On
ink and used my ATG to adhere it to the card base. I then cut a length of white
seam tape and dyed it to match the card with Electric
Blue Tattered Angels Glimmer Mist. A multi-loop bow with a Cutter’s
Creek Flower glued in its center was adhered to the card base using Glue
Dots. The embellishment is a Sizzix die cut with my Big Shot, slathered
with Rock
Candy Distress Crackle Paint and set aside to dry. Once it was dried and
crackled, I used the same Tattered
Angels Glimmer Mists to color the heart. (This Technique called Shattered
Stains. It is in T. Holtz’s second compendium, page 48, if you’d like the
specifics.) I wove one ribbon tail through the heart and used mini Glue
Dots to loop both tails in place, added a sentiment inside, and my mother’s
card is done.
Labels:
Chris,
Cutters Creek Branded Flowers,
Glimmer Mist,
Ranger Distress Crackle Paint,
Staz-On Ink
Sunday, April 22, 2012
Birthday Card by Deanna M
I have for you today a birthday card I made for a friend to give to her Mom. My card base is a piece of green cardstock cut and scored to 4 1/4” X 5 1/2”. I added a mat from the Mod Squad Cut and Emboss paper pack cut to 4” X 5 1/4” and then a patterned paper mat from the Prima Botanical paper collection cut to 3 3/4” X 5. I then used Elegant Edges to cut a mat for my butterfly at 3”. I used the same paper as my first mat for the base layer of the mat for the butterfly. I then used a piece of paper from the Whitewashed Cut and Emboss paper pack for the top layer. I ran that layer through my Cuttlebug and embossed it with Sizzix Embossing folder called Dots and Flowers Embossing folder and sanded it so the colored green core showed through (and yes, Kim can order this for you. You get two folders in the package).
My butterfly on this card is once again one of the laser cut embellishments by Kaisercraft. I am so loving these embellishments. (And, yes Kim can order these for you too!) They are so easy to work with, are not too think and add a great dimension and elegance to a card. For the butterfly I started off by using my craft mat and rubbing some different colors of Distress Ink on my mat, spritzing with water and them placing the butterfly in the ink on my mat. I used Persimmon, Concord Grape and Broken China Distress Ink. I let it dry for a bit then spritzed it with similar colors of glimmer mist. Again I let that dry and then added some Glimmer Glam in Violet and a Copper color. Once again I allowed that layer to dry. I then added some Glimmer Glaze to the antenna’s and around the orange areas of the butterfly. I then went back with a bit more Persimmon distress ink. I let all that dry overnight (only because it was bedtime). The final layer I added some Pearl glimmer mist. This butterfly is so iridescent looking in person. I adhered my the butterfly to my mat with some of the ASI Kool Tak tape clear gel foam tape.
The flower I added to the card is a Cutter’s Creek Gardenia. The flower was actually yellow but it just didn’t go with the card as well as I likes, so I spritzed it with some Honey Dew Mist glimmer mist, and problem solved. It softened the butter yellow of the flower and gave it a light green color which went much better with my card. I then stamped my sentiment with some Rusty Hinge Distress Ink. Finally I added some Copper Pearl liquid pearls to the tip of each antenna. Sure hope you have enjoyed my project and that I have inspired you to get out your goodies and make a project.
Labels:
ASI (Kool Tak) clear foam squares,
Cutters Creek Branded Flowers,
Deanna M,
Elegant Edges,
Glimmer Glam,
Glimmer Glaze,
Glimmer Mist,
Kaisercraft,
Liquid Pearls,
Prima,
Tim Holtz Design Ruler
Tuesday, April 10, 2012
Mother's Day Card by Deanna M
Guess what I have for you today! Remember those wooden laser embellishments by Kaisercraft Kim shared awhile back? I was able to get some of the Dress Forms and have a Mother's Day card made with them. I am loving these embellishments. They are so thin but still add a bit of dimension to your card.
Okay, on to my card. I started with a cream colored card stock card base cut and scored to 4 1/4" X 5 1/2" My first mat is cut at 4" X 5 1/4" and it is from the Mod Squad Core'denations Cut and Emboss paper. I used the reverse side of one of the papers. To be frugal, I cut the base layer of my dress from the same piece of paper, I used the front side of the paper for the base layer. I cut the dress from the Nifty Fifties cartridge at 5 3/4". The patterned paper top layer for the dress is from the Howdy Doody My Minds Eye 6" X 6" paper pad. The patterned paper behind my dress is also from the same paper pad cut at 3 3/4" X 5". I inked the edges of all of my papers with some Antique Linen Distress Ink.
The dress form I used is the first on on the left in the picture above. I used some Oil Slick Glimmer Glaze to paint the legs on the dress form and the top little circle. (Glimmer Glaze is a special order item that I know Kim would be very happy to order for you if you are interested, just ask) I sprayed the remainder of the dress form with some Old Lace Glimmer Mist and inked it lightly with some Antique Linen Distress Ink.
I used some Scotch Quick Dry Adhesive to adhere my dress layers together and adhere them to the wooden dress form and then adhered the dress form to my card.
To finish my card, I added a piece of lace from my stash. I adhered the lace with some of the 1/8" Scor-Tape. I added a small pearl to the center of the belt area of the dress, and then 3 larger pearls to the lower side of the card. I stamped my sentiment with some Walnut Stain Distress Ink.
Labels:
Core'dinations,
Cut and Emboss,
Deanna M,
distress ink,
Glimmer Glaze,
Glimmer Mist,
Kaisercraft
Wednesday, March 28, 2012
Live Life with Joy Card by Deanna M
I was able to get a package of the laser cut wooden embellishments from Kaisercraft. Wow, I love them. They are super thin, about the thickness of a dime. (I tried to get a picture but just couldn’t get it clear enough). There is a wide assortment of different embellishments to chose from, like birds, birdcages, there are some gorgeous butterflies, dress forms. If you are interested in any of them just let Kim know at Cutter’s Creek and she can special order them for you. If there is enough interest we might be able to talk her into stocking them in the store.
For my card today, I started with a 4 1/4” X 5 1/2” white card stock card base. I added a mat cut to 4” X 5 1/4” cut from some Gemstone Core’denations cardstock. I love this cardstock, it is shiny, with a great glimmer. My patterned paper is cut at 3 3/4” X 5” from the Howdy Doody My Minds Eye paper pad.
For my wooden embellishment, I first sprayed it with 4 coats of Vintage Pink Glimmer Mist, allowing it to dry thoroughly between coats. Then I gave it a quick coat of Hammered Copper Glimmer Glam (another item that Kim will happily order for you). I used some Scotch Quick Dry Adhesive to attach my wooden embellishment to my card. I added a foam dot into the middle of the flower (the flower center was not solid). For my flower center I used a 3-D Glue Dot and dipped it into some Citrus Crush Ultra Fine Flower Soft. I used my finger to press the flower soft into the glue dot. I kept the glue dot on the paper backing until I was ready to adhere it to my flower center.
I used some Wild Honey Distress Ink to stamp my sentiment. To finish my card I added a rhinestone flourish from Want 2 Scrap that I just cut to fit the areas of my card.
Please be sure to leave us a comment and let us know if you are interested in these laser cut embellishments.
Labels:
Bazzill Simply Smooth,
Deanna M,
Flower Soft Ultra Fine,
Glimmer Glam,
Glimmer Mist,
Glue Dots,
Tim Holtz Distressed Ink Pads
Monday, March 26, 2012
Mandie's Gift Box
Today I'd like to show you a fun gift box that I created. I used some fabulous Echo Park Paper, Distress Ink and Adirondack Paint Daubers, and Glimmer Mist!

First I painted all of the edges of my box with the Pitch Black Adirondack Paint Dauber and let it dry. Then I cut my Echo Park Papers (these are from the Be Mine line but you could easily use any of the gorgeous lines they have) to be slightly smaller than each side of my box. Then I inked the edges of everything with the Black Soot Tim Holtz Distress Ink.

Next I created my spiral roses. I used a variety of circles that were cut into a spiral shape. I used scalloped scissors on a couple. Then I rolled them into the flower shape. To give them a little bling, I added some Pink Bubblegum Glimmer Mist and then let them dry.

I adhered my roses to the box with some Glue Dots and added some mirrored paper leaves. Then I used Scor Tape to add the ribbon around the middle of the box. Finally, I used my Crop-A-Dile to add holes and eyelets to the sides of the box and threaded some ribbon through for a handle.

First I painted all of the edges of my box with the Pitch Black Adirondack Paint Dauber and let it dry. Then I cut my Echo Park Papers (these are from the Be Mine line but you could easily use any of the gorgeous lines they have) to be slightly smaller than each side of my box. Then I inked the edges of everything with the Black Soot Tim Holtz Distress Ink.

Next I created my spiral roses. I used a variety of circles that were cut into a spiral shape. I used scalloped scissors on a couple. Then I rolled them into the flower shape. To give them a little bling, I added some Pink Bubblegum Glimmer Mist and then let them dry.

I adhered my roses to the box with some Glue Dots and added some mirrored paper leaves. Then I used Scor Tape to add the ribbon around the middle of the box. Finally, I used my Crop-A-Dile to add holes and eyelets to the sides of the box and threaded some ribbon through for a handle.
Wednesday, March 7, 2012
Caps for Sale Layout by Chris
I love this children’s book and it has found its way into
several of my grandchildren’s albums, but this time I wanted to imitate the
illustrator’s work a bit more closely. I used glimmer mist to create/paint the
backgrounds for my pages, and was I pleased with how it easy it was to use and
the soft shimmer the pages now have.
To start I used ZooBalloo Cricut
cartridge to cut a tree mask for inking and placed it on my pages using a
rolled piece of removable tape to be sure it didn’t shift. Then using used
copier paper; I tore them to create the horizon line I wanted. With the bottom
portion covered I sprayed Trunk
Bay Glimmer Mist in nice easy strokes across the page until I had the depth
of color I wanted. I then covered the top half of the page with some more
copier paper and sprayed the bottom with Lily
Pad Glimmer Mist. The page with the peddlar walking away also has a strip
of Glimmer
Mist Coffee Shop as the path. After that I used Pebbles
Chalk to fill in any white portions across the horizon, giving the
background a bit more depth.
Once the background was done, I went back to ZooBalloo Cricut
cartridge and cut several monkeys using my Expression, varying the sizes
from 1.5 inches to 2.5 inches and “flipping” a few. I hand sketched the caps
and the peddlar and paper pieced them together using scraps from my stash. The
photomats are Spellbinders
Nestabilities—Petite Scalloped circles and Classic Circles (small). Blue
circles were edged with Bundled
Sage Distress Ink and the green circles were edged with Tumbled
Glass Distress Ink.
Another month done! Hope you try “painting” with glimmer
mist too.
Labels:
Chris,
Cricut,
distress ink,
Glimmer Mist,
Pebbles Chalks,
Spellbinders
Subscribe to:
Posts (Atom)