Start with a scrap piece of wood 2.5x3.5x1.5. (An online friend sent me the wood canvas but if you have access to 2x4 boards and someone to cut them for you, you’re golden!) I painted the entire block with acrylic white paint and set it aside to dry. (Actually she sent me four pieces and I have three more to work with—yippee!)
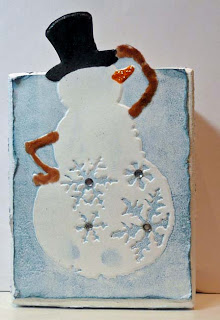
While the paint was drying, I took out my two
Tim Holtz Alterations Snow Flurries and Snowman embossing folders. Using
Stormy Sky Distress Ink and my
brayer I inked the “indented” side of the folder and carefully laid the white paper in the folder and ran it through my Big Shot Express. Love how the background was now blue, even though I got some blue on the snowman—hey snow has a bluish tinge, right. In the snow flurries folder I placed a piece of
acetate and ran it through the machine. By now my snowman was dry enough to cut out. I knew he was taller than my block, so I measured up to 3.5 and then cut around his arm and head. Using
Cinnamon Toast Fun Flock I glued it along the snowman’s arms. I filled in his carrot nose with
Orange Peel Stickles. Then, I dabbed the top part of the image with my
Embossing Magic powder, colored in the hat with my embossing pen, sprinkled it with
black embossing powder, and heated it with my heat gun. I set this aside to dry. Next I used the
Distrezz-it-All to rough up the edges and added some jewels in the center of the snowflakes.

I then started on side two by cutting out ‘tweety’ from Stretch Your Imagination at 2.5 inches first in brown and then red. I cut off the red bird and glued it on top of the brown one. I cut a sled from the Wild Card cartridge at .5 inches—the base out of red and the layers out of tan scraps. I sketched a hill on the block and then used
Stormy Sky,
Tumbled Glass, and
Weathered Wood Distress Inks to ink in a sky and stamped ‘Let It Snow’ on the bottom with a blue pigment ink.

While I waited for that to dry, I kept throwing away ideas for the edges. I then thought of all the little scraps of snow I saved from when I punched my Christmas Thank You cards (I never throw anything out) and decided to use
Glossy Accents to randomly glue them on all four edges. Once that was done I was ready to put the chunky ATC together. I used
Scor-Tape to adhere the Snowman and Glossy Accents to attach the bird and branch. After that I drew a few lines with my
White Liquid Applique pen and heated it to add some dimension. I left that dry over night before attaching my sled using pop up dots and the embossed acetate sheet, using some
Glossy Accents in the corners to hold it in place.
One ATC down, three more to go; what about you?
Cutters Creek Shopping List:
Tim Holtz Alterations Snow Flurries and Snowman embossing foldersStormy Sky,
Tumbled Glass, and
Weathered Wood Distress Inks
BrayerAcetateCinnamon Toast Fun FlockOrange Peel SticklesEmbossing MagicBlack embossing powderDistrezz-it-AllGlossy AccentsScor-TapeWhite Liquid Applique pen





 Posts
Posts


