Good Morning,
I made this card for a very special friend's birthday.
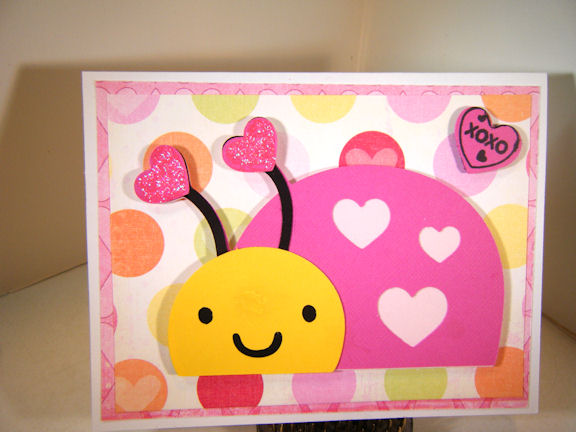
I used my Gypsy and the Cricut Cartridge "A Child's Year".
Products from Cutters Creek:
Stickles glitter glue in Stardust to outline the wings
Liquid Pearls in Buttercup for the star on the end of the wand
Perfect Pearls Mist in Turquoise for paper flowers
ATG for putting it together
Glue Dots for adhering the flowers
Showing posts with label Liquid Pearls. Show all posts
Monday, February 17, 2014
Monday, December 2, 2013
On the 3rd Day of Christmas... by Mindy
Hi, it's Mindy and it's my turn to post my 12 days of Cristmas project. I collect a lot of stamps and sadly, several of them remain unlinked. For the project I decided to break one of them out and ink it up!
The image I used is from House Mouse. They have so many cute images and they're fun to color. I colored these little guts with my Copic markers. I used Liquid Pearls to add some snowflakes. All the paper I used is from My Mind's Eye.
I hope you have enjoyed the projects so far and don't forget to check out the remaining ones.
Cutters Creek Shopping ListMonday, November 25, 2013
O' Christmas Tree by Deanna M
I hope everyone had a great weekend and their week is off to a good start. I am not sure about you but wow, I can't believe Thanksgiving is just a few short days away. That means that Christmas won't be far behind. I decided I better get started on some cards and quick. Here is what I have for you today.
My card base is 4 1/4" X 5 1/2" white Bazzill card stock. My pattern paper is from the Echo Park Holly Jolly 6" X 6" paper pad. My red pattern mat is cut at 4" X 5 1/4". I cut a piece of green card stock 3" x 5 1/4" and used a border punch on each side. The music paper is the back side to the red paper and I cut it so it would fit on the green punched mat but it too is 5 1/4" tall. My tree, is from the new Sizzix Framelits Dies and Stamps Tim Holtz Christmas Tree set. I love the versatility of these sets. For this card I opted to not use the stamps but just the dies. But I just as easily could have stamped and cut, or just stamped.
I used three different shades of green card stock one for each layer with each layer getting a bit lighter. The star is cut from some gold paper and then sprayed with some Gold Glitter Dust. ( Be sure to stock up on the Glitter Dust spray, it is a holiday must have). To decorate my tree I added some random pearls using a variety of colors of Liquid Pearls.
I stamped my sentiment on some white card stock using some Memento ink. This color is called Love Letters and is a gorgeous red.
Thanks for stopping by today. I hope you have a Happy Thanksgiving everyone.
My card base is 4 1/4" X 5 1/2" white Bazzill card stock. My pattern paper is from the Echo Park Holly Jolly 6" X 6" paper pad. My red pattern mat is cut at 4" X 5 1/4". I cut a piece of green card stock 3" x 5 1/4" and used a border punch on each side. The music paper is the back side to the red paper and I cut it so it would fit on the green punched mat but it too is 5 1/4" tall. My tree, is from the new Sizzix Framelits Dies and Stamps Tim Holtz Christmas Tree set. I love the versatility of these sets. For this card I opted to not use the stamps but just the dies. But I just as easily could have stamped and cut, or just stamped.
I used three different shades of green card stock one for each layer with each layer getting a bit lighter. The star is cut from some gold paper and then sprayed with some Gold Glitter Dust. ( Be sure to stock up on the Glitter Dust spray, it is a holiday must have). To decorate my tree I added some random pearls using a variety of colors of Liquid Pearls.
I stamped my sentiment on some white card stock using some Memento ink. This color is called Love Letters and is a gorgeous red.
Thanks for stopping by today. I hope you have a Happy Thanksgiving everyone.
Saturday, May 11, 2013
My Version of Gate Fold Card by Deanna M
When I set out to design this project, I knew I wanted to do something a bit different then my typical A2 card. I did some blog hopping and decided I wanted to make a gate fold card. But I decided I wanted to create my own version of a gate fold card and that is what I did.
I started with a piece of white card stock cut to 5 1/2" X 12". I die cut one edge using a Tim Holtz on the edge butterfly die. (Check with Kim if you are interested in this die). My next thought was how to dress up the butterlies. Once again Tim Holtz to the rescue. I placed several different colors of distress stain (I used Peacock Feathers, Squeezed Lemonade and Shaded Lilac) I then spritzed the distress stains with water and and swished my butterflies in the stain. I then let them dry. I added some Buttercup and Lavendar Lace Liquid Pearls to the bodies of the butterflies.
Once the butterflies were all dried I scored my card stock at 3 1/2" from each end. I heavily inked all the edges of my card with Peacock Feathers Distress Ink (this is one of my favorite colors). I added a black mat and then my patterned paper mats. I also did the inside of the card.
My next dilemma was how to finish the card. It just needed a bit more. I took another piece of white card stock and again applied some distress stains to my mat. This time I used Peacock Feathers, Seedless Preserves, Salty Ocean and the Burnish Pewter Metallic stain (again Kim can order these for you, just ask). I again squirted the stains with water on my mat and just swished the paper across my mat to color the entire page. I then spritz the paper with a bit of water to get the colors to flow. I allowed the paper to dry thoroughly. I cut two butterflies using my Silhouette cameo. I cut the base layer using the stained paper I created. The top layer was cut using the tracing paper I have it is a bit transparent.
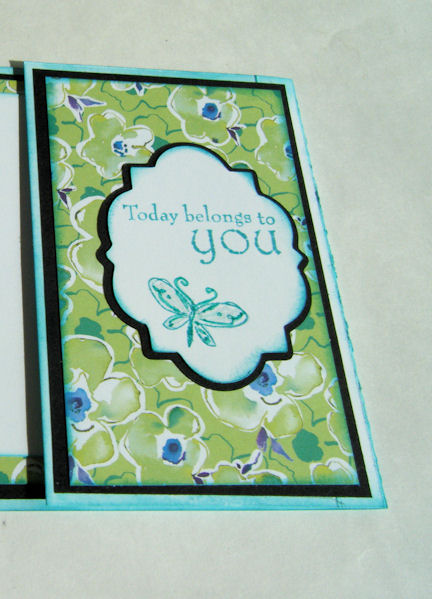
To finish the front of the card, I cut a mat using Elegant Edges (again Kim can order this for you) at 3". I cut the shadow out of black and the base layer out of white. I inked the white mat with the Peacock Feathers distress stain and stamped my sentiment and the butterfly. I used my Turquoise Spica pen to enhance the lines of the butterfly and use the Clear Spica pen to add sparkle inside the wings.
I sure hope you enjoyed my version of a Gate Fold card. I would love to see you all create your own version as well and share it with me. I think this card would work great for a Mother's Day card, Birthday card, or even a Graduation card. What do you think?
I started with a piece of white card stock cut to 5 1/2" X 12". I die cut one edge using a Tim Holtz on the edge butterfly die. (Check with Kim if you are interested in this die). My next thought was how to dress up the butterlies. Once again Tim Holtz to the rescue. I placed several different colors of distress stain (I used Peacock Feathers, Squeezed Lemonade and Shaded Lilac) I then spritzed the distress stains with water and and swished my butterflies in the stain. I then let them dry. I added some Buttercup and Lavendar Lace Liquid Pearls to the bodies of the butterflies.
Once the butterflies were all dried I scored my card stock at 3 1/2" from each end. I heavily inked all the edges of my card with Peacock Feathers Distress Ink (this is one of my favorite colors). I added a black mat and then my patterned paper mats. I also did the inside of the card.
My next dilemma was how to finish the card. It just needed a bit more. I took another piece of white card stock and again applied some distress stains to my mat. This time I used Peacock Feathers, Seedless Preserves, Salty Ocean and the Burnish Pewter Metallic stain (again Kim can order these for you, just ask). I again squirted the stains with water on my mat and just swished the paper across my mat to color the entire page. I then spritz the paper with a bit of water to get the colors to flow. I allowed the paper to dry thoroughly. I cut two butterflies using my Silhouette cameo. I cut the base layer using the stained paper I created. The top layer was cut using the tracing paper I have it is a bit transparent.
To finish the front of the card, I cut a mat using Elegant Edges (again Kim can order this for you) at 3". I cut the shadow out of black and the base layer out of white. I inked the white mat with the Peacock Feathers distress stain and stamped my sentiment and the butterfly. I used my Turquoise Spica pen to enhance the lines of the butterfly and use the Clear Spica pen to add sparkle inside the wings.
I sure hope you enjoyed my version of a Gate Fold card. I would love to see you all create your own version as well and share it with me. I think this card would work great for a Mother's Day card, Birthday card, or even a Graduation card. What do you think?
Labels:
atyou spica,
Deanna M,
Liquid Pearls,
Tim Holtz Distressed Ink Pads,
Tim Holtz Distressed Stains
Tuesday, April 23, 2013
Envelope Mini Book
Today is another project I found on You Tube. I always wanted to make a mini book but they just seemed so involved for me. So I searched and found this You Tube Video.
I followed the video tutorial pretty closely but I made some variations to my mini envelope book. Below the photos are all the details of how I created my mini book and the supplies used.
My last project was clean and simple but this one I went a little overboard and yet I like it. I couldn’t stop myself from adding things to the cover until I ran out of room. 
I love the sentiment because that’s exactly what I am using this album for – all my bits and pieces. I will keep tags, butterflies, flat flowers, hearts, etc. in each envelope. You know a place for everything and everything in its place (wink).
Details: Graphic 45 –A Ladies Diary – 8" x 8” Paper Stack; Inkssentials Glossy Accents; Stickles Glitter Glue by Ranger (Star Dust) and Distress Stickles Glitter Glue (Crushed Olive); Liquid Pearls by Ranger (White Opal & Petal Pink); Distress Ink Pad (Crushed Olive).
From My Stash: Prima Flowers, Table Confetti (Wedding Collection Flowers –Green & Ivory), Butterflies (Butterfly Punch by Martha Stewart), Ric Rac (white), Sentiment (Silhouette Store), Tags by Marianne Design (LR0154), Quilled Flowers (Quilling paper strips), Five (A2-4.375 x 5.75) envelopes (dark brown), Ribbon (lt. green), Floral Border used on envelopes – Martha Stewart Border Punch.
Reminder: If there is something I used and you cannot find at Cutters Creek Store just contact Kim Bush here and she may be able to special order it for you. Kim ordered my Silhouette Portrait for me and I got it so quickly and love it.
Thank you for stopping by,
Fran
Wednesday, April 17, 2013
Sweet Shop Box
I am very excited today. This is my first post as part of the Cutters Creek design team. I love to decorate my bay window in my kitchen so when I saw the cute sweet shop box on the Cricut Sweet Tooth Boxes cartridge I knew what I had to make. (Kim can order this cartridge for you.)
I cut the box at the cartridge recommendation of 10 inches.
I had fun making this box with different papers. The roof and accents are My Mind's Eye Nostalgia paper and if you look closely in the windows you'll see a fairy and Mrs. Rabbit and her little ones. These pictures are from Graphic 45.
I used different colored Stickles glitter glue to add bright color, glitter and texture to the grass, windows, and flower. I used Liqued Pearls for the door handle and sweet shop sign.
Before adding on all the pieces and accents, I used Tim Holtz Distress Ink Pad - Tea Dye to smug the edges of the box and the accents I cut out.
I used Scotch quick-dry adhesive to glue the box together. This is my go to glue because it drys quick and is strong.
This is such a fun spring/summer box to make and use as a decoration and it goes so lovely with all my other knick knacks in my window.
I cut the box at the cartridge recommendation of 10 inches.
I had fun making this box with different papers. The roof and accents are My Mind's Eye Nostalgia paper and if you look closely in the windows you'll see a fairy and Mrs. Rabbit and her little ones. These pictures are from Graphic 45.
I used different colored Stickles glitter glue to add bright color, glitter and texture to the grass, windows, and flower. I used Liqued Pearls for the door handle and sweet shop sign.
Before adding on all the pieces and accents, I used Tim Holtz Distress Ink Pad - Tea Dye to smug the edges of the box and the accents I cut out.
I used Scotch quick-dry adhesive to glue the box together. This is my go to glue because it drys quick and is strong.
This is such a fun spring/summer box to make and use as a decoration and it goes so lovely with all my other knick knacks in my window.
Sunday, April 7, 2013
Happy Birthday Card by Deanna M
I was watching some youtube videos yesterday and saw a project that someone did using a white card base and a white mat with just a little bit of color added as embellishments. I wanted to try making my own version of that card and this is what I came up with.
My card base is white card stock cut and scored to make a 4 1/4" X 5 1/2" card base. My card is a portrait card, I cut a white card stock mat 4" X 4" and ran it through my eBosser and embossed it with the Script Texture Cuttlebug embossing folder. I love my eBosser, it does such a wonderful job embossing and die cutting and I love that it is all electric, no cranking to help my white mat stand out from the white card base a bit I laid it on a piece of paper and using my Cool Gray 1 Copic Marker I traced around the outside edge of the mat using the brush tip. This applied a faint line of the light gray marker around the outside edge. I used my Scotch Quick Dry adhesive to adhere my mat to my card base.
Now for my pop of color. I wanted to add a flower to my card and found this one in the Silhouette store. I used the print and cut feature to color it and cut it out. The center of the flower was originally a heart which I didn't want, so I cut a small circle instead. Again, I adhered my layers together with Scotch Quick Dry adhesive. I added my flower to my card front with some Kool-Tak Clear foam adhesives. To finish my flower I used my Buttercup Liquid Pearls to add some tiny pearls around the outer edge of my green flower center. That is what I love about Liquid Pearls, I always have the right color and size of pearl I want because I can make whatever size I need.
Finally I added a White Opal pearl using Liquid Pearls again, in each corner of my mat to help anchor it. My sentiment is stamped in Rose Bud Memento ink. This was a super quick card to put together but I am really happy how it turned out.
Labels:
ASI (Kool Tak) clear foam squares,
Cuttlebug Folder,
Deanna M,
eBosser,
Liquid Pearls,
Memento,
Scotch Quick Dry Adhesive
Sunday, February 17, 2013
Distressed Card by Deanna M
I received some new WOW! stamps and of course I had to try them out. The sets I bought were Everyday Sentiments, Funky Border Strips and French Music. This is what I came up with. This card style is a bit out of my comfort zone, I don't make a lot like this one. However, I had a lot of fun working on it.
My card base is a light tan card stock cut and folded to make a 4 1/4" X 5 1/2" card base. I added a dark brown mat cut at 4" X 5 1/4" from the Tim Holtz Nostaglic Collection Core'dinations card stock. And another tan mat cut at 3 3/4" X 5".
For my final layer, I started with some white card stock cut at 4" X 5". I used some Tim Holtz distress ink in old paper, antique linen, tea dye, and vintage photo to ink up my paper. I started with my lightest color and worked my way to the darkest color layering the color as I went. I then lightly spritz the paper with some water and allowed it to dry. Next I took some of the Tim Holtz Distress Stain in tarnished brass and inked around outer edges of my paper. I allowed it to dry for a few minutes then turned the paper over and spritzed it with water until it was fairly damp and then crumbled it all up. I spritzed from the back so my ink on the front wouldn't react to the water. I carefully opened up the paper and dried it with my heat tool. Once it was dry I took my blending tool and some Vintage Photo and lightly went over the top of my paper to enhance the wrinkles I had created.
Using Vintage Photo and the French Music stamp I stamped the inked paper. Because of some of the creases, and wrinkles I got a very broken up image which was what I wanted. I then cut it down to 3 1/2" X 4 3/4" so it would fit the front of my card. I took my scissors and distressed the edges of the paper and the adhered all my layers together.
I wanted my sentiment to be the focal point of my card. So using my Cricut and the Elegant Edges cartridge and the Oblong creative feature I cut a scallop and shadow at 3". The shadow was cut out of the dark brown and the top layer was cut out of the light tan.
I inked the edges of the tan scallop with some Tea Dye Tim Holtz Distress Ink and used Vintage photo to stamp my sentiment. Because this ink lightens a bit when it dries, it was a perfect choice to use with the sentiment to carry my distressed theme.
I added some rhinestone flourishes to the front of my card. These were actually clear rhinestones that I colored with a Spectrum Noir marker GB10.
My flowers are a 3d Rose cut that I cut with my Silhouette Cameo. The paper is Core'dinations Gemstone card stock, but not sure of the name of the color but it is a light golden yellow.
I rolled my flowers and adhered a gold pearl in the center of each flower. I didn't have enough small gold pearls to trim my scallop so I used some Gold Pearl Liquid pearls for that. I adhered the sentiment mat to my card using some foam tape.
I hope you like it. I had a lot of fun working on this one as it was a bit more of a challenge for me.
My card base is a light tan card stock cut and folded to make a 4 1/4" X 5 1/2" card base. I added a dark brown mat cut at 4" X 5 1/4" from the Tim Holtz Nostaglic Collection Core'dinations card stock. And another tan mat cut at 3 3/4" X 5".
For my final layer, I started with some white card stock cut at 4" X 5". I used some Tim Holtz distress ink in old paper, antique linen, tea dye, and vintage photo to ink up my paper. I started with my lightest color and worked my way to the darkest color layering the color as I went. I then lightly spritz the paper with some water and allowed it to dry. Next I took some of the Tim Holtz Distress Stain in tarnished brass and inked around outer edges of my paper. I allowed it to dry for a few minutes then turned the paper over and spritzed it with water until it was fairly damp and then crumbled it all up. I spritzed from the back so my ink on the front wouldn't react to the water. I carefully opened up the paper and dried it with my heat tool. Once it was dry I took my blending tool and some Vintage Photo and lightly went over the top of my paper to enhance the wrinkles I had created.
Using Vintage Photo and the French Music stamp I stamped the inked paper. Because of some of the creases, and wrinkles I got a very broken up image which was what I wanted. I then cut it down to 3 1/2" X 4 3/4" so it would fit the front of my card. I took my scissors and distressed the edges of the paper and the adhered all my layers together.
I wanted my sentiment to be the focal point of my card. So using my Cricut and the Elegant Edges cartridge and the Oblong creative feature I cut a scallop and shadow at 3". The shadow was cut out of the dark brown and the top layer was cut out of the light tan.
I inked the edges of the tan scallop with some Tea Dye Tim Holtz Distress Ink and used Vintage photo to stamp my sentiment. Because this ink lightens a bit when it dries, it was a perfect choice to use with the sentiment to carry my distressed theme.
I added some rhinestone flourishes to the front of my card. These were actually clear rhinestones that I colored with a Spectrum Noir marker GB10.
My flowers are a 3d Rose cut that I cut with my Silhouette Cameo. The paper is Core'dinations Gemstone card stock, but not sure of the name of the color but it is a light golden yellow.
I rolled my flowers and adhered a gold pearl in the center of each flower. I didn't have enough small gold pearls to trim my scallop so I used some Gold Pearl Liquid pearls for that. I adhered the sentiment mat to my card using some foam tape.
I hope you like it. I had a lot of fun working on this one as it was a bit more of a challenge for me.
Sunday, February 10, 2013
One More Valentine’s Card
This card says it boldly! It all began with the flower. I wanted to make it smaller but it look so pretty in this size so I decided to build my card around the size of the flower. So next came the sentiments (Front and Inside). I chose two very pretty fonts and sized them accordingly. I kept looking at the card and said something is missing. So I used a Martha Stewart heart punch for the bottom, front of the card. Then I cut out a heart border and added it to the front of the card. Then a strip of red card stock that matched the flower and added it to the bottom front too. Inside I cut a background bordered with hearts out of the same card stock as the flower. Sprayed the outside and inside with Iridescent Glitter Dust (gorgeous in person). I Added some liquid pearls in Rouge to the flower center and heart border.
Recipe:
Iridescent Glitter Dust; Liquid Pearls (Rouge); Martha Stewart Heart Punch; Silhouette Cutting Machine: (Sentiments, heart border, heart background Mat-inside, and flower from Silhouette Store); Neenah Card Stock (white and Red).
NOTE: If you see anything that is not sold at Cutters Creek (contact Kim Bush )and she may be able to order it for you. She ordered the Silhouette Cutting machine for me and I got it from Kim in no time.
Thank you for stopping by, Fran
Friday, February 1, 2013
Painting with Liquid Pearls by Deanna M
So when I was sick last month I spend a lot of time just watching card making youtube videos. I found a couple of videos the used liquid pearls to paint with and of course I had to give it a try.
I used my eBosser and the magnetic mat to die cut my violets. I then ran them back through the eBosser after removing the magnetic mat and topping the die with the rubber embossing mat and embossed them. It worked wonderfully.
To paint my violets I first laid my craft mat down. I then put some of the Squeezed Lemonade distress ink on my mat then I squirted a little dab of the Daffodil and White Opal liquid pearls in the center of the distress ink. I think added some water with a misting bottle just to the side of the ink and liquid pears. Using my brush I I mixed the ink and liquid pearls together adding a bit of water as I went. Then I painted it on the center of my violets and let them dry. After they were dry I used some Seedless Preserves distress ink and some Majestic Purple and more of the White Opal liquid pears and repeated the mixing process and then painted that color to the outer edges of my violets and then let them dry.
For the stems and leaves I used Mowed Lawn distress ink and Avocado and White Opal liquid pearls. Again I mixed them together and added water to get the colors I wanted. Added the color to my leaves and stems and let them dry.
While they were drying I put my card base together. I started with a white card stock card base cut, scored and folded to make a 4 1/4" X 5 1/2" card base. I cut a lavender mat at 4" X 5 1/4" and the patterned paper mat at 3 3/4" X 5". My patterned paper is from a Prima paper pad.
Next I used my Elegant Edges Cricut Cartridge to cut out a scalloped mat and it's shadow for my violets to be placed on. The mat was cut at 3". I ran the lavender mat through my eBosser and embossed it with the Swiss Dots Cuttlebug folder. I added my violets to the mat and attached it to my card with some foam tape. Finally I cut out a zigzag border using yellow and dark purple card stock my Silhouette Cameo and adhered them to my card. I added some Lavendar Lace Liquid Pearls to the dark purple card stock. I stamped my sentiment with the Seedless Preserves . Finally I added some Lemon colored Kaisercraft Pearls to the centers of my flowers.
Labels:
Deanna M,
eBosser,
Liquid Pearls,
Prima,
Swiss Dots embossing folder,
Tim Holtz Distress Ink Pads
Wednesday, January 2, 2013
Valentine's Day Cards by Deanna M
It is hard to believe that 2012 is over with and we have entered 2013. If time moves as quickly has it has been Valentine's Day will be here before you know it. Here are a few easy cards to get you started on creating yours.
All of my cards have a white card stock base and are 4 1/4" X 5 1/2". My mat layers are 4" X 5 1/4" and 3 3/4" X 5. All of my paper is from K & Company and are from older paper pads.
All of my little critters are from Create A Critter 2. I cut the Teddy Bear and Koala bear at 3 1/2" and the Love Bug is cut at 3".
For my Teddy Bear I used some onyx pearls liquid pearls for his eyes and a white gel pen to add some faux stitching to my heart. I used white distress stain to stamp my little sentiment on my heart. He is attached to the card with an Action Wobble.
This is the Hero Arts stamp set I used for all of my sentiments. I got it awhile back and have been anxious to use it.This item is not a standard stock item in the store but Kim at Cutter's Creek can order it for you so don't hesitate to ask her.
Friday, November 30, 2012
Nativity Card
Hi! With Christmas right around the corner, I have been feeling a little overwhelmed with the daily schedule my family has and have been dreading making my cards this year. I found myself trying to find alternatives to my usual elaborate cards as I just don't have the time with an active infant trying to crawl everywhere!
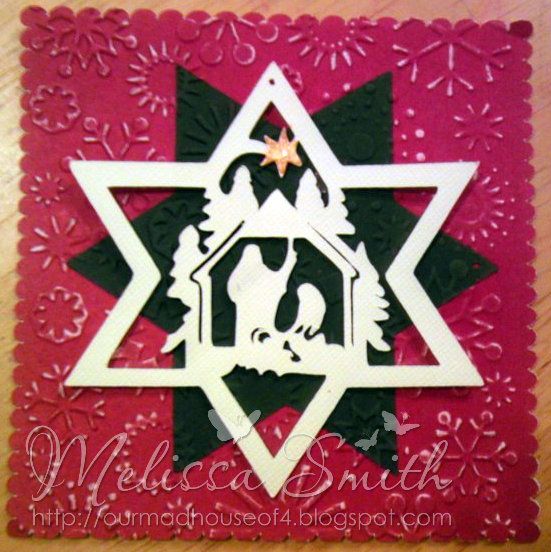
Here is a very simple Christmas Card I made using scraps found in my paper drawer with an SVG image I found here. I love all of his designs and they are so versatile with every project I have been making lately. I than used my cutting machine to cut out the base, the star and the nativity scene.
I adhered the star to my base and ran it through my Big Shot with the Cuttlebug Snowflakes folder and than used a file to make the white stand out a little more. I used clear mounting tape to place my image for a 3D effect. I thought about lining up the image with the green star, but I found I liked the layered look better. I think it makes it pop a little more. For the final touch, I added Liquid Pearls for the star.
thanks for looking!
Stash: Paper
Sunday, October 21, 2012
Halloween Decor Graphic 45 Style
I found these cute little canvas's and easels at a local craft store and just had to get them. I painted the easels and the canvas with some black acrylic paint. I then used the Graphic 45 Happy Haunting's Paper Pad for my images. I cut around part of the image and used some Matte Inkssentials Glue N Seal to seal my canvas and adhere my image. Then it was time to decorate.
For the square canvas I made some roses using a tutorial found here. I adhered them to the canvas with some hot blue and added some Diamond Ice Stickles to the edges of the flower petals.Then I added a couple of Rhinestone flourishes. I then embossed the edges of the canvas with some Black Glint WOW! Glitter Embossing Powder.
For the other canvas I again used the Matte Inkssentials Glue N Seal to seal my canvas and adhere my image. For this one I also made a rose and used some Stardust Stickles along the edges of the petals. I had some black tulle with some purple glitter in it and that cut and gathered to put behind the rose. I used some Majestic Purple Liquid Pearls to add some dimension to the canvas. I then outlined the edges of the canvas with some Black Diamond Stickles.
Labels:
Deanna M,
Glue and Seal,
Graphic 45,
Ice Stickles,
Liquid Pearls,
Stickles
Thursday, August 16, 2012
You're Special Card by Deanna M
Today I have for you this cute Gnome Home card. My card base is Kraft card stock cut and folded to make a 4 1/4" X 5 1/2" card base. My patterned paper is from a My Minds Eye Six by Six paper pad called Gnome Sweet Gnome. This paper is not yet in the store but Kim can order it for you. I added a Green patterned paper mat cut at 4" X 5 1/4" and then the striped cross stitch patterned paper cut at 3 3/4" X 5". I then cut a strip of the reverse of the green patterned mat that had the flowers on it at 5" in width and ran that across my card.
My Gnome Home is from the Gnomes and Mushroom Cricut Digital cartridge but I just thought it was so cute. I cut the Gnome Home at 3" and all the layers are cut from scraps. I adhered the home to the card with some foam tape and added a small onyx liquid pearl for the door knob. I inked all my edges with some Tim Holtz Tea Dye Distress Ink. For my sentiment I heavily inked a small white piece of card stock that I used Faded Jeans Distress Ink to stamp my sentiment. I mated that with a piece of brown card stock and added a couple of buttons from my stash.
Tuesday, August 7, 2012
Birthday Card by Deanna M
I have a fun birthday card for you today! I made this for my son's girlfriend. Sure hope she likes it.
My card base is white card stock and is cut and folded to make a 4" X 9" card. This card will fit in a regular #10 business envelope. I added a pink mat cut at 3 3/4" X 8 3/4". My next dilemma was that the paper pad I wanted to use was a 6" X 6" paper pad but I need an 8 1/2" tall paper for my card. So what I did is I took two different coordinating papers from the My Minds Eye "Life's A Party" paper pad. This paper has not been added to the store yet but if your interested in it, let Kim know. Here is a picture of the paper pad.
I cut the blue patterned paper in the middle of my card at 3 1/2" X 4". I then found a piece of paper in the pad that had strips for borders and cut that at 3 1/2" X 2 1/2" and placed that at the top of bottom of the blue piece on my card. Then the reverse of the border print paper had the same pattern as the blue but it was pink so I cut a 1/2" X 3 1/2" piece of that paper to place over the seams, My birthday ice cream cone is cut at 6 1/2". I ran the cone part through my Cuttlebug and embossed it with a Sizzix Argyle embossing folder. (This Cuttlebug embossing folder is very similar and would work well.)
To finish my ice cream cone I added some Key Lime Liquid Pearls for my sprinkles and some Orange Peel and Paprika stickles to my candle. I added my Ice Cream Cone with some foam tape to my card front.
Labels:
Cuttlebug,
Deanna,
Liquid Pearls,
My Minds Eye,
Stickles
Thursday, July 12, 2012
I'll be Home for Christmas Card by Deanna M
To help with your planning there are just 165 days left until Christmas. I can't believe we are almost halfway through July and it just is never to early to start working on your Holiday Cards, and Craft sale items. To help get you in the mood, I have for you this fun Christmas card.
I used the Handyman Cricut Lite cartridge and welded two shadows of this house together and cut it from white card stock. I cut one additional shadow layer from white and adhered it to the front of the card. I cut the card base and all the layers at 5". I cut the layers for the house out of patterned paper from My Minds Eye. While there isn't any of this paper left, check out what is in the store from Echo Park, it would work perfect. I used some Polar White Flower Soft on the roof edge. I then cut a snowman at 2 1/4" from the Winter Frolic cartridge (need this cartridge? Kim can special order it for you, just ask) and stamp his face with the Snow Cuties Peachy Keen Stamp Face. I also cut a tree topiary from the Joys of the Season cartridge also at 2 1/4". I used some Sugar Can Glimmer Glaze (Yes, Kim can special order this for you) to glaze my pot on the tree to give it a brassy look. Finally I used some Rouge Liquid Pearls to added some decorations to the tree and the buttons on the Snowman. Finally I added a black nail head for the doorknob.
I hope I have inspired you to get out those papers and get a jump start on your holiday crafting!!
Thursday, June 14, 2012
Center Step Card Tutorial By Deanna M
I have a fun new card for you today. At least new to me. It is called a Center Step Card or Front Panel Card. The card will fit in an A2 size envelope and was a lot of fun to make. All of my papers are from Echo Park. I apologize for the dark picture a big gray cloud decided to cover up the sun just as I started taking pictures. I attached all of my paper down with my ATG Gun.
My cupcake was cut from the Straight From the Nest cartridge (which Kim can order for you if you want it) at 2 3/4". Because the little holes for the sprinkles were so small I opted to add some liquid pearls in Hydrangea and Key Lime to them instead. I attached my cupcake to my card with an action wobble.
I did a short video for you to help explain how I made this card. I first saw this idea on SplitcoastStampers. I hope the video helps you understand how this card works.
Here is a side picture of the finished card.
I sure hope you will give this a try. If you do let me know what you think. Thanks for visiting.
My cupcake was cut from the Straight From the Nest cartridge (which Kim can order for you if you want it) at 2 3/4". Because the little holes for the sprinkles were so small I opted to add some liquid pearls in Hydrangea and Key Lime to them instead. I attached my cupcake to my card with an action wobble.
I did a short video for you to help explain how I made this card. I first saw this idea on SplitcoastStampers. I hope the video helps you understand how this card works.
Here is a side picture of the finished card.
I sure hope you will give this a try. If you do let me know what you think. Thanks for visiting.
Labels:
Action Wobbles,
ATG,
Deanna M,
Echo Park Paper,
Liquid Pearls,
Video Tutorial
Sunday, April 22, 2012
Birthday Card by Deanna M
I have for you today a birthday card I made for a friend to give to her Mom. My card base is a piece of green cardstock cut and scored to 4 1/4” X 5 1/2”. I added a mat from the Mod Squad Cut and Emboss paper pack cut to 4” X 5 1/4” and then a patterned paper mat from the Prima Botanical paper collection cut to 3 3/4” X 5. I then used Elegant Edges to cut a mat for my butterfly at 3”. I used the same paper as my first mat for the base layer of the mat for the butterfly. I then used a piece of paper from the Whitewashed Cut and Emboss paper pack for the top layer. I ran that layer through my Cuttlebug and embossed it with Sizzix Embossing folder called Dots and Flowers Embossing folder and sanded it so the colored green core showed through (and yes, Kim can order this for you. You get two folders in the package).
My butterfly on this card is once again one of the laser cut embellishments by Kaisercraft. I am so loving these embellishments. (And, yes Kim can order these for you too!) They are so easy to work with, are not too think and add a great dimension and elegance to a card. For the butterfly I started off by using my craft mat and rubbing some different colors of Distress Ink on my mat, spritzing with water and them placing the butterfly in the ink on my mat. I used Persimmon, Concord Grape and Broken China Distress Ink. I let it dry for a bit then spritzed it with similar colors of glimmer mist. Again I let that dry and then added some Glimmer Glam in Violet and a Copper color. Once again I allowed that layer to dry. I then added some Glimmer Glaze to the antenna’s and around the orange areas of the butterfly. I then went back with a bit more Persimmon distress ink. I let all that dry overnight (only because it was bedtime). The final layer I added some Pearl glimmer mist. This butterfly is so iridescent looking in person. I adhered my the butterfly to my mat with some of the ASI Kool Tak tape clear gel foam tape.
The flower I added to the card is a Cutter’s Creek Gardenia. The flower was actually yellow but it just didn’t go with the card as well as I likes, so I spritzed it with some Honey Dew Mist glimmer mist, and problem solved. It softened the butter yellow of the flower and gave it a light green color which went much better with my card. I then stamped my sentiment with some Rusty Hinge Distress Ink. Finally I added some Copper Pearl liquid pearls to the tip of each antenna. Sure hope you have enjoyed my project and that I have inspired you to get out your goodies and make a project.
Labels:
ASI (Kool Tak) clear foam squares,
Cutters Creek Branded Flowers,
Deanna M,
Elegant Edges,
Glimmer Glam,
Glimmer Glaze,
Glimmer Mist,
Kaisercraft,
Liquid Pearls,
Prima,
Tim Holtz Design Ruler
Wednesday, April 18, 2012
Anniversary Card by Chris
Our fortieth anniversary just passed and I wanted to make a
special card for my DH that was also a bit masculine. I decided on a z-shape
card. I started with a slate blue piece of Bazzill cardstock cut 6 inches by 12
inches. I scored it at 3 inches from one end on the backside of the cardstock,
flipped it over to the right side and scored it at 6 inches. I then creased the
6 inch score in towards the un-scored side and creased the 3 inch score back
towards the left side. (If you place the scored sheet right side up, score the
A line as a mountain fold and the B line as a valley fold.)
When the scores are creased and closed the card measures 6x6
inches. I then cut two pieces of Graphic
45 Proper Gentlemen Collection to cover the inside pieces (5-7/8 x 5-7/8
and 2-7/8 x 5-7/8) and glued them down with my ATG. [I’m sure Kim could order
you this particular pad if you’re interested.] The front panel was also cut at
2-7/8 x 5-7/8 from my stash.
Using Spellbinders
Beaded Circles I cut the largest circle and then layered it with two Spellbinders
Petite Scallop Circles (large)—one from Silver American
Crafts POW! Glitter paper and another from my stash. On top I layered a red
vellum heart, which I attached with micro Glue
Dots. I then add some silver Liquid
Pearls on the beads.
The front circle was made stacking the largest of the Spellbinders
Petite Scallop Circles (large) with the largest of the Splendid Circles,
the decorative element from Spellbinders Parisian Accents, and the smallest of
the Splendid Circles. The silver glitter paper again was from American
Crafts POW! Glitter paper. The smallest circle was adhered with a Glue Dots
pop up dot; all others were glued with my Zig
two way pen. I used my Copic
Lipstick Red R29 to color the heart gem, which was glued down with Glossy
Accents.
The sentiment is on the inside fold. It was printed on my
computer and then cut with Spellbinders
Labels Four –small and mounted on a Spellbinders
Labels Four—large. All edges were inked with Vintage
Photo Distress Ink.
Before I glued down the circles, the two short edges of the
card were trimmed with Tim Holtz Idea-ology Tissue Tape. I then centered and
glued the inside circle on the square and glued the outside circle on the Z so
when closed it looks like one circle until pulled open. I had to have a bit
more color, so a red ribbon finished off the card.
Labels:
Chris,
Graphic 45,
Liquid Pearls,
POW Glitter Paper,
Spellbinders
Subscribe to:
Posts (Atom)