Showing posts with label Acetate. Show all posts

Saturday, March 26, 2011

Cutters Creek Spring Blog Hop!

Welcome to the Cutters Creek Spring Blog Hop! All of our designers have created some wonderful Spring projects featuring products that you can purchase at the Cutters Creek Store! The Cutters Creek Design Team Blog is the first and last stop in the hop! Each blog along the way will have a link to the next blog in the chain. Don't forget to make sure you are following each of our personal blogs and leaving comments along the way to enter to win a box full of CHA Swag and maybe a few other goodies along the way!!!!

On the Cutters Creek Design Team blog we are featuring a gorgeous Accordion Fold Spring Card created by Chris! Take it away, Chris.....

What better way to celebrate spring than with flowers? Or even better, flowers in a garden? I wish I had a green thumb to create this in my yard or even a picket fence with which to begin, but alas my garden lives in paper—LOL.


Starting with a 6"x12" piece of white cardstock, I rounded one edge and scored it with my Scor Pal at 4" and 8". Using my cloud-maker and Tim Holtz Distress Ink in Tumbled Glass and Scattered Straw I inked my sky on the front panel and the outside panel that showed behind it. The two inside panels are covered with cardstock cut at 4"x6" from the Prima Fairy Flora 6"x6" Paper Pad. I used Scor Tape to adhere them. I then cut Flower #12 and its shadow at 4 inches from Cricut Lite Botanicals cartridge and mounted it on the inside left panel. My sentiment is printed on ivory cardstock and cut with Spellbinders Shapeabilities Fancy Tags. I also cut and embossed a piece of translucent paper with Nestabilities Labels Four (#6), which I glued down with Vellum Glue Dots then mounted the Tag on top of the label using pop dots.


To make the front of the card, I stamped several flower stamps on cardstock and cut them out. One flower was colored with Copics colors Y08, YR65 and YG23. I colored the rose with Copic color RV66. I used Flower Soft Glue and Flower Soft to highlight the different flowers. For the rose I used Peony Pink. The Dianthus is accented with Ocean and Baby Pink. And the for the Daisy I used Marigold and Citrus Crush. I set those aside to dry and took some scraps of acetate, cut them with my Tim Holtz Alterations Tattered Florals; using Staz-On Black ink I stamped the two larger pieces with a background stamp and then flipped them and colored with Copic Markers B02, B06, RV66, and RV63. Once they dried, I used my Crop-A-Dile to punch a center hole and add a rivet to each. Going back to the Flower Soft flowers, I glued a Cherry Twinkle Jewel in each center to two of the pink Dianthus flowers and a pearl in the center of the Daisy. I had one last flower to make and I used a French White Prima Rose sprayed with Perfect Pearl Mists Forever Red.


While that was drying, I used my On the Fence Tim Holtz Alterations Die to cut American Crafts White Glitter Paper and trimmed it to the width of the front panel (4 inches). I put pop ups on the back along the two railings and up each side, but didn’t glue it down yet. I started arranging the flowers behind it and decided that some grass needed to be both behind the fence and along its base for that I used—you guessed it—Meadow Flower Soft. While that was drying, I adhered the two acetate flowers using Glossy Accents and my Zig Glue Pen to put down the rose and two daisies. I decided to use a scrap of wire to create a “vine” around one fencepost and used Glossy Accents to adhere the 3 small flowers to the fence. I mounted the fence and then again using Glossy Accents added the Prima rose. The final addition was a butterfly stamp that I colored with Sand, Lilac, and Peach from the Copic atyou Spica Set B.

See, didn't I tell you her card was gorgeous??? When you complete the hop, come back here show your love for Chris and all of our designers! Leave one comment at every blog along the way and make sure you are following the Cutters Creek Design Team blog and the designer's blogs too! Now hop on over to my blog HERE! Oh, and check out the AWESOME prize we have for one lucky winner:


You will get that Springy looking tote, the Creative Options Box, Graphic 45's A Proper Gentleman, and look at all the little things in the Creative Options box! You get those too!!!

Here's a complete line up of all of the blogs in the hop in case you get lost along the way:

Cutters Creek Design Team Blog - You are Here!
Mandie's Blog - http://mandiesscrappin.blogspot.com
Kim's Blog - http://kreativekim.blogspot.com
Mindy's Blog - http://www.scrappyandpiggy.blogspot.com
Laura's Blog - http://scrapaddict4life.blogspot.com
Melissa's Blog - http://www.ourmadhouseof4.blogspot.com
Lori's Blog - http://savingmine.blogspot.com
Vicki's Blog - http://scrappyleopard.blogspot.com

Wednesday, February 23, 2011

Stained Glass Stickles by Chris

To Make the image: Gather together Acetate Sheet, Stickles, a stamp, and Staz-On Black Permanent Ink. Stamp your image on the acetate and let dry 3-5 minutes or use your Heat Tool to speed the process.


Just be careful to keep it a distance from the acetate as it will melt. Once dry decide what color Stickles you want to use and then working on the back side of the stamped image, begin at the center and work towards the edges, color your image. Be generous with the Stickles.


I outlined areas with one color and then filled in with others. My flower center used Yellow and Cinnamon. The smaller floral petals are Glam Pink with wisps of Fruit Punch between them.


I then outline the larger petals with Lavender and filled them with Thistle.


The leaves are outlined with Mystic Green and filled with Patina. Leave the image to dry overnight. (This is very hard for me; I am not a patient person) Once the image is dry and you are sure you didn’t miss any spots, cut around the design leaving an edge of transparency all around the image and prepare your card. (If you did miss a spot or two just add more Stickles and set aside to dry again.)


To Make the Card: My card base is a 12 x 6 piece folded in half to make a 6 x 6 square (not my usual A2 card). I glued a designer sheet on top of the base with Scor Tape. I then used my Spellbiners Nestabilities Labels 10 dies (the second and third largest) to make a frame to set off my stained glass image.


Before running them through my Big Shot, I used removable tape to make sure they didn’t slip and then cut my Mulberry Pink American Crafts glitter paper. I also used my Spellbinders Borderabilities Lotus Border Petites and glitter paper to put a border inside the card. Don’t throw out the small petals that you get from the border; they were used to make the two flowers in the top corners. All I did was glue two pieces with quick drying glue and added a Twinkle Jewel in each center.


I then made a sentiment tag using Spellbinders Shapeabilities Fancy Tags and some translucent paper I had in my stash. I colored the ends of the tags with the lavender pen in the Sakura Gel Pen set. This was glued down with Glue Dots Vellum sheets. (I haven’t decided what I will use this card for so I left the tag blank for now.)


To adhere the stained glass to the card use some Glossy Accents (on the Stickled side) and turn over and stick to the card and you are done.


Boy, don’t you just love how the stamped lines are highlighted by the Stickles? I know I do! Let’s see what you create.


Cutters Creek Shopping List:
Acetate Sheets
Stickles: Yellow, Cinnamon, Glam Pink, Fruit Punch, Lavender, Thistle, Mystic Green, and Patina.
Staz-On Black Permanent Ink
Heat Tool
Scor Tape
Mulberry Pink American Crafts glitter paper
Spellbiners Nestabilities Labels 10 dies
Spellbinders Borderabilities Lotus Border Petites
Spellbinders Shapeabilities Fancy Tags
Sakura Gel Pen set
Glossy Accents

Thursday, January 27, 2011

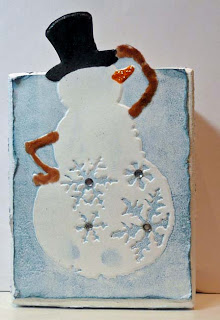
Chunky ATC Chris-styled

Start with a scrap piece of wood 2.5x3.5x1.5. (An online friend sent me the wood canvas but if you have access to 2x4 boards and someone to cut them for you, you’re golden!) I painted the entire block with acrylic white paint and set it aside to dry. (Actually she sent me four pieces and I have three more to work with—yippee!)


While the paint was drying, I took out my two Tim Holtz Alterations Snow Flurries and Snowman embossing folders. Using Stormy Sky Distress Ink and my brayer I inked the “indented” side of the folder and carefully laid the white paper in the folder and ran it through my Big Shot Express. Love how the background was now blue, even though I got some blue on the snowman—hey snow has a bluish tinge, right. In the snow flurries folder I placed a piece of acetate and ran it through the machine. By now my snowman was dry enough to cut out. I knew he was taller than my block, so I measured up to 3.5 and then cut around his arm and head. Using Cinnamon Toast Fun Flock I glued it along the snowman’s arms. I filled in his carrot nose with Orange Peel Stickles. Then, I dabbed the top part of the image with my Embossing Magic powder, colored in the hat with my embossing pen, sprinkled it with black embossing powder, and heated it with my heat gun. I set this aside to dry. Next I used the Distrezz-it-All to rough up the edges and added some jewels in the center of the snowflakes.


I then started on side two by cutting out ‘tweety’ from Stretch Your Imagination at 2.5 inches first in brown and then red. I cut off the red bird and glued it on top of the brown one. I cut a sled from the Wild Card cartridge at .5 inches—the base out of red and the layers out of tan scraps. I sketched a hill on the block and then used Stormy Sky, Tumbled Glass, and Weathered Wood Distress Inks to ink in a sky and stamped ‘Let It Snow’ on the bottom with a blue pigment ink.


While I waited for that to dry, I kept throwing away ideas for the edges. I then thought of all the little scraps of snow I saved from when I punched my Christmas Thank You cards (I never throw anything out) and decided to use Glossy Accents to randomly glue them on all four edges. Once that was done I was ready to put the chunky ATC together. I used Scor-Tape to adhere the Snowman and Glossy Accents to attach the bird and branch. After that I drew a few lines with my White Liquid Applique pen and heated it to add some dimension. I left that dry over night before attaching my sled using pop up dots and the embossed acetate sheet, using some Glossy Accents in the corners to hold it in place.

One ATC down, three more to go; what about you?

Cutters Creek Shopping List:
Tim Holtz Alterations Snow Flurries and Snowman embossing folders
Stormy Sky, Tumbled Glass, and Weathered Wood Distress Inks
Brayer
Acetate
Cinnamon Toast Fun Flock
Orange Peel Stickles
Embossing Magic
Black embossing powder
Distrezz-it-All
Glossy Accents
Scor-Tape
White Liquid Applique pen
Related Posts with Thumbnails