Showing posts with label Distrezz-it-All. Show all posts

Monday, August 8, 2011

Chris’ Altered Box

An altered box is so easy to make when you have quality paper like Graphic 45. For this box I used Curtain Call and a couple of sheets from A Proper Gentleman. Inside I just measured and cut strips and glued them down with my Scor Tape. On the inside top lid I added a flower made from 3 circles of the same paper (2.5, 2, and 1.5 inches) and punched a hole in the centers. I distressed the edges with my Zutter Distrezz-It-All, sprinkled the circles with water, crumpled them and pushed a brad through it when dry. I then rubbed some Tattered Rose and some Antique Bronze Distress Stickles over the petals and set aside to dry.


The brads around the lid are actually half of a silver ribbon that I cut in half length-wise and colored with Copic Y28 Lionet Gold. This too was attached with Scor Tape (gotta love that stuff!). I then painted the lid of the box with Antique Linen Crackle Paint. (I did not use Gesso first because I wanted it to peel and show some of the gold print underneath--.) When it was dry I rubbed a bit of Black Soot Distress Ink into the cracks. Cutting out some more Graphic 45 paper I mounted them on slightly larger rectangles (from the Gentleman Collection), dampened the edges with my fingers and torn and folded/twisted the paper to make distressed frames.


To make the corner flower I cut up a used dryer sheet, sprayed it with Glimmer Mist in Sun Sisters and Santa Baby and a homemade brownish one using Distressed Walnut ink and some bronze mica powders. These were joined with a button and edged with Tattered Rose and Antique Bronze Distressed stickles. The two goldish-colored roses were made using SCAL and PDC’s cut file.


The sentiment I created on my computer and cut and embossed with the Cuttlebug Embossing Plus Fanciful Labels and Black Soot Ink. To age all the pictures and the label I smeared them with Rock Candy Crackle Paint and let them dry. Everything was adhered with Scor Tape. I then added Tim Holtz’s Ideology Film Strip Ribbon. This was tricky to curl where I wanted, but with a bit of patience and some Glossy Accents I got it to stick.


My husband is lovin’ it and has his jewelry stashed inside. What do you think?

Thursday, January 27, 2011

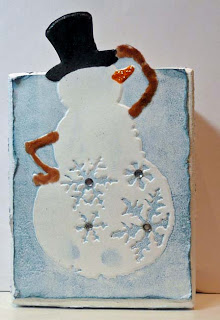
Chunky ATC Chris-styled

Start with a scrap piece of wood 2.5x3.5x1.5. (An online friend sent me the wood canvas but if you have access to 2x4 boards and someone to cut them for you, you’re golden!) I painted the entire block with acrylic white paint and set it aside to dry. (Actually she sent me four pieces and I have three more to work with—yippee!)


While the paint was drying, I took out my two Tim Holtz Alterations Snow Flurries and Snowman embossing folders. Using Stormy Sky Distress Ink and my brayer I inked the “indented” side of the folder and carefully laid the white paper in the folder and ran it through my Big Shot Express. Love how the background was now blue, even though I got some blue on the snowman—hey snow has a bluish tinge, right. In the snow flurries folder I placed a piece of acetate and ran it through the machine. By now my snowman was dry enough to cut out. I knew he was taller than my block, so I measured up to 3.5 and then cut around his arm and head. Using Cinnamon Toast Fun Flock I glued it along the snowman’s arms. I filled in his carrot nose with Orange Peel Stickles. Then, I dabbed the top part of the image with my Embossing Magic powder, colored in the hat with my embossing pen, sprinkled it with black embossing powder, and heated it with my heat gun. I set this aside to dry. Next I used the Distrezz-it-All to rough up the edges and added some jewels in the center of the snowflakes.


I then started on side two by cutting out ‘tweety’ from Stretch Your Imagination at 2.5 inches first in brown and then red. I cut off the red bird and glued it on top of the brown one. I cut a sled from the Wild Card cartridge at .5 inches—the base out of red and the layers out of tan scraps. I sketched a hill on the block and then used Stormy Sky, Tumbled Glass, and Weathered Wood Distress Inks to ink in a sky and stamped ‘Let It Snow’ on the bottom with a blue pigment ink.


While I waited for that to dry, I kept throwing away ideas for the edges. I then thought of all the little scraps of snow I saved from when I punched my Christmas Thank You cards (I never throw anything out) and decided to use Glossy Accents to randomly glue them on all four edges. Once that was done I was ready to put the chunky ATC together. I used Scor-Tape to adhere the Snowman and Glossy Accents to attach the bird and branch. After that I drew a few lines with my White Liquid Applique pen and heated it to add some dimension. I left that dry over night before attaching my sled using pop up dots and the embossed acetate sheet, using some Glossy Accents in the corners to hold it in place.

One ATC down, three more to go; what about you?

Cutters Creek Shopping List:
Tim Holtz Alterations Snow Flurries and Snowman embossing folders
Stormy Sky, Tumbled Glass, and Weathered Wood Distress Inks
Brayer
Acetate
Cinnamon Toast Fun Flock
Orange Peel Stickles
Embossing Magic
Black embossing powder
Distrezz-it-All
Glossy Accents
Scor-Tape
White Liquid Applique pen
Related Posts with Thumbnails