Showing posts with label crop-a-dile. Show all posts

Monday, March 26, 2012

Mandie's Gift Box

Today I'd like to show you a fun gift box that I created. I used some fabulous Echo Park Paper, Distress Ink and Adirondack Paint Daubers, and Glimmer Mist!


First I painted all of the edges of my box with the Pitch Black Adirondack Paint Dauber and let it dry. Then I cut my Echo Park Papers (these are from the Be Mine line but you could easily use any of the gorgeous lines they have) to be slightly smaller than each side of my box. Then I inked the edges of everything with the Black Soot Tim Holtz Distress Ink.


Next I created my spiral roses. I used a variety of circles that were cut into a spiral shape. I used scalloped scissors on a couple. Then I rolled them into the flower shape. To give them a little bling, I added some Pink Bubblegum Glimmer Mist and then let them dry.


I adhered my roses to the box with some Glue Dots and added some mirrored paper leaves. Then I used Scor Tape to add the ribbon around the middle of the box. Finally, I used my Crop-A-Dile to add holes and eyelets to the sides of the box and threaded some ribbon through for a handle.

Monday, March 7, 2011

Fairy Thank You Card by Vicki

I have been needing a lot of Thank You cards lately, so here is one I made for a family member. Since I have needed a bunch, I felt like my mojo was out of sorts, so I used a sketch from a new Facebook friend I made, Sketch Support.

I used a simple kraft paper base, and then challenged myself to use a color I normally do not gravitate towards...Orange! Since it was a simple 5 1/2 x 4 1/4 card, I was able to use paper scraps in my stash - I didn't need to cut up a bunch of sheets of full cardstock!! I used my Crop-A-Dile Corner Chomper to round the corners of the nested squares.


The 'Thank You' sentiment was cut from the Wild Card Cricut cartridge. I sized it up just the right size on my Gypsy, and cut it in orange cardstock. Then, I used my markers to outline the sentiment in brown, so it would stand out better on the card.

The sketch called for a variety of hearts cut in matching papers, but I wanted to make this a little more personal for my family member, so instead, I used a digi-image. I used an image called Fairy Belle, from The Character Cafe. I printed the digi on my laser printer on Bazzill Simply Smooth White Cardstock. I colored her with several of my Copic markers. I used G24 and G28 on her dress, E21, E00 on her skin, R20 for her cheeks, and E44 and E47 on her hair. I didn't have any orange Copics, so I supplemented with my Sharpies. I thought she still needed a little something, so I used Rusty Hinge Distress Stickles for her flowers, and Diamond Stickles in her hair. The Diamond color has flakes of orange, gold and green tinged glitter that matched perfectly! I was making her wings separate from her body, so I cut around the image closely with my Cutterbee Scissors. The images from Character Cafe often come with little extras. In this case, they have a separate image of just the wings on the PDF file. I cut her wings out separately, coated them with Flower Soft Glue, and used Polar White Diamond Range Flower Soft to make her wings look like feathers. Although the Flower Soft has a touch of glitter in it, I thought it need a little more, so I used more Diamond Stickles as a thick outline on the edges of the wings.

Just a hint - when using Stickles AND Flower Soft - allow PLENTY of time for the products to dry before you try to assemble them. Otherwise you end up with glitter and glue all over your fingers!!

So, after waiting a sufficient time to let them dry, I assembled her on the card, using 3-D Dots. The result is a fairy that appears to 'fly' off the card with a little bit of magic dust.


Just a reminder that EVERY comment left this month will be eligible for our Blog Candy drawing at the end of the month. You can comment once per project so make sure you check back often!!!!

Cutters Creek Shopping List:
Crop-A-Dile Corner Chomper
Cricut
Bazzill Simply Smooth White Cardstock
Copic Markers: G24, G28, E21, E00, R20, E44 and E47
Rusty Hinge Distress Stickles
Diamond Stickles
Flower Soft Glue
Polar White Diamond Range Flower Soft

Wednesday, December 29, 2010

New Year's Hostess Gift by Laura C

Start the New Year off right, ring it in with a fun set of wine/drink charms, that can be a great hostess gift, or you may want to keep them for yourself!


Start with shrink plastic (I used white), a small stamp of your choice (I had the word "cheers"), Staz-On Black Ink (must be a good permanent ink), Ranger alcohol inks or Copic Markers, an Tim Holtz Ink Applicator and felt and a Crop a Dile hole punch. I used a 1&1/2" circle punch to make my "stencil". Then I traced and cut out 8 circles from the shrink plastic. Then I stamped my image on the disc—some people will sand the shrink plastic to make this easier.....I did not....but it might slip a bit so don't push down too hard. Then use the Crop a Dile to punch a hole......I stacked them all up and did it with one punch (the larger hole)—love the Crop a Dile!! Then using the Tim Holtz Ink Applicator and felt....I brushed the edges of each disc with a different color of alcohol ink. You can get a similar effect with Copic Markers as well. Here is a look at the disks before shrinking:


Now, on your Bazzill Splat Mat or other heat safe surface, use a toothpick in the hole to keep the disc from blowing away, and use your embossing Heat Gun to shrink it. It will curl all up, but will return to a flat disc when it's done. Now you can do these up anyway you choose. You can use a thin ribbon or twine, I had a good wire in my craft stash, so I strung on some small beads that complimented the disc color, and I used a needle nose pliers to form each end into hooks. I used a jewelry ring to attach the shrink plastic charm so it will lay flat.


To make the "matchbook" to hold them, use a 8&1/2" by 5" piece of cardstock. Score it at 3&1/2", 4", and 7&1/2" on the Scor Pal, and fold to create match book. I used a small piece of Velcro to secure it closed. You can decorate for any holiday, I chose New Year's, used a celebrate stamp that I embossed using Tim Holtz embossing ink, and Super Fine Embossing Powder on a 1&3/4" by 2&1/4" piece of black cardstock, I then used Flower Soft glue around the edge, and applied Beadazzles in the Waltz color. I used American Crafts glitter cardstock (a 1&1/4" x 5" strip) and layered a 2&3/4" by 2&1/2" square and foam dotted the dry "celebrate" square on top. A 1/2" x 5" strip on the small flap finishes it off. On the inside, I used plain white cardstock and a ribbon slot punch to make the card to hold the charms. I fastened this piece on the bottom edge only, to hold it in place, but allow easy access to the charms.

This is a gift any hostess would love to receive!

Available at Cutter's Creek:

Suze Weinberg Beadazzles (waltz)
Tim Holtz Ink Applicator
Super Fine Embossing Powder (silver)
American Crafts Glitter Cardstock (silver)
Staz-On Black Ink
Bazzill Simply Smooth white cardstock
Bazzill Splat Mat
Copic Markers
Crop a Dile
Scor Pal
Flower Soft glue

Wednesday, December 22, 2010

Sweet Treat Gift Card Holder by Laura C

Want to make a simple gift card a little more special? Give it in this sweet little
box! You need, plain white Bazzill Simply Smooth Cardstock, American Crafts glitter cardstock, some Diamond Stickles, a red Copic marker, and your favorite strong adhesive.


Start with an 8 1/2" by 7" piece of white cardstock. You then score the 8 1/2" length at 1/2", 4", 4 1/2", and 8". Then turn and score the 7" length at 1 1/2", 2", 4 1/4", and 4 3/4". Trim with a scissors all areas not needed to form box (see pic below).


Now, fold on score lines and assemble box. Then, cut 1/4" pieces of the red and white glitter cardstock, apply adhesive to the box front, and apply pieces at an angle. Trim excess with scissors. Repeat for back of box. For flap and top, use red glitter cardstock cut to size and trim flap with a 1/4" strip of the white glitter cardstock. A small piece of velcro under the flap keeps it closed. The peppermint candy embellishment was a 1" circle that I drew some freehand red "swirls" with the copic marker #R46 the brush tip makes this super easy. Then I poked 2 small holes, and tied with thread, then I sparkled it up a bit with diamond stickles. I punched holes in the lid with my crop a dile, and tied on some tulle, so I can hang it from my tree for a Christmas surprise!

This little box could be decorated any way you want to make a gift card more special for any occasion!


Available at Cutter's Creek:
American Crafts Glitter Cardstock (Rouge and White)
Diamond Stickles
Bazzill Simply Smooth Cardstock (white)
Score Tape
Copic Markers (#R46)
Crop a Dile

Wednesday, December 15, 2010

Mandie's Poinsettia Card

This year I've been procrastinating mailing off my Christmas cards. I have no good reason, just haven't gotten it done yet. But I am still finding so many beautiful cards to inspire me! Have you ever really looked at some of the extra features on your cartridges? Unless they are fonts, I generally ignore them. But something on the Winter Woodland Cricut cartridge caught my eye... the Card Feature! I used it to make this stunning card:


I've had this cartridge for over a year and have made a few cuts with it here and there but never really thought about using the card bases. I really didn't know where to begin. I thought it would be nice if the layers were made to fit the card bases but I didn't see how to make them fit.... or could it be as simple as cutting the card and measuring the design? Couldn't be that easy, right? Well, it is! I cut my card base from the poinsettia cut on the Winter Woodland cartridge at 5". Then I used my Scor Pal to score my card.


Then I grabbed my Tim Holtz Design Ruler to measure the height of the poinsettia in the center of the card. It was about 3 3/4" tall so I cut the poinsettia at 3 3/4" with Real Dial Size off. Well, I looked at the cut that was way too small and turned Real Dial Size ON and tried again. Perfect fit! The cut normally has a set of leaves with it that aren't on the card front so that is what happened. Anyway, I didn't toss that 1st cut, I decided to layer it on top of the other one after I distressed them both with the Tim Holtz Frayed Burlap Distress Ink. I also cut the center of the flower at 5" (Real Dial Size OFF). Before gluing anything down though I pulled out a roll of packing tape and some clear micro beads that I've had unopened forever.... you could also use glitter for the same effect. Now, laid my card face down on my Bazzill Splat Mat (make sure you have a non-stick mat and NOT paper under your card) and carefully tore a strip of packing tape (don't get your fingerprints on it) and stuck it to the back of my design. You will need 2 strips to cover the whole opening, one strip for each side. Then pull your card up and add your beads or glitter to the sticky part. I love the stained glass effect my transparent beads created here.


Once it's totally covered I used my Zip Dry Glue to adhere my large poinsettia flat to the card base. Then I used some Pop Up Dots to attach the smaller flower after bending the petals a bit for more dimension. Then I used the Pop Up Dots cut in half to pop up the flower center. Finally to finish off my card I used my Crop-A-Dial to punch a hole about an 1" from the top and bottom along the score line and tied a ribbon through the holes. The directions seem like a lot but it took me about 15 minutes to whip up this card and I think it is so pretty!

Shopping List:
Winter Woodland Cricut Cartridge
Scor Pal
Tim Holtz Design Ruler
Tim Holtz Frayed Burlap Distress Ink
Bazzill Splat Mat
Zip Dry Glue
Pop Up Dots
Crop-A-Dial

Thursday, October 28, 2010

Featured Artist-Deanna M (Holiday Card)


Here is a Christmas card I made using the Ultra Soft Flower Soft. I started with a 5 1/2" X 5 1/2 card base made from Kraft card stock. I added a red mat cut at 5 1/4" X 5 1/4" and a piece of patterned paper cut at 5" X 5". I rounded the lower corners of the card base and each of the mat layers. The wreath was cut from the Cricut Christmas solutions at 3 1/2". The base layer of the wreath was cut from dark green card stock. I ran it through my Xyron upside down so the adhesive was on the top of my cut, and covered it with the Pine Ultra Soft Flower Soft. The lighter colored leaves were cut from some light olive green paper, again run upside down in my Xyron and covered with the Sage colored Ultra Soft Flower Soft. I used the Flower soft adhesive to adhere the Sage colored leave to the wreath. I added some drops of the Flower Soft adhesive and covered them with the Strawberry Ultra Soft Flower soft. I wanted them to look like Holly Berries. I just sprinkle the glue with the Flower Soft and left it to dry then tapped off the excess. I also covered the Ribbon cut with the Strawberry Ultra Soft Flower Soft. I adhered the wreath to the card front with some foam tape. The sheer ivory ribbon is from my stash. For the sentiment, I stamped it on a small scrap of kraft card stock and rounded the ends and added a mat of red. I used my Crop-a-dile to punch a hole in each end of the tag and added a gold colored brad. I adhered the tag to the front of the card with foam tape.

Tuesday, October 19, 2010

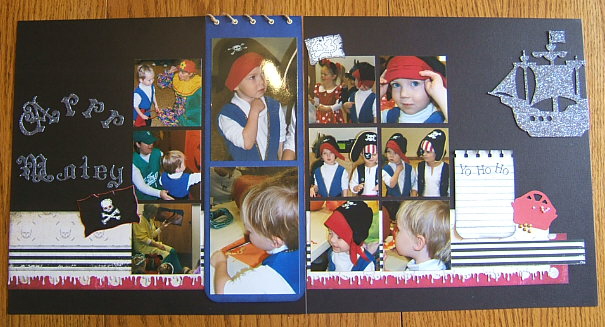
Pirate Halloween by Lori B.

Think glitter is just for "girly" layouts?  Oh no, my friend, oh no.  Everything looks better with a little bling, and boys are no exception.  Two years ago, my son was a pirate for Halloween (yes, I know, I'm "behind") and I recently got around to scrapping those photos.  Complete with glitter and bling!


I used a simple sketch and mostly cardstock in order to keep the focus on the pictures.  Adding a touch of bling to a simple layout like this can really give it a pop.  Using American Crafts glitter cardstock, I cut my title using my Cricut and Happy Hauntings, and my pirate ship from Paper Doll Dress Up.  The cuts are adhered to my layout using Scor Tape.  The treasure chest is also from PDDU, cut from red CS.  I used my Crop-a-dile to punch the holes at the top of the blue mat and set the eyelets, then strung it with some hemp cord.


Supplies available from Cutters Creek:

Friday, August 27, 2010

Card Making with Cricut by Chris P.

I bought this book from Cutters Creek a while ago and it has sat on my shelf as I played with SCAL. Then when I was rearranging my art space, I realized I had so many Cricut cartridges that were not being utilized; I turned to the book to give me some ideas and reacquaint myself with them. I chose four different styles and to protect copyright I won’t be able to tell you exactly how to make them, but I will tell what changes I made and products used.


Card 1 uses the ZooBalloo cartridge and was the simplest to make using one of the Creative Features with one small exception. The card cut perfectly, but I found that in order to fool my expression into cutting the envelope I needed to tell it that the mat was 24 inches and not 12 even though there was enough paper on the mat for it to cut.


Card 2 uses Walk in My Garden (one of my all-time favorite cartridges). I changed the colors of the papers from bright and springy to a more subtle combination and left off the sentiment. I think this would work for a sympathy card or a thinking of you card. I also used my cuttlebug: swiss dots for the bellyband and stickles on the butterfly (golden rod on the wings and waterfall and lime ice on the body).


Cards 3 & 4 use the Wild Card cartridge, which until today wasn’t even opened. (Really have to stop hoarding materials and use them!) Card 3 is probably my favorite and such a different style than my usual work. I followed the directions exactly and of course had to use my American Craft glitter paper on the front and some pink stickles on the heart inside. To cut the glitter paper I used a multi-cut of 2 and a pressure of 5.


Card 4 also follows the directions, but I found the directions inaccurate when cutting the small bird. I needed to discard their version and recut a second branch out of the teal paper. Then I just trimmed the bird off and glued it directly over the original brown branch. To add some depth to the frame and opening I used Tattered Rose distress ink to edge the edges and to pop the words and the birds I used Pine Needles distress inks. Ialso added some Patina stickles for the eyes and rounded all four corners. One trick to share: the card was wider than my Swiss dots folder, but after once running the paper through, I carefully realigned the dots and reran to finish the card. That flattened one row of dots, but working from the inside and using the end of a crochet hook I was able to repop those dots.

While I don’t own every cartridge highlighted in this book, I still have many options and ideas to choose from. There are 47 different card styles and with different papers and embellishments the options are endless and there are a few more I want to try. Check it out and let me know which ones you try.

Cutters Creek Resources:
Cricut Cartridges: Walk in My Garden, ZooBalloo, Wild Card
Tim Holtz Distress Ink Pads—Tattered Rose, Pine Needles
Related Posts with Thumbnails