Showing posts with label Kaisercraft. Show all posts

Saturday, November 30, 2013

The Key To A Better Future Starts With You!


That’s the theme for my tag.  I really had fun making this tag.  I basically stayed with one color.  And what made it so easy were all the products I had in my stash to get that monochromatic look.

OLYMPUS DIGITAL CAMERA

OLYMPUS DIGITAL CAMERA

(you can click on the photos to get a larger view)

What I did first was use some collage tissue paper by 7 Gypsies from the Journey Collection.  I used mod podge to adhere the tissue to a piece of card stock.  Then I used Glue N’ Seal by Inkssentials in a matte finish to protect the tissue paper from moisture.  I cut several strips of the tissue to make the small flowers. The steampunk padlocks were made using a silicone mold and paper clay.  I embossed the padlocks with Aged Ochre Embossing Powder by Stampendous.  The memo pins in the flowers are from Tim Holtz’s idea-ology line. I covered one of the pins also with Aged Ochre Embossing Powder.  The other memo pin holds the theme message created on the Silhouette.  The wooden Key is by KaiserCrafts.  I painted the key with three shades of *Distress Paints to get a patina look (pumice stone, rusty hinge, & peeled paint).  Then I added some *Distress Glitter (tarnished brass).

*The Distress Paints and Distress Glitter were purchased through a club. Kim often sells products by offering her customers a chance to join clubs where you pay a reduced cost over a 6 month period. The clubs help you build on your craft supplies.  Its an unique way to get the items that are popular.  You can join these clubs by being part of the Cutters Creek Yahoo Group.

Stop by the Cutters Creek Online Store and see all the awesome products Kim offers.  And if there is something you are looking for and it’s not available in the store you can contact Kim and she may be able to special order it for you.

Thank you for stopping by, Fran


Thursday, October 24, 2013

Belated Birthday Card by Deanna M

I had to make a birthday card for a co-worker's birthday that we missed. I started with a wooden flower embellishment from Kaisercraft. I painted the flower using Sailboat Blue Paint Dabber. Once the flower was dry I embossed the flower with some Bodacious Blue WOW embossing glitter embossing powder.

My card is a white card stock base cut and folded to make a 4 1/4" X 5 1/2" card. I added a blue mat cut at 4" X 5 1/4". My patterned paper is from my stash. The floral paper was cut at 3 1/2" X 3 3/4". The striped piece was cut at 1 1/2" X 3 3/4". I took a strip of the blue paper and used a scallop punch to create a little border between the two different papers. I also added a strip of blue to the upper half of my card. I then attached my flower embellishment using a craft glue dot. I stamped my sentiment on a piece of white card stock using some Memento Danube Blue ink. I used the ink pad to ink around the edges of the white card stock.

On the inside of the card, I added a strip of the floral paper and stamped the rest of my sentiment using the Danube Blue ink.


Monday, September 9, 2013

We’re Lick This Together by Fran


Today I bring you a card designed for Cutters Creek Online Store.

I really thought this stamp was so cute and the sentiment that comes with it “We’ll lick this together” can be used for so many things in one’s life.  I’ve been doing a lot of coloring using my Paint Shop Program but this time I dusted off my Prisma Colored Pencils and colored the image. Coloring can be so relaxing especially if it goes smoothly, lol.

And I did it again!  I just started coloring not even thinking if I had paper that matched the colors I used on the image.  Well I didn’t!!  But I improvised and I thought it still turned out nicely.  But it really makes more sense and easier to select your papers first and then match your colored pencils to the paper.  But I have to do things the hard way :)


OLYMPUS DIGITAL CAMERA


Card Details:  All papers used are from my stash:  Neenah, DCWV, and Recollections.  Card base and frames (Decorative Artisan) were cut using my Silhouette Portrait. The rolled rose (3D Paper rose); leaves (Leaf); and flourish (Miss Kate Flourishes) were also cut using the Silhouette.  The glitter dots were created using two colors of stickles to match the dress on the image.  The pearls are by KaiserCraft.  The one on the rose was left white to balance out the white card base.  The colored pearls were colored using a Copic marker V06, lavender.  I really thought it was a good match. Everything is held together using Glossy Accents and Tombow Mono Adhesive. The card measures: 4-3/4” wide (including the flourish).  And 5-3/4” long (including the leaves).

OLYMPUS DIGITAL CAMERA

Note:  Once I rolled the rose I took a pair of tweezers and curved the ends to give it more of a rose look.


Product Details Purchased from Cutters Creek Online Store

Stickles by Ranger (Lavender & Cranberry)

KaiserCraft Pearls (Champagne)

Copic Sketch Marker (Lavender-V06)

Inkssentials Glossy Accents

Tombow Mono Permanent Adhesive


There are so many awesome products sold by Cutters Creek.  Plus the owner, Kim has various clubs selling the most popular items.  The cost to join the clubs that normally run for 6 months depends on the product(s).

If you want to learn more about the clubs you can contact Kim here.  Or you can join the Cutters Creek Yahoo Group.


Thank you for visiting, Fran

Tuesday, June 25, 2013

Bookend Drawers with Lori

I am sad to announce that this is my last post with Cutters Creek. As my kids have gotten older, it seems like a lot more of my time is spent ferrying them places, and I just don't have the time to commit to Kim's Design Team in addition to my own business.  I will still be around the Yahoo group as time permits, and I hope you'll take the time to come visit me once in a while at my blog as well!

For today's project, I wanted to complete this Kaisercraft bookend that I got a while back.  My intention was to make it for my future expanded craft room to hold up my sketch books, but as soon as my daughter saw the pearl paint going on, she tried to claim it for her room.  We'll see who wins in the end, but I think it's gonna be me this time! 


This bookend is one of the wooden items from Kaisercraft that Kim can special order (just ask her!). I coated it first in a white pearl paint that I had in my paint rack.  Once the paint was dry, I used a Tim Holtz Distress Ink pad in Evergreen Bough to add sheer color to the paint while keeping its shiny look.


The chipboard boxes are easy to assemble using Glossy Accents. I hold them in place while I count to 60 or so in order to prevent them from popping open.  Once dry, I used more Distress Ink, in the Evergreen Bough, Spiced Marmalade, and Vintage Photo along the top edges of every drawer. I then
covered the front and part of the sides in paper using Scor Tape.  My papers are from a 6x6 My Minds Eye paper pad. (This one is not in the store, but you're sure to find one that you like!)  I trimmed them down to 2 3/4" high strips, and trimmed them to fit the "finger hole".  I adhered the papers to the front and about halfway around the sides using the 1/4" width of  Scor Tape.


I distressed the edges of the papers using a sanding tool; a nail file would probably work too.  Lastly,
I decorated the fronts with vintage buttons from my stash and some metal brads from the Graphic 45 "Staples" line. Kim does not carry these in the store, but she may be able to special order them for you.

I hope you enjoyed my final project here! I know I sure enjoyed making it, just like the rest of my projects for Cutters Creek.

Monday, June 17, 2013

Altered Box with Fran


OLYMPUS DIGITAL CAMERA
 
Well I went out of my comfort zone and decided I wanted to cover a paper mache box.  I haven’t done this in such a long time.  And looking at all the wonderful altered boxes the other DT members made I wanted to give it a try.  I used Graphic 45 paper, French Country. 
When I covered the bottom outside and inside I had to see how the lid would go on.  Well it was a little hard to get it on but I got  to fit and stretched it a little.   Considering this I did not decorate the inside of the lid.
I used three prints that I loved to cover the box and made a flower and leaves for the lid.  I added some bling to the side of the lid using red rhinestones by Kaisercraft.  Once I made the flower and leaves and shaped them to my liking I finger painted them with Stickles Glitter Glue (Star Dust).  After looking at the completed project I just felt it needed something else.  So I added wooden balls (3 of them) to the bottom for feet.  I painted the wooden balls using Adirondack Acrylic Paint Dabber in Willow (this color is so pretty).  It actually matches one of the colors in the leaves.  And everything is held together using Inkssentials Glossy Accents.
OLYMPUS DIGITAL CAMERA
The flower was made using Spellbinders  Donna-Salazar Rose Creations Die (S5-050)
OLYMPUS DIGITAL CAMERA

Note:  All underlined items can be purchased at https://www.cutterscreek.com/store/.  If there is something I used to create my project but is not sold in the store just contact Kim here and she may be able to get it for you.
Thank you for stopping by, Fran

Tuesday, June 11, 2013

Wish with Anne

Happy Friday friends!  I wanted to share with you today a card I did with a magnificent paper pack from Echo Park Paper.  It was a happy day on Monday when I went to the mail box!  I went into my craft room and made this card, all with the paper pack from "Charming".  I cannot tell you how much I adore this pack!  It is just awesome!  The Gold Rhinestones, and Green Self Adhesive rhinestones can all be found at the Cutter's Creek Store.  Hope you enjoy my post today!  Have a great weekend!


Thursday, April 25, 2013

Thinking of You Card with Lori

It seems that I am always needing some kind of a get well or thinking of you card.  (Maybe that's a sign of my increasing age, I don't know...) I like that kind of card to "feel" happy, and I decided some Secret Garden papers from Graphic 45 were in order.  Here's the most recent card I made:


I love the little cut-apart images G45 always seems to include in their paper pads, and these mini seed packet designs are just perfect and sunny looking. Layered on a couple of Spellbinders Nestabilities, this one was the perfect focal point for my 5x7 card.


I matted the focal image once, and popped that up with foam adhesive on a second matted blank.  I added Kaisercraft pearls to the four corners for a little something extra.


Lastly, I added some bling to my image using Copic Spicas in Orange, Lemon, Buttermilk, and Clear.  I hope you enjoyed my card today, and I hope my recipient has a sunny day after seeing it!

Items available at Cutters Creek:

Other Items Used:
  • cardstock
  • Spellbinders Lattice Rectangles
  • border punch
  • stamping ink & sentiment stamp

Friday, March 29, 2013

A New Techinque with Patterned Paper by Deanna M


So I recently signed up for an online card class that was taught by Kristina Werner and Jennifer McGuire called Pattern Play. It was a class about how to use patterned paper.

I wanted to share with you one of the techniques I learned in the class. For this technique the goal is transform patterned paper to give it an entirely new look.

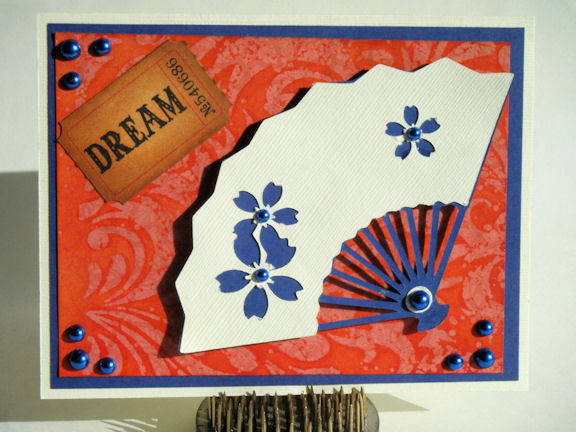
To make my card, I stared with a piece of white card stock cut and scored to make a 4 1/4" X 5 1/2" card. I added a dark blue mat cut at 4" X 5 1/4". For the orange mat, I stared with a piece of patterned paper cut to 4 1/4" X 5 1/2".  I used a Hero Arts Leaf and Branch background stamp (yes, Kim can get Hero Arts products, just ask) and stamped it on my patterned paper with some Versamark. I added some Clear WOW! embossing powder. Here is a before and after shot of the paper I used.

Next I used some Distress Inks in Rusty Hinge, Spiced Marmalade, and Ripe Persimmon and my blending tool to apply some ink to my embossed patterned paper. The embossed areas will resist the ink.  On the left is the paper I started with, on the right is what I ended up with after I embossed it and added the ink. The other step that I did based on what I learned in the class was to take my iron set on dry, medium heat and some printer paper and I laid the printer paper over my embossed patterned paper and ironed it a couple of times, moving the printer paper as I did this to take off the glossy embossing powder.


To finish my card, I cut a fan from the Cricut Pagoda cartridge (yes, Kim can special order this for you, just ask) at 3". I added it to my card front with some foam tape. Then I took a Tim Holtz ticket that said Dream and inked it with some Tea Dye and Vintage Photo distress ink ad added it to my card. Finally I added some dark blue pearls from my stash. Kim has a wide selection of pearls in multiple colors and sizes here in the store.

I hope you will give this technique a try. It is a great way to change up a patterned paper that may now be working for you.


Friday, March 8, 2013

Favor Boxes with Lori

Welcome back to another day of National Craft Month projects! I hope you're enjoying all of the projects, I know I sure am!

With three school-age kids, and involvement in several volunteer organizations, some of my favorite things to make are treat bags and favor boxes.  Luckily, there are a ton of them available on Cricut cartridges and as SVGs and PDFs for cutting. And you can make the same box in multiple styles just by changing the papers and embellishments.

For today's projects, I used Graphic 45 papers with a Cricut cartridge to make an elegant more "grown up" gift as well as a more fun Easter box suitable for a girl of any age. Change the papers & embellishments again, and you can make the same box into a masculine gift. I chose this particular box, because one of my favorite treats, especially for the grownups, are Ghiradelli chocolate squares.  The ones out now for Easter have a cute bunny on them, so I had to show him off!


The first box uses papers from The Olde Curiosity Shoppe.


For a simple but elegant touch, I tied some black mesh ribbon around the box lid and add a Kaiser Craft flower to the center. (These are not listed in the store, but Kim can order them.)


The frame is cut from American Crafts glitter cardstock. By the way, did you know that you can cut a frame using ANY shape on a Cricut cartridge?!  This box had a window in the top, and I found a matching shape on the same cartridge.  Just measure the approximate size of the window so you know what size to make the inner cut of the frame.  I needed my inner frame to be about 1.75", and I wanted the outer frame to be about 2".  So I moved my cutting blade in to about 1.5" in both directions on the mat to give myself a little extra room and hit the "Center Point" button.  Setting the size to 1.75", I cut the shape once.  Then I reset the size to 2" and cut the shape again.  Frame done! (Be sure to remember to turn off the Center Point  button when you are done.)

The second box uses paper from Once Upon a Springtime, which is no longer in the store.  You will find similar colors and beautiful patters in the Secret Garden papers.


For this box, I used the leftover negative cuts from my box lid and frame to make a plaque for the front of the box. I used a Studio G stamp from my stash and some Vintage Photo distress ink to stamp the "chocolate" bunny.  I also sponged on distress ink in Peeled Paint on all the edges of the box and lid.


For a more girly feel, I used Pow Glitter Paper instead of the Glitter Cardstock, because the glitter is finer.  I also added flowers and pearls.  The pink flower in the center is a Prima, the others were "built" from flowers and brads in my stash.  I added Stickles to the flowers as well.

Items available from the Cutters Creek store:

Other:
  • Artiste Cricut cartridge (box is cut at 2" high size for this project)
  • black mesh ribbon
  • white hemp twine (or use twine/ribbon of your choice)
  • flat paper flowers
  • brads
Thanks for stopping by today! I'd love to hear what you think of my project.

Friday, March 1, 2013

March Is National Craft Month!!! Graphic 45's Secret Garden with Kim B

Happy National Craft Month everyone!  For the first week of March, the Cutters Creek Design Team will be bringing you a project every day to inspire you to get crafting.  Hopefully we have a good mix of projects that will appeal to all levels and types of crafters.  I will be kicking off the week with a scrapbook page using the newly released Secret Garden by Graphic 45.  So, on to my project!


I first have to say, this new release is awesome!  I love French Country and Secret Garden by Graphic 45, although Secret Garden was really calling my name.  I used my new favorite subject for my page.  This is Oliver, the kitten I received from my mom for Christmas.  He is approx. 10 weeks old in this photo and one of my favorite photos to date.  (He is now 15 weeks old.)  Since Oliver is a boy, I decided to pick up some of the blue in the patterned paper I chose.  I did the matting using my favorite tool, Perfect Layers (see my coupon code on the right side bar to get a discount!).  I also used some lavender because let's face it, I like girly, girl stuff.  I cut a 4" piece for my border on the left and then I punched a few butterflies with the leftover piece and ran them through my xyron and added crystal glitter to them to tone down the paper a bit and add some bling so it would not take away from my border piece.  I added some pearls to each of them and used micro foam squares to attach them to my layout so they look like they are in flight.  Also, in the right top corner, I used a pocket and tag from the tags and pocket set that came out with this release to do some hidden journaling and inked the edges of both the pocket and tag a bit. 


I used my Perfect Pearls Mist to color some Color Me White Cutters Creek Branded Flowers and then attached some Cutters Creek Branded Micro Roses in purple to them.  I put down some rhinestone flourishes for some more bling!  I also attached one of the chipboard tags from one of the chipboard die cut sets, added some peel offs around the edge of the photo (you can find additional peel off stickers HERE), and then added a pretty blue bow.


I hope you enjoyed my project as I sure enjoyed making it!  Please leave a comment regarding my project and tell our readers what you are doing for National Scrapbook Month.


Wednesday, January 23, 2013

Sparkly Valentine with Lori

Today I have a bit of a non-traditional Valentine to share with you.  I'm using non-Valentine paper and a non-Valentine image, but by focusing on the red and adding some sparkle and some little added bits, it would make a fun Valentine for a special someone (who might be just a little bit grumpy, lol).

I started with the Miss Caroline Dilly Dally 6"x6" pad from My Mind's Eye, a Gorjuss Girl stamp from my stash (sorry, she's discontinued), and my Copic Markers and Spicas.  This is how it turned out:


 I can honestly say that I am in love with this little grouch!  I stamped my image in Memento Cocoa Brown on Xpress Blending Card, then chose the papers I wanted to use with her.  I wanted the red & white polka dots for a mat to put the focus on the red. Then I decided that the ticket pattern would make a great background and I could treat it like a kissing booth.  I cut a ticket shape from a Cricut Cartridge (I think I used Art Philosophy, but there are tickets on a number of cartridges), and stamped the sentiment with an alphabet set in my stash.  I didn't worry about making it straight, letting it be fun & child-like.  

I colored my image with Copic Markers to match the papers I chose (see list below).  Then I used Copic Spicas in Red and Lipstick to trace the letters on the tickets and go over all of the hearts on the girl's dress and her barrettes.  Finally, I trimmed all of my papers to size and added borders using a Chocolate Copic Spica.  I sponged the edges of the papers and the card base with coordinating inks and adhered everything, adding ribbon from my stash to the ticket paper. After assembly, I added my ticket using foam adhesive squares, and added some Kaisercraft adhesive pearls in Lemon.

 Here's an angle that shows how glittery the Spica Pens make everything!:


Products available from Cutters Creek:
Here's a closeup of the colored image, followed by a list of the colors I used:

Skin: E00, E02, E11, E13, YR000, R20
Hair: YR21, YR23, YR24
Shoes: E15, E37, E59
Clothes: BG11, BG15, BG18, R24, R27, R29
Shadow: W1, W3, W5

Now it's your turn!  Grab some papers  an image that may not say "Valentine's Day", but includes one color you can focus on to bring your theme through.

Sunday, December 23, 2012

Advent Calendar by Deanna M


Here is the advent calendar I made this year. The tree is from Kaisercraft and Kim special ordered it for me. (Thanks Kim!)

I painted the edges with some green acrylic paint as well as the little wooden pieces for the numbers. I used some Glue and Seal to adhere my paper to the front and back of my tree. The paper is from my stash. I added some Washi Tape by My Minds Eye for my garland.

Next I cut a star from the George and Basic Shapes cartridge at 2 1/2" and I covered the whole thing front and back with some WOW! Gold Rich Ultra embossing powder.

Next I cut the countdown to Christmas out with my Silhouette out of some red card stock and then embossed it twice using the Clear Gloss WOW! embossing powder.

Finally I cut my numbers out of red vinyl and adhered them to my wooden pieces.

Tuesday, September 18, 2012

Holiday Wishing Well by Deanna M

I have for you today a Home Decor or Gift Item. I saw this wishing well in one of the KaiserCraft Workshop magazines Kim sent me and I just had to have one. I thought this would make a cute table decoration for just about any event. You can use it as a bank if you wish.

As you can see, I decided to decorate mine up for Christmas. First I painted all the areas I wasn't going to cover with paper with my Bottle Green Adirondack Paint Dabber. I then traced around my pieces onto my patterned paper and attached them to the wooden pieces with some Matte Glue N Seal. I really  like this adhesive and find it doesn't wrinkle my paper like some of the other products out there. Once I had all my pieces covered with paper I sprayed them all with some Gold and Silver Glitter Dust. WOW! Do they sparkle, love it.


I let everything dry overnight and then put my pieces all together adhering them with a little Beacon 3 in 1 Glue and the tabs to help secure the pieces together. I really like this glue thought it can be a bit stringy. It is my go to glue with nothing else will work, like when I am glue wood, or metal pieces. It is a thick clear glue and dries clear. I added some Cabbage  Glitter Tape (just ask and Kim and order this for you) along the edge of the roof peak and the top and bottom of each side. Finally I hot glued a few small roses to each side of the well.

It was a lot of fun to do and really quick and easy. I know Kim can special order one for you if you are interested.

Friday, August 24, 2012

1 Sketch + 1 Paper Pad = 2 Looks with Lori

Do you ever wonder how you're going to use a single paper pad and manage to get a variety of looks from it?  Luckily, the 6" x 6" pads from My Minds Eye make it easy, and I have a few additional tips for you to carry it through.

I started with the Miss Caroline Dilly Dally paper pad and this weeks sketch from Mojo Monday.  --Just an FYI, I am the Queen of Sketches!  I love to take a sketch or pattern and use it to make my own creations. Sometimes I will just use it for the basic idea and completely change things up, but other times I will use it pretty much as is to make my life easier.  So, as I was recovering this week from a self-inflicted foot injury, I decided the easier my life, the better!  Here's the sketch I used for my two cards:

Using this sketch, I decided to make one masculine and one feminine card.  I left them sentiment-free for now so I can use them for whatever in the future.  Since the MME papers are double-sided, I used a single sheet of paper for each card (plus a small scrap for my flower center).  I made my cards 5" x 7", as  I prefer the larger size, and cut each panel to 3" x 5".  So, here are my two cards:


Even with the same overall design, kraft base, and distressing, I think they look pretty different.  The difference is all in the pattern paper I chose from the pad and the additional supplies I chose to use with them.

 For a more masculine look, I chose a more graphic paper, with a fairly simple pattern on the other side.  I added metal embellishments, which I distressed with a W5 Copic Marker.


I added trims in basic neutral colors, leaving frayed ends on the ric-rac and tying a simple knot in the hemp cord.  My additional embellishments were basic tickets, repeating the graphics from the paper without adding anything frilly.

For the more feminine look, I chose a floral pattern with a happy polka dot on the back side. I added some vintage crochet trim, sparkly glitter tape, and some paper flowers colored with Glimmer Mist.  The flower center is a clear button backed with a paper scrap and a few Kaisercraft Pearls in the center.  To enhance the feminine look even more, you could leave off the distressing and sponge the ink around the edges of the papers rather than the direct-to-paper techniques I used.  But I love a vintage look, especially paired with sparkly bling, so I kept the distressing. It reminds me a bit of my grandmother's kitchen!

I hope you enjoyed today's cards!  If you decide to follow my lead, I'd love to see your cards too.  You can snap a pic and send them through to the Cutters Creek Yahoo Group where we can all ooh and ah over them!

Supplies used for these two cards:

Tuesday, July 24, 2012

Etching with WOW! Embossing Powder by Deanna M

Today I have another video for you on the WOW! Embossing powder. This video shows you how to do the etching on the dress form skirt. I cut my dress from the Nifty Fifty's Cricut Cartridge at 6 3/4".

My finished card is a 4 1/4" X 5 1/2" white card stock base. I added a black mat cut at 4" X 5 1/4" and a black and white patterned paper cut at 3 3/4" X 5". I adhered my dress form with some foam tape to the front of my card.
Cutter's Creek Products used in this project: WOW! Embossing Powder Silver Ultra Wooden Manniquen by KaiserCraft Glimmer Glam-Special order item

Friday, June 1, 2012

Father's Day Blog Hop

Welcome to the Cutters Creek Design Team Fathers Day Blog Hop! We want you to hop along with us and play for the Grand Prize The objective for our Blog Hop this weekend is to inspire you to create something beautiful for all of the "Fathers" in your life! We have a bit of everything, from cards to gift ideas to layouts about our fathers!


Take an old pink and white frame, a bit of paint, and Graphic 45 paper and turn it into a Father’s Day gift. The first bit of transformation was painting the whole frame with black acrylic paint and then slathering it with Vintage Photo Distress Crackle Paint. Once it dries and cracks, rub some Black Soot Distress ink into the cracks and rub off the excess with a soft cloth. Next take your chipboard letters and glue them to Graphic 45 paper. These used two sheets from the Olde Curiosity Shoppe pads and some Aleene’s Quick Dry Tacky Glue. Once they were dry I inked the edges using Gathered Twigs for the word Pappy and Peacock Feathers for the We and U, and I used Glossy Accents to add some shine to the bottom letters.

I then chose a coordinating cardstock (also from the Olde Curiosity Shoppe set) and covered the mat. I used Scor-Tape to adhere it to the backside. To add a bit more depth I stuck a piece of Inkssentials Foil tape sheets to a remnant piece of cardstock and cut it with Tim Holtz’s On the Edge Steampunk.  I used several different alcohol inks to age it and then glued to the mat with Glossy Accents. Next I took one of the Kaisercraft Wood Flourishes (hearts) and covered it with Ruby Diamond Range Flower Soft using the Flower Soft Glue.

While everything was drying, I punched a few butterflies out of leftover foil tape and Graphic 45 papers, layered them and glued them around the mat. I used mini glue dots to hold Pappy angled from the frame to the mat, Glue Dots pop dots for the letter w, and on everything else I used glossy accents again.  I needed one more embellie and turned to my Tim Holtz tickets and his stick pins, colored them with all three of the new Distress Inks (Peacock Feathers, Shaded Lilac, and Squeezed Lemonade—these are absolutely gorgeous colors!), and pushed it into the mat.

Now for the details about the Grand Prize I mentioned at the beginning of my post. Check it out! What an awesome prize don't you think???


To qualify you must leave a comment at every stop along the way. Comments should be made by Midnight, June 3rd. We will use Random.org to select a winner so be sure to check back with us on Monday to find out if you have won!

Don't forget to leave a comment here before you hop along to  Kim's Blog! Thanks for hopping by!

Friday, May 11, 2012

Mother's Day Card by Deanna M


I recently received my new Tim Holtz Spring Distress Inks. Wow, are they beautiful. I love them. I decided to make my own background paper using some Adirondack Acrylic Paint Dabbers. I started with a piece of white card stock cut to 3 3/4" X 5". I used a flourished background stamp from Hero Arts (yes, Kim can get this for you, just let her know) and inked it generously with the Snow Cap acrylic paint. Once the paint dried I used my sponge applicator to apply the ink to my paper. I love how it turned out.

For my card, I started with a piece of white card stock cut and folded to 4 1/4" X 5 1/2". I added a gold patterned paper mat from My Minds Eye. Then I added the background paper I made. To finish the card, I added one of the Kaisercraft Dress Forms. I painted my dress form with Eggplant Paint Dabber. I then spritzed it with some Dragonfly Glimmer Mist. Once that dried I spritzed it lightly with some Pearl Glimmer Mist.


I cut a mat for my sentiment from the Elegant Edges cartridge at 1 1/4". I used the same ink colors to ink up my shadow mat and then inked the edges with the Lilac color and stamped my sentiment with the lilac color. I added some pearls to finish my card.

Here is a short video showing you how I did the background paper.


Wednesday, May 9, 2012

Mother's Day Card by Fran


Today I am sharing the Mother's Day card I created for Cutters Creek. The main focus of the card is the adorable stamped image by Sarah Kay called Barbette Sewing. What a sweet image and so much fun to color. I colored her using Prisma Colored Pencils using the Gamsol technique. I used the Spellbinders Nestabilities to frame her. I shaded the two layers of nestabilities with Chalk-Shimmers (its sold out) but it is really fun to use. The papers are by Echo Park called This & That Graceful Double Sided. They are gorgeous! And I even added a zig zag stitch around the border using yellow thread. I used seam binding for my ribbon and dyed it to match one of the colors in the paper using the Distress Ink Re-inkers. The roses are from my personal stash however I colored them using Liquid Pearls Rouge and Gold Pearl. This medium is amazing to work with because you can use it right from the bottle, paint with a brush or dilute it with water for a shimmery look. Check out the cute scissors (these come from my personal stash). And I covered them with Stickles Gold Glitter Glue. Cutters Creek is now carrying them and they are from Kaisercraft. Go and check them out to see all the beauiful shapes. The corners on the card front and the scalloped borders on the inside of the card were made with the Rounded Banner Trio by Die-namics. The inside of the card uses the same paper from the This & That Graceful Double Sided 6x6 pad. And I punched 1/2 inch circles from the same paper to form a scallop border around the oval shape for the sentiment. This card can also be used as a Birthday Card too.
Below are photos of the front and inside of my Mother's Day Card. And all the different mediums that worked so well together to get these results.


Have a wonderful Day! Fran
Related Posts with Thumbnails