We are well into the busy birthday months for me so today I have a birthday card for a co-worker. I started with a white card stock card base cut and scored to make a 5" x 6 1/2" card base. I added a light aqua mat cut at 4 7/8" X 6 3/8". I used a new Anna Griffin embossing folder called Eleanors Lace and embossed a piece of lavender card stock cut at 4 3/4" X 6 1/4" using my eBosser.
Got to love my eBosser. I love not cranking and it just flows through smoothly.
I then used a new die I also go as part of my package with the Anna Griffin embossing folders. It was cut out of a dark turquoise card stock from my stash. I adhered my mats together with some Scotch Adhesive Dot Roller Adhesive. Kim doesn't stock them in the store (hint, hint) but she can order them and the refills for you.
Okay, so call me crazy, but I really wanted that die cut image popped up! So Kool Tak 3D Clear Foam on a Roll to the rescue! I love this product and it is one of my favorite products I have bought from Cutters Creek!!
The advantage to using the Kool Tak Clear Foam is that it is clear. I also love the one on the roll so I can cut any size I need. It worked perfect to pop up my die cut.
Finally, I cut a small square piece of what card stock and used a border punch on it. Then cut a lavender piece of card stock that embossed my sentiment with Wow! embossing powder. I used Port and Brandy from a limited edition set called Girls Nigh Out! Love this embossing powder.
Want me to let you in on a little secret. I could not emboss with embossing powder if my life depended on it!! UNTIL I found the Wow! embossing powder.. So this too, is one of my favorite products I have ever purchased from Cutters Creek. If you haven't tried you, you should order a few colors and give it a try. You won't regret it!
So pop on over to Cutters Creek and get your supplies ordered and start crafting!!
Showing posts with label ASI (Kool Tak) clear foam squares. Show all posts
Monday, April 7, 2014
Thursday, February 27, 2014
Aged to Perfection! by Deanna M
With the coming of Spring (we all hope) comes for me a lot of birthdays. So, I decided I better get a jump start on some of the cards I am going to need.
I recently heard of a sunburst or starburst card and of course I had to give it a try. I started with 4 different pieces of patterned paper cut 1 1/2" X 4". Take each strip and cut it diagonally corner to corner to form two triangles. Lay your triangles out point side down and decide on the pattern you want.
Next, cut a piece of scrap card stock 2 3/4" X 5". First thing to do is to find the center of the paper along the 5" side. I drew a line from top to bottom to mark my center. Next I covered the entire piece of card stock with some Glue n Seal. Starting from the center of your card stock you start applying your triangle pieces being sure to let the hang off of each end of the paper a bit and be sure you are covering the entire piece of card stock. You may have to adjust your placement to be sure the corners are covered. One done allow it to dry and the cut all the overhanging excess paper off.
Next I adhered the entire panel to another piece of white card stock cut at 3 3/4" 5". And, Joy of Joy's I got to try out my new mini perfect layers when I cut my black mat. I used the 1/8" side and it was fast an easy to get a perfectly centered mat behind my image layer. I also added a 1/2" x 5" piece of black card stock to the front of my card.
I then cut a butterfly out at 2 3/4" using my Cameo and some green and black card stock. Before adhering the layers together I decided I wanted to glitter my butterfly. I pressed the black layer of the butterfly into my Versamark embossing pad and sprinkled it with some Ranger Sticky Embossing powder. I think everyone should have some of this embossing powder it is awesome, because, when you heat it up it goes from the white powder to shiny and becomes sticky. I then sprinkled the layer with some of the Black Soot Distress Glitter and then briefly heated the whole thing again to make sure the glitter was permanently adhered. It was quick and easy with the Sticky Embossing powder and I don't have glitter falling off my project. If you would like some of the Sticky Embossing powder shoot Kim and email and she can special order for you. It is so worth it. The Distress Glitters are also a special order item and they are all gorgeous. Some of the prettiest glitter I've seen.
Once I had the butterfly done, I adhere the two layers together with some Scotch Quick Dry Adhesive. I adhered the butterfly to my card front with some of the Clear 3D foam pads. I stamped my sentiment with some Memento Tuxedo Black Ink and added some bling to finish it off.
Thanks for visiting. I hope you will get in touch with Kim to get your Sticky Embossing powdered ordered. You won't regret it!
Monday, December 30, 2013
Thanks SEW much! by Deanna M
Now that the gift giving is over it is time to thank all our loved ones for the generosity. Today I have a fun play on words Thank You card.
I started with white card stock cut and scored to make a 4 1/4" X 5 1/2" card base. I added a dark blue mat cut at 4 1/4" X 5 3/8" then my patterned paper mat cut at 4" X 5 1/4". All of my patterned paper is from an American Crafts 6" X 6" paper pad called Family Ties. Check with Kim, I am sure she can order it for you.
I wanted to create a patchwork quilt background for my sewing machine. So, I cut a piece of golden paper at 3 1/2" X 4 3/4". I then cut each of my little squares at 1 1/16" X 1 1/2". I used a bit of Scotch Quick Dry Adhesive to adhere the squares to my gold mat and then ran a zig zag stitch around all the squares. I then adhered that to my card using some foam squares.
I cut my sewing machine from the Nifty Fifties Cricut Cartridge at 3". After adhering the layers together, I added it to the front of the quilted mat again using foam squares. My sentiment is stamped with some Memento Tuxedo Black ink.
Wednesday, September 25, 2013
Happy Halloween by Deanna M
Today I have for you a Halloween card that I made using the new Tim Holtz Stamps and Framelit dies.
For my card I started with a 4 1/4" X 5 1/2" black card stock base. I used my Graphic 45 Steampunk Paper for my card as well. The rust color mat is cut at 4" X 5 1/4" and the black dotted paper is cut at 3 3/4" X 5". (the dotted paper is the reverse of the rust paper, got to love two sided paper)! Even though it is sold out in the store, just ask, and Kim can order you some and there are some other great pads, check out the 12 Days of Christmas paper pad.
For my web, I embossed each layer with some WOW! embossing powder in Black Glint embossing powder. The spider was embossed with the Black Ebony embossing powder. I stamped and cut the web out of white card stock. To age it just a bit I sprayed it with some Old Lace Glimmer Mist.
I layered the cuts of the web with some foam dots between the layers. I then added a foam dot to the very center of my layered spider web and then adhered it to my card front with some Scotch Quick Dry Adhesive. To finish the spider I added some purple stickles to his body. My sentiment is from the same stamp and die set. I stamped it with some Memento Tuxedo Black ink.
I used my eBosser and the Magnetic Shim to cut my die images out. One of Kim's customers asked if we could do a video showing how to use this shim and the embossing mat. So while working on this project I shot a short video to show you how I use the shim. I hope it will help answer some of your questions.
For my card I started with a 4 1/4" X 5 1/2" black card stock base. I used my Graphic 45 Steampunk Paper for my card as well. The rust color mat is cut at 4" X 5 1/4" and the black dotted paper is cut at 3 3/4" X 5". (the dotted paper is the reverse of the rust paper, got to love two sided paper)! Even though it is sold out in the store, just ask, and Kim can order you some and there are some other great pads, check out the 12 Days of Christmas paper pad.
For my web, I embossed each layer with some WOW! embossing powder in Black Glint embossing powder. The spider was embossed with the Black Ebony embossing powder. I stamped and cut the web out of white card stock. To age it just a bit I sprayed it with some Old Lace Glimmer Mist.
I layered the cuts of the web with some foam dots between the layers. I then added a foam dot to the very center of my layered spider web and then adhered it to my card front with some Scotch Quick Dry Adhesive. To finish the spider I added some purple stickles to his body. My sentiment is from the same stamp and die set. I stamped it with some Memento Tuxedo Black ink.
I used my eBosser and the Magnetic Shim to cut my die images out. One of Kim's customers asked if we could do a video showing how to use this shim and the embossing mat. So while working on this project I shot a short video to show you how I use the shim. I hope it will help answer some of your questions.
Friday, September 6, 2013
Party Hardy by Deanna M
I have another masculine birthday card for you today. This card is for my son who will turn 23 on Saturday.
I was actually working on a different project for today's post but when I received my new 6" X 6" paper pads from Cutters Creek from the paper club I am in, I had to use some. We received two new Bo Bunny paper pads, the one that these papers are from is Trail Mix and the other pad is called Key Lime. Don't these names just call out to you? They sure did to me. Interested? Join the Cutters Creek Yahoo group to find out more about the clubs or contact Kim through the customer service link in the store to ask about doing a special order.
On to my card. I started with a piece of kraft card stock cut and scored to make a 4 1/4" X 5 1/2" card base. I cut a brown mat at 4 1/8" X 5 3/8", I just wanted a little of the card base to show. I wanted the patterned papers to be the star. The green patterned paper was cut at 4" X 5 1/4". When I saw this herringbone wooden pattern, I thought it would be perfect to serve as an anchor for my mug, to act like a table top. That piece is cut at 2 1/2" X 4".
My mug is from the Silhouette store and was cut at the default size. I adhered all the layers together using my Scotch Quick Dry adhesive. Before adding the foam to the top of the mug, I first added some white liquid applique and then lightly covered that with some clear glitter from my stash. I set it aside to dry. Once it was dry I used my heat tool to heat up the liquid applique which causes it to puff up. I thought it really brought the foam to life. I then added the foam to my mug using some clear foam tape.
I then adhered my mug to my card from also using the clear foam tape. To finish my card I stamped my sentiment using some Memento Morocco ink. I received this particular color while in the Memento Ink Pad club through Cutters Creek.
I bought my son a couple of bottles of beer for his birthday along with a beer stein and then a gift certificate to a local restaurant so he and his girlfriend can go have dinner together. I am hoping to etch his name on the stein if I get a chance. I thought the card went along with the theme of his gifts. Thanks for visiting today. I would love if you left a comment letting me know what you thought.
Cutters Creek Products Used:
Scotch Quick Dry Adhesive
Liquid Applique
Memento Ink Pad
ASI Kool Tak Foam Pads
I was actually working on a different project for today's post but when I received my new 6" X 6" paper pads from Cutters Creek from the paper club I am in, I had to use some. We received two new Bo Bunny paper pads, the one that these papers are from is Trail Mix and the other pad is called Key Lime. Don't these names just call out to you? They sure did to me. Interested? Join the Cutters Creek Yahoo group to find out more about the clubs or contact Kim through the customer service link in the store to ask about doing a special order.
On to my card. I started with a piece of kraft card stock cut and scored to make a 4 1/4" X 5 1/2" card base. I cut a brown mat at 4 1/8" X 5 3/8", I just wanted a little of the card base to show. I wanted the patterned papers to be the star. The green patterned paper was cut at 4" X 5 1/4". When I saw this herringbone wooden pattern, I thought it would be perfect to serve as an anchor for my mug, to act like a table top. That piece is cut at 2 1/2" X 4".
My mug is from the Silhouette store and was cut at the default size. I adhered all the layers together using my Scotch Quick Dry adhesive. Before adding the foam to the top of the mug, I first added some white liquid applique and then lightly covered that with some clear glitter from my stash. I set it aside to dry. Once it was dry I used my heat tool to heat up the liquid applique which causes it to puff up. I thought it really brought the foam to life. I then added the foam to my mug using some clear foam tape.
I then adhered my mug to my card from also using the clear foam tape. To finish my card I stamped my sentiment using some Memento Morocco ink. I received this particular color while in the Memento Ink Pad club through Cutters Creek.
I bought my son a couple of bottles of beer for his birthday along with a beer stein and then a gift certificate to a local restaurant so he and his girlfriend can go have dinner together. I am hoping to etch his name on the stein if I get a chance. I thought the card went along with the theme of his gifts. Thanks for visiting today. I would love if you left a comment letting me know what you thought.
Cutters Creek Products Used:
Scotch Quick Dry Adhesive
Liquid Applique
Memento Ink Pad
ASI Kool Tak Foam Pads
Labels:
ASI (Kool Tak) clear foam squares,
Bo Bunny,
Deanna M,
Liquid Applique,
Memento Ink,
Scotch Quick Dry Adhesive
Monday, August 26, 2013
Aged to Perfection by Deanna M
My stepdad is turning 83 this week so I though I should get a card made for him. This is what I came up with.
Cutters Creek Products I Used:
Glossy Accents
Distress ink
Foam Squares
My card base is Kraft card stock cut and scored to make 9" x 4" card base. I like using Kraft card stock as base for my masculine cards. it seems to go well with the masculine colors I use for my cards. Now here is a tip for you. I really wanted to use patterned paper from my Swagger paper pad (Kim can order this for you) but it was a 6" X 6" paper pad and my card base was bigger. What I did was I took 2 pieces of the blue paper and cut them to 3 3/4" in width. I left one at 6" and cut the other one to 2 3/4" and adhered both pieces to my card base. Next I took two different patterned papers and cut them in varying heights but all at 3 1/2" wide. I then alertnated the papers leaving small gap between them. No seam from the blue show through and I was able to use my smaller paper on a bigger card.
My bottle was cut at 7" from the County Fair Cricut cartridge. (Kim can order that for you too). I cut the base out of some yellow card stock, I inked the cork top with some Tim Holtz Gathered Twigs Distress Stain. The bottle was cut out of some dark from the Tim Holtz Kraft core card stock. I covered the entire green bottle with some Glossy Accents and let it dry overnight. Once the bottle was dry I used my Glossy Accents to adhere all my layers together. I then wrote on the label Est. 1930 the year he was born.
The last thing I did was cut a tag using Tags, Bags, Boxes, and More. I cut my tag out of Kraft card stock at 2". Once cut I spritzed it with water and wrinkled it up then smoothrd it back out and hit it with my heat tool to dry it. After it was dry I distressed the edges lightly with a pair of scissors then inked it with some Tea Dye distress ink. I stamped my sentiment with some Vintage Photo distress ink I rubbed some kitchen twine with my blending tool to give it an aged look then tied the sentiment tag do the bottle. I adhered the bottle to my cardbase with some foam tape and added a glue dot to the back of the tag so it would stay where I wanted it too.
All of the adhesives I used in the making of my card I got while I was part of Kim's adhesive club. It was a great way to stay supplied with some great adhesives and maintain my budget. One final word on Glossy Accents, my son was repairing the little wooden slides for a couple of dresser drawers. He wanted to use some wood glue to help hold the new slides in because the screws were short. He also wanted to add some adhesive to the cracked slides. However we couldn't find the wood glue. Glossy Accents to the rescue. The glossy accents and a couple of wood clamps and a half hour and presto, repair complete.
Cutters Creek Products I Used:
Glossy Accents
Distress ink
Foam Squares
Friday, August 16, 2013
Simple and Fun card by Cindy
Hi everyone,
Today, I am sharing a card that I made using products from the Cutters Creek Store. Many of the products that I used for my card, I received by joining clubs at the Cutters Creek Store Yahoo Group. If you click on the link, you can join the group and get information on how to join the many clubs available. What is nice about the clubs is you can grow your collection and get new supplies monthly in an economical way.
For this card I used the 6x6 paper pad Authentique Renew and the Anna Griffin embossing folder Matellase. My girl was cut from the Playtime Cricut cartridge and I used the Simple Sallies Peachy Keen Stamps for her face. She was attached to the card using clear foam adhesive squares.
I hope that you like my card today. Thanks for visiting.
Cindy
Friday, August 2, 2013
Country Living Card
Hi everyone,
Today, I am sharing a card that I made using products from the Cutters Creek Store. Many of the products that I used for my card, I received by joining clubs at the Cutters Creek Store Yahoo Group. If you click on the link, you can join the group and get information on how to join the many clubs available. What is nice about the clubs is you can grow your collection and get new supplies monthly in an economical way.
The items that I used from the clubs include the Authentique Remembrance paper pad (6x6 paper pad), Anna Griffin Embossing Folder Rosa (Anna Griffin Embossing Folder club), 3D clear foam pads (adhesive club). I also used the Country Living Cricut cartridge and the Lacy Labels Cricut Lite Cartridge.
Be sure to watch the video to see how it all gets put together.
Thanks for visiting.
Cindy
Sunday, July 7, 2013
Fabulous Day Card by Deanna M
I received some new goodies from Kim the other day and OF course I had to play a little this weekend. This is what I made.
I started with some green card stock cut and scored to make a 4 1/4" X 5 1/2" portrait card base. I add a yellow mat cut at 4" X 5 1/4" then I added another green mat cut at 3 3/4" X 5". I then cut another piece of yellow card stock at 3 1/2" X 3 1/2 and ran it through my eBosser and embossed it with my new Anna Griffin Matelassé embossing folder. (I love this one, and Kim can and will order if for you, just ask her. You can contact Kim through the store site here.)
I adhered all my layers together with my ATG gun. After I adhere the embossed yellow mat, I added a piece of Washi Tape to the base as a border. (OK, I admit, this is my free gift from Kim at the end of the club, but she can likely order this too.)
Next I stamped a small piece of card stock cut to 2" X 2" with my flower image with some Memento Tuxedo Black Ink. I colored my flower image with some chalk. I then went back and using a blue water colored pencil to add a bit of shading. I blended everything together with my Dove blending pen. I matted my image on another piece of green card stock cut to 2 1/4" 2 1/4" and adhered it to my card front with some Kool Tak clear foam squares.
Finally I added my sentiment using some VersaMark embossing ink and the new Saraha WOW! Embossing Powder I just received from Kim. The new Desert Sand Limited Edition set. LOVE IT!!! So sparkly. Okay, so now confession time, I really had bad luck and did not enjoy using embossing powders on my projects until Kim started selling the WOW! embossing powders. The others I tried to use just didn't melt and give me the results I expected. The WOW! embossing powders melt beautifully. If you haven't tried them yet, you should, you won't regret it.
I would love to know what you think of my project and this embossing folder. I think it is beautiful and am so excited that I now own it.
I started with some green card stock cut and scored to make a 4 1/4" X 5 1/2" portrait card base. I add a yellow mat cut at 4" X 5 1/4" then I added another green mat cut at 3 3/4" X 5". I then cut another piece of yellow card stock at 3 1/2" X 3 1/2 and ran it through my eBosser and embossed it with my new Anna Griffin Matelassé embossing folder. (I love this one, and Kim can and will order if for you, just ask her. You can contact Kim through the store site here.)
I adhered all my layers together with my ATG gun. After I adhere the embossed yellow mat, I added a piece of Washi Tape to the base as a border. (OK, I admit, this is my free gift from Kim at the end of the club, but she can likely order this too.)
Next I stamped a small piece of card stock cut to 2" X 2" with my flower image with some Memento Tuxedo Black Ink. I colored my flower image with some chalk. I then went back and using a blue water colored pencil to add a bit of shading. I blended everything together with my Dove blending pen. I matted my image on another piece of green card stock cut to 2 1/4" 2 1/4" and adhered it to my card front with some Kool Tak clear foam squares.
Finally I added my sentiment using some VersaMark embossing ink and the new Saraha WOW! Embossing Powder I just received from Kim. The new Desert Sand Limited Edition set. LOVE IT!!! So sparkly. Okay, so now confession time, I really had bad luck and did not enjoy using embossing powders on my projects until Kim started selling the WOW! embossing powders. The others I tried to use just didn't melt and give me the results I expected. The WOW! embossing powders melt beautifully. If you haven't tried them yet, you should, you won't regret it.
I would love to know what you think of my project and this embossing folder. I think it is beautiful and am so excited that I now own it.
Wednesday, June 19, 2013
Get Carried Away with Mindy
I have gotten carried away with Disney projects the last few months and it was nice to sit down and make a card again. I decided to play some more with my cricut since I had a couple of cartridges I hadn’t opened yet. I used my Imagine to make this card so that all I needed was a couple pieces of white cardstock.

I layered different patterns of paper on my cardfront and then used some 3D foam pads to pop my rhino up from the background. I love his chevron print glasses.
I printed some more cardstock for the inside of the card and added my sentiment.
That’s it a super quick and easy card. Don’t get too carried away that you forget to do what you enjoy.
Supplies Used
cardstock
ATG tape
Cricut Imagine
I layered different patterns of paper on my cardfront and then used some 3D foam pads to pop my rhino up from the background. I love his chevron print glasses.
I printed some more cardstock for the inside of the card and added my sentiment.
That’s it a super quick and easy card. Don’t get too carried away that you forget to do what you enjoy.
Supplies Used
cardstock
ATG tape
Cricut Imagine
Thursday, April 18, 2013
Asian Gift Box with Lori
Today I have a different kind of gift box to share with you. The other day I used a new cut file for an Enchanted Lantern, and I decided I just HAD to make the open-window version, but with a twist. I basically closed up all of the windows and turned the "lantern" into a gift box. With Mother's Day fast approaching, a small box like this is always handy for an elegant presentation of a gift card to a favorite store or lunch spot. At any rate, I was excited to measure the window openings and discover that the "trading card" images on my 8x8 Grraphic 45 paper pad fit almost perfectly. Here's what I did:
Even though the lantern itself is not an Asian style, I think it lends itself wonderfully to these papers. And would also look wonderful with many other G45 papers, due to its simple style. Since I was planning for Mother's Day, I chose 4 images and words I thought fit the theme well. I used the Pagoda Cricut cartridge to cut the Kanji words to match each picture. The "photos" are all from the 8x8 paper pad, and the script paper forming the main box of the lantern is from the 12x12 pad.
For some added dimension, the "photos" were adhered behind the windows with two layers of the ASI Kool Tak clear adhesive squares. I also added a frame around each opening with Distress Stickles in Fired Brick. I added additional Stickles dots along the base of the lantern on all sides.
As a helpful hint, since the Kanji characters are fairly intricate and I was cutting at only 1", I cut them from vinyl instead of paper. It made them easier to cut and adhere to the shadow base. I then added more Stickles over them to tie in with the rest of the lantern. The shadow is cut from metallic cardstock. The American Crafts Specialty Cardstock - Foil is a great option for this.
Here are the Cutters Creek supplies I used for this project:
| "Mother" |
| "Wisdom" |
| "Happiness" |
| "Beauty" |
As a helpful hint, since the Kanji characters are fairly intricate and I was cutting at only 1", I cut them from vinyl instead of paper. It made them easier to cut and adhere to the shadow base. I then added more Stickles over them to tie in with the rest of the lantern. The shadow is cut from metallic cardstock. The American Crafts Specialty Cardstock - Foil is a great option for this.
Here are the Cutters Creek supplies I used for this project:
- Graphic 45 papers in 12x12 and 8x8
- Scor Tape in 1/8"
- Glossy Accents (to adhere Kanji characters to lantern)
- ASI Kool Tak clear adhesive squares
- Distress Stickles in Fired Brick
- black cardstock, suede texture
- gold metallic cardstock
- Pagoda cartridge for Cricut
- Cricut indoor vinyl
- Enchanted Lantern cutting file from Creations by AR
Sunday, April 7, 2013
Happy Birthday Card by Deanna M
I was watching some youtube videos yesterday and saw a project that someone did using a white card base and a white mat with just a little bit of color added as embellishments. I wanted to try making my own version of that card and this is what I came up with.
My card base is white card stock cut and scored to make a 4 1/4" X 5 1/2" card base. My card is a portrait card, I cut a white card stock mat 4" X 4" and ran it through my eBosser and embossed it with the Script Texture Cuttlebug embossing folder. I love my eBosser, it does such a wonderful job embossing and die cutting and I love that it is all electric, no cranking to help my white mat stand out from the white card base a bit I laid it on a piece of paper and using my Cool Gray 1 Copic Marker I traced around the outside edge of the mat using the brush tip. This applied a faint line of the light gray marker around the outside edge. I used my Scotch Quick Dry adhesive to adhere my mat to my card base.
Now for my pop of color. I wanted to add a flower to my card and found this one in the Silhouette store. I used the print and cut feature to color it and cut it out. The center of the flower was originally a heart which I didn't want, so I cut a small circle instead. Again, I adhered my layers together with Scotch Quick Dry adhesive. I added my flower to my card front with some Kool-Tak Clear foam adhesives. To finish my flower I used my Buttercup Liquid Pearls to add some tiny pearls around the outer edge of my green flower center. That is what I love about Liquid Pearls, I always have the right color and size of pearl I want because I can make whatever size I need.
Finally I added a White Opal pearl using Liquid Pearls again, in each corner of my mat to help anchor it. My sentiment is stamped in Rose Bud Memento ink. This was a super quick card to put together but I am really happy how it turned out.
Labels:
ASI (Kool Tak) clear foam squares,
Cuttlebug Folder,
Deanna M,
eBosser,
Liquid Pearls,
Memento,
Scotch Quick Dry Adhesive
Wednesday, March 20, 2013
A Ladies Diary–Graphic 45 Paper Collection
I get this 8x8” paper pack in my mailbox from Cutters Creek. The paper is by Graphic 45 (one of my favs) called A Ladies Diary. I look at each sheet of paper and the prints are beautiful on both sides. Yep it is double sided. A card makers dream.
I ponder a while and wonder what papers will I use. And what image will I need to find that will go with the theme. And then color it. Then it hit me! I will fussy cut one of the images from the paper and it will be my focal point.
I chose three prints to make my card. And added black paper from my stash as the accent color.
Surprisingly what I thought would be a hard task to pull it all together started to flow so easily. It took me a long time to make the card because I added die cuts, flowers, butterflies,flourishes using only the 3 pieces of paper from A Ladies Diary and the black paper from my stash.
Below the photo will be all the details on what I used to make the card. And you can click on the photos to get a closer view.
Sidebar: It couldn’t happen at the worse time but the battery to my digital camera died. No it didn’t need re-charging it died and was not fixable. New one ordered. So Kim of Cutters Creek reminded me I could take pictures with my iPad Mini. My first time for this but what made it worse I had to sync it to my computer first
. When it rains it pours. The photo images do not do the card justice but you still see how awesome the card turned out. I don’t think I will be able to let go of this one 
Recipe: Graphic 45 A Ladies Diary Designer Paper, All items in black is Neenah Paper (Classic Linen in Black), Spellbinders Nestabilities Timeless Rectangle (Front & Inside), We R Memory Corner Chomper (Deco Corners), EK Success Retro Flower Punches, Martha Stewart Butterfly Punch, Silhouette Portrait (black flourishes and leaves), Black Diamond Stickles, Scotch Quick-Dry Adhesive, and Kool Tak Double-sides Permanent Tape (awesome).
Remember if there is something you need or want and its not available in the Cutters Creek Store just contact Kim.
Thank you for stopping by,
Tuesday, February 19, 2013
Washi Tape Die Cutting by Deanna M
I wanted to share the technique I used to make the flower on this birthday card. For all of you in the Cutters Creek Washi Tape club or Adhesive Club (even better, both!) should like this one as it uses Washi Tape and Inkssentials Glue n Seal. I love this adhesive.
A co-worker is redoing her bathroom in black and white tile and her favorite color is red so I decided to incorporate all 3 colors into a birthday card for her.
My card base is white card stock cut and folded to make a 4 1/2" X 6" card base. I added a black mat cut at 4 1/4" X 5 3/4" and then another white mat cut at 4" x 5 1/2" and finally a black patterned paper mat cut at 3 3/4" X 5. My flower is die cut using a sizzix die and I embossed the sentiment with some WOW! Opaque Bright White embossing powder. (it is currently sold out but I am sure Kim will be adding more to the store soon). I added a black stitched white ribbon and tied a knot bow on it.
For the flower I cut a piece of white card stock big enough to fit my die and lightly coated it with some Inkssentials Glue n Seal. I then added rows of Washi Tape to my card stock in a diagonal pattern (just because I wanted to).
Here is a short video showing you how I did this.
On my original sample I cut the excess Washi Tape off, in the Video I did not. However I think it is better to cut the excess of.
To finish my flower I added some Kool Tak clear adhesive foam squares between my layers of my flower as well as to adhere the flower to the card. For the center of my flower I first added a 3d Glue Dot to the center. Then I took another 3d Glue Dot and dipped into some Strawberry Ultra Fine Flower Soft and attached it to the glue dot already in the center of the flower. To finish the card I also added some white faux stitching with my white gel pen.
As I said in the video, I think this would be a great technique for a background mat on a card as well. I sure hope you will give this technique a try.
A co-worker is redoing her bathroom in black and white tile and her favorite color is red so I decided to incorporate all 3 colors into a birthday card for her.
My card base is white card stock cut and folded to make a 4 1/2" X 6" card base. I added a black mat cut at 4 1/4" X 5 3/4" and then another white mat cut at 4" x 5 1/2" and finally a black patterned paper mat cut at 3 3/4" X 5. My flower is die cut using a sizzix die and I embossed the sentiment with some WOW! Opaque Bright White embossing powder. (it is currently sold out but I am sure Kim will be adding more to the store soon). I added a black stitched white ribbon and tied a knot bow on it.
For the flower I cut a piece of white card stock big enough to fit my die and lightly coated it with some Inkssentials Glue n Seal. I then added rows of Washi Tape to my card stock in a diagonal pattern (just because I wanted to).
Here is a short video showing you how I did this.
As I said in the video, I think this would be a great technique for a background mat on a card as well. I sure hope you will give this technique a try.
Labels:
ASI (Kool Tak) clear foam squares,
Deanna M,
Flower Soft Ultra Fine,
Glue and Seal,
Washi Tape,
WOW Embossing Powder
Saturday, December 8, 2012
3D Christmas Card
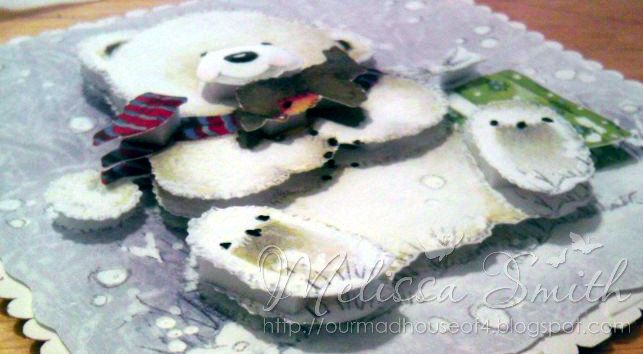
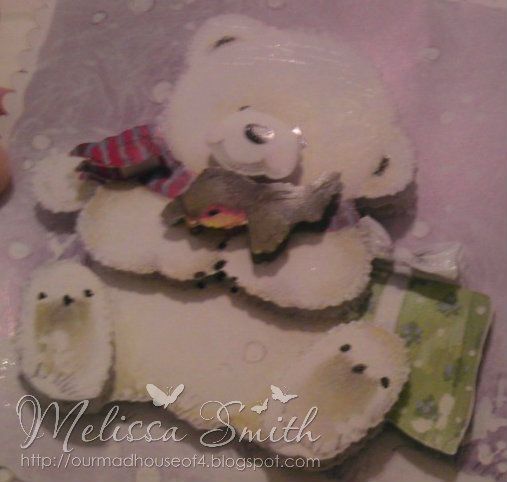
Here is a simple Christmas card made from the 3D White Bear. It is a very simple and quick card.
After I used the Foam pads to "build it up", I used my pitch black and clear spicas and my cool grey copics to add a little depth and glimmer to the images. I wish the pictures would show much it made it sparkle for snow.
Overall, I love the final product and how fast it went together. I am definitely going this route for future Christmas cards as it is a huge time saver and still has a personalized touch!
Enjoy!
Image: 3D White Bear
Embellishments: Spicas - Pitch Black and Clear, Copic Sketch
Other: ATG, Foam Pads
Stash: Paper
Friday, November 30, 2012
Nativity Card
Hi! With Christmas right around the corner, I have been feeling a little overwhelmed with the daily schedule my family has and have been dreading making my cards this year. I found myself trying to find alternatives to my usual elaborate cards as I just don't have the time with an active infant trying to crawl everywhere!
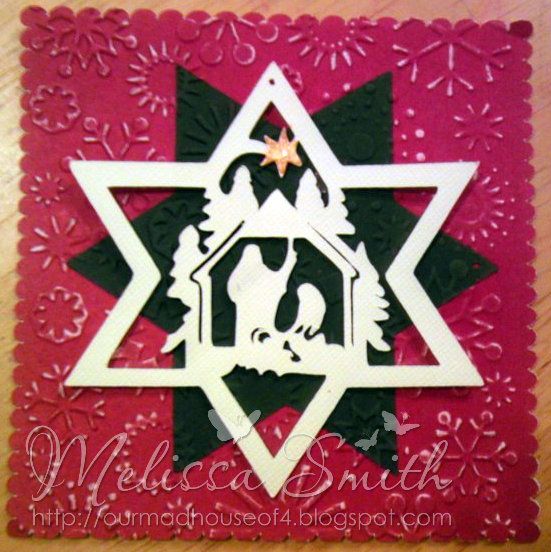
Here is a very simple Christmas Card I made using scraps found in my paper drawer with an SVG image I found here. I love all of his designs and they are so versatile with every project I have been making lately. I than used my cutting machine to cut out the base, the star and the nativity scene.
I adhered the star to my base and ran it through my Big Shot with the Cuttlebug Snowflakes folder and than used a file to make the white stand out a little more. I used clear mounting tape to place my image for a 3D effect. I thought about lining up the image with the green star, but I found I liked the layered look better. I think it makes it pop a little more. For the final touch, I added Liquid Pearls for the star.
thanks for looking!
Stash: Paper
Monday, October 8, 2012
Bird Song Card with Lori
I cut the fan shape, greenery, and all of the flowers using my Cricut and the Pagoda cartridge. The circles are also cut using the Cricut; I used the Center Point feature to cut the circle around the portion of the geisha image I wanted. I outlined everything using a gold leafing pen, and embellished with brads and ribbon from my stash. Everything is adhered using ATG tape and the Kool Tak clear foam adhesive pads. Finally, I used my Copic Spica pens to glitter up lots of stuff! I used the red on the designs on the fan, clear to outline the flowers on the background paper, and both colors on my focal image. It's very difficult to get the glitter to show up in photos, but this one shows it the best:
I used clear on the white portion of the kimono nearest her neck, then red along the next strip. I even used clear on the pink flowers in the image.
I hope you enjoyed today's card! I'd love to hear your comments on it.
Friday, June 22, 2012
Window Card by Deanna M
I saw the idea for this card last December in a card making magazine and have been wanting to make one. My card base is white Bazzill Smooth card stock cut and scored to make a 4 1/4" X 5 1/2" card base. My patterned papers for the curtains is from the My Minds Eye paper pad Miss Caroline All Dolled Up. Using the Plantin Schoolbook Cricut Cartridge I cut the scallop at 1" and then trimmed it to fit across my card. My "curtains" are cut at 1 7/8" X 4". I ran the paper through my paper crimper to get that pleated look. For my window I cut the image from the Christmas Solutions cartridge at 3" out of the Mod Squad Cut and Emboss Paper by Core'denations. I then cut the view for my window from a scrap from the Echo Park Summer Paper pad from last summer. I adhered the view down straight to my card. I attached the window with some of the ASI 3D Clear Foam. I also attached the curtains and the valance with some foam tape. To finish it off, I added a couple of bows.
Labels:
ASI (Kool Tak) clear foam squares,
Bazzill Simply Smooth,
Core'dinations,
Cricut,
Deanna M,
Echo Park Paper,
My Minds Eye
Sunday, April 22, 2012
Birthday Card by Deanna M
I have for you today a birthday card I made for a friend to give to her Mom. My card base is a piece of green cardstock cut and scored to 4 1/4” X 5 1/2”. I added a mat from the Mod Squad Cut and Emboss paper pack cut to 4” X 5 1/4” and then a patterned paper mat from the Prima Botanical paper collection cut to 3 3/4” X 5. I then used Elegant Edges to cut a mat for my butterfly at 3”. I used the same paper as my first mat for the base layer of the mat for the butterfly. I then used a piece of paper from the Whitewashed Cut and Emboss paper pack for the top layer. I ran that layer through my Cuttlebug and embossed it with Sizzix Embossing folder called Dots and Flowers Embossing folder and sanded it so the colored green core showed through (and yes, Kim can order this for you. You get two folders in the package).
My butterfly on this card is once again one of the laser cut embellishments by Kaisercraft. I am so loving these embellishments. (And, yes Kim can order these for you too!) They are so easy to work with, are not too think and add a great dimension and elegance to a card. For the butterfly I started off by using my craft mat and rubbing some different colors of Distress Ink on my mat, spritzing with water and them placing the butterfly in the ink on my mat. I used Persimmon, Concord Grape and Broken China Distress Ink. I let it dry for a bit then spritzed it with similar colors of glimmer mist. Again I let that dry and then added some Glimmer Glam in Violet and a Copper color. Once again I allowed that layer to dry. I then added some Glimmer Glaze to the antenna’s and around the orange areas of the butterfly. I then went back with a bit more Persimmon distress ink. I let all that dry overnight (only because it was bedtime). The final layer I added some Pearl glimmer mist. This butterfly is so iridescent looking in person. I adhered my the butterfly to my mat with some of the ASI Kool Tak tape clear gel foam tape.
The flower I added to the card is a Cutter’s Creek Gardenia. The flower was actually yellow but it just didn’t go with the card as well as I likes, so I spritzed it with some Honey Dew Mist glimmer mist, and problem solved. It softened the butter yellow of the flower and gave it a light green color which went much better with my card. I then stamped my sentiment with some Rusty Hinge Distress Ink. Finally I added some Copper Pearl liquid pearls to the tip of each antenna. Sure hope you have enjoyed my project and that I have inspired you to get out your goodies and make a project.
Labels:
ASI (Kool Tak) clear foam squares,
Cutters Creek Branded Flowers,
Deanna M,
Elegant Edges,
Glimmer Glam,
Glimmer Glaze,
Glimmer Mist,
Kaisercraft,
Liquid Pearls,
Prima,
Tim Holtz Design Ruler
Tuesday, March 20, 2012
M-Bossibilities Tutorial by Deanna M
I just received a couple of the M-Bossiblities by Spellbinder and of course had to try them out and wanted to share how fun these are.
| Splendid and Simplicity M-Bossiblities |
I embossed a couple of the 4 1/4" X 5 1/2" Cut and Emboss paper packs from Core'denations. What great papers, I love them and they are the perfect size for cards. Look at the great colors you get.
| Top side |
| Colored Side |
Here is a short video to show you how you can use the M-Bossiblities and the Cut and Emboss paper. There are several different types of the Cut and Emboss paper I am showing you just two same with the M-Bossiblities folders. Be sure to pop on over to Cutterscreek.com to check out the assortment available through the store.
Labels:
ASI (Kool Tak) clear foam squares,
Core'dinations,
Cut and Emboss,
Deanna M,
Ice Stickles,
M-Bossiblities
Subscribe to:
Posts (Atom)