Showing posts with label Tim Holtz Embossing Folder. Show all posts

Monday, October 1, 2012

An Experiment with Mirrored Paper by Chris


I cut a mirrored sheet to fit in a Tim Holtz Alterations embossing folder (but there are a ton from Cuttlebug that would work just as well), and ran it through my ebosser using the basic embossing sandwich. It made a deep, crisp emboss.

To highlight the embossing I took off the protective sheet and swiped the front of the card with Stazon Ink and set it aside to dry. I had a sliver of silver left over so I inked and embossed that with the word poison from another embossing folder.

I matted the larger piece and used my Perfect Layers tool to cut at 1/8, and the sentiment on a piece of orange ribbon along matted both the image and the sentiment were then mounted on a 5x7 cardbase. I did have some trouble keeping the mirrored piece glued down. Not sure if the embossing was so deep that it didn’t have enough of the sticky back touching the cardbase, or if the size was a bit heavy for the front of the card, but to secure it I used some Gloo adhesive. Next time I’m going to try some alcohol inks. What about you?

(Note: this surface is truly a mirrored surface—trying to take a photo and not having too much light or me reflected in it proved too much of a challenge for me--J. I hope you can see its beauty even with my poor photography skills.)

Tuesday, May 31, 2011

Tutorial Tuesday - Faux Metal with Lori

Welcome to another installment of Tutorial Tuesday!  Today I have an awesome embossing folder technique for you - faux metal!  Do I sound excited?  I totally am; this is one of my all-time favorite techniques to use with embossing folders.  In fact, I got so carried away I made three cards!

First, let me say that, yes, I know there are metallic papers and such available to buy out there.  But I can guarantee that they look nothing like this!  This technique uses just a few supplies:

  • metallic ink pad (my samples are shown in copper, gold, and silver)
  • Glimmer Mist in complementary colors (more details below)
  • heat gun
  • embossing folder of your choice (Cuttlebug or Tim Holtz/Sizzix)
  • cardstock (more details below)
OK, let's jump in!  First, choose your cardstock based on the type of metal you want.  For gold I use light brown; for silver, light gray; and for copper, dark orange.  Next, lightly spray the cardstock with one or two colors of glimmer mist:

Based on what I had on hand, I used Pearl for the gray CS, and Bronze for the gold.  (I used both Bronze and Patina for the copper, not shown.)  After the CS is damp, place it right-side-up on the embossing folder and emboss, then dry with the heat gun.

After drying the cardstock, I used my metallic ink pads and rubbed color over the cardstock directly from the ink pad.  You will want to cover the cardstock pretty well, but unevenly if possible, so some areas are more "inky" than others.  Finally, dry the ink with the heat gun.


At this point, it isn't going to look like anything very special, just some inky cardstock.  So we are going to spray on more layers of Glimmer Mist for depth and highlights.  You can also use a metallic white ink for some added highlights; just be sure to dry with the heat gun between Glimmer Mist and ink pad!


For the gold, I used both Bronze and Chocolate Glimmer Mist.  For the silver, I used Pearl and Denim Blue.  For copper, I used Bronze and Patina, not shown.

Gold
Silver
 OK, now for one of the finished products!
For this card, I made my copper sheet using the Tim Holtz/Sizzix Steampunk embossing folder.  I love how the Patina Glimmer Mist really makes it look aged!  And the different amounts of ink covering the cardstock really give this piece some depth.  I just loved this panel so much, that I had to use it on an entire card front!  My patterned papers are from the Graphic 45 Steampunk Debutante paper pad.  My main image uses a technique called "cracked glass", but that's a story for another post, lol.


Thanks for stopping by today - we look forward to seeing you again next time!  If you'd like to see the other two cards I made, they are on my blog here.

Thursday, May 26, 2011

Mandie's Butterfly Card

Have you ever had one element that you made just to try out a technique and end up loving it sooooo much that you then create an entire project around it? When I experiment I usually make something I like and put it in the "Someday" pile... and for most of that stuff Someday hasn't come yet. But when I was playing with my embossing folders and Glimmer Mist I created a super cute paper that I LOVED and had to create a project with it! Add my Cricut (of course), the GORGEOUS Echo Park For The Record papers and a few odds and ends and I came up with....


... this beautiful card! So here's what I did to create this. It all began with a one of the Tim Holtz Texture Fade Embossing Folders. The one I used is called Patchwork Card which isn't currently in the store but a great substitute would be the Postal Folder. First I embossed a sheet of plain white cardstock which I had cut to fit the folder (4 x 5.5 if I remember right). Then I grabbed my Yellow Daisy, Walnut Gold and Coffee Shop Glimmer Mists and started spraying. I dried everything with my Heat Tool and then used the Tim Holtz Walnut Stain Distress Ink with my sponge dauber to bring out the embossing even more. Then I tore the edges off my paper down both sides and inked those too.


Then I grabbed my Echo Park For The Record 6 x 6 Paper Pad and started flipping through it. I will admit, I LOVE the smaller paper pads for card making not only because of the scaled down size but also I don't feel like I'm *wasting* a whole sheet of 12 x 12 paper that I may want to use in my scrapbook one day (yes, I'm a TOTAL paper hoarder)! Anyway, I selected a few sheets and decided that I wanted a big butterfly for the front of my card. I used the Once Upon A Princess Cricut cartridge to cut out my butterfly and inked all the edges of my cuts with the Walnut Stain Distress Ink. I actually used a makeup sponge to get into the small spaces on my cut. Then I added the patterned paper to the background of my card and decided to adhere my Glimmer Misted Patchwork Card at an angle. I trimmed it to fit and inked all the way around the card. To adhere my butterfly I used some Pop Up foam only on the body of the butterfly so the wings can flap. I inked my Baker's Twine a bit and wrapped it around my card 3 times and tied it off. Then I decided to add antenna to the butterfly with a scrap of the twine. I wish I had thought of it before I had adhered the butterfly but I just tied a knot in it and stuck it on with a Glue Dot. Then I stamped "Fly" on a scrap and matted it with another scrap after inking them both. Finally I added my green buttons with more Glue Dots. I love the way my "experiment" ended up and I can't wait to play more!

Monday, May 16, 2011

Howdy Card by Mandie

Howdy, ya'll! Thanks for dropping by the blog today! Since my card has a sort of Western theme I thought I'd get in the spirit of things! LOL! I'd like to share this fun card that I made.


I had so much fun creating this one! I started with a 5x6.5" card blank. I cut a sheet of black card stock to 5"x6.5" to cover the front. Then I used the Echo Park's For the Record 6x6 paper pad and cut my papers down. The floral is 4.75 x 2.5" and the newsprint is 4.75 x 3.75". I stamped out the Cheeky Shooter image using my Memento Tuxedo Black Ink. I didn't have a red marker that matched my papers so I decided to stamp my image on a piece of red and white polka dot paper from the paper pad and cut out the elements that I wanted red (hat, scarf and skirt). Before I glued them down I colored the rest of my image. For the skin tones I used Copics E000, E00 and E11 and the cheeks are R20. I used Bic Mark-It's to color the rest because I'm still trying to build my Copic collection. I used my Quickie Glue Roller Pen to adhere the red paper to my image. Then I trimmed my white sheet to about 3x3.25" and inked the edges with Tim Holtz Walnut Stain Distress Ink. Then I added the black mat to make it pop even more. I also inked all of my papers before adhering them. I decided that I wanted to add a bit more texture to my card and normally I'd grab some ribbon. Since we are talking about Cuttlebug techniques this month I decided to pull out my machine! I used the Gridlock Texture Fades embossing folder and embossed my strip of gold cardstock (I think it's 2" wide). Then I inked up a sponge dauber with more Distress Ink and swirled it over the pattern and the edges. Then I used the alphas from the For the Record Collection (not currently in the store, but I bet if you asked real nice Kim could get it) to spell out "Howdy". I still wanted just a little more... something, so I decided to add some Bling! I pulled out my i-rock and added some black gems under the letters. I am thrilled with how this card turned out!!!

Cutters Creek Shopping List:
Echo Park's For the Record 6x6 paper pad
Cheeky Shooter
Memento Tuxedo Black Ink
Copic Markers: E000, E00,E11 and R20
Quickie Glue Roller Pen
Tim Holtz Walnut Stain Distress Ink
Gridlock Texture Fades
sponge dauber
i-rock Gems

Monday, March 21, 2011

Pinwheel Card with Melissa

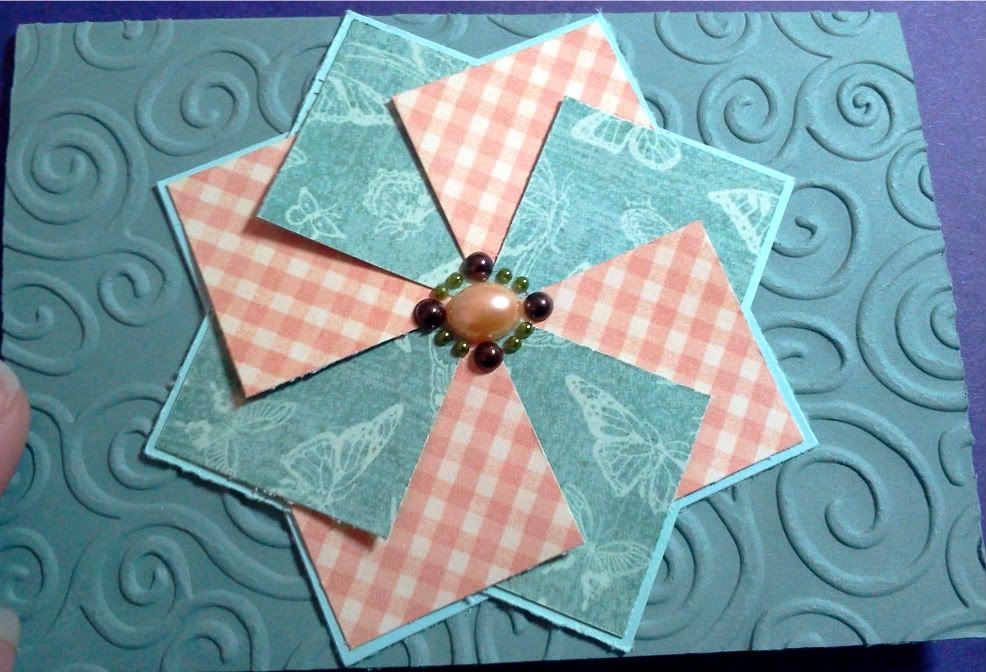
So today I am sharing a super easy card with no stamping involved; took me less than 10 minutes from start to finish!  You absolutely have to try this!  It is simple and quick for mass production or just a quick card on the go.  I got the idea from my good friend KellyRae.  She got it from here (video included).  


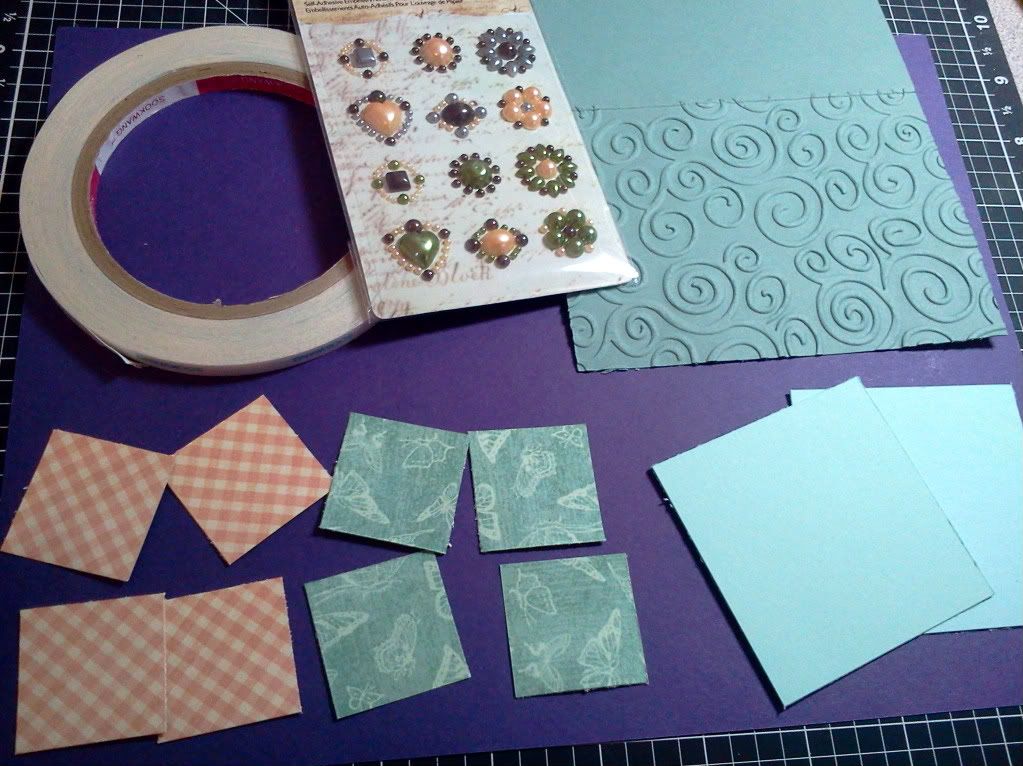
Here is what I started with:
A base card of 3.5" x 5" -slightly smaller than the standard A2 card already run through my big shot with the Swirls Embossing Folder.
8- 1 1/4" squares in two different patterns
2- 2 5/8" squares as my base
Embellishment -Prima Say It In Pearls


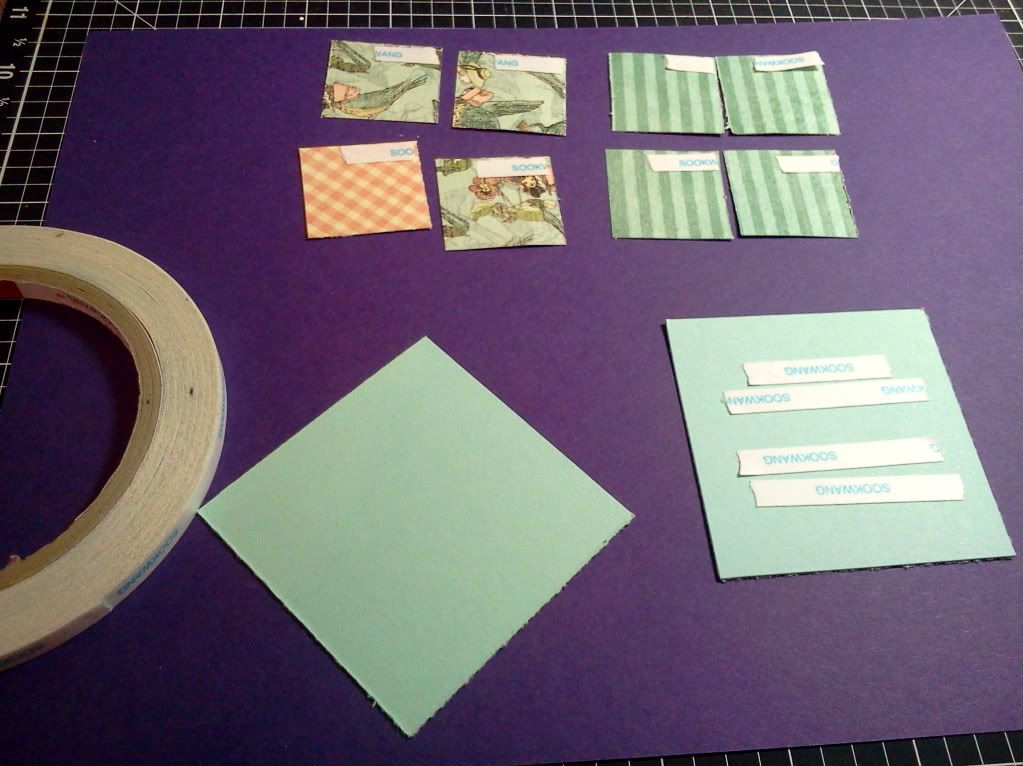
Start with putting your adhesive on the papers; make sure the tape goes in the same corner for the 1 1/4" squares on the back side of the paper.  As you can see in my pic, I didn't follow the steps on the first try :o)

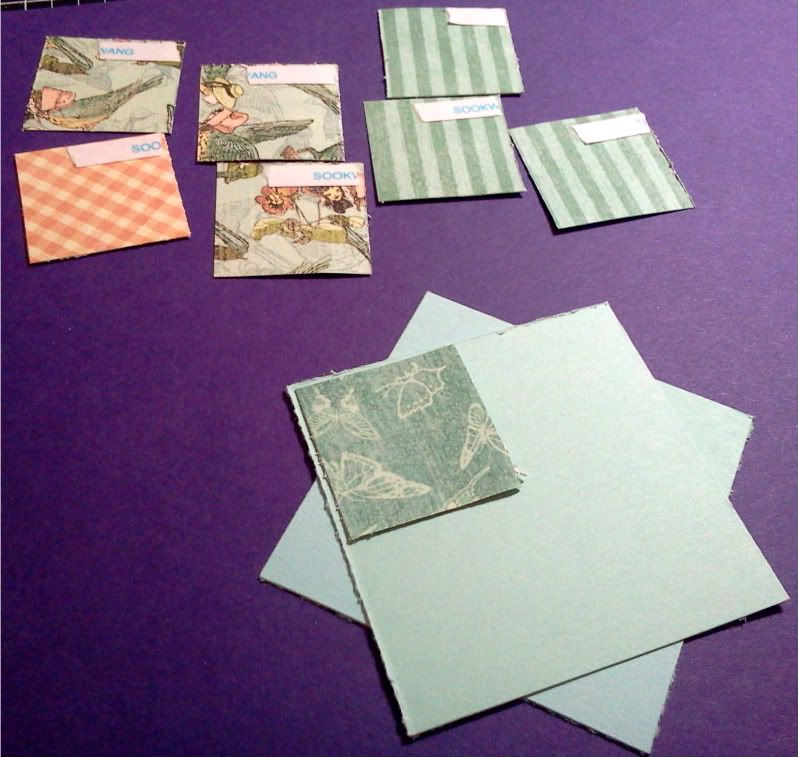
Next add tape to one 2 5/8" square and place the other square across it, twisted.  


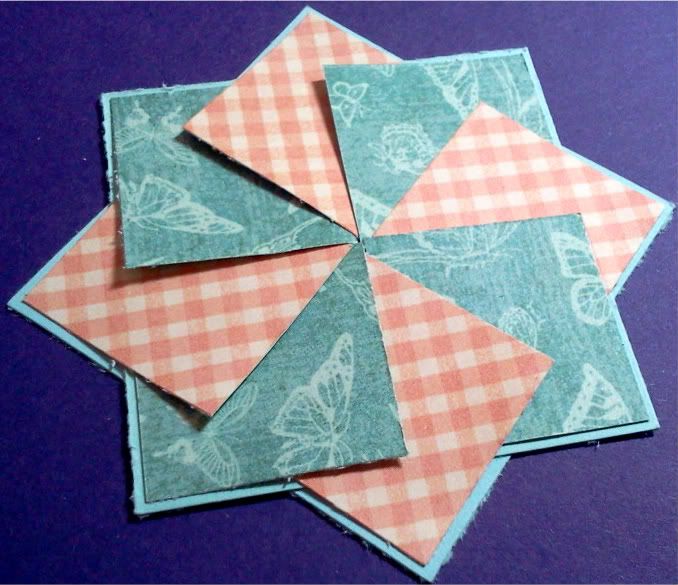
Now add your first square.  The rest is easy!  Just alternate the color or pattern papers aligning it with the corner of the base card stock.  For the last piece, you simply lift the edge of the first piece you laid down and work the last piece in so it is layered.  Very, very easy to do.

And here is the end result of the layering.  Hmm, I think I need to change my trimmer blades . . . . . 


I than added an embellishment in the center and used Scor-Tape again to adhere it to the card base.  I chose the smaller card base of 3 1/2" x 5" as I wanted the Pinwheel to dominate the card front so all of my stamping can be on the inside.  Think it worked?  


Photobucket

Stamps: none!
Ink: none!
Other: Scor-Tape, Paper Trimmer

Thursday, January 27, 2011

Chunky ATC Chris-styled

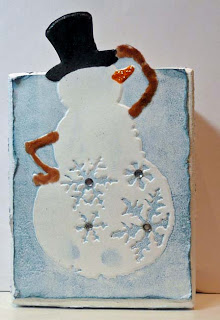
Start with a scrap piece of wood 2.5x3.5x1.5. (An online friend sent me the wood canvas but if you have access to 2x4 boards and someone to cut them for you, you’re golden!) I painted the entire block with acrylic white paint and set it aside to dry. (Actually she sent me four pieces and I have three more to work with—yippee!)


While the paint was drying, I took out my two Tim Holtz Alterations Snow Flurries and Snowman embossing folders. Using Stormy Sky Distress Ink and my brayer I inked the “indented” side of the folder and carefully laid the white paper in the folder and ran it through my Big Shot Express. Love how the background was now blue, even though I got some blue on the snowman—hey snow has a bluish tinge, right. In the snow flurries folder I placed a piece of acetate and ran it through the machine. By now my snowman was dry enough to cut out. I knew he was taller than my block, so I measured up to 3.5 and then cut around his arm and head. Using Cinnamon Toast Fun Flock I glued it along the snowman’s arms. I filled in his carrot nose with Orange Peel Stickles. Then, I dabbed the top part of the image with my Embossing Magic powder, colored in the hat with my embossing pen, sprinkled it with black embossing powder, and heated it with my heat gun. I set this aside to dry. Next I used the Distrezz-it-All to rough up the edges and added some jewels in the center of the snowflakes.


I then started on side two by cutting out ‘tweety’ from Stretch Your Imagination at 2.5 inches first in brown and then red. I cut off the red bird and glued it on top of the brown one. I cut a sled from the Wild Card cartridge at .5 inches—the base out of red and the layers out of tan scraps. I sketched a hill on the block and then used Stormy Sky, Tumbled Glass, and Weathered Wood Distress Inks to ink in a sky and stamped ‘Let It Snow’ on the bottom with a blue pigment ink.


While I waited for that to dry, I kept throwing away ideas for the edges. I then thought of all the little scraps of snow I saved from when I punched my Christmas Thank You cards (I never throw anything out) and decided to use Glossy Accents to randomly glue them on all four edges. Once that was done I was ready to put the chunky ATC together. I used Scor-Tape to adhere the Snowman and Glossy Accents to attach the bird and branch. After that I drew a few lines with my White Liquid Applique pen and heated it to add some dimension. I left that dry over night before attaching my sled using pop up dots and the embossed acetate sheet, using some Glossy Accents in the corners to hold it in place.

One ATC down, three more to go; what about you?

Cutters Creek Shopping List:
Tim Holtz Alterations Snow Flurries and Snowman embossing folders
Stormy Sky, Tumbled Glass, and Weathered Wood Distress Inks
Brayer
Acetate
Cinnamon Toast Fun Flock
Orange Peel Stickles
Embossing Magic
Black embossing powder
Distrezz-it-All
Glossy Accents
Scor-Tape
White Liquid Applique pen

Thursday, December 16, 2010

Sandi’s Christmas Card


I love the look of this card; it was easy to create with a simple layering effect and looks great. Simply create your card base from green cardstock. Use the Corner Chomper to round all 4 corners. Emboss the white cardstock with the Tim Holtz Snow Flurries Embossing Folder and use decorative scissors to make a border. Adhere this to your base with Tombow Mono Adhesive. Next use the Lace Punch to create a border strip and adhere. Cut a large green circle and a smaller white circle with the Spellbinder Scallop Circles Set. Stamp "Tis the Season" on the white circle with the Justrite Stamper 1 5/8 . Layer with Pop Dots and adhere. I left the inside blank so I can personalize each one.

You can purchase these products from Cutters Creek:
Tim Holtz Snow Flurries Embossing Folder
Diamond Stickles
Justrite Stamper 1 5/8
Pop Dots
Spellbinder Scallop Circles Set
Corner Chomper
Tombow Mono Adhesive
Other Supplies:
Decorative scissors
Martha Stewart Lace paper punch
Related Posts with Thumbnails