Showing posts with label Copic Markers. Show all posts

Friday, June 20, 2014

For You by Fran

OLYMPUS DIGITAL CAMERA

DETAILS:

The card measures 5-1/2” square.   Background done in Chalks by Pebbles, Inc. The bench was cut from real wood paper and then stained using Vintage Photo Distress Ink.  The bow in the corner was cut using the Silhouette Portrait and colored with a Copic  Marker.  The flowers were created using a gold frame sticker and water color paper.  Colored the flowers using water color paints.  The Magnolia Image was colored using Copic markers.  Rhinestones on the flower centers and small sentiment tag are from my stash.  Used Pop-up Adhesive dots behind flowers, bench and Magnolia image.  And Glossy Accents is holding the bow in place.

Items you can purchase from the Cutters Creek Online Store:

Distress Ink Pads

Copic Markers

Magnolia Images

Rhinestones

Pop-up Adhesive Dots

Glossy Accents

Highlighted items can be special ordered through Cutters Creek.  Contact Kim here.

Thank you for stopping by and I hope I inspired you in some way today.

Fran

Sunday, May 25, 2014

The Reader

OLYMPUS DIGITAL CAMERA

(I went overboard with the edge coloring but it grew on me)


Details:  The card measures approx. 5” by 6”.  The shaped card is from the Silhouette Store.  I used Neenah 80# Solar White card stock.  The image is by Saturated Canary called “Reader”.  I used Copic markers to color the skin.  And Promarkers for the rest of the image.  The shading was done using Tea Dye Distress Ink Pad.  And the glitter dots were created using Stickles, Platinum.  The sentiment is from the Internet and created using Paint Shop Pro.  And I added Glossy Accents to the glasses for effect.


Stop by the Cutters Creek Online Store for some awesome crafting accessories.  And if you have any questions about the products you can contact Kim Bush.

Thank you for stopping by, Fran

Sunday, April 27, 2014

Have A Sweet Day by Fran


The image is by Sassy Cheryl and I remember going to a drug store as they were called back when I was young.  I would love to sit at the counter and order a Root Beer Float.  One time I bought a banana split and two of my friends and I shared  it.  Oh it was so good!  And my favorite Sundae was a Chocolate Nut Sundae with a cherry on top.  Did I stir up any memories for any one?

OLYMPUS DIGITAL CAMERA

(the little white dots on the stool are glitter)


I love round shaped cards.  It was so much fun coloring this image.  I used both Copic markers and Promarkers.  My card measures 5-1/2”.  The card base, printed papers, elements (gears and light bulb) are from my stash.  The sentiment was created in Paint Shop Pro.  I used Glossy Accents to hold things together.  And Shabby Shutters Distress Ink was used to color the edges of the all layers on the card.  I used a mini ink blending tool to apply the shabby shutters.

Items that can be purchased from the online store:

Copic markers

Glossy Accents

Distress ink pad (Shabby Shutters)

Mini Ink Blending Tool

You can purchase these items from the Cutters Creek Online Store and other neat things too.  And don’t forget to stop by the CC DT Blog to view many projects from the Design Team.  I would love if you left a comment to let me know what you thought of my card.  I love reading them.  You could even ask a question and I will get you an answer about any of the products used on my card.  And if you have any questions about the online store you can contact Kim here.

Have a Sweet Day!  Fran

Sunday, April 13, 2014

Love Is In The Air! By Fran


OLYMPUS DIGITAL CAMERA

OLYMPUS DIGITAL CAMERA

The digital stamp is called First Love by Sassy Cheryl.  And so I took it one step further and made it mine with Love Is In The Air!  I was going for whimsy but maybe I over did it. But any who I still like how it turned out.

My Recipe:  My card is 4-3/4” by 6”.  All elements were cut on my Silhouette machine except for the butterflies (MS Punch).

The background paper is watercolor paper.  I used the new Tim Holtz Spritzer (my new favorite item) and Distress markers in two colors and spritz the paper.  Then I used a paintbrush to water color in the sky.  If you haven’t bought yourself one of those spritzers you are missing out on a awesome tool.  It is not hard to use once you find your rhythm.  I used the new smaller blending tool to enhance the edges.  And Glossy Accents which is my most favorite medium.

All the coloring was done with several different mediums:  Copic Markers, Prisma Colored Pencils, Inktense Pencil, Distress Ink Pads and Markers, and Wink of Stella Glitter brushes

Copic Markers:  Olive, Apricot, Golden Yellow, Baby Blue, Veronese Green, Frost Blue, Light Grayish Cobalt, Pink Flamingo, Egg Shell, Brick Beige, Warm Gray #3, and Blush.

Prisma Colored Pencils:   Chocolate, Ginger Root, and Denim Blue.

Inktense Pencil:: Dark Chocolate

Distress Ink Pad: Stormy Sky

Distress Markers: Stormy Sky and Tumbled Glass

Stop over the Cutters Creek Store and check out the new items and the all time favorite items.  And if you have any questions you can contact Kim.

Monday, March 31, 2014

Ballerina by Fran


The Star of my card is Abi Ballerina.  She is a digital image by All Dressed Up.  Abi was colored using both Copic Markers and Promarkers.  The card base is made from 110# Solar White and measures 5-1/2” by 6-3/4” (portrait style).

OLYMPUS DIGITAL CAMERA

Abi was colored on 110# card stock, solar white.  The mat behind Abi is water color paper. What I did was take three shades of Distress Ink (Worn Lipstick, Tattered Rose, & Peacock Feathers) and rubbed the colors on my work mat.  Sprayed them with water and placed the water color paper on the distress inks.  I loved how it turned out.  Then I measured out a border to add Stickles around the edge (Dry Fine Glitter, Diamond) by Ranger.

The small frame was made using a mold and covered with Fran-tage Shaved Ice fragments by Stampendous.  I added a dashed lines using Gelly Roll Glitter Pen (stardust).  And more of the glitter pen on the TuTu and around Abi.  Remaining embellishments on the corners are sequins and pearls.  And I used Glossy Accents for my adhesive. 

There are so many neat products you can get from the Cutters Creek online store.  Stop in and look around.  And if you don’t see what you are interested in purchasing just ask Kim and she will try to get it for you.

Have a wonderful day!  Fran

Tuesday, March 25, 2014

Pretty Kitty by Mindy

I was looking through my scrapbook room trying to decide what I was going to use for my project and I found a cute little stamp I've had forever but never used. Sadly, I have a lot of those. I decided to ink it up and color it.


I colored this little cutie with my Copic markers to coordinate with the colors in my papers. I used some core'dinations card stock and lightly sanded it to reveal the pattern as my background and a paper pack from My Mind's Eye for the layers. I added some rhinestones to the kitty's tiara and a little banner in the corner hanging from some twine. 
 
I've used the following supplies from the Cutters Creek online store. 


Wednesday, March 5, 2014

Mardi Gras Time by Mindy

Ok, I know I'm a couple days late with this ( and a dollar or two short lol ), but I still wanted to share it.


I used a lot of cricut for this card. The mask, the jester's hat, and the sentiment all come from the Designer's Calendar cartridge.  I've never made a calendar with this cartridge, but it has some great extras on it. I colored my stamped image with Copic markers. I then added some stickles, sequins, and feathers to the mask to bling it up a little.  I also added some Mardi Gras beads to Tilda's hands. The purple paper behind the mask has been embossed with my Cuttlebug and sanded to bring out the detail more.  I thought the fleur de lis detail was perfect for this card.  This card is an easel card.  It will stand up when open, but closes flat. 
 
Cutters Creek Shopping List

Saturday, February 22, 2014

Head start on Easter by Mindy

I just got back from vacation and I had a little extra time at home. I decided to get an early start on Easter. I love this little Magnolia chicken image.


I colored her with my Copic markers. To make the image look distressed like the papers , I kept going over it with my w00 marker to tone down the brightness.  My papers are from My Mind's Eye. I sewed around the border of every layer.  My image is cut out with a nestabilitie using my cuttlebug. 

It feels good to get a head start on a holiday for once. The supplies used from the Cutters Creek store are Copic markers and My Mind's Eye papers. 

Wednesday, February 12, 2014

Raven Hair Beauty by Fran


I found a free digital image that I love.  But I had no clue on how I was gone to color it.  After much thought I chose my Copic Markers.  The image is mostly colored black but using dark greys to give it the appearance of looking black.  Black and red are the hardest colors to blend and shade.  But I think it turned out pretty good.  The rest of the colors came from the “E” family of Copic Markers.  I Just used the Warm Greys and Skin tone colors.  I used a Prisma colored pencil, white for the highlights on the hair.

The card dimensions are 5-1/2” by 6”.  The card base is made from Bazzill Simply Smooth, white card stock.  The other papers are from my stash.  The corners and filigree came from the Silhouette store and cut using the Silhouette.  I popped up the image using 3-D Adhesive Foam Pads.  The image’s ears and belt are decorated with Gold Vinyl stickers. And I added the same colored vinyl stickers to the borders of the black card stock.  I used two types of adhesive: ATG Tape Glider and Glossy Accents.  And to finish the card off I used a Wink of Stella Brush marker in Clear Glitter.

OLYMPUS DIGITAL CAMERA

If there is anything that I used but isn’t listed in the Cutters Creek Online Store you can always contact Kim Bush here.  Kim is the one who got my Silhouette Portrait for me.

Thank you for stopping by and have a wonderful day!

Fran

Thursday, January 30, 2014

Howdy-Do! By Fran


I really had fun coloring this image by Sassy Cheryl called a Simple Bunch of Flowers.  It was not hard to keep a smile on your face while coloring her.  Let me know what you think.


OLYMPUS DIGITAL CAMERA

(Click on photo for a larger view)


Details:  Card base is 5-3/4” square.  The shape of the card was cut using a Silhouette Portrait.  Card base is made from Bazzill Basics, Simply Smooth White.  The remaining papers are from my stash. The image was colored using Inktense Paint Pencils and Copic markers for the skin (E00, Eo1, E11, & R20) my favorite colors for skin).  The buttons on the dress and shoes were accented with Enamel Accents (dimensional faux enamel) made by Inkssentials, Ranger.  I used a Crop-A-Dile Corner Chomper (Deco) to create the corners of the image.  The rosette and button was cut using the Silhouette and the button is decorated with stickles and Scrappers Twine. The sentiment was created on the computer and then cut to create the banner. And I used Distress Ink to the edges of the banner.  On the image I used Glossy Accents to the centers of both flowers.  And some Wink of Stella Clear Glitter.

Supplies:    Bazzill Basics Paper

                      Stickles (starry night)

                      Tombow Adhesive

                      Glossy Accents

                      Distress Ink Pad

                      Copic Markers

I hope my card gave you some inspiration to do some coloring using digital images or your stamps.  To me coloring is so relaxing.

If there are any products noted in the Details that are not available from Cutters Creek Online Store you can always contact Kim to see if she can order it for you. I ordered my Silhouette through Kim and the process was so easy because Kim makes it easy.

Thank you for stopping by and I hope you leave a comment to let me know your favorite thing on my card.

Fran

Saturday, January 25, 2014

Embossing Paste Technique card by Cindy

Hi everyone,

Today, I am sharing a project that I have up on the Cutters Creek Design Team blog. My project uses a new technique, embossing paste!
I laid my stencil on top of my card and spread the embossing paste over the stencil. I used Wendy Vecchi white paste. After it dried, I colored some of the hearts with my Copics, some with Wink of Stella and some I put Glossy Accents on top and then dumped some pretty Tim Holtz distress glitter on top of it. The heart was cut out with Sizzix Framelits and I also used My Mind's Eye paper. I attached my ruffled ribbon to the back of my heart and to my card using Scor-Tape.
If you are interested in any of the products that I used today, be sure to visit the Cutters Creek store.

Monday, January 13, 2014

Smitten by Fran


I fell in love with this digital image that I used on my card and just knew I had to color her up and make a card.  I am pretty sure I will give it to my hubby for Valentine’s Day even though it has a bow on it.

OLYMPUS DIGITAL CAMERA

OLYMPUS DIGITAL CAMERA


Details:  My card is a standard A2 card (4.25x5.5 inches).  The base of the card is made from Bazzill Simply Smooth Cardstock 8.5"X11"-White. There 6 layers including the image layer on the front of the card.  I colored the Bazzill white layers (edges) with pink and red glitter pens.  And the black card stock is by Neenah.  The image is by Sassy Cheryl and is called Smitten. I colored her using Inktense Ink Pencils except for the skin.  I used Copic Markers to color the skin (E00, E01, E11, RV21).  The lady bug on the hat, buttons on the shoes and center of flower on the hat was accented with Inkssentials Glossy Accents.  The heart buttons were hand made using a heart mold.  Then I colored them using a Wink of Stella Glitter Brush in Red.

The inside of the card is made from Neenah Black Card stock and the pink card stock is from my scraps.  The sentiment is part of the digital stamp image.  And the falling hearts were die cut to get the various sizes and colored them to match the front of the card.

The card is held together using Tombow Mono Aqua (liquid glue) and Hot glue was used to adhere the buttons and bow.

All items that are linked can be purchased at the Cutters Creek Online Store.  And if you have any questions about the products I used you can contact Kim Bush of Cutters Creek and she will be glad to assist you.

Thank you for stopping by and I would love it if you left me a comment to let me know what you think of my card.  I love reading all the comments.  And they give me incentive :)

Fran


Monday, December 2, 2013

On the 3rd Day of Christmas... by Mindy

Hi, it's Mindy and it's my turn to post my 12 days of Cristmas project. I collect a lot of stamps and sadly, several of them remain unlinked. For the project I decided to break one of them out and ink it up!
The image I used is from House Mouse. They have so many cute images and they're fun to color. I colored these little guts with my Copic markers. I used Liquid Pearls to add some snowflakes. All the paper I used is from My Mind's Eye.
I hope you have enjoyed the projects so far and don't forget to check out the remaining ones.  
Cutters Creek Shopping List

Wednesday, November 20, 2013

It's Beginning to Look...

It's starting to look a little bit like Christmas. I'm ready to start shopping and put up my decorations. One great way to get in the Christmas spirit is to get started in your Christmas cards. I decided to challenge myself on my first one and deviate from the my usual bright and cheery Christmas colors.
This paper pack from My Mind's Eye is soft and muted. I tried to match it with my copics as best as I could. I popped my image up from the burlap strip with some 3D adhesive and added a paper poinsettia to the corner. This card was quick and simple to put together. I didn't want to overwhelm myself on the first one. 


Shopping List My Mind's Eye Paper Copic Markers 3D Adhesive

Wednesday, November 6, 2013

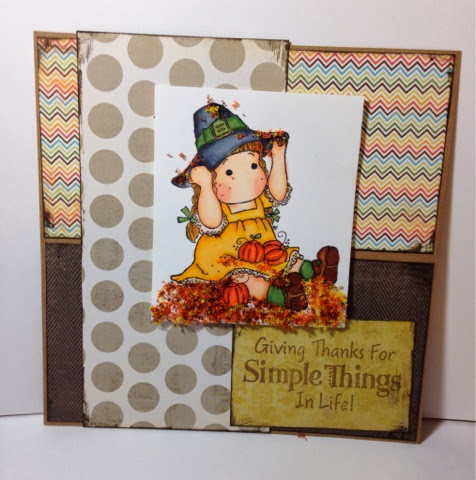
Giving Thanks

This time of year we all think about what we're thankful for. It's easy to be thankful for the big things like family, friends,  and our health, but sometimes we forget about the simple things that make us happy every day. When I found this sentiment stamp from House Mouse it made me think about how thankful I am for simple things like having the time to craft.

I think this image of Tilda playing in the leaves is perfect for this sentiment.  I colored her with copic markers and added some Flower Soft to make it look like she's sitting in a pile of leaves. I love how sweet she looks. I kept my papers from My Mind's Eye simple as well and didn't add any embellishments. 

Take some time this holiday season to remember the simple things in life that make you happy. 

Sunday, October 20, 2013

Trick or Treat

I've been spending a lot of time trying to get my scrapbook room organized and put everything in a place that makes sense. In doing that, I've become reacquainted with things I haven't used in a while or, even worse, forgot I had. I found this little Tilda holding a pumpkin and knew I wanted to color her. 
She's so cute and perfect for Halloween time. I colored her with copic markers to match the colors in my favorite My Mind's  Eye paper. It's hard because the colors in the paper are so muted. I matted the image with a couple of rectangle nestabilities and then finished the card off with a Cutters Creek gardenia.

I guess it's time to put my Halloween images and paper up for another year. I've had a lot if fun playing with some old friends. 


Tuesday, September 17, 2013

EEEEEEEK

Hi, it’s Mindy and  I have a Halloween card to share with you all.  My copic markers and I have a love hate relationship. I love to color with them and then I hate how what I just colored looks.  I’m trying to just have fun and color, not worry about light sources and shadows and all that.  It worked this time.  I started doubting the image and almost started over, but I made myself stick with it.    I also have a love hate relationship with my scrapbook room.  I love having a room devoted to scrapbooking, but I hate going in there because it’s such a mess I can’t find anything including my desk.   I decided it was time to tame the beast and get it organized.  I’m not all the way done, but it’s 90% better than it was.  Also, since I’ve been so busy organizing and rearranging my supplies, I’ve found all kinds of things I haven’t used in forever.  So enough with all that, let’s get to the project. 

I used the My MInd’s Eye Mischievous paper pack.   I love this paper because it’s Halloween paper, but it’s not too Halloweeny.  I colored my image with my copic markers.    I wanted the image to match the distressed look of the paper so I dulled down all the color by going over them with a pale warm grey or light tan color. 
photo (31)
After I finished coloring the image, I went over the entire thing with some old paper distress ink then I edged it with some black soot distress ink.  I went over some parts of the image with my copic spica pens, but it’s too hard to capture in the picture.  For the sentiment I used some black Wow embossing glitter.  It was great to reconnect with some of my old supplies.  Sometimes you need to deep clean your scrapbook room to remind yourself of what you have (and what you don’t have but you really really need).
One thing I discovered while cleaning was that I had a problem with my 6 x 6 pads.  I have them stored vertically in a little drawer.  When I use a pad, I put all the scraps back inside the pad.  I’ve found when I pull the pad out by the top, the scraps were falling out.  I saw this idea on Youtube and it worked great.  I put the scraps in a clear envelope and attach that to the back of the pad so the scraps and the full pieces are all together.  In this case since the pad was pretty empty, I put the pad and the scraps down in the envelope.  This has been working great. 
photo (32)   photo (33)
I hope you have enjoyed my Halloween card and that I have encouraged you to reconnect with some of your older supplies. 
Cutters Creek Shopping List
Distress Ink
Copic Markers
Wow Embossing Glitter
My Mind’s Eye paper
Clear envelopes

Monday, September 9, 2013

We’re Lick This Together by Fran


Today I bring you a card designed for Cutters Creek Online Store.

I really thought this stamp was so cute and the sentiment that comes with it “We’ll lick this together” can be used for so many things in one’s life.  I’ve been doing a lot of coloring using my Paint Shop Program but this time I dusted off my Prisma Colored Pencils and colored the image. Coloring can be so relaxing especially if it goes smoothly, lol.

And I did it again!  I just started coloring not even thinking if I had paper that matched the colors I used on the image.  Well I didn’t!!  But I improvised and I thought it still turned out nicely.  But it really makes more sense and easier to select your papers first and then match your colored pencils to the paper.  But I have to do things the hard way :)


OLYMPUS DIGITAL CAMERA


Card Details:  All papers used are from my stash:  Neenah, DCWV, and Recollections.  Card base and frames (Decorative Artisan) were cut using my Silhouette Portrait. The rolled rose (3D Paper rose); leaves (Leaf); and flourish (Miss Kate Flourishes) were also cut using the Silhouette.  The glitter dots were created using two colors of stickles to match the dress on the image.  The pearls are by KaiserCraft.  The one on the rose was left white to balance out the white card base.  The colored pearls were colored using a Copic marker V06, lavender.  I really thought it was a good match. Everything is held together using Glossy Accents and Tombow Mono Adhesive. The card measures: 4-3/4” wide (including the flourish).  And 5-3/4” long (including the leaves).

OLYMPUS DIGITAL CAMERA

Note:  Once I rolled the rose I took a pair of tweezers and curved the ends to give it more of a rose look.


Product Details Purchased from Cutters Creek Online Store

Stickles by Ranger (Lavender & Cranberry)

KaiserCraft Pearls (Champagne)

Copic Sketch Marker (Lavender-V06)

Inkssentials Glossy Accents

Tombow Mono Permanent Adhesive


There are so many awesome products sold by Cutters Creek.  Plus the owner, Kim has various clubs selling the most popular items.  The cost to join the clubs that normally run for 6 months depends on the product(s).

If you want to learn more about the clubs you can contact Kim here.  Or you can join the Cutters Creek Yahoo Group.


Thank you for visiting, Fran

Monday, August 5, 2013

Cuddly Koala

I have had this cute cuddly koala Marci stamp from La La Land Crafts for a while and I decided it was finally time to ink it up.  Koalas were my favorite animal as a child and I think this image is adorable.  I recently got a new 6 x 6 My Mind’s Eye pad from Kim and thought this image would go great with it.  I love how soft the colors in this pad are.  The pad is called lavender, but there’s actually no lavender it’s pinks, blues, and yellows. 

photo (30)

I colored Marci with my copic markers to match the colors in the papers.  I love chevron right now, so I had to make that the background.  I picked a few more patterns to add and then finished the card off with one of my favorite Cutters Creek branded flowers. 

Shopping List

La La Land Crafts

My Mind’s Eye

Copic Markers

Cutters Creek Branded Flowers

Monday, July 22, 2013

Celebrate

Hi, it's Mindy and it's my turn to post a project today. I recently got a new puppy, so I've been spending a lot of time with her and my other little dog outside in the backyard. They love chasing each other and barking at birds. I found this little bird digital stamp and thought it would make a nice bright summery card.


I've colored my image with my copic markers to match the bright colors in the Echo Park paper. This is an older pack, but they have several others that are just as cute. To finish the card off, I added some Cutters Creek brand flowers. I always like having these on hand to finish off my cards. They come in a large variety of colors and styles and if the color isn't exactly what you're looking for, you can modify them with your copic markers or some stickles. 

I hope you have enjoyed my bright summery card and that your summer isn't too hot to enjoy. 
Related Posts with Thumbnails