Showing posts with label Liquid Applique. Show all posts

Friday, September 6, 2013

Party Hardy by Deanna M

I have another masculine birthday card for you today. This card is for  my son who will turn 23 on Saturday.


I was actually working on a different project for today's post but when I received my new 6" X 6" paper pads from Cutters Creek from the paper club I am in, I had to use some. We received two new Bo Bunny paper pads, the one that these papers are from is Trail Mix and the other pad is called Key Lime. Don't these names just call out to you? They sure did to me. Interested? Join the Cutters Creek Yahoo group to find out more about the clubs or contact Kim through the customer service link in the store to ask about doing a special order.

On to my card. I started with a piece of kraft card stock cut and scored to make a 4 1/4" X 5 1/2" card base. I cut a brown mat at 4 1/8" X 5 3/8", I just wanted a little of the card base to show. I wanted the patterned papers to be the star. The green patterned paper was cut at 4" X 5 1/4". When I saw this herringbone wooden pattern, I thought it would be perfect to serve as an anchor for my mug, to act like a table top. That piece is cut at 2 1/2" X 4".

My mug is from the Silhouette store and was cut at the  default size. I adhered all the layers together using my Scotch Quick Dry adhesive. Before adding the foam to the top of the mug, I first added some white liquid applique and then lightly covered that with some clear glitter from my stash. I set it aside to dry. Once it was dry I used my heat tool to heat up the liquid applique which causes it to puff up. I thought it really brought the foam to life. I then added the foam to my mug using some clear foam tape.

I then adhered my mug to my card from also using the clear foam tape. To finish my card I stamped my sentiment using some Memento Morocco ink. I received this particular color while in the Memento Ink Pad club through Cutters Creek.

I bought my son a couple of bottles of beer for his birthday along with a beer stein and then a gift certificate to a local restaurant so he and his girlfriend can go have dinner together. I am hoping to etch his name on the stein if I get a chance. I thought the card went along with the theme of his gifts. Thanks for visiting today. I would love if you left a comment letting me know what you thought.

Cutters Creek Products Used:

Scotch Quick Dry Adhesive 
Liquid Applique
Memento Ink Pad
ASI Kool Tak Foam Pads

Friday, October 14, 2011

Elegant Edges Christmas Cards

One of my favorite things to do with my Cricut for cards is to make nice mats or frames for images.  So, I thought I would show you one of each on some Christmas cards I made.  Just a quick note: I use my Gypsy for this purpose, but if you have Design Studio or Cricut Craft Room, you can use them in the same manner.

First up, an elegantly simple card using papers from Graphic 45's Christmas Emporium paper pad.
5x7 card base

I started with a kraft card base.  I chose my design from the "Santa Express" sheet of images, cut it out, and measured its height & width.  Using my Cricut Gypsy, I chose a frame I liked from the Elegant Edges cartridge that had a similar height/width ratio. (Remember, Kim can special order just about any cartridge you want!)  I then "unlocked" the height and width fields so they wouldn't adjust together.  I then adjusted the height and width independently until the inner opening of the frame was approximately the same size as my cutout design.  (Slightly larger is great!)  I then cut the frame using some coordinating cardstock.

I then cut a 4.5"x6.5" mat from the green side of the "Merry and Bright" sheet.  I distressed the edges of all of my papers and my card bases using a sponge tool.  I adhered the green paper to the card, then layered on the frame using the ASI Kool Tak clear foam squares.  Next, I adhered the cutout design within the frame.  Finally, I added a touch of Polar White Flower Soft to my holly for added dimension.  VERY easy!

My second card takes a bit more time, but totally worth the effort for its beauty!

5x7 card base
I began with my vintage Santa stamp.  Mine is from my stash, but you can find a similar feel using the Crafty Secrets Vintage Christmas clear art stamp set.  Using the transparent ruler in my Cricut Tool Kit, I measured the approximate size of my stamp image.  I then chose a doily mat I liked from the Elegant Edges Cricut cartridge, and used my Gypsy to resize it until it was an appropriate size for my image, and cut it out.

I stamped my Santa image with Memento Tuxedo Black, colored it with Copic markers, then added his hat band and pom pom using white Liquid Applique sprinkled with clear glitter.  Note: to get this effect, sprinkle the glitter while the Liquid Applique is wet, then let it dry for a couple of hours before you heat it with your embossing gun.  I then distressed the entire image by sponging on some distress ink.  I also used the ink on my Doodle Bug twine so it would match better.  I stamped a small holly image on scrap as well, and colored & cut it out to use as an accent.

I used papers from Echo Park Paper's Season's Greetings 6x6 paper pad to create my background.  I used a brick Texture Fades embossing folder to create my accent piece on coordinating cardstock, then added additional dimension by distressing with multiple colors of ink.  I edged all of my paper pieces in black ink, since my image was stamped in black - it helps tie everything together.  I assembled the card, and popped up the image using the Kool Tak clear foam squares.

If you're interested, here's a list of specific Copic colors used in the Santa image:
E000, E00, E11, R20, R24, C2, Y17, YR04, YG63, G99, R29, R35, R39, and 0 colorless blender

Thursday, January 27, 2011

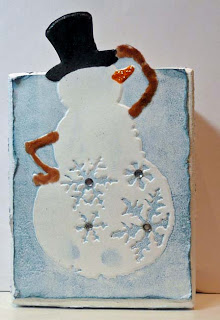
Chunky ATC Chris-styled

Start with a scrap piece of wood 2.5x3.5x1.5. (An online friend sent me the wood canvas but if you have access to 2x4 boards and someone to cut them for you, you’re golden!) I painted the entire block with acrylic white paint and set it aside to dry. (Actually she sent me four pieces and I have three more to work with—yippee!)


While the paint was drying, I took out my two Tim Holtz Alterations Snow Flurries and Snowman embossing folders. Using Stormy Sky Distress Ink and my brayer I inked the “indented” side of the folder and carefully laid the white paper in the folder and ran it through my Big Shot Express. Love how the background was now blue, even though I got some blue on the snowman—hey snow has a bluish tinge, right. In the snow flurries folder I placed a piece of acetate and ran it through the machine. By now my snowman was dry enough to cut out. I knew he was taller than my block, so I measured up to 3.5 and then cut around his arm and head. Using Cinnamon Toast Fun Flock I glued it along the snowman’s arms. I filled in his carrot nose with Orange Peel Stickles. Then, I dabbed the top part of the image with my Embossing Magic powder, colored in the hat with my embossing pen, sprinkled it with black embossing powder, and heated it with my heat gun. I set this aside to dry. Next I used the Distrezz-it-All to rough up the edges and added some jewels in the center of the snowflakes.


I then started on side two by cutting out ‘tweety’ from Stretch Your Imagination at 2.5 inches first in brown and then red. I cut off the red bird and glued it on top of the brown one. I cut a sled from the Wild Card cartridge at .5 inches—the base out of red and the layers out of tan scraps. I sketched a hill on the block and then used Stormy Sky, Tumbled Glass, and Weathered Wood Distress Inks to ink in a sky and stamped ‘Let It Snow’ on the bottom with a blue pigment ink.


While I waited for that to dry, I kept throwing away ideas for the edges. I then thought of all the little scraps of snow I saved from when I punched my Christmas Thank You cards (I never throw anything out) and decided to use Glossy Accents to randomly glue them on all four edges. Once that was done I was ready to put the chunky ATC together. I used Scor-Tape to adhere the Snowman and Glossy Accents to attach the bird and branch. After that I drew a few lines with my White Liquid Applique pen and heated it to add some dimension. I left that dry over night before attaching my sled using pop up dots and the embossed acetate sheet, using some Glossy Accents in the corners to hold it in place.

One ATC down, three more to go; what about you?

Cutters Creek Shopping List:
Tim Holtz Alterations Snow Flurries and Snowman embossing folders
Stormy Sky, Tumbled Glass, and Weathered Wood Distress Inks
Brayer
Acetate
Cinnamon Toast Fun Flock
Orange Peel Stickles
Embossing Magic
Black embossing powder
Distrezz-it-All
Glossy Accents
Scor-Tape
White Liquid Applique pen

Monday, December 27, 2010

New Year's Bottle Tag by Sandi

I made the Bottle Tag for a New Years Eve skating party. I started off with a thick white cardstock and made a hole big enough for the tag to sit on the largest part of the Champagne bottle so the 3D snowflakes could be placed on the top inside of the hole and sit on the top of the cork. I hope the photos allow you to really see the festive look of this tag.


I started with the Spellbinder Impressibilities Snowflakes Die for the background and covered it with Pebbles Pastels Chalks in pastel blue and white. I cut the fireworks from the Stand and Salute Cricut cartridge and applied more blue and white chalk on the edges. Then I added White Liquid Applique for dimensional snow on the edges of the fireworks and raised it by applying a Heat Gun. I used White American Crafts Glitter Paper to cut out the skates from the Joys of the Season Cricut cartridge and created the 3D snowflakes from the Christmas Cheer Cricut cartridge by gluing 3 cuts together with some Mini Glue Dots. I welded letters from the Plantin School Book cartridge to create ‘Happy New Year’ and added more blue and white Pebbles Pastels Chalks and dimension with White Liquid Applique on the bottom of the letters. On my Gypsy I found the perfect ‘Thank You’ from the Gypsy Wanderings cartridge. I finished with a Martha Stewart Paper Punch on the sides.


Cutters Creek Shopping List:
White Liquid Applique
Pebbles Pastels Chalks
Mini Glue Dots
Christmas Cheer Cricut cartridge
Joys of the Season Cricut cartridge
Stand and Salute Cricut cartridge
Spellbinder Impressibilities Snowflakes Die
White American Crafts Glitter Paper
Heat Gun

Sunday, January 31, 2010

Mandie's Little Lily Bag!


Today I was trying to think of a quick, easy project that any level paper crafter could do! I think that I succeeded! You can make this as simple or as fancy as you want by just adding more embellishments!

To start I cut this bag from Plantin SchoolBook using my Cricut Expression Machine. To determine the size I loaded a 12” x 12” piece of paper and selected the “Fit to Page” function key. The machine determined that it would cut the bag at 7 ½”.

Then I used my Scor-Pal to score the folds on the bag and adhered it with my Scor-Tape . For those of you that haven’t tried Scor-Tape yet I highly recommend it for projects that need a little extra sticking power when you don’t want or can’t wait for liquid glue to dry!

Then I stamped my Lily Valentine Fairy onto Prism Simply Smooth cardstock with my Staz-On black ink. Since I am just beginning my Copic collection I used: E00 and E11 for the flesh and R20 to make rosy cheeks. Then I used some pink and yellow markers to color the rest of her.

Next I used my Sakura Jelly Roll Stardust Glitter Pens to add glitter to the large heart, hearts on her dress, headband and cupcake and her wings. Then I used my White Liquid Applique on the hem of the dress and the cupcake frosting. I didn’t wait for it to dry, just used my heat gun to puff it up!

Finally I trimmed around my image and adhered it to the bag some Pop-Up Dots. Last I added a little lace around the bottom with more Scor-Tape and it’s ready to give!

Wednesday, January 6, 2010

Lea's Winter Wonderland

Perfect cuts fast and easy with striking details –
I find myself reaching for die cuts and cutting
my own to match my personality and what I want to create! Although most of this layout is designed with the Winter Wonderland cartridge (The mini cartridges are perfect for other snowflakes), I found the perfect bridge when I looked at my Paper Dolls cartridge. Mix and match your cartridges! You will find more elements that can work together, EVEN, if you never thought a cartridge would have an element to match. I almost passed Paper Dolls for this layout but I’m so thrilled I didn’t.

Here are some easy techniques to enhance your die cuts:

Pastel Chalking Die Cuts: I loved how the bridge cut out with little lines so I knew where the shading would go if I wanted to enhance this image. I used Pebbles Earthtone Chalks and added gray to areas to make bricks. I did use a little white to make the highlighted areas pop out! It is really easy to do, takes moments and the results are striking. If one didn’t want to do all the shading, just take the chalks and run color around the edges using the applicator to pull color in onto the surface of the die cut. I used a little gray on the bunny’s ear and under his chin. I am totally addicted to these chalk palettes - they have so many colors and shades, and now I noticed shimmers and metallic colors! I have to HAVE them ALL!!

Ink Edging: Take your favorite pigment inks or Ranger’s Distressed inks and swipe the edge of your paper or photo mat into the ink pad. This creates a defined edge to your paper, makes it stand out against the surface it is mounted to. See photo.

Flower Soft Textures: Flower Soft isn’t just for flowers. Look at textures, of hair, or animal fur or even in this layout, the bunny’s tail!! I have a variety pack of Flower Soft ordered filled with many colors to choose from. A starter kit might be perfect to give one ideas for playing with this fabulous product.

Liquid Appliqué/EP/Glitter Snow: I wanted to make the snow look realistic without going over the top. I wanted “bling” of glitter to make the little crystals of snow stand out. The easiest way to achieve this is to use
Liquid Appliqué (LA). LA comes in tubes and it is easy to squirt out with great detail. If you heat the LA right away with a heat tool, you get lots of bumpy texture. If you wait until it is dried, you get a more smooth yet bumpy texture. I let the LA dry before I heated the surface. Another way to add snow is to use Blingz! The extra thick Shimmerz that will dry with dimension if you blop it on or use a small palette knife. For the tree I used Stickles to lay down the glitter, then embossed Ranger’s Blue Pearl EP on top, then added the LA for the final dimension.

Multi-colored Glittered Snowflakes: The snowflakes started out a light blue. I used a blue
pigment ink to add dark blue to areas. I use pigment inks because I can take a sponge or my finger and spread the color the way I want to. On top of that I used a corner of Ranger’s Adirondack “Snow Cap” pad to add white. I used the corner of the pad because some of the blue will get on the pad. The color will blend so you have white, light blue, and dark blue. Lastly went over the area of the snowflakes with Stickles and spread it out and then added a dot of Stickles in the center of the snowflakes.

Note: For the tree, one tree was cut in olive green and one in light blue. I cut the tree part off of the light blue die cut and then glued it the bottom of the olive green die cut.

Supplies for Lea's Winter Wonderland Include:
  • 6x6 blue decorative cardstock
  • Dark blue cardstock to fit photo (Bazzill)
  • Cardstock in gray, light blue, dark blue, olive, red, black, and green (Bazzill)
  • Cricut Machine – cartridges: Winter Wonderland, Paper Dolls
  • Zip Dry
  • Flower Soft
  • Earthtone Chalk Pallete (Pebbles)
  • Liquid Appliqué in White
  • Blue Pearl Embossing Powder (Ranger)
  • Adirondack Snow Cap pigment ink (Ranger)
  • Brilliance Mediterranean Blue pigment ink (Tsukineko)
  • Stickles Crystal (Ranger)
  • Heat Tool (Ranger)
All of these supplies can be purchased directly from Cutters Creek!
Related Posts with Thumbnails