Tuesday, January 29, 2013

Inspiration for the New Year...by Laura C

Do you have goals or dreams you'd like to accomplish
in the next year? Maybe ideas you'd like to keep track of?
This project is a small "reminder" of those things you want
to keep in mind. I've included a simple "how-to" so you
can make your own mini inspiration board:
 
And a close up:


I started with an inexpensive wooden frame from
the craft store and my supplies:
 

I painted the frame, using the Adirondack
daubers in Aqua...I used a pouncing method
to do this....hopefully you can see the bumpy
texture in this pic....(you can see in the first
pic of the finished project, I added some color
around the edges with Sunset Orange as well):


Once that dried, I turned over the frame
applied Scor-Tape to the entire inside
edge, and then cut and stuck my twine
down in the pattern I wanted (making
sure it was VERY tight!) making this:


Next up....2 layers of foam tape on top of the
Scor-Tape and twine layer:


Then I made a backing piece out of left
over chipboard from a paper pack (I'm a
pack rat, what can I say?) and some
pretty patterned paper....so many options
in Kim's store....Graphic 45 or Echo Park
collections lend themselves to these projects!


The paper was adhered with Scor-Tape, and
then the entire backing adhered to the foam
tape on the back of the frame....it gave just
enough depth to be a usable memo board,
which you can hopefully see from this pic:


Now for embellishing....the FUN part!!
I die cut little memo pieces....dressed
them up with embossing powder, and
Distress Ink (I used Rusty Hinge and
WOW embossing powder--some ovals
I stamped reminder messages on).  The
roses are Prima Fairytale Roses (I used
the Poppyfield and Baby Pink), the bird
was embossed with the WOW and then
inked with Distress Ink--this pic below
shows that, and how I embossed my
sentiment, then traced around it using the
inside of the Spellbinders die (Fancy Tags Two)
so I could cut it to fit the die cut frame:


And more embellishing goodies....Want2Scrap
Nestabling (the tag after being diecut was attached
to the matching Nestaboard as well....this stuff is
awesome if you've never tried it!).  The stick pin
made from beads in my stash, buttons, some twine,
Want2Scrap swirl bling was cut apart to fit the top of my
frame. And the tiny clothes pins are from Canvas Corp,
the Mini Clothespins in Natural (YES...Kim has these
in the store!)....I painted them with the Adirondack
Sunset Orange paint.

So there you have it....a great project to jump start
a creative, productive New Year!  Would be a
cute project for small school photos too!

Happy Crafting!!

PS....remember, if one of these items is not in store and
you'd love to have it....you can always ask Kim!!

Monday, January 28, 2013

Sweet 16 Birthday Card - by Tee

 Hi Everyone, Happy Monday to you. Today I am sharing with you a card (well, I made 50 of them but who's counting) for a Sweet 16 Birthday Party.

I used Teresa Collins Sophisticated cricut cartridge for the frame, the shoe is a svg file. I inked the edges then I added stickles to the zebra printed pattern paper and the frame. Added some rhinestones and a big black bow.

I love how this turned out but by invite 10 I was so done with them.. :)

Wouldn't think make a great birthday card too?

~Tee


Wednesday, January 23, 2013

Sparkly Valentine with Lori

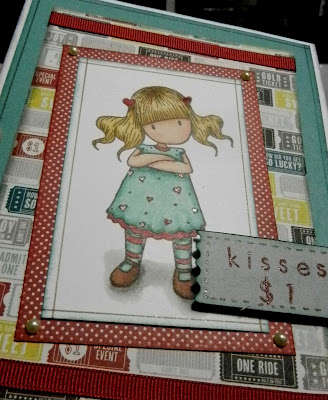
Today I have a bit of a non-traditional Valentine to share with you.  I'm using non-Valentine paper and a non-Valentine image, but by focusing on the red and adding some sparkle and some little added bits, it would make a fun Valentine for a special someone (who might be just a little bit grumpy, lol).

I started with the Miss Caroline Dilly Dally 6"x6" pad from My Mind's Eye, a Gorjuss Girl stamp from my stash (sorry, she's discontinued), and my Copic Markers and Spicas.  This is how it turned out:


 I can honestly say that I am in love with this little grouch!  I stamped my image in Memento Cocoa Brown on Xpress Blending Card, then chose the papers I wanted to use with her.  I wanted the red & white polka dots for a mat to put the focus on the red. Then I decided that the ticket pattern would make a great background and I could treat it like a kissing booth.  I cut a ticket shape from a Cricut Cartridge (I think I used Art Philosophy, but there are tickets on a number of cartridges), and stamped the sentiment with an alphabet set in my stash.  I didn't worry about making it straight, letting it be fun & child-like.  

I colored my image with Copic Markers to match the papers I chose (see list below).  Then I used Copic Spicas in Red and Lipstick to trace the letters on the tickets and go over all of the hearts on the girl's dress and her barrettes.  Finally, I trimmed all of my papers to size and added borders using a Chocolate Copic Spica.  I sponged the edges of the papers and the card base with coordinating inks and adhered everything, adding ribbon from my stash to the ticket paper. After assembly, I added my ticket using foam adhesive squares, and added some Kaisercraft adhesive pearls in Lemon.

 Here's an angle that shows how glittery the Spica Pens make everything!:


Products available from Cutters Creek:
Here's a closeup of the colored image, followed by a list of the colors I used:

Skin: E00, E02, E11, E13, YR000, R20
Hair: YR21, YR23, YR24
Shoes: E15, E37, E59
Clothes: BG11, BG15, BG18, R24, R27, R29
Shadow: W1, W3, W5

Now it's your turn!  Grab some papers  an image that may not say "Valentine's Day", but includes one color you can focus on to bring your theme through.

Sunday, January 20, 2013

Be Mine by Deanna M


I have another Valentine Day card for you today. I do think this card would work great for an Anniversary or even a Birthday too. Or just to say Hello to someone, and let them know you are thinking about them.

So the last card I made used some Hero Art stamps. While I later found out that Hero Arts makes a die that fits those stamps. (Yes, Kim can order Hero Arts products. Just contact her through Customer Service at Cutters Creek.) Of course I had to get them. Then this idea popped into my head and this is what I came up with.

My card is a 4 1/4" X 5 1/2" white card stock card base. I love using the Bazzill smooth white card stock for my card bases. It is a good sturdy paper and since it is smooth everything you layer on top lies nice and flat.

I added a black mat cut to 4" X 5 1/4" and then the patterned paper mat cut to 3 3/4" X 5".  I added some Washi Tape from American Crafts at the bottom of my patterned paper for some color. For my heart balloons I cut both sizes of the small dies out of some patterned paper. For my sentiment I stamped that in some Memento Tuxedo Black ink on some red card stock. I used my eBosser to cut all the hearts out. Got to love the eBosser! I did use my magnetic shim which works great to help keep your dies in place. In case you are wondering, the machines shipping now come with the magnetic shim. For those of us that got in on the first shipment they did not but Cutters Creek sells them.

I then attached some of the Doodlebug twine to each of my hearts and adhered them to my card with some foam tape. The red heart and pink heart are both on two thicknesses of foam tape and the rest is on one thickness. Finally, I doubled some of the pink and white striped twine and tied all the strings together in a bow. I added a couple of pink heart stick pens that are from My Minds Eye and some white stitching with my gel pen.

I had a lot of fun making this one and with the eBosser doing all the work it went together really quick.

Friday, January 18, 2013

Oh Wow oh Wow - Embossing Powders by Tee

 Hi Everyone, I want to share with you a project I made at CHA this past week using the Wow Embossing Powders and some of their newest stamps and powders called Girls Night Out and Vodka Sparkle....

I first inked the dress form with versamark and added a coat of pink embossing powders.....Inked again and added a second coat.. I then added a coat of the extra thick for that glossy glassy look on top.

I then used the embossing pen and draw on the bottom of the dress and added some new vodka sparkle...

The wings has three coats of silver then while the embossing was still wet I pressed a decorative stamp into... Look how lovely they turned out..

The tag was stamped with one of their new burlap stamp pads and first embossed in silver than stamped again and embossed in black.  Love these embossing powders


Wednesday, January 16, 2013

Hello everyone! I made this card for my Mom that just had back surgery. I wanted to use somewhat soft colors without using a lot of pastels.

 I chose to use the sentiment "Sending you encouragement" because every other card she received had the sentiment "Get well soon", I like to be different. :)
 After choosing the pattern paper that I wanted go with. I used some matching card stock, inked the edges and stamped the sentiment using Distress Ink. 
 I added some brown rhinestones to the corners and some clear ones to the butterfly that I punched.
The flowers were from my stash and I used Cinnamon Stickles to accent the column of dots on the side of the card. I hope you have enjoyed this quick and easy card. Thanks for looking! :)

Monday, January 14, 2013

Feel Better Soon!


Its been a very long time since I made a Get Well Card.  And in my stash of files I found a card that would be great to make for any one.  A while ago I purchased a set of cards for all occasions.  And today I thought I make a Get Well Card.  I haven’t made one for quite a while.  And the neat thing about it was all components except for the base of the card was made using my Cricut Expression.  I wish I would have timed myself when I started making the card because it took so little time to cut it out and put it all together.  And all the components were made using a 6x6 Paper Pad by Echo Park called This & That CharmingIt’s a standard A2 size card (5-1/2” by 4-1/4”).  The word B-E-T-T-E-R was cut three times and glued each of the 3 letters to give the word some dimension.  I love the colors in the paper and I thought it would be a nice card for a man.  I plan to give this card to my Dad along with his favorite candy – Orange Slices. 

OLYMPUS DIGITAL CAMERA

OLYMPUS DIGITAL CAMERA

It did not take a lot of supplies to make this card because having the right paper really helped pull it all together.  You can get the paper here from Cutters Creek.  Plus I added just a hint of bling using Wild Honey Distress Stickles which match the colors in the paper so well.  Click on the links and they will take you to the Cutters Creek Store and the products I used to make this card.

So glad you stopped by,

Fran

Saturday, January 12, 2013

Love You

I know it’s only January, but it’s not to early to get started on your Valentine’s Day cards.  January is a busy month for me, so I like to make quick simple cards.  I decided to dust  off my cricut Imagine and use it for this project.  The Imagine makes things so quick and simple because you don’t even have to think about matching papers and colors, the cartridges do it for you.  To make this simple little card, I used the Best Friends cartridge. 

cat card

All the papers and elements for this card were printed and cut on my cricut Imagine.  I inked all the elements with some distress ink to make them stand out from each other a little more.  I popped the cat and the bird border strip up from the background with some clear 3D tape.  I wanted to give the cat a sassy little collar, so I made a pearl one with some liquid pears.  I added a little liquid pearls to the center of the flowers also.  I love how quick and simple this was to make.

Cutters Creek Supplies Used

Tim Holtz distress inks

Ranger liquid pearls

Cricut Imagine Supplies by request

Friday, January 11, 2013

Chalkboard Art by Laura C

Have you seen the hot new trend of
Chalkboard Art?  I have just seen it
recently....had to give it a go!  It's
a fun, easy technique....once you get
the hang of it.

I decided to try a Valentine card:

Isn't this a fun look?  Super simple too!!
The key is.....trying your images on scrap
paper first to get an arrangement you like.
Then you take black cardstock....good
idea to use an "anti-static" embossing
buddy (Kim will be getting more)....then stamp images..
.I used Tim Holtz stamps...Kim has some of these...
can order the others.  For me, I like having
the images all stamped and then emboss all
at once, or you can choose to do one at a time.
This was done using WOW embossing powder
(I used Opaque Bright White...Kim can order!).
Next up, you stamp again.... slightly off this time
with white ink....to give the shadow effect.
Then use a white colored pencil to trace around.
I also used a soft pink for a little color, tho it's
hard to see.  You also want to add a few chalky
white smudges....with a little of the white ink and
a paper towel.  Buttons, Want2Scrap bling, twine,
and it's done.

I know I'll be trying this technique more, hope
you are inspired to give it a try! 


Wednesday, January 9, 2013

Copic Practice and Contest with Lori

I am always looking for new images to practice with my Copic Markers, especially my blending and my skin tones.  It also helps me decide when I need more colors to work with in a certain range.  Right now, Copic Marker has a coloring contest going on, and the images they provided for the contest are great practice sheets.  One of the images is pretty detailed with lots of small areas unless you print it out really large, but the other one is perfect for one of my practice sessions. And I thought I would use it to point out a few helpful hints for using a practice session to improve your coloring.


Normally, I like coloring more detailed images, like the Sarah Kay stamps in the store. But because the areas are smaller, it is harder to see the blending and to figure out why something may not be looking exactly right.  These larger bits make it much easier.  For example, I think the green sweater and the "2013" look great!  I used a series of 3 colors in a range for these areas and they blended really well. (Example: the greens I used are YG06, YG07, and YG09.)

However, look at the orange streamer and orange hair bow - they look a little more flat.  That's because somehow, I managed to buy YR04 and YR07, but not a third color which would have helped add more depth to those areas. Also, look at my blue streamers. I used B21 and B24, but then jumped to B29, which seems too dark for the other shades and doesn't blend as well. So, I should get another blue in between B24 and B29 for a smoother transition.

I can also tell that I need more work on my skin tones on faces where the features are not as well defined. I have always had trouble drawing faces, especially noses, so I have trouble getting the shadows right. Another thing to study up on and get more practice!

Note: I always use the Copic recommended Xpress Blending Card when coloring with my markers.  It really does make a big difference in my coloring!

If you want to print out the images (and check out the contest that ends 1/20), you can see it at Copic Marker here.

Thanks for stopping by today! I hope I've given you some suggestions to use when practicing your coloring. Let us know if there's anything else you'd like to know about choosing and using Copic Markers.

Thursday, January 3, 2013

Shrink Plastic and Copic Tutorial by Tee

Hi Everyone, It's me Tee, here sharing with you my new found love for Shrink Plastic and Markers. I found Copic markers to work the best but any will do!

First I used my cricut and Sophicated cartridge to my image out of the shrink plastic using the deep cut blade. I replaced the blade with a black Cricut marker and traced around the image.

I then used my markers to color in the image and used my finger (blotter or something else would have worked better) to smooth it out.  I applied two coats to get a darker coverage.   The marker in the image is Tim Holtz, see how it is all blotchy? Copics don't do that but I didn't have a copic marker in this color.

I let this dry then removed from my cutting mat and punched a hole in the top. I learned the hard way that if you want a hole to punch it BEFORE you shrink.

Now the magic happens. You will need something to hold your image or is will blow away.

Don't panic if it starts to curl up into a ball, keep the heat on it and it will flatten out... Use your tweezers to help it back into shape. Once it cools off it will get super hard.


See how pretty it turned out?

I think I am going to make these into earrings? What do you think???

Wednesday, January 2, 2013

Valentine's Day Cards by Deanna M


It is hard to believe that 2012 is over with and we have entered 2013. If time moves as quickly has it has been Valentine's Day will be here before you know it. Here are a few easy cards to get you started on creating yours.

All of my cards have a white card stock base and are 4 1/4" X 5 1/2". My mat layers are 4" X 5 1/4" and 3 3/4" X 5. All of my paper is from K & Company and are from older paper pads.

All of my little critters are from Create A Critter 2. I cut the Teddy Bear and Koala bear at 3 1/2" and the Love Bug is cut at 3".

 For my Teddy Bear I used some onyx pearls liquid pearls for his eyes and a white gel pen to add some faux stitching to my heart. I used white distress stain to stamp my little sentiment on my heart. He is attached to the card with an Action Wobble.


For my Koala I used my Imagine and the Baby Boutique color pallet for my grey colors. The black and red I cut with my Expression. Again I added some faux stitching to my heart and the ribbon. I embossed the sentiment with some Opaque White WOW! Embossing Powder.

For my Love Bug I added some Glam Pink stickles to the heart shaped antennas. My sentiment on this one is stamped in Memento Tuxedo black ink and is tamped on the larger heart that cut out from the bugs body.


This is the Hero Arts stamp set I used for all of my sentiments. I got it awhile back and have been anxious to use it.This item is not a standard stock item in the store but Kim at Cutter's Creek can order it for you so don't hesitate to ask her.


Related Posts with Thumbnails