Monday, September 12, 2011

Graphic 45 To The Rescue with Chris

Did you ever forget a birthday of a dear friend? I did and needed something quick, easy, and nice, so I turned to my Graphic 45 The Magic of Oz Collection. My pad is 8x8. I fussy cut the scarecrow with the sign “Wanted a Brain”, aptly named for this project, don’t you think?

I used a cardstock base of 4.25 x 5.5 and layered a 3-7/8 x 5-1/8 inch black rectangle from my stash and a 3.75 x 5 inch green one from the Oz pad. I used my gold leaf pen to edge the green rectangle and then used ScorTape to adhere it to the card.

I wrote the sentiment on my computer and printed out on cream cardstock. The clip that is holding it was originally baby blue. I sanded it first and then, used Lettuce, Latte, and Cloudy Blue Alcohol Inks to change the color. I then edged the sentiment card with Vintage Photo Distress Ink, slipped it into the clip and used Glossy Accents to attach it. The scarecrow is popped up. I used the ASI Kool TaK Clear squares where they would show and regular pops towards the middle that you couldn’t see. Now all I need to do is write a note and the card will be in the mail.


Sunday, September 11, 2011

Remembering 9/11...........................


The Cutters Creek Design Team sends our many thanks to our American Heroes and those in our Armed Services, Fire Fighters, & Police Officers.  We also send our heartfelt prayers to all those who lost their loved ones  on 9/11/01.  We will never forget...............................


Thursday, September 8, 2011

Happy Days Layout with Echo Park from Lori

I am absolutely LOVING this Happy Days collection from Echo Park!  The bright cheery colors make it great for so many projects.  I don't know about you, but I still have about a ton and a half of photos from my kids' younger days hanging around.  I thought these pictures from my now-5th-graders 3rd birthday were a perfect match for these papers.


Totally loving this!  Here are a few ways I added some dimension with these fun papers:

 Using a black distress ink pad, I edged all of my papers (I used a black marker around the shield shape).  Then, I popped up some of the pieces using some dimensional foam adhesive.


Finally, I added a few dimensional embellishments, like these bottle caps I smashed using the No More Shims mat.  I simply added some of the sticker elements from the collection mounted on cardstock in the centers.

Items available at Cutters Creek:

To see some add-ons I made for this layout, you can visit my blog.  Thanks for checking us out today!  Don;t forget to check back all month for projects featuring Echo Park Paper products.

Wednesday, September 7, 2011

Echo Park Happy Days LO by Laura C


Ok....I gotta say....I think I am in LOVE!! With this new
EP "Happy Days" paper collection!! It's so fun with so
many options!! And just to show you that it doesn't have
to be for "nostalgic" pics (but those look awesome too!)
This LO used the collection pack...the words are all from
the journal and word strip sheets, the record, music notes,
title letters, and black diamond strip are all from the sticker
sheet. A few buttons with twine finish the page off. A super
simple and super cute way to show off a fave pic (like this
one of my son in the "Sundae Relay" at youth theater camp!

Make sure to check out this awesome Echo Park Paper
at Cutters Creek!!

Available at Cutters Creek:
Echo Park "Happy Days" 12x12 collection pack
Glue Glider Adhesive

Tuesday, September 6, 2011

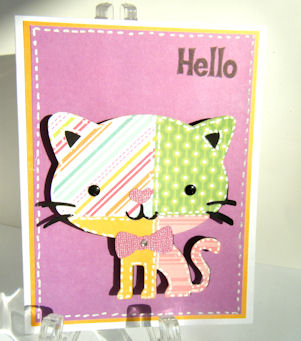
Patchwork Kitty-By Deanna M

So for Tutorial Tuesday I wanted to give you an idea on how to use some of those scraps building up in your scrap bin. If you are like me, you hate to recycle a piece of paper that you just might be able to use on another project. Here is what I have for you.
To make my patchwork kitty, I started with a 4" X 6" piece of regular bond, printer paper and ran it through my Xyron. You could also use a large adhesive label but I didn't have any so had to improvise and it worked beautifully. I then cut 2" X 2" squares from some of my scrap paper. My paper for this project is from several Echo Park Paper Pads.
 I then randomly picked up my squares and attached them to my paper using the adhesive applied by the Xyron. Here is how it looked.

I then selected my image which was the Kitty from Create-a-Critter. I cut the base layer out of black card stock (another scrap) and then the top layer from my patchwork paper I made. I grabbed a scrap of pink for the bow and the kitty's nose. My card base is  4 1/4" X 5 1/2" white card stock. The yellow and purple paper are from the Echo Park Summer Days Paper Pad. I used my white gel pen to add some faux stitching around the outside of the card as well as to "stitch" all the seams and along the outside of the kitty. I added some black nail head embellishments from my stash for her eyes and a silver rhinestone from the new Want2 Scrap embellishments, to the kitty's bow. I used some Memento Tuxedo Black Ink to stamp my Hello. I attached my kitty to my card front with an Action Wobble I hope I have inspired you to trying something new with those scraps. Thanks for stopping by. Be sure to come visit us again as we will be featuring projects using the Echo Park Paper Pads all month.

Monday, September 5, 2011

Chris' Quick Pick Me Up Card

I just had to. I couldn’t wait. Kim’s package arrived in the late afternoon and I had that Echo Park Paper opened and ideas buzzing through my head in less than five minutes. I already had an image from a coloring page colored with my Copic Markers that matched wonderfully. I fussy cut around it.

Hat: Y21, Y23, Y26, YR15
Skin: E00, E21, E50
Wood bin: E34, E57, E59, E0000, E33
Dirt: E11, E13, E21
Hair: Y23, Y26, Y28
Chicks: Y02, Y06, Y00, YR68
Straw: Y17, Y15, Y19
Shirt: G17, G19, G20
Jeans: B26, B28, B24, B32

I fussy cut two strips of the birds on a line from a piece of paper from the Echo Park Paper Country Drive collection called "Sundress" - of course! Then, using the other side of the same paper, I cut the third largest square from Spellbinders Nestabilities Lacey Squares. Of course I got a lot my toys in my package that I had to play with, so I tried the No More Shims Embossing Mat and yes, it is all it is cracked up to be. What a great deep embossing I got! The sentiment is another of Paulette’s, printed out small enough to be cut by the one-inch square of the Spellbinders Nestabilities Small Squares. I edged this sentiment with Copic color YR15.


To assemble the card, I folded a piece of cardstock to 4.25x5.5 and glued my bird strips along the long edges with my ATG (Advanced Tape Glider). I used the ASI Kool Tak Stix 2 Clear Foam Pads (Yup, another item in my package) behind both the girl and the sentiment. The girl is raised one layer and I raised the sentiment two layers by doubling the pads on the back. And Voila a finished card!

Saturday, September 3, 2011

Wedding Card & Hurricane Irene

Hurricane Irene has been rough on a lot of us on the East Coast. When you lose electricity, you lose so many things that you take for granted each day that are just "there". Running water was the one thing that was the hardest for us. We could not clean, give animals fresh water, flush, cook, and so much more. You also find out that you have to communicate with people the old fashion way, actually talk face to face. I think our world of internet and smart phones has made it so we no longer have to interact with people the old fashion way. I for one, loved running into strangers and chit chatting as we all were searching for water and ice. So I am one to have any excuse to craft and Irene gave me that chance. I made this wedding card for our neighbors. They are getting married next week. Since I had so much time on my hands, I really put a lot into this card, including time. I am more of a scrapbooker, so as my card morphed before my very eyes, I was so pleased I spent the time I did on it. Here is the front of the card:


I used an Ecstasy Craft kit for the wedding image and put that together with foam squares. I then hunted through my massive paper stash and found a piece of pearlized 12x12 paper and some American Crafts glitter cardstock in ocean. I cut down the white paper to a 5x7 card base. I then took one of my punches and created a lacy edge down the front of the card. I then took my butterfly punch and punched a butterfly and glittered it and added KaiserCraft pearls in denim for his little body. I mounted my Ecstasy Crafts image on the glitter cardstock and also cut a strip and adhered it to the inside edge of my card. I then attached my butterfly with foam squares under the wings to make it look like it was in flight and then added some more denim pearls on the bottom front of the card.
Here is the interior:

On the interior I took a piece of the leftover pearlized paper and stamped a sentiment and found a scrolly heart stamp and stamped that below the sentiment and added tiny denim pearls to each end of the scroll and in the four corners of the sentiment and mounted that on glitter cardstock. I also took one of my bonus images in my Ecstasy Crafts kit and mounted it on glitter card stock and adhered it to the interior as well. 

All in all, I am pretty pleased with my finished card and took so much time as I know the bride will save all her cards she receives.

All of these items can be purchased at Cutters Creek!


Related Posts with Thumbnails