Sunday, July 22, 2012
WOW! Embossing Powder Preview-By Deanna M
Here is a video I did to show you the WOW! Embossing powder. This powder is awesome stuff and I hope you enjoy it.

Saturday, July 21, 2012
Happy Birthday! By: Ms. Pebbles
Hello everyone!
I made this card the other day for my cousin and she shares the love for the same color as I do, so it was a joy to make a card using purple!! :)
 I inked the edges of a base white card with some purple pigment ink. Then I cut a piece of soft pink cardstock 1/4 inch smaller than the base card and used a emery board to rough up the edges and then inked those edges with a pink pigment ink. After that I layered a scrap piece of white cardstock with a piece of pattern paper from my stash, then a piece of purple ribbon and added some Kaiser Rhinestones for a little bling.
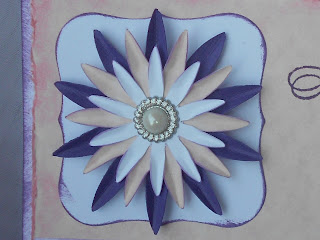
Now I know I've done this flower before using my eCfrat Purpleberry, but she liked it so much on my other project that she asked could I make her one. This time I used purple, pink and white cardstock for the flower and jewel brad for the center.
 After creating the flower, I adhered it to the card using 3D Pop Dots for some added dimension!
Thanks for looking and always remember, if we are out of stock on anything, ask Kim if she can special order it for you. Have a great weekend everyone! :)
I made this card the other day for my cousin and she shares the love for the same color as I do, so it was a joy to make a card using purple!! :)


Now I know I've done this flower before using my eCfrat Purpleberry, but she liked it so much on my other project that she asked could I make her one. This time I used purple, pink and white cardstock for the flower and jewel brad for the center.

Thanks for looking and always remember, if we are out of stock on anything, ask Kim if she can special order it for you. Have a great weekend everyone! :)
Wednesday, July 18, 2012
My Sunshyne! By Ms. Pebbles
Hello everyone! :)
I guess you would consider this a "layout" that I created of my youngest darling daughter Sunshyne. I wanted to create something to put on one of my walls in my scraproom, but I wanted to get a little more creative than the standard sizes and frames.

So I used my eCraft Purpleberry to cut out the black and purple flower shape that I used as my background.

In this close up, you can see where I used some Black Diamond Stickles to border the title "BEAUTIFUL", that I adhered using foam adhesive squares.

I used some Say it in Pearls as some corner bling. I replaced the original champagne colored bling with the purple rhinestones.

I used one of my purple makers to color these Color Me Crazy flowers to match and added a large gem I had in my stash to the center. I had allot of fun making this unconventional layout and my daughter loves it!
Thanks for looking! :)
Remeber....if we are out of an item, Kim may be able to order it for you.
I guess you would consider this a "layout" that I created of my youngest darling daughter Sunshyne. I wanted to create something to put on one of my walls in my scraproom, but I wanted to get a little more creative than the standard sizes and frames.

So I used my eCraft Purpleberry to cut out the black and purple flower shape that I used as my background.

In this close up, you can see where I used some Black Diamond Stickles to border the title "BEAUTIFUL", that I adhered using foam adhesive squares.

I used some Say it in Pearls as some corner bling. I replaced the original champagne colored bling with the purple rhinestones.

I used one of my purple makers to color these Color Me Crazy flowers to match and added a large gem I had in my stash to the center. I had allot of fun making this unconventional layout and my daughter loves it!
Thanks for looking! :)
Remeber....if we are out of an item, Kim may be able to order it for you.
Monday, July 16, 2012
Bright and Cheery
There is no doubt we are smack dab in the middle of Summer. Summer always reminds me of bright cheery colors, so I thought I would make a bright Summer card. When I saw this digital image, it screamed for bright cheery colors. I pulled out my one of trusty Echo park paper packs and decided which colors I wanted to use. This pack is an older one, that’s not in the store any more but I ‘m trying to clear out my stash because Kim leaves for CHA tomorrow and I know she’ll be bringing back a ton of new stuff I need to make room for.

I colored this adorable image with my copic markers to match the bright cheery colors in the Echo Park paper. I don’t use my bright darker markers a lot, so it was fun to break them out and give them a chance to play. Be sure to check back often this week to see all the exciting new stuff Kim is ordering at CHA. I can’t wait to hear about all the new goodies!!
Cutters Creek Shopping List
Friday, July 13, 2012
First Pony Ride Layout by Chris

The background is painted Caspian Sea Glimmer Glam on the back of a piece of decorative paper that
I just knew I would never use. The photo does not do the glimmer justice. It
absolutely GLIMMERS!
I mounted a 5x7 photo on Echo Park’s Country Drive paper and
used my Perfect Layers ruler at ¼ inch, distressed with the Zutter Distrezz-It,
and inked with Peacock Feathers Distress Ink. Another strip—yellow—was cut at
2.25x8.5 inches, inked with Squeezed Lemonade Distress Ink, and partially
layered under the photo mat.
I made my own Washi Tape using the paper towel I had under
my glimmer mist backgrounds project. I peeled apart the layers and backed it
with Scor Tape, ripped off a piece, and voila—washi tape. (Great way to
recycle, not lose a bit of glimmer mist, and get creative color combinations!)
Along the top of the photo is a decorative edge (also from the background paper
I had made a few weeks ago) cut with Spellbinders Shapeabilities Banner Basics
Two. I also cut a set of the larger
banners and trimmed one off and edged it also with Peacock Feathers. The
letters are from Echo Park and from my stash.
The best part of this simple layout is the Stkr.it card, which is coming soon to the Cutters Creek Store. Keep a look
out for it and if you got one of the samples Kim gave out, play with it. It is
so easy to do and adds a special touch to your cards or LOs. To see what is on
my Stkr.it card you can either scan with your smart phone if you have the
Stkr.it app, or you can go to the site: http://stkr.it/#home and enter the code that’s written below the scan square.
Once you do you should see a short clip of Quinn riding the pony.

I think I am
in love with this product and will be trying it out on a few other pieces. To
make it was also easy. You just need to enter the code that’s on the Stkr.it
you are going to use and follow the directions. It was so easy to do.
Resources from
Cutters Creek
Caspian Sea Glimmer Glam (Kim’s monthly club—yippee! She can special order this, just ask)
Zutter Distrezz-It
Spellbinders
Shapeabilities Banner Basics Two (Check with Kim for this product.)
Stkr.it card
Thursday, July 12, 2012
I'll be Home for Christmas Card by Deanna M

To help with your planning there are just 165 days left until Christmas. I can't believe we are almost halfway through July and it just is never to early to start working on your Holiday Cards, and Craft sale items. To help get you in the mood, I have for you this fun Christmas card.
I used the Handyman Cricut Lite cartridge and welded two shadows of this house together and cut it from white card stock. I cut one additional shadow layer from white and adhered it to the front of the card. I cut the card base and all the layers at 5". I cut the layers for the house out of patterned paper from My Minds Eye. While there isn't any of this paper left, check out what is in the store from Echo Park, it would work perfect. I used some Polar White Flower Soft on the roof edge. I then cut a snowman at 2 1/4" from the Winter Frolic cartridge (need this cartridge? Kim can special order it for you, just ask) and stamp his face with the Snow Cuties Peachy Keen Stamp Face. I also cut a tree topiary from the Joys of the Season cartridge also at 2 1/4". I used some Sugar Can Glimmer Glaze (Yes, Kim can special order this for you) to glaze my pot on the tree to give it a brassy look. Finally I used some Rouge Liquid Pearls to added some decorations to the tree and the buttons on the Snowman. Finally I added a black nail head for the doorknob.
I hope I have inspired you to get out those papers and get a jump start on your holiday crafting!!
Tuesday, July 10, 2012
Clear Scraps Tutorial Tuesday with Lori
Since it's
Tuesday that means it's time for a tutorial! There was a question on
the Cutters Creek Yahoo Group about the Acrylic Sheets from Clear
Scraps, so I thought I would share a project and some tips about them.
These clear acrylic sheets are 12"x12", so they are the perfect size for scrapbook pages or decor projects. They can also be cut with scissors, dies, and cutting machines (see video for cutting machine tips). There are plenty of ways to take your projects from everyday to extraordinary using these cool clear sheets! Today I have my most recent project to share with you, as well as a longer-than-my-usual video with more information. There's just too much information to type out, so if you're not able to watch videos and have a question, just leave it in the comments and I will respond as soon as possible. Here are two photos of the layout I made:
This layout looks WAY more cool in the
video where you can see the lights glaring off of it. I think it would
look awesome in a floating frame on a wall, but in my scrapbook I'll
keep the yellow CS behind it so that whatever layouts are behind it in
my album will not show through. It still has all kinds of awesome
dimension just perfect for my daughter's album!
Here's the video:
FYI: I checked and it looks like several of the Doodlebug Designs twine assortments have colors that will match this Echo Park collection so shop away! (And as always, you can ask Kim any question. If she's got items in stock, I'm sure she would be happy to color-compare for you.)
Here's a list of supplies I used that are available at Cutters Creek:
Thanks for stopping by today; hope to see you again soon!
These clear acrylic sheets are 12"x12", so they are the perfect size for scrapbook pages or decor projects. They can also be cut with scissors, dies, and cutting machines (see video for cutting machine tips). There are plenty of ways to take your projects from everyday to extraordinary using these cool clear sheets! Today I have my most recent project to share with you, as well as a longer-than-my-usual video with more information. There's just too much information to type out, so if you're not able to watch videos and have a question, just leave it in the comments and I will respond as soon as possible. Here are two photos of the layout I made:
 | ||
| Looks like an average layout, yes? |
 | ||
| But aha, remove the cardstock behind and it's a super-cool clear layout! |
Here's the video:
FYI: I checked and it looks like several of the Doodlebug Designs twine assortments have colors that will match this Echo Park collection so shop away! (And as always, you can ask Kim any question. If she's got items in stock, I'm sure she would be happy to color-compare for you.)
Here's a list of supplies I used that are available at Cutters Creek:
- Clear Scraps 12"x12" Acrylic Sheets
- Echo Park Paper, Hello Summer collection (currently sold out, so ask Kim about it if you want one!)
- Ranger, Tim Holtz Distress Ink in Festive Berries (from Winter LE set), Spiced Marmalade, and Peeled Paint
- Scor Tape, 1/8" and 1/2"
- Making Memories, Scrapbook Colors in Red Wagon and Spotlight (currently on special for half off at Cutters Creek!)
- Close To My Heart, cardstock in Sunny Yellow and Twine in Paradise assortment
- Echo Park Paper, Hello Summer chipboard elements (possible special order from CC - just ask!)
- We R Memory Keepers, Crop-A-Dile
- Copic, Multi-liner 0.3 in brown (journaling)
Thanks for stopping by today; hope to see you again soon!
Subscribe to:
Posts (Atom)





 Posts
Posts


