Tuesday, August 7, 2012

Birthday Card by Deanna M


I have a fun birthday card for you today! I made this for my son's girlfriend. Sure hope she likes it.

My card base is white card stock and is cut and folded to make a 4" X 9" card. This card will fit in a regular #10 business envelope. I added a pink mat cut at 3 3/4" X 8 3/4". My next dilemma was that the paper pad I wanted to use was a 6" X 6" paper pad but I need an 8 1/2" tall paper for my card. So what I did is I took two different coordinating papers from the My Minds Eye "Life's A Party" paper pad. This paper has not been added to the store yet but if your interested in it, let Kim know. Here is a picture of the paper pad.


 I cut the blue patterned paper in the middle of my card at 3 1/2" X 4". I then found a piece of paper in the pad that had strips for borders and cut that at 3 1/2" X 2 1/2" and placed that at the top of bottom of the blue piece on my card. Then the reverse of the border print paper had the same pattern as the blue but it was pink so I cut a 1/2" X 3 1/2" piece of that paper to place over the seams, My birthday ice cream cone is cut at 6 1/2". I ran the cone part through my Cuttlebug and embossed it with a Sizzix Argyle embossing folder. (This Cuttlebug embossing folder is very similar and would work well.)

To finish my ice cream cone I added some Key Lime Liquid Pearls for my sprinkles and some Orange Peel and Paprika stickles to my candle. I added my Ice Cream Cone with some foam tape to my card front.

Monday, August 6, 2012

Another Ecstasy Craft Project by Deanna


Isn't this Morehead Ecstasy Craft just the cutest! Kim has some of these in the Ecstasy Craft section of the store and I believe there are new ones still be be loaded to the CHA section so be sure you shop both places. I have for you today a quick Get Well card I made for friend recovering from knee replacement surgery.

My card base is white card stock cut and scored to make a 4 1/4" X 5 1/2" card base. This card is a portrait card. My patterned paper is from the My Minds Eye On the Bright Side One paper pad. I cut the blue mat at 4" X 5 1/4". I then used my Elegant Edges cartridge to cut the mat my Image is sitting on. I cut the shadow and top layer using the Oblong creative feature at 3 1/5". I adhered the mat with some foam tape to my card front.
I put my little kitty together using  the Joy! Foam pads. I strongly recommend that you get at least one package of each of the sizes of these foam pads. They work great with the Ecstasy Craft images for layering. I used some Scotch Quick Dry adhesive to attach my kitty image to the mat.

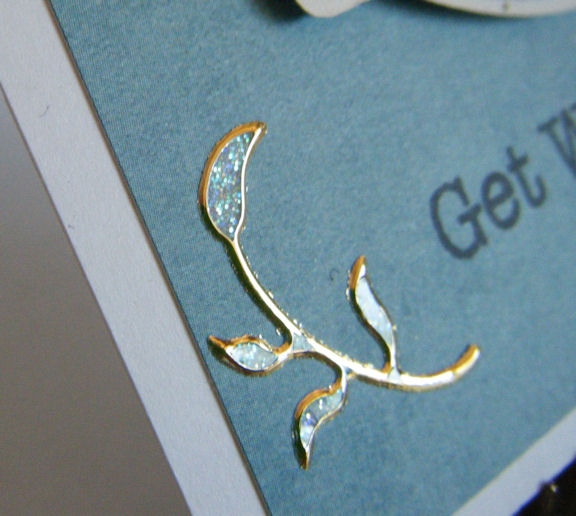
To dress up my card a bit I used some of the Peel Off Flourishes. The ones I have are gold with an iridescent look to the leaves. Here is a close up of just one of the flourishes.

Aren't they beautiful? And still this picture does not sow of the shimmer and shine of the flourish. You will have to get some for yourself to really see their loveliness.


Sunday, August 5, 2012

Summer Sisters! By: Ms. Pebbles

Hello everyone! :)
Today I want to share a layout I did of myself and one of my sisters using the Country Drive collection by Echo Park

The 12x12 and 11.5x11.5 background paper is just a couple of pieces from my stash. I used my eCraft Purpleberry to cut a 8x8 circle from the Flutter By piece in the pack and then I cut a 8.5x8.5 piece of white card stock to border it.

The picture was taken a few summers ago but I'm just now getting around to scrapping it! This particular summer, we did almost everything together like we were teenager again!

 The Alpha Stickers and quote stickers that came with the collection works perfect on the cut out Journaling Cards in the pack...my handwriting is terrible! :) I used one of my Color Me Crazy flowers in the corner but left it white and just added a large gem I had in my stash and made a stick pin to coordinate. The little yellow bow is also from my stash.

All of the flower embellishments in this section is from the Color Me Crazy pack except for the green layer on the top flower. I used some markers to color the yellow and the pink flowers. The butterfly is one of the card stock stickers that comes in the pack. I applied it to white card stock then carefully cut it out. I bent the wings back slightly and used a foam square to adhere it to the layout.

I created this using one of the element stickers that came in the pack. I adhered it to a piece of white card stock then cut it out to border it. I used the same stripped card stock from the pack named Apron Strings and glued it to white card stock  to create a border for this as well. I used foam squares to adhere the title to the stripped border to give it some dimension.

This picture has always brought back sweet memories of very fun summer I had with my sister and now I'm glad that I've finally scrapped it using such a bright and fun paper pack!

Thanks for looking! :)


Thursday, August 2, 2012

CHA Goodies! by Laura C

Kim has SO many amazing new goodies in the store, or
coming to the store!  But she also has some "hidden
gems" in the store too!  This card is a little of both:


Here is most of what I used:

The papers are some of the new MME coming
and the new WOW embossing powder was
used to emboss the sentiment. Distress Ink in
Ripe Persimmon and Wild Honey distress up
the sentiment tag, and the stamped image is
colored in with Broken China and Wild Honey
Distress Markers.  The "washi tape" is the
American Crafts....Kim still has several types
in the store....and of course the new washi
is in....by Love My Tapes!!! 

Make sure to keep checking in the store
daily for all the new goodies Kim brought
in, but don't forget to take a peek around,
there might just be a hidden surprise you
missed the first time around! 


Tuesday, July 31, 2012

Ecstasy Craft Sneak Peak-Part 2 by Deanna

I have another sneak peak for you of some of the awesome holiday Ecstasy Craft items that Kim has just added to the store.


These are called Reddy Die-Cuts and this is Popcorn the bear. As you can see I got 4 cards from one package. As you can see they come with a background paper to build your image on. Building the image is easy as 1,2,3. All of the punch out items are numbered in the order that you layer them. It took me just about an hour to make all 4 cards which is fast for me. The individual card toppers measured just under 4" so I cut 4 white card stock card bases at 4 1/4" X 8 1/2" and scored and folded them to make four 4 1/4" square cards and rounded the corners. These will fit in a standard size A2 envelope so you won't have to pay extra postage to mail a square card.

On this little guy I added some Frosted Lace Stickles between the snowline and the sky and also on the 4 larger snowflakes. (sorry it doesn't show up better in the photo).

On this one I again added some Frosted Lace Stickles to the snowline and I also added some Stardust Stickles to the stars by the moon.

For this one I added some Ultra Fine White Flower Soft to the snow along the top of the fence and also to some of the snow on the tree limbs.

On this one I again added some Stardust Stickles to the fireworks in the sky.

Check out the dimension you get with these wonderful little layered images.These were quick and easy to make and are beautiful as is without any additions. It is a fun and quick way to make some cards to give as gifts or to mail to family and friends.


There are some great new Flower Soft products that have been added to the store just in time for your holiday crafting so be sure to check them out. Also be sure to check the  new CHA 2012 Release section of the store to find out the latest and greatest additions including these wonderful Ecstasy Craft items.


Sunday, July 29, 2012

Ring Ring

Today I have another card featuring one of the adorable La La Land Craft stamps.  Cutters Creek has just started carrying these stamps and they are so cute.  Right now Kim just has the holiday stamps in the store, but if you want a certain one and you don’t see it in the store, send her an email and see if she can get it for you.  For my card I’ve chosen Telephone Marci. 

photo(7)

I love the retro telephone and her glasses, so I chose papers that with retro colors.   I colored Marci with copic markers to match the colors in the Echo Park Walk in the Park paper pack.  I wanted to add some dimension and texture to the card, so I went over the phone and her glasses with some glossy accents  so they would look like shiny plastic.

marci phone close up

This is a fun way to make certain elements of your image stand out.  I finished the card off with a sentiment (included with the image) and a big flower.  I made a paper covered brad to match the papers of the card and added that to the center of the flower. 

I encourage to keep checking the store to see what new stuff Kim is adding.  I ‘m trying to use up all my old stuff to make room for all the new stuff I want. 

Cutters Creek Shopping List

Copic Markers

Echo Park Walk in the Park paper

Ranger Glossy Accents

Saturday, July 28, 2012

Stair Step Card Tutorial by Fran


I fell in love with the cutest decorated stair step card I saw on the Whiff of Joy Blog.  I also loved the theme too.  It really inspired me to give it a try.  I guess you can say that I scrap lifted but added my own style to my version of the card.  I like to share with you the steps I took to come up with the same size card as on the Whiff of Joy Blog that folds to approximately 5” by 5” square card.

I was undecided on how I was going to decorate it so I colored the images I wanted to use.  And the background piece I wanted to use also.  But the rest of the elements may be different in the finished card then what you see below.  But not that much of a difference. I added lots of flowers and butterflies that I did not show below.

(Click on photos for larger view)

Pieces Of All Elements For Card

To get the finished size as indicated above you need a piece of card stock that measures 10-1/2” by 5”.  And you score it using the measurements indicated in the photo below.

Stair Step Card Measured and Creased

  1-1/4”, 2-1/2”, 4-1/4”, 6”, and 8-1/4”

Once you score your card you fold accordion style.  But make sure the first small fold is folded down.  And this is the portion that is the front of your card.  See photos below of how it looks once folded.

Preliminary Card Base Folded

Preliminary Card Base Folded_Side View

Once I had my card folded in the stair step style I began putting elements on the different layers (steps).  Below is a photo of the beginning stages of my card.

Partial Layout of Stair step card


Here is the finished card!  I had fun making this card and will probably make more but it does involve lots of elements.  And it helps to think of the theme so you can gear all of your elements to that theme.  I hope you like it.  Details about the card are below the photos.

Front View 1

Side View

Close close up

o  Images:  Fence & Stone Path (La La Land) now at Cutter’s Creek

o  Sassy Sally Sets in Wonder (Sassy Cheryl’s Digital Images

Note:  Fence and Sassy Sally colored w/Prisma Colored Pencils

o  Background Sky & Sun Paper (Digital paper by Creativeqube)

o  Pattern Papers – Recollections (my stash)

o  Squirrel – Free Digital Image (my stash) Colored w/Prisma         Colored Pencils

o  Mushrooms – Free Digital Image (colored using Paint Shop Pro)

o  Grass – Free SVG Cut File (my stash)

o  Sentiment – Cuddly Buddly Crafts

o  Flowers – Fancy Blossoms Die Cut by Memory Box

o  Butterflies – Butterfly Delights Die Cut by Memory Box

Liquid Pearls – by Ranger

Stickles Glitter Glue by Ranger

   Thank you for stopping by

Cutters Creek!

Related Posts with Thumbnails
