Friday, May 31, 2013

Graduation Masculine Card


This is my card for masculine/Father's Day week.  Instead of doing a Father's Day Card, I chose to do a graduation card for my God Son who's graduating from High School next week.  Most everything but the letters can be found at the Cutter's Creek Store.     I used the
 Echo Park 6x6Paper Pads and the Green Rhinestones, were 1mm in size.  The banner with the letters and the Congratulations stickers were all things I had in my stash.  Hope you enjoy the card!


Thursday, May 30, 2013

Father's Day project by Cindy

Hi everyone,
The Cutters Creek Design team is making masculine projects this week and today I am sharing my project. I really wanted to make something for my husband and my dad but I didn't want anything to crazy since we will be on vacation on Father's Day. So I came up with a card and a gift all in one! I used mucho scraps to make this little book. I used my Bind-it-all and the Dilly Dally paper from My Mind's Eye along with cardstock from SU. The size is 5x7.


For my image, I used the Father's Day cartridge for the motorcycle and the DAD was cut from Create a Critter 2, I think that it was part of the trophy image?


I then found an image of a present, made it big enough to see and then printed it out and attached it to some cardstock. My son doesn't look super thrilled at all, does he?


Then I printed a picture of my Lily holding a heart picture that I found on the Internet. She is always to ready to pose for the camera, messy hair and all.


Then I printed out Happy Father's Day and cut out the words and mounted them on cardstock and took a picture of my kids holding the signs.


I then used my brand new We R Memory Keepers envelope board and made a cute envelope. It stays closed with velcros. I plan on having the kids write a little note that I will tuck inside. Then these books will get packed in my suitcase until Father's Day. There is a learning curve to using this board but I think its a phenomenal tool. 


Here is the version for their Grandpa. I used the Robotz cartridge for the lettering and the chair was cut from the Father's Day cartridge. My dad has a recliner that is "his" its remote control. As soon as my dad gets up, my kids all run over and sit in his chair. They think its hilarious to steal Grandpa's chair.

I did make a video for you so that you can see everything a bit clearer and you get to see the envelope board in action.


Thanks so much for visiting me today. Be sure to visit the Cutters Creek store if you are interested in any of the products I used today.

Cindy

Wednesday, May 29, 2013

Thank you dad by Jearise

Father's Day is a special time to say thank you dad for all you do and that is why I put together this special Father's Day card.


I used the Tim Holtz Idea-Ology Paper Stash Paper Pad-Kraft Resist to make the card. This paper is great for making masculine projects.

I have to show you a close up side view so you can see the Glimmer Mist I used. I just love this stuff and find I spray it on almost all my projects now just to give them that little extra touch. Also, these mist that add a touch of glimmer and glitz to your projects come in almost every and any color you can think of.

(I must add that my letters are more of the yellowish color like in the first picture but every time I tried to get a good picture of the Glimmer Mist, the letters would turn out more green in color.)

Here's a close up of the "D" and the "A." You can see how I used Tim Holtz Distress ink pad in Tea Dye to give them a distressed look.


My final touch came with the buttons and twine. I used Doodle Twine in the Primary Colors Pack - green.

I used my go to glue - Scotch Quick-Dry Adhesive and my go to tape gun -  Scotch Advance Tape Glidder to hold it all together.

Thanks for taking a peek today and I hope I've given you some Father's Day inspiration.

Jearise from Lorby's World saying so long for now and looking forward to next time.

Tuesday, May 28, 2013

Michele's Card

Hello ,
Today is my day to present to you a father's day card I made.  The card base is white card stock 4 1/4 x 5 1/2". Then with some blue cardstock I embossed it with Tim Holtzs Alterations texture fades Retro Cirque Set- Carnivale.  Next I added a simple saying #1 Dad and I cut that out from the Cricut using "Celebrate with Flourish". This cartridge had a lot of saying for all the seasons and holidays.  I used 2 different colors of brown and then glued together and used pop up dots.  I had some ribbon that is brown in the middle and outline in blue.  All of the items I used was some of the stash I already had at home.
If you have seen anything you like from my card please visit the store. The store has lots of items for you and if you do not see something please ask KIM and she will try to get it for you.

Monday, May 27, 2013

Father’s Day Card


My project for the Cutters Creek Design Team is a Father’s Day Card.  Obviously, when I was thinking about the card my Dad was the person who put my creative gears in motion.  I’ve always bought his cards but I thought he would really enjoy getting a card that I handmade.  My Dad is 93 and I didn’t know what he would like so my little brain thought why not use a car as the main image.  And use one that was current the year he was born—1919.  So off I went to Google and found a image that was perfect. 
OLYMPUS DIGITAL CAMERA
I tweaked the image in Paint Shop Pro and aged it more.  Then I added a frame that looked like its been around for 93 years.  The frame is the border that gives the appearance of an old photo.  The gears (front & inside) and the Sentiment is from the Silhouette store.  I used my Silhouette Portrait to cut them out.  Everything on the card is held together using 3 different adhesives:  Scotch Adhesive Dot Roller (Permanent), Glossy Accents by Inkssentials, and Sakura Pinpoint Roller Pen Quickie Glue (great for thin items like the sentiment).
Note: The Scotch Adhesive Dot Roller is not available in the Cutters Creek  Store but you can contact Kim to see if she can special order it for you.
And if you’ve been playing with the idea of getting a Silhouette I know Kim can special order it for you.  She did for me and then I put it on Layaway for 3 months.  Easy Peasy so they say!
Thanks for stopping by and I hope I tweaked your creative side a little.   Fran

Sunday, May 26, 2013

Family Man by Deanna M

Welcome to the start of Masculine Week here at the Cutters Creek Design Team Blog.

We know that for many of you making masculine cards can be difficult. So we wanted to help you all out by offering up a full week of ideas, just in time for Father's Day. So be sure to stop by each day this week to see all of the Design Teams inspiration.

For my card today I have a Kraft card stock base cut and scored to make a 4 1/4" X 5 1/2" card. I added a dark blue mat cut at 4" X 5 1/4". I added a patterned paper mat cut at 3 1/2" X 4 3/4". I did this so I had more of the dark blue showing.

My image is cut using the Suburbia Cricut Cartridge at 4". (Check with Kim, she can order it for you. It has some great silhouette images on it of men, women, and children. Kim can be contacted through the store here. Be sure to browse around while visiting the store.) The rug is a Silhouette cut that was cut at approximately 3 1/4".

I used Scotch Quick Dry Adhesive to put my cuts together. I really like using this adhesive for things like this because it gives you a few seconds to get your cut layers lined up. It is awesome adhesive if you haven't tried it yet. My sentiment is stamped with Memento Tuxedo Black ink. I adhere the rug to the card front with the Scotch Quick Dry Adhesive. The other man in the chair and the sentiment are attached with foam tape.

My blue mat and the base layer of the man are cut from some Tim Holtz Core' denations kraft core card stock. I know Kim can get this for you because she ordered it for me.

The patterned paper I used for the background and the rug are all from a 6 X 6 paper pack by Fancy Pants called Swagger. Its a great pack for masculine card. Kim doesn't carry this but can special order it for you, just ask.


I chose this image because it reminded me of my grandfather. I remember when I was a child visiting my grandparent. Grandpa would come home at night and sit down in his chair in the living room and read the paper. I have a lot of happy memories about my grandparents.

I hope you will find plenty of inspiration throughout this week. Please let us know if you find it helpful in when you need to create a masculine card.

Friday, May 24, 2013

Graduation Card by Cindy

Hello, Today, is my turn to post a project for the Cutter's Creek Design Team blog. I received my first commission to make some cards for a colleague. She wanted 25 Graduation cards. I wanted them to be pretty but still simple enough to do a large amount of them. This is what I came up with:


I used the swiss dots embossing folder on white cardstock. The sentiment is from my stash. I used my Nate's ABC's cartridge to cut out the numbers and the hat was cut at 2.0 inches from the Wrap it Up cartridge. I used burgundy stickles on the tassle. I attached the hat using foam dots. If you are going to make multiple copies of a card, the assembly line method works very well. I cut out all of my pieces using my cricut. Stamped the sentiment and then ran my card through my Cuttlebug. The last thing that I did was adhere all of the pieces to my card. If you are interested in any of the products that I used today, be sure to visit the Cutters Creek store.

Thursday, May 23, 2013

Teacher Card with Lori

The end of the school year is upon most of us in the next couple of weeks. I like to send the teachers a little something in a card to say thank you for their efforts. My son is not likely to appreciate anything too girly, and since I want him to sign it, I went with this easy number:


The entire thing is cut from the Cricut Wild Card cartridge, using My Mind's Eye papers and cardstock. The Stella & Rose - Mabel paper pad I used is not in the store, but many of their lines have the same muted feel. I think it looks a bit like a county fair, which I think is pretty cool!

To add to the rustic look, I used Tim Holtz Distress Ink in Spiced Marmalade and Evergreen Bough to edge all of my cut papers.

 After assembly, I added accents with Distress Stickles in Spiced Marmalade, Broken China, and Clear Rock Candy. I also slightly curled up the bottom ends of the ribbons.


It's a great way to accent small bits, or to draw attention to a certain part of a single color item, like this sentiment.


I cut the matching envelope from the cartridge, and also ink distressed the edges of the closed envelope to coordinate.


Items available from Cutters Creek:

Other items:
  •  Cardstock

I hope you enjoyed today's project; I had a great time making it! Thanks for stopping by.

Wednesday, May 22, 2013

BINGO

For today's post, I made a little Bingo card.  For those of you who are 4-H Mom's, you know how long days are at the county and state fair when your children are showing.  So I made a little card to send out to all the parents in our club to remind them to start collecting their quarters.  We always go and play and cool off in the air conditioned building, while the kids are showing at the horse show...

If you've never used the WOW Embossing Powder there's a great You Tube Video video from CHA that explains everything on the How To's.  It's super easy and a lot of fun.  On my BINGO card I used the powder on the card itself, and on the numbers.

The other items I used were Graphic 45 Paper and  Rich Coco Memento Ink to do some distressing around the white paper.   Everything that has a link to it, except the You Tube Video from CHA, can be found at Cutter's creek Store.  If you have any questions, please feel free to ask.  Hope you enjoy my post!


Tuesday, May 21, 2013

Michele's Father's Day Card

Hello

This week I decided to make a Father's Day Card since it is about 1 month away.  First I started with a white card base and with brown cardstock  I embossed using Tim Holtz Alterations Texture Fades-Harlequin- ask Kim she may be able to order if not in the store. Here is what it looks like after I embossed it.
Next, I added some We R Memory Keepers twine- yellow, around the brown cardstock before taping it down to the white cardstock.  Then I cut out some strips of card stock I had in my stash in two different color plaids.  For the center I used Spellbinders Labels Twenty-Two, cut it out in white card stock and with a stamp I had stamped Happy Father's Day dad. I added pop up dots to give it some dimension.
Hope you enjoyed this.  If you see anything here that I have used please visit the store here and if you do not see something just ask Kim she might be able to get it for you.

Monday, May 20, 2013

65th Birthday Card by Deanna M

One of my friends at work is turning 65 this week and I told her I was going to make her a card that celebrated her special birthday. This is what I came up with.

My card is a  5" X 7" white card base. I added a dark purple mat cut at 4 3/4" X 6 3/4" and a patterned paper mat cut at 4 1/2" X 6 1/2".

For my 65 I used the Cricut Craft Room and the Craft Room Basics and the shadow  feature to weld together the 65 purple base. I then cut the main layer out of a reddish pink card stock.Papers are from my stash. I sprayed the this layer with two coats of the Pink Glitter Dust Spray. My numbers were cut out at 4".

I used Scotch Quick Dry adhesive to adhere my number layers together. I also used the adhesive to attach my numbers to my card front.

My banner is cut from the Create-A-Critter 2 cartridge. (Kim can order this for you). I cut it at 3 1/4" out of some lime green card stock. I stamped my sentiment with some VersaMark embossing ink (Kim can probably get this for you). I formed my clear stamp so it followed the curve of the banner and stamped it. Since purple is my friends favorite color I embossed the image with some Presido Purple WOW! Embossing Powder. I attached my banner to my card using some 3D pop up glue dots. I used one glue dot on each end and two glue dots stacked in the middle so the banner has a wavy appearance.

This was a fun card to make. I hope you enjoyed it.

Friday, May 17, 2013

Graduation Card by Michele

Hello,
I wanted to share with you  2 graduation cards I made for a co-worker.  The first card I made was with some black card and a graduation paper I found in my stash.  The card is 9x6, and at the end I scored it in at 2 1/4 on both sides.
I added my graduation paper on the flaps.  To close it I added a band that is 1 1/2 wide and you can adjust the length.  I used a die-cut from Spellbinders Lacey Ovals
A closer look

From my collection of stamps, I stamped congrats grad! and then I embossed it in WOW! embossing powder-Primary Ebony.  Then I add some bling.  The inside of the card I added a piece of white card stock and stamped congratulations
 

I also made another graduation card.  The size is 5x7 and the base is white and found some orange color paper and another graduation paper I had at home.  I just did half and half of each paper and in the middle I added some white ribbon. 


The saying I printed out from my computer and then added pop up dots.  The hat(a stamp I had in my stash) I cut out and added some Diamond Stickles. The inside I stamped congratulations.


Hope you like the cards.  If you like anything I did and would like to order some items please contact Kim she will be able to help you get the items you want and check out the store for more amazing items.  Thanks for stopping by to check out my card


Wednesday, May 15, 2013

A Golden Tag by Jearise

Hello,

Today I have another tag to show you. I was never one for tags but have started making a few lately and love what I can do with them. I think I like the idea of working on a smaller scale.

I started with Core'dinations papers and used the Sweet Tooth Boxes cartridge to cut out this lovely tag. There are more then boxes on this cartridges (Check with Kim about ordering it.)

I then sanded and used Tim Holtz distress ink (frayed burlap pad) on the tag.

Next I added Perfect Pearls Mist (heirloom gold). It's hard to see unless you enlarge the pictures.
Finally I ended up with this...
The flower is from the Flower Shopped cartridge by Provo Craft (Check with Kim about ordering it.) and I used Tattered Angels (Starfish) for the flower petals and Stickles (yellow) for the center.

It's been a pleasure to show you another tag and I hope that I have inspired you to try a tag if you haven't made a few already.

Thanks for stopping by,
Jearise from Lorby's World

Monday, May 13, 2013

Hip Hip Hooray!


Today for Cutters Creek I did a Birthday Card.  On occasion time just doesn’t allow you to just sit down and color an image that you want to use on your card.  So I went to my faithful box to see what I had stashed away. And there it was I colored a Magnolia image, Tilda over 2 years ago.  That’s right 2 years ago!  I was just learning the techniques of using Prisma Colored Pencils and Gamsol (Mineral Spirits).
I looked at it for a few minutes and said its perfect for what I want to do.  I used some digital papers that went well with the colors I used on Tilda (mostly lime green and warm gray).  I added dark brown color to her hair and gave her big rosy cheeks.  Everything on Tilda was colored with Prisma Colored Pencils except for the skin I used Copic Markers.  And I used my fine point scissors by Elizabeth Crafts.  Let me tell you these scissors are awesome.  I cut out between Tilda’s hair and arms with no problems (made for fussy cutting).  You just take your time and let the scissors do the work for you. 
Now I am thinking what sized of a card do I want.  I chose a 5-1/2” square card.  I rounded the corners of the card with the Crop-A-Dile Corner Chomper. Then I went further in my stash and used some white flowers and colored them with Tim Holtz Distress Ink in Squeezed Lemonade and Shabby Shutters.  Now you know I just had to add some bling so I used Stickles Glitter Glue in Lime Green and Yellow.
I kept looking at Tilda's posture and said I need a cute sentiment that will go with her posture.  So I went shopping at the Silhouette Store and found the perfect sentiment (Hip Hip Hooray!).  I glued the sentiment on green checkered cloud shape which is an external offset of the sentiment done with the Silhouette. And on the inside the sentiment will be “Happy Birthday” also cut on the Silhouette Portrait.
The large flower in the corner is the one I colored with distress ink and I added two leaves made from ribbon (very light celery green) from my stash.  You know it sounds like I lot of work to do for one card.  But if you have the right products and tools your card goes together so quickly.  What takes long is waiting for the Stickles to dry :)
Front View
OLYMPUS DIGITAL CAMERA
Inside View
OLYMPUS DIGITAL CAMERA
Card Details:  Glossy Accents by Inkssentials,  Stickles Glitter Glue (Yellow & Lime Green),  Tim Holtz Distress Ink Pads (Squeezed Lemon & Shabby Shutters), Mini Glue Dots Brand Adhesives. Skin in Tilda colored with Copic MarkersElizabeth Crafts Fine Pointed “Fussy Cut” scissors*.   All these items can be found at the Cutters Creek Store.  Just click on the words and it will take you where the items are featured.
* Elizabeth Crafts Fine Pointed "Fussy Cut" Scissors are sold out at this time.  But please check with Kim Bush here if you are interested in purchasing the scissors.
The printed digital papers are by Bella’s Beauties (Tart & Tangy Ginghams) and Pretty Paisleys designed by Kris Breach.  The grass is a cut created with the Silhouette.  And all the flowers are from my stash.
And if there are any other items you see and like just check with Kim here and she may be able to special order it for you.
Thank you for stopping by, Fran

Sunday, May 12, 2013

Happy Mother's Day!!!

The Cutters Creek Design Team would like to wish everyone a very Happy Mother's Day.


Saturday, May 11, 2013

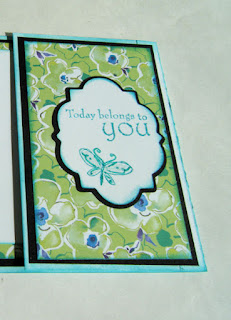
My Version of Gate Fold Card by Deanna M

When I set out to design this project, I knew I wanted to do something a bit different then my typical A2 card. I did some blog hopping and decided I wanted to make a gate fold card. But I decided I wanted to create my own version of a gate fold card and that is what I did.


I started with a piece of white card stock cut to 5 1/2" X 12". I die cut one edge using a Tim Holtz on the edge butterfly die. (Check with Kim if you are interested in this die). My next thought was how to dress up the butterlies. Once again Tim Holtz to the rescue. I placed several different colors of distress stain (I used Peacock Feathers, Squeezed Lemonade and Shaded Lilac) I then spritzed the distress stains with water and and swished my butterflies in the stain. I then let them dry. I added some Buttercup and Lavendar Lace Liquid Pearls to the bodies of the butterflies.

Once the butterflies were all dried I scored my card stock at 3 1/2" from each end. I heavily inked all the edges of my card with Peacock Feathers Distress Ink (this is one of my favorite colors).  I added a black mat and then my patterned paper mats. I also did the inside of the card.


My next dilemma was how to finish the card. It just needed a bit more. I took another piece of white card stock and again applied some distress stains to my mat. This time I used Peacock Feathers, Seedless Preserves, Salty Ocean and the Burnish Pewter Metallic stain (again Kim can order these for you, just ask). I again squirted the stains with water on my mat and just swished the paper across my mat to color the entire page. I then spritz the paper with a bit of water to get the colors to flow. I allowed the paper to dry thoroughly. I cut two butterflies using my Silhouette cameo. I cut the base layer using the stained paper I created. The top layer was cut using the tracing paper I have it is a bit transparent.

To finish the front of the card, I cut a mat using Elegant Edges (again Kim can order this for you) at 3". I cut the shadow out of black and the base layer out of white. I inked the white mat with the Peacock Feathers distress stain and stamped my sentiment and the butterfly. I used my Turquoise Spica pen to enhance the lines of the butterfly and use the Clear Spica pen to add sparkle inside the wings.

I sure hope you enjoyed my version of a Gate Fold card. I would love to see you all create your own version as well and share it with me. I think this card would work great for a Mother's Day card, Birthday card, or even a Graduation card. What do you think?

Thursday, May 9, 2013

Birthday Card

This is a birthday card I made for my niece who turned 8 over the weekend.  All of the paper used on the card is from My Mind's Eye (Indie Chic) and the bakers twine is from Doodle Twine.  The colors I've chosen to use are orange, green, and blue.   All of these products can be found in the Cutter's Creek Store.   Hope you enjoy my post.


Wednesday, May 8, 2013

Mother's Day card by Cindy

Hi everyone, Today is my Design Team post for Cutter's Creek. I decided to make a side step stair card for my mom for Mother's Day. I used the tutorial from Splitcoaststampers here. One of my favorite ways to use Graphic 45 paper is to make mini albums. After I made the album here, I still had quite a bit of beautiful scraps that I thought would be perfect for this project.


This is a case of a card from Glenda's Crafts. The Graphic 45 paper is Secret Garden. I also used the Bloom Cricut cartridge for the flower boxes, Elegant Edges for the sentiment mats, the hat and grass is from Everyday Paper Dolls and and the fence is from My Community. 


I used the d'vine swirls cuttlebug folder on the fence. I also used some stickles on the tips of the flowers.

I hope that you like my project today. If you are interested in any of the products I used be sure to visit the store!

Tuesday, May 7, 2013

Fairy Tag by Jearise

Today I decided to showcase a fairy gift tag I made. I rarely ever make a gift tag but after making this one I want to make more. I love how it turned out and hope you like it too.


I used my Cricut Expression and the cartridge Plantin School House to cut out the tag. (Ask Kim and she can order the cartridge for you.) The Fairy image is from Graphic 45 - Once upon a Springtime.  I then sprayed the tag and the fairy image with Perfect Pearls Mists in Perfect Copper. I found a paper flower I had and also used the Perfect Pearls Mists for that. The fairy wings were outlined in Stickles. Finally, I used Scotch Quick Dry Adhesive to assemble all the pieces except the pearls. I used my glue gun on them.

Here are close ups of the wings and flower.


I love the way you can change a plain white paper flower into something so beautiful by just spritzing it a few times.


So until next time, I'm sending you some happy fairy wishes.

Related Posts with Thumbnails