Wednesday, June 30, 2010

Weddding Card by Chris


Ever since Kim has gotten in the American Glitter paper I have been finding different ways to use them. This card could be a wedding card from the bride to the groom or any other occasion that warrants a tuxedo, but it was actually created for my mom to give as a gift to my nephew on his wedding day. She needed a card that she could fit the US savings bonds she’s collected for him over the years; so the card base is one 11 x 8.5 sheet of white cardstock, scored at 5.5 to fit an A8 envelope (5.75 x 8.75). Red cardstock (left over from Valentine’s Day embossed with hearts) was cut and glued on to cover the base.

I then used Inkscape to trace a tuxedo jpeg and brought it into SCAL to cut. (I know you can trace in SCAL, but I am a bit faster at it in Inkscape.) I made a shirt piece out of the white glitter paper, the lapels from the silver, and the jacket, pocket and bowtie from the black glitter paper. I hand cut a handkerchief to peek out of the pocket. I used my 1/8 of an inch ScorTape to adhere the pieces together. I find that works best when adhering the glitter paper together. I then used black stickles to put shirt buttons and one button on the jacket. Next I created the sentiment in SCAL. I used Wrexham Script and cut it from white cardstock, sponged the cardstock with versamark, sprinkled silver embossing powder over it, and used my heat tool to set. I repeated that step three times to get a really rich tone of silver. Had a leftover heart from Valentine’s Day too so I embossed that and added it to the card. I hope she likes it. For your pleasure I’ve attached the svg of the sentiment and the svg and scut of the tux. I’d love to see what you create.


Cutters Creek Resources:

Friday, June 25, 2010

"Preserve" Your Memories by Lori B.


If you thought the Preserves Cricut cartridge was just for recipes, think again! I've been using it for some "sweet" cards, and now this great layout. I took my kids blueberry picking last summer, and Preserves was just the right touch for enhancing those pictures.

I used American Crafts glitter paper in Marine for the top layer of my berries and for my title. With the attention this paper is bound to get, I skipped any other embellishments entirely. The layers on this cartridge cut easily at all the sizes I used, and they're super easy to assemble!


Because the glitter paper is so thick, I used Scor-Tape to adhere it to the shadow layer. I used my Tombow adhesive to layer the leaves, and adhered the berry layers to the leaves using foam adhesive squares for added dimension. The "picking" portion of my title was cut with the Opposites Attract cartridge and Design Studio. It was adhered using my Quickie Glue Pen. The rest of the layout was adhered using Tombow adhesive.

Items available at Cutters Creek:

Thursday, June 24, 2010

Monogram Sign Project by Melissa


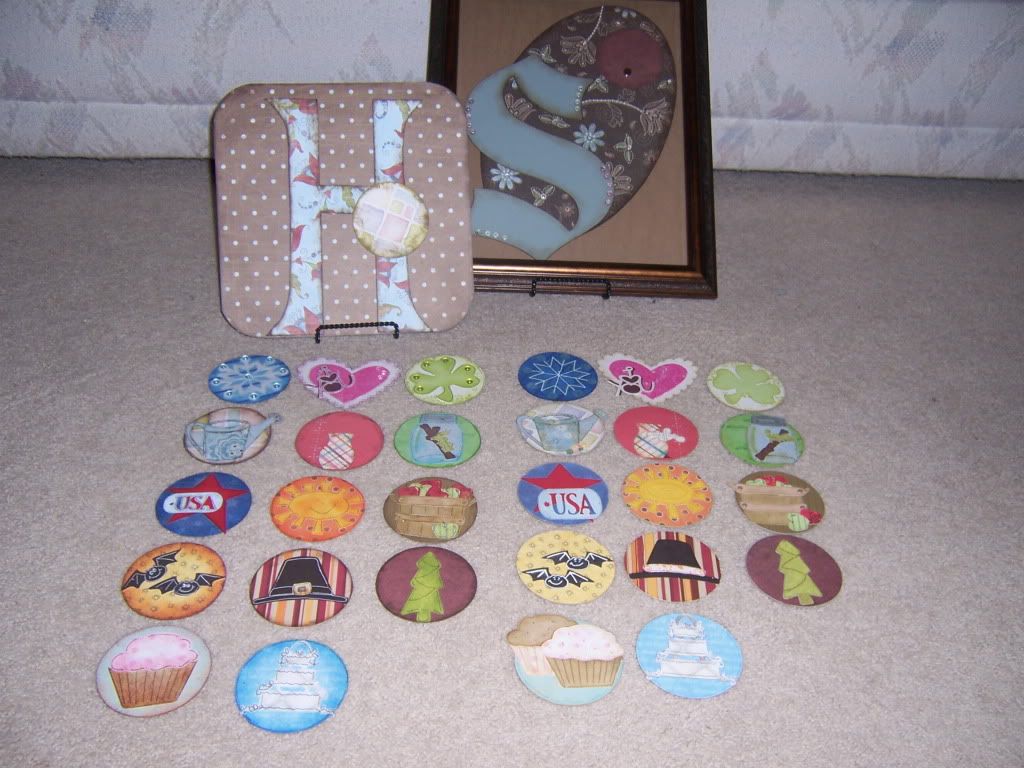
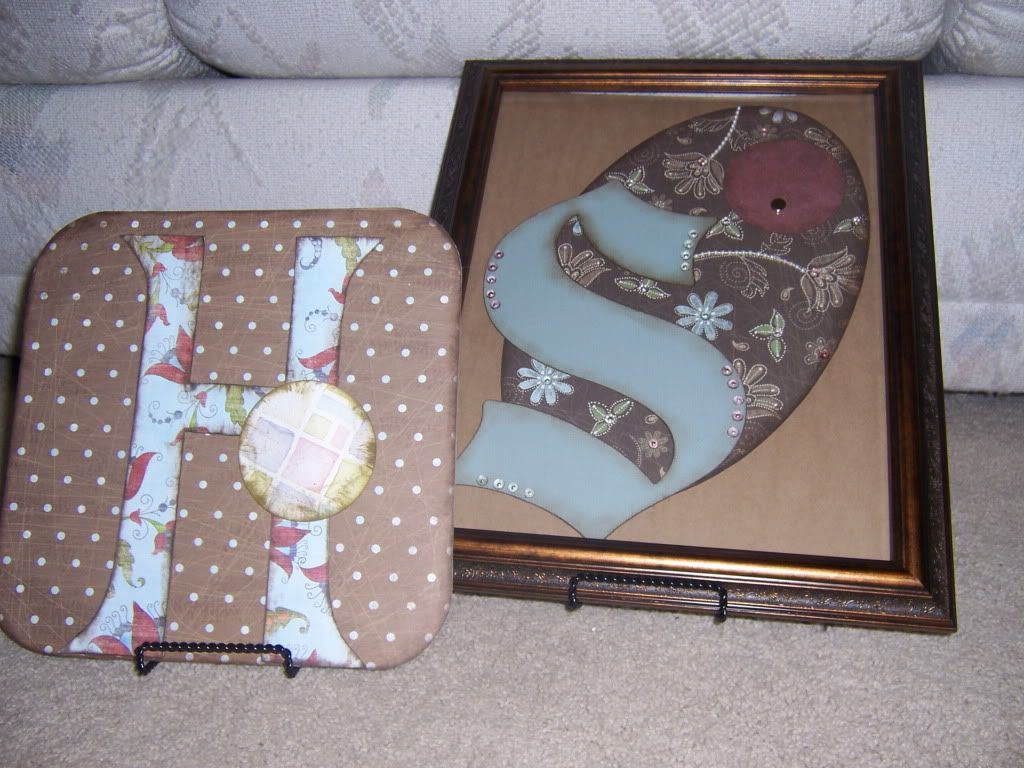
Here is another project I have been pushing off for a while at my house. Months ago, my mom and I had made Monogram signs to use as home decor. She finished hers; mine has been sitting on my craft shelf in the "to do" pile. I decided that it needed to be completed :o) The Letters were cut out with Make The Cut first as paper and than as two layers of chipboard. Mom chose a square background (H) while I did an elongated oval (S). Mom's is on a plate stand while I framed mine to hang on the wall. I attached a magnet to the front of the glass so I won't have to open the picture frame all the time to update the images. I haven't completed it yet as I still haven't found a background I like to go with my letter. I might eventually get a shadow frame with glass on both sides so I don't have to worry about it .. . .hmmmm . . . . .
100_3744.jpg
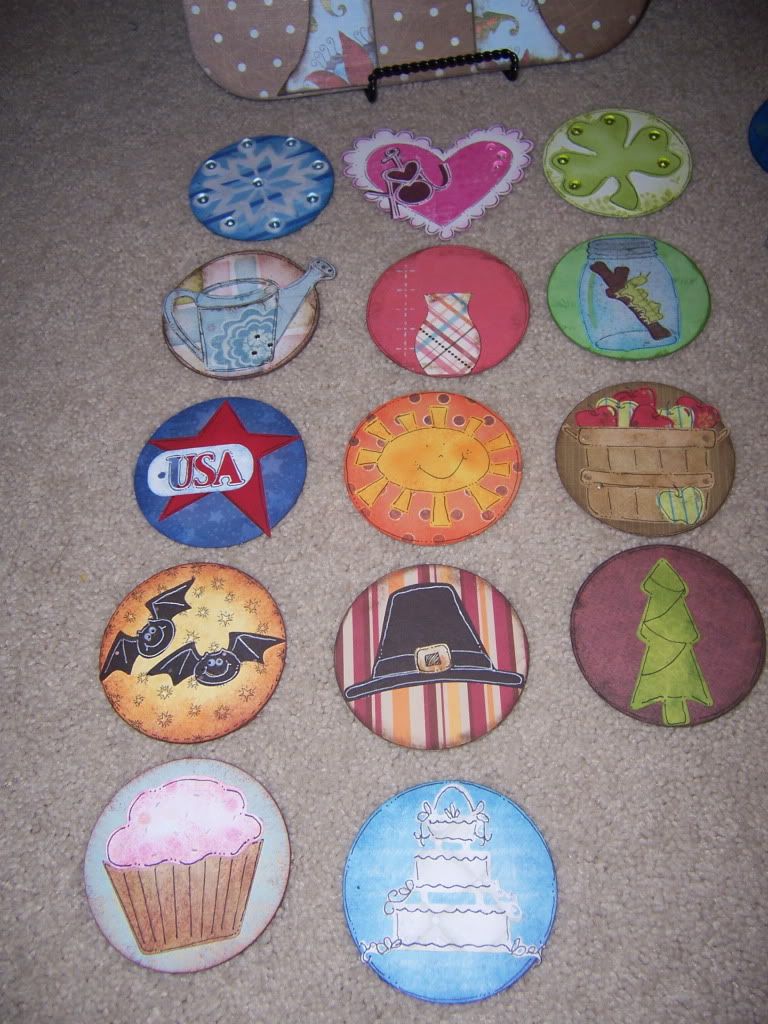
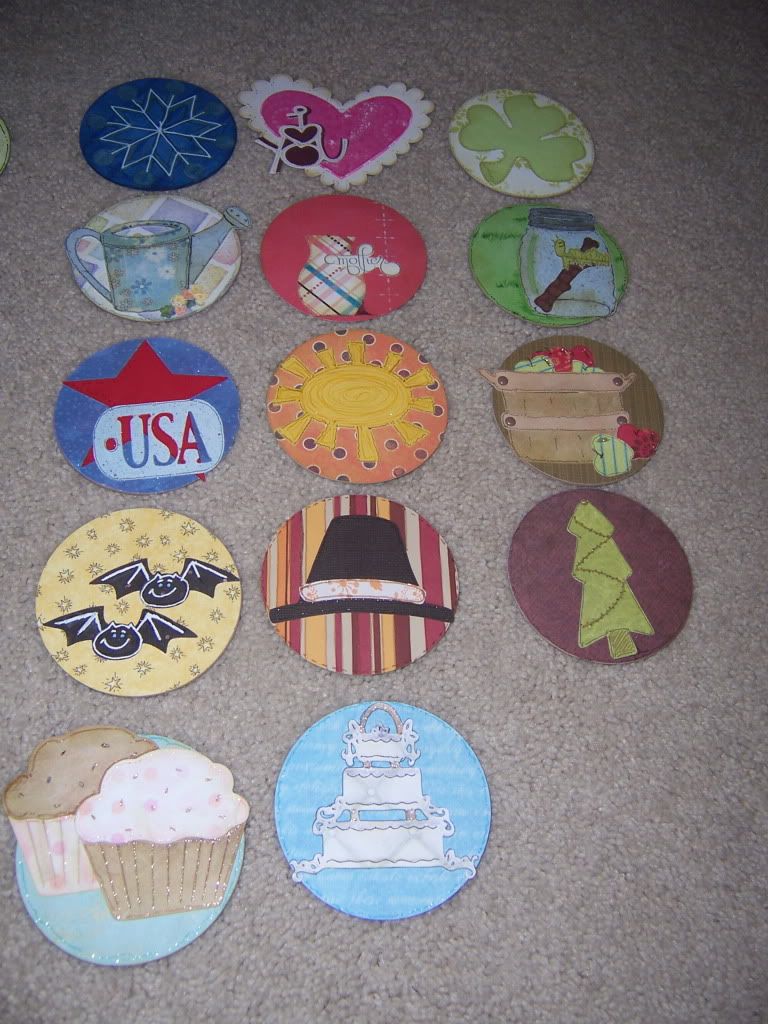
We than cut out 3 1/4" circles from chipboard and coordinating papers for backgrounds for the months and holidays. We only did 14 total circles but I know this something I can create new ones any time I want to! With Design Studio, I cut out multiple images for the coordinating month/holiday. I also listed alternatives or additional circles below- I am already thinking of other circles to create and design!
January-Snowflake/Winter/New Year's
February-Heart/Valentines
March-Spring/St Patrick's Day
April- "showers"/ gardening/Easter
May-"flowers"/Mother's Day
June-June Bugs/Father's Day
July-Popsicles/Fourth of July
August-water/sun
September-Back to School/Autumn/Harvest
October-Halloween
November-Fall/Thanksgiving/Veteran's Day
December-Winter/Christmas/Hanukkah
Birthdays-cupcakes/balloons/name
Anniversary-Heart/Cake/Wedding Bells/Rings
100_3747.jpg
I assembled all of the circles adding my own personal touch to them. In fact, in this picture my circles are on the right and my mom's are on the left. Can you tell where my creativity comes from? By the way, all of the paper used is from my stash and scrap pile - -this is a great way to use those scraps!! All other supplies can be purchased at Cutters Creek. Let me know if you need any measurements or picture close-ups. Thanks for looking!
100_3748.jpg 100_3749.jpg
Supplies Used:
Design Studio
Make The Cut
Chipboard
Adhesive
Atyou Spicas
Copics
Multiliner Pen 0.1
Inkssentials Pen
Twinkle Jewels
Quickie Glue Pen
Basic Grey Small Magnets
Carts-Blackletter, Home Decor, Doodlecharms, Paperdolls, Christmas Cheer, Accent Essentials, Walk in My Garden

Wednesday, June 23, 2010

Little Mermaid Ceiling Fan Project by Mandie


Here's my project for this month! It's a bit different as you can see :)

For today’s project I created some thing a little different. My 4 year old daughter’s absolute favorite princess is Ariel. Her bedroom is half pink and half purple with Ariel border, bedding and pictures. So when my husband decided her room needed a ceiling fan I knew my Cricut Expression would come in handy…
One of my favorite Cricut cartridges is Dreams Come True. It features Ariel, Belle, Jasmine, and Pocahontas. The Happily Ever After cartridge features Cinderella, Sleeping Beauty, Snow White and Mulan.

So I pulled out Dreams Come True and my Cricut Expression as well as some self adhesive vinyl I picked up and set to work. My daughter is absolutely thrilled with her new fan and I like that when she changes her mind about her room décor I can pull the vinyl off of the fan and put new designs on!


Editor's Note: This is such a fantastic project idea for a child's room or any room in your home. There are so many wonderful Cricut cartridges that would match any theme or decor! Mandie has given us some amazing ideas on how to personalize and transform our homes in a way that is still changeable. Because let's face it, we all reserve the right to change our minds.


Monday, June 21, 2010

Copic Mondays: Marker Basics by Laura Burleson


Which Copics are best? It is a common question that is asked by anyone considering the investment in these great markers. I know I wondered myself, why would someone pay over $6 for a marker. Then I tried them! I fell instantly in love with the way they color and blend. Trust me, buying PrismaColor or Sharpie markers are no where near close. They might all be alcohol markers, but not all markers are equal in quality. Copics are non-pilling. They blend evenly without destroying the paper.

With Copics, they are literally a lifetime marker. You can replace the nibs, and refill the inks on all of your markers. Ink and nib replacements are inexpensive to do, and you have a lifetime of service. Once a Sharpie or Prismacolor runs out, you have to throw it away and buy a new marker.

All Copic markers have a guaranteed 3-year shelf life. The color consistency between all of the lines is completely guaranteed by Copic. If you buy RV00 in a Ciao, Sketch and Original, all of those colors will be the same.

All Copic markers are low odor, and are easy to clean up using an hand sanitizer with alcohol or alcohol wipes.


So you know "why" Copics, but now the question is which marker is best for me?


Ciao

The Ciaos are the least expensive of the Copic Markers. The hold the least amount of ink of all the Copics. Their shape is round, rather than oblong. They will roll off of you work surface. The marker caps do not have the color number on them, but the cap is color is the marker color. The nibs on the Ciao and the Sketch markers are the same. The Ciaos come in a total of 144 colors, and there will not be any new colors added to the Ciao line. The Ciaos will not work with the Copic airbrush system. They are a great economical choice.

Do be careful if you purchase the Ciao markers. Each marker has a ring inside the cap with air holes. This is to prevent choking should anyone accidentally swallow the cap. When putting your caps on your markers, be mindful of the rings inside. You do have the potential to damage the marker tip if you don't line it up correctly in the cap.


Sketch


The Sketch are by far the most popular of the Copic marker line. In fact, card makers and scrapbookers are the fastest growing market for Copics overall. The Sketch markers hold a full 2 oz. of ink. They come in 334 colors with new colors due on the market very soon. No other marker set has this many color options available. The Sketch markers can be used in the Copic airbrush system. They are created with an oblong shape with prevents them from rolling off of your work surface. Each end of the marker has the marker color number printed on it. Like the Ciao the cap is the color of the marker. The gray ring on one side indicates your brush tip side of the marker.

Original


The Copic Original markers have a medium broad tip and a fine tip. They are great for lettering, journaling and small images. The fine tip allows you to create very detailed artwork. Because they don't have the brush tip like the Ciao and the Sketch, you cannot do techniques such as feathering. Oringials come from the factory in 214 colors. There are empty markers available, so the line is expandable to all 334 colors by using the empty markers and the refill inks. They are compatable with the airbrush system.

Wide


These are great for large areas. They are easy to refill. Due to the extremely large 3/4" nib, they use a lot of ink. The 3/4" nib comes in two style: the Calligraphy nib and the Standard Broad nib. The Wide markers come in 36 popular colors, but like the Originals they are expandable to all 334 colors using empty markers and the ink refills. These are great for coloring large areas. They are excellent when used for backgrounds, calligraphy and architectural design.

Ink Refills


Ink refills are available in all 334 Copic colors. How many times will one ink refill fill up your marker? Here is the chart:


Since the Ciao holds the least amount of ink, you will be able to refill it 15 times with one refill bottle. The Sketch marker can be refilled 12 times, and the Original 9 times.

Nibs

You can change the nibs on your markers. The Ciao and the Sketch both come with the Medium-Broad and Super Brush nibs. The Original marker comes with the Medium-Broad and Fine nibs. The Wide marker comes with the Calligraphy or Chisel nib.

Ciao nib options:


Sketch nib options:


Original nib options:


I hope this really brings together some marker basics for new Copic customers, and answers some basic questions for those of you that already love these markers like I do. In future articles, I will bring you information and uses for the multi-liner pen, Atyou Spica Glitter pens, the Colorless Blender, and the Colorless Blender solution.

Remember the complete line of Copic Markers are available in the Cutters Creek store.


**Credits - information from Copic International, Jennie Lin Black, and I like Markers. Photos courtesy of Copic International.

Sunday, June 20, 2010

Congratulations Card by Vicki


I L-O-V-E the new Petaloo Color-Me-Crazy flowers!! My first purchase was the Assortment Pack, because I wasn't sure how much I would like them - HA! These are amazing. They come in plain white, and you can color them with the medium of your choice - Copics, inks, paint, chalk - so much fun, and soooo easy to coordinate!! I have been using the smaller flowers in my scrapbook projects, but was at a loss with what to do with the huge flowers that came in this pack. Then, after perusing some of my favorite blogs, I got the idea for this card!!

I used coordinating papers to make the base of the card, using a triple pane effect to create visual interest. I wanted to keep it simple, so that all the attention went to my big flower accent. I colored my flower with my Copic markers. Copics are so much fun...you can get so many shades of the same color with just one marker. (These flowers are made of an absorbant material, so it soaks up the color but it also leaks thru a little bit - so make sure to use something underneath the flower to 'catch' the color! I use my Ranger mat - it provides a nice smooth surface and holds up to EVERYTHING!) I used R20 - Blush for the main color. I colored over the flower three times, which turns the light blush color into a pretty light coral. Then, I went back to each petal and did a light stripe of R29 - Lipstick Red. Then I went back over AGAIN with the R20, to blend in the red just a touch. This softened the red lines nicely. I used a giant red button in the center, adhered with glue dots, which work nicely with a variety of non-paper products! The "Congratulations" sentiment is a sticker from my stash.

Cutters Creek Items used:
Copic Markers - R20, R29
Petaloo Color Me Crazy flower assortment
Glue Dots

Saturday, June 19, 2010

Two More Father's Day Cards

Father's Day is this Sunday, and I had a couple more cards I needed to get done. It seems masculine cards are always the hardest for me to do. Here is what I came up with:

This card was made with left over papers from other projects. I started with a standard kraft side-fold card. The background was a left over from some map paper I had from a travel project. I had a scrap of red card stock, and I stamped my compass image. I cut it out close using my Cutter Bee Scissors. They are the best for intricate work. I threaded my button and attached it using Glue Dots. The blue patterned paper was cut at 2.5" and I distressed the edges for a more aged look. I inked my edges as well for the well worn look.

I added my scrap piece of ribbon using my 1/4" Scor Tape. I used my 1/2" ScorTape put the cardstock pieces together, and then to attach the finished piece to my card front. Lastly I added my compass using a Glue Pop Dot.


For this card I got a bit fancier. I used all Basic Grey papers for my patterned papers, and they are available in the Cutter's Creek Store. These are from Green at Heart, Kioshi, and Indian Summer. I started with a kraft paper gate-fold card. I used my ScorPal to get the perfect folds. I cut my cardstock and distressed all of the edges on the patterned papers. I attached them using my Scor Tape.

I cut a 3.75" x 4" Kraft paper square, and I distressed those edges as well. I used a scrap piece of blue cardstock at 3" x 3.5" for the ocean/sky background, and drew curly circles on the bottom 3/4" of the blue piece using my Inkssentials White Gel pen. I cut out my stamped sailboat using my Cutter Bee Scissors. Lastly I adhered the piece together and then to the card using my Scor Tape.


I stamped my images and sentiment using the Tsukineko Cocoa Brown Ink on both cards.


All of the basic supplies I used to make these cards and the Basic Grey papers are available in the Cutters Creek Store.

Be sure to check out the full line of Basic Grey papers and kits. They have such amazing papers! I love the texture and weight of their line. There are even some Christmas papers available .

Remember Kim will always do special orders. If you are looking for special items, be sure to ask her about them. I am super excited about the new PINK ATG gun! Pink just rocks!

Friday, June 18, 2010

A Simple Graduation Thank You by Chris


Using the local HS colors of green and gold, I started with a 10 x7 card base scored with my scorpal at 5 inches. Then I made 3 graduated squares—a 4” green, a 4 1/8 gold, and a 4 3/8 black. I layered the three to form the base of the cap. Digging in my stash I found a gold shank button and some gold embroidery floss. I made a 2” tassel. I used a 4 ½ piece of cardstock folded in half the long way, wrapped the floss (all six strands) around it twenty-five times. I then tied off one end of the loops and cut the other end. Taking another piece of floss (about 2” long), I tied it around the floss to make the head of the tassel, wrapped each side of the extra floss around the head a few times (be sure to go in opposite directions) and then tied that off. I attached the floss to the shank of the button and used a pop dot to glue it to the center of the cap. To make the sentiment I used my gel pens and Biscotti font with SCAL, my labels nestabilities, and my cuttlebug. I first wrote and then “cut” the thank you out with SCAL on my gold paper. Then using the nestabilities label, I cut and embossed the sentiment. I then ran every thing (hat, ribbon, and sentiment) through my xyron and layered them on the card. Stamped the back with one of the made by stamps from the Image Tree set. Just add a personal note inside and its ready to send.


Cutters Creek Resources
Scor Pal
Spellbinders Nestabilities Labels and embossing pad
SCAL
Glue Dots ½ inch Pop Up Dots
Xyron
Image Tree Clear Stamp Card Set-Handmade

Thursday, June 17, 2010

New Pink ATG at Cutters Creek!!


Isn't she so pretty?!?!? This item will ship to stores early July. Click HERE to pre order yours from Cutters Creek now!

Tuesday, June 15, 2010

Wedding Card by Lori


June is traditionally a month of weddings, so I thought it appropriate to share a wedding card today!

I've done all of the hard work for you, so if you own Make The Cut you can just search the gallery, import the files, and cut away. To find the files, just open your Make The Cut software and from the menu choose Help -> Free SVGs and MTCs. A search box will appear where you type in your search terms - simple as that! My files are named "Bride and Groom Silhouette" and "Gazebo".

To add to the elegant look I wanted, I used black mats for definition, a little ink for dimension, and a layer of American Crafts glitter paper in White. This is NOT your ordinary glitter paper-nothing flakes or rubs off. And it is thick; almost more of a chipboard. It really holds up well to all kinds of projects, and just adds that extra little something!

Supplies available at Cutters Creek:

Cricut Expression
Make The Cut software
Cardstock
Ink Pads
American Crafts glitter cardstock

Friday, June 11, 2010

Graduation Layout by Laura C.


Now that those graduations are over, do you have pics waiting to be scrapped?? This layout is great, because it will fit YOUR pics. No right or wrong....just use these cute file tabs (NEW Tim Holtz On the Edge File Tabs Die!!) to label or journal your pics. Super simple.....just cut pics and mats (in school colors) arrange the way you want, and you're good to go!! A border on a page creates a nice frame, so I used 2x12 strips cut from the same cardstock used to mat pics. Extra
touches make a page, so I used a little AC glitter cardstock to "bling it up", some grad ribbon, the clocks (since it's "time" to celebrate, and they are set at 8 going on 9 because that was the change in grades). I used the Tim Holtz Lost & Found paper pad, cut the clocks out of one of the pages, roughed up the edges and then used Tim Holtz Chipped Sapphire distressing inks (used this on all the file tabs and mats as well!). Lastly, the diploma on the left is made using a 2" x 5 & 1/2" piece of paper folded and distressed. I've included pics to show how it was folded and also
an example of a card made using the same technique...I used rock candy distress crackle paint to make the diploma "pop". Hope you've grabbed some inspiration....so you can grab those pics, and get scrappin'!!

Available at Cutters Creek:

Tim Holtz On the Edge Dies (File Tabs)
Tim Holtz Distressing Inks (Chipped Sapphire & Vintage Photo)
Tim Holtz Idea-Ology Paper Stack (Lost & Found)
Tim Holtz Distress Crackle Paint (Rock Candy)
American Crafts Glitter Paper (Silver)
Glue Glider Pro

Monday, June 7, 2010

Copic Mondays-More Copic Basics by Laura Burleson

Did you know that some inks can ruin your Copic Markers?

Are some papers better than others for coloring your images?

Did you know that you can actually ruin your markers coloring on some surfaces?

If you are like me, I had no idea that some basic items I use for crafting could be damaging to my Copic markers. Granted, you can replace the nibs, so damage wouldn't be permanent. Still, I would rather do all I can to prolong my marker's life.

Copic markers have a shelf life of three year when kept properly capped. I know I would never let mine sit that long without use, but it is nice to know that they are made to last.


Okay, back to inks. Copic officially endorses using Tsukineko Memento or Brilliance Inks, Tim Holtz (Ranger) Distress Inks, A Muse Ink, and Stewart Superior Palette Noir Ink. Cutters Creek carries both Tsukineko Inks and Ranger Inks. You can add clear embossing powders or heat set the inks for your best results. Embossing inhibits the "running" or "bleeding" of your inks when coloring. Never use colored embossing powders. Colored powders react with the markers. Never use solvent based inks with your Copic Markers. These products are intended for use with water-based media, and they don't work well with Copics. Staz-On inks will stain will run and make a messy image, but worse yet, it ruins the nib on your markers. Stampin' Up, Close to My Heart, and other water based inks will run and discolor the nibs on your markers.

There is only one time you would use Staz-On inks with your Copics. If you wanted to color a vellum image, you would stamp the image on the front (glossy) side of your vellum. You then color the image from the back (rough) side of the paper using your Copics.

Now as for paper. Choosing a good paper is very important. You need one that allows the ink to soak into the paper, but also allows you to move it around while you are coloring. When a paper is super glossy, the ink will just float on the paper. It doesn't stick or soak into the paper. If a paper is too soft, then you aren't able to control the ink. It will bleed outside your image lines too quickly. You want to test your paper for saturation and bleeding before using it to color a project.

Copic International recommends two main papers for coloring with your Copic Markers, Bazzill (Prism) Simply Smooth Cardstock in Ivory or Neenah Classic Crest Solor White or Ivory 80# Cardstock. Bazzill papers are available from Cutter's Creek in both white and ivory. These papers absorb your inks beautifully without feathering too quickly. They allow you to work well with wet inks and blend your colors so nicely. You won't believe the difference!

Lastly, let's visit things that can ruin your Copic Markers. Never color over any glitter pens except your Atyou Spica pens. The Spica pens are made with special glass glitters that will not clog or gum up your marker's nib. Never color over Opaque White, White Out, Acrylic Paints or gel pens. These will ruin the marker ends, and once clogged, the inks will not flow properly onto your projects. White out has actual paper fibers in the liquid that will glob up in the marker tip. Color your projects first, and then add any gel pen accents. If you have colored over these products, don't worry. Your marker nibs are replaceable.

Copics are amazing markers. All of the basics to get you started are available at the Cutters Creek Store. If you need help selecting markers, papers, or inks, please ask. Kim or I will be happy to assist you!

Cutters Creek always stocks:

Copic Markers
Copic Spica Pens
Replacement Nibs and Nib Tweezers
Tsukineko Memento or Brilliance Inks
Tim Holtz (Ranger) Distress Inks
Bazzill Cardstock

Resources: Copic Markers/Imagination International Inc., Marianne Walker, and Jennie Lin Black, Regional Certification Instructors

Father's Day with Sandi


I wanted to make a really nice card using as many cricut cartridge images welded together as I could think of. Keep in mind, however, if you don’t have these carts use a similar shape from a cart you do have, so here goes.

Outer frame: George and Basic shapes
Inner frame Gypsy wanderings
Route 66 Sign: Cricut Sampler
Numbers: Gypsy Font
The Word Route: Plantin Schoolbook
Car: graphically speaking
Carefree welded to car bumper: Graphically speaking
Dad: Beyond Birthdays
You can use any background paper that has a travel theme to it.


You can buy these items at Cutters Creek:
Check out the amazing Cardstock selection
Cricut Cartridges

Sunday, June 6, 2010

Father's Day with Vicki


I have quite the stash of paper, and they aren't always the ideal sizes I need for my project. So, instead of cutting up a perfectly good full sheet of paper, I came up with a way to 'make' my paper fit my project. In this case, I love the pattern of the paper, and it gives a nice 'old fashioned' feeling. So, since my rectangle wasn't quite the size I needed, I cut it up in a unique pattern, and used the cream colored base of the card to make a pretty geometric background.

The paper has a slight jaquard pattern behind the stripes, and as soon as I saw that, I KNEW I had to use the Storybook cartridge for my main piece. I used coordinating colors of Bazzill cardstock to my patterned paper. I attempted to cut the 'Accent' feature for each of my letters in 'DAD' - but for some reason they came out too small. Rather than use more paper, I improvised, and used my Copic markers to mimic the accents that the original cuts would have given me! My base tag is antiqued slightly on the edges, using Tim Holtz Distress Ink in Walnut Stain. The tag is adheared with 3-D dots to give it a little more dimension. The overall effect reminds me of the Old West!

Cutters Creek Items used:

Cricut Storybook cartridge
Tim Holtz Distress Ink - Walnut Stain
Glue Dots 1/2" Pop Up Dots
Copic Marker - E47 - Dark Brown

Thursday, June 3, 2010

Sandi's Baby Card


I used the Gypsy Wandering and Gypsy Font cartridges to create the lettering, bottles and swirls and Graphically Speaking cartridge for the Baby Carriage. I used stickles to add glitz to the letters, wheels and carriage. I colored the flowers to match the orange and yellow cardstock and added flower brads in the centers

You can buy these items at Cutters Creek:
Card stock
Stickles
Flowers
Brads
Cricut Cartridges

Tuesday, June 1, 2010

Sunflower Card by Chris


Every since my friend Penny created cutlines for SCAL back in October, I’ve been waiting for June to come around. Her cutline Half Moon looks like a sunflower to me, just perfect for my DS & DIL’s anniversary this month. I’ve been dreaming about this card for a long time, so I’ve tried a lot of different techniques on it. I started with a tan card base cut 7x 9.5 and scored it (on my ScorPal) at 4.5 inches. I wanted the front half of the card to be narrower than the back so I could put some edges along the side. I had some scalloped cardstock that I hardy ever use and cut off two strips to glue along the inside right edge.

I sprayed the outside of the card with Tattered Angels Old Lace. (This is absolutely my favorite glimmer mist now! Such a light rosy shade.) I embossed a piece of yellow cardstock with a cuttlebug folder and ran my distress ink—Spiced Marmalade--over it. Then I opened SCAL and on one layer imported the cutline and set it at 3.5 inches. On another layer I opened a circle that was just slightly larger than the sunflower at 3.75 inches and cut out the sunflower. I sprayed the sunflower with an orangey-gold glimmer mist and set it aside to dry. While it was drying, I took some acetate and free hand cut a vase and a brown shadow of the vase. I used my alcohol ink applicator and pounced several inks—pearl, lettuce, and shell pink—all over one side of the acetate. When it dried, I painted Antique Linen Distress Crackle over the inks and set it aside to dry. Going back to the sunflower, I began folding the lines. I used a tad of tacky glue to hold each fold in place and then ran some vintage photo distress ink around the edge. I then cut another circle (4.75 inches) this time out of brown cardstock; sprayed it with the Old Lace glimmer mist, roughed up the edges with a scissor and then rubbed Wild Honey distress ink around the edges. By this time the vase was dry. I took sandpaper to remove some of the crackle ink to allow some of the alcohol ink to show. I cut a stem free hand and glued it to the top of the brown cut a shadow of the vase and layered the acetate over it using glossy accents. I made sure I rubbed some around the shadow layer too to give it sheen.

I layered the sunflower over the brown circle with the stem between and then using my flower soft glue added brown flock to the center of the flower. I added the sentiment using Memento cocoa brown and of course, used Image Trees Homemade on the back of the card. I hope you like it. I think it is one of my best so far. Let me know what you think. Happy days…

Cutters Creek Resources:
Scor Pal
Flower Soft Glue
Memento Rich Cocoa
Fun Flock—Caramel Tan
Tattered Angels Glimmer Mist—Old Lace
Image Trees—Homemade stamps
Adirondack Alcohol Inks and Ink applicator
Ranger Distress Crackle Paint—Antique Linen
Aleene’s Original Tacky Glue
Distress Inks—Wild Honey, Spiced Marmalade, Vintage Photo
Glossy Accents
SCAL
Cuttlebug
Related Posts with Thumbnails