Monday, December 30, 2013
Thanks SEW much! by Deanna M
Now that the gift giving is over it is time to thank all our loved ones for the generosity. Today I have a fun play on words Thank You card.
I started with white card stock cut and scored to make a 4 1/4" X 5 1/2" card base. I added a dark blue mat cut at 4 1/4" X 5 3/8" then my patterned paper mat cut at 4" X 5 1/4". All of my patterned paper is from an American Crafts 6" X 6" paper pad called Family Ties. Check with Kim, I am sure she can order it for you.
I wanted to create a patchwork quilt background for my sewing machine. So, I cut a piece of golden paper at 3 1/2" X 4 3/4". I then cut each of my little squares at 1 1/16" X 1 1/2". I used a bit of Scotch Quick Dry Adhesive to adhere the squares to my gold mat and then ran a zig zag stitch around all the squares. I then adhered that to my card using some foam squares.
I cut my sewing machine from the Nifty Fifties Cricut Cartridge at 3". After adhering the layers together, I added it to the front of the quilted mat again using foam squares. My sentiment is stamped with some Memento Tuxedo Black ink.
Saturday, December 28, 2013
Happy New Year's card by Michele
I have for you today a clean and simple card for New Years. You can make this card in the morning and by the evening it will be ready to go.
Thursday, December 26, 2013
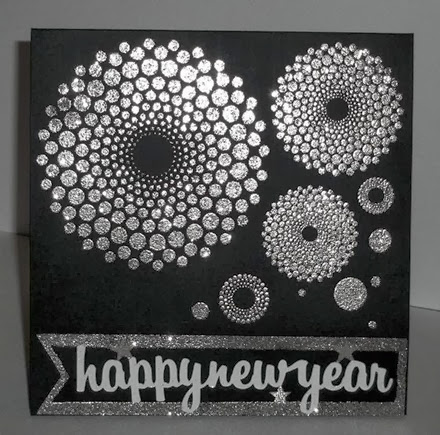
HAPPY NEW YEAR by Fran
I think I got my glitter fix making this card, lol. I have a stamp set called Dot Spot. I placed the various dots on my Fiskars Stamp press in the pattern I wanted for my card. Added VersaMark Watermark to the various dot stamps and stamped the front of the card. Then to get the WOW effect I wanted I coated the stamped dots with WOW! Embossing Powder (Metallic Platinum Sparkle). The Happy New Year sentiment and banner were created using the Portrait Silhouette. And used 3-D foam pads behind the banner for dimension. I added the Metallic Platinum Sparkle embossing powder to the edges of the banner using VersaMark Watermark. Oh a little, just a little Wink of Stella Clear Glitter on the sentiment.
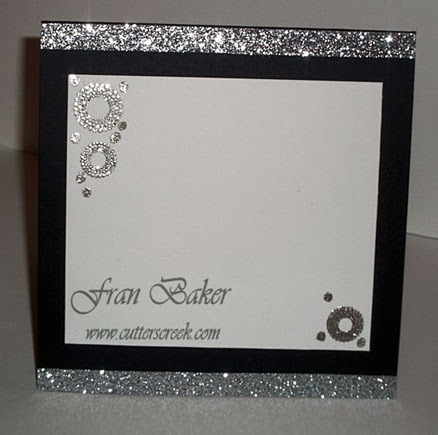
On the inside of the card I cut a 4-1/2” square in white cardstock. I added some of the dots (embossed with metallic platinum sparkle) on two corners to bring the front of the card inside. And I added silver glitter tape* to the top and bottom edges.
The overall size of the card is 5-1/2” square.
*Glitter Tape was purchased from Cutters Creek’s one of many clubs offered by Kim Bush. The clubs offer a number of various creating supplies for a set cost each month for 6 months. The clubs enable you to build on your supplies.
Supplies used can be purchased from the Cutters Creek Online Store:
Adhesive – Tombow Mono Permanent Runner
Glitter Tape – this link will take you to Glitter cardstock that can be cut in to strips and adhered to your card.
If you have any questions about the crafting supplies I used you can contact Kim Bush and she will be glad to assist you.
Happy New Year, Fran
Tuesday, December 24, 2013
Merry Christmas From Cutters Creek
Friday, December 20, 2013
Giftcards by Cindy
Today, is my day to share for the Cutters Creek Design Team. My project today is Giftcard holders. I used a tutorial that I found here.
I used the Anna Griffin paper pad that I got in the 6x6 paper pad club, as well as G45 25 Days of Christmas 6x6 paper pad. I also used scor tape and cut images from my Cricut and I also used a stamp from Cat's Pajamas.I also used some bling too.
These giftcards are super easy to make and a fun way to jazz up your giftcard gifts! If you are interested in any of the products that I used today be sure to visit the Cutters Creek store.

Monday, December 16, 2013
Graphic 45 , 12 days of Christmas by Anne
Saturday, December 14, 2013
All Hearts Come Home for Christmas by Deanna M
The images on my card are from the new Tim Holtz Sizzix Framelits Stamps and Dies. The set I used is called Holiday Joy. I used markers to color my tree stamps so I could have green trees and brown trunks. The deer was stamped with Gathered Twigs Distress Ink, this is a great brown and a wonderful addition to your Distress Ink pads. For the snowflakes I stamped them with some Versamark and embossed them with some WOW! Neutral Ultra Shimmer Glitter embossing powder.
I adhered the trees directly to my card stock using some Scotch Quick Dry Adhesive. The snowflakes and the deer are adhered with some foam squares. My sentiment is stamped with Cottage Ivy Memento Ink.
I hope you all will try these new Sizzix Framelits Stamps and Dies. They are so versatile. The die set I used for my card today could just as easily be made for a spring, summer or fall card simply by changing the papers. I think the images from this dies and stamp set would make a great masculine card for a birthday as well. Kim still has a few left in the store, so hop on over and check them out. Buy yourself a little Christmas present or ask someone in your life to call Kim for help in surprising you.
Thursday, December 12, 2013
12 days of Christmas, Day 12
Wednesday, December 11, 2013
12 DAYS OF CHRISTMAS - Day 11 with Jearise
I used Mod Podge to attache my paper to each side. I cut the paper in a 3 3/4 circle. The background of the paper is black so I sprayed some Glitter Mist in red on it. I sprayed after I had put on a top coat of Mod Podge and that's why you get the neat look to the background. I used Stickles to accent each candle and then added some rhinestones and a bow.
I painted the side of the ornament black and then used the ribbon for the bow to wrap around the side of the ornament as well.
Products used:
Mod Podge
Graphic 45 Christmas Emporium Double-Sided Paper Pad 12" X 12"
Stickles in Christmas Red and Yellow
Perfect Pearls in Interference Red
Thanks for stopping by today and Merry Christmas!
Tuesday, December 10, 2013
Twelve Days of Christmas–Day 10 by Fran
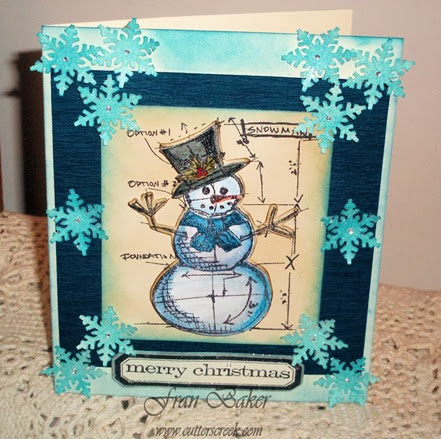
My project today was created using the Snowman Blueprint by Sizzix. It comes with both the stamps and dies to help you achieve a complete look. I special ordered it from Kim Bush of the Cutters Creek Online Store.
I was a little anxious about how it all will work together for me. And I was thoroughly surprised how easy it was to get the layered look that Tim Holtz demonstrated at the Summer CHA 2013. Here is the video if you would like to watch Tim demonstrate.
Details: I stamped the snowman on Tim Holtz’s Distress Watercolor Cardstock. The various layers of the snowman were cut and layered like Tim demonstrated in the video.
I colored the pieces using my new watercolor pencils called Inktense by Derwent. They are a pencil to ink in one wash application. They are the best of both worlds: the vibrancy of ink with the subtlety of pencils. Once dried the color is permanent.
I used Neenah Ivory Card Stock for the card base and blueprint image behind the snowman. The dark blue paper is from my stash. The snowflakes were colored using Distress Ink Broken China then I applied Glossy Accents to each of the snowflakes and covered them with Distress Glitter – Clear rock Candy. The edge of the card was colored with Distress Ink Broken China.
I used lots of foam pads to give the card and snowman dimension. I added a hint of Wink of Stella Clear and Silver Glitter to the snowman and the sentiment.
The size of the card measures approximately 5-1/2” by 6-1/2”.
If there is a product I used that is not stocked at the Cutters Creek Online Store you can contact Kim Bush and she may be able to special order it for you.
Thank you for stopping by and I hope that I gave you some inspiration. And I would love if you left me a comment about my project.
Fran
Monday, December 9, 2013
12 Days of Christmas Day 9 by Deanna M
Today I have for you a 5" X 7" card. My card base is white card stock. I cut a piece of dark blue card stock 4 1/2" X 6 1/2". I stamped my image with some Versamark ink and embossed it using Opaque White WOW! embossing powder. To give the allusion that it's snowing, I added some Shabby White Fran-Tage.
Next I cut another piece of white card stock about 3". I used a Memory Box die called Country Landscape to cut the top of my card stock. (AND Yes, Kim can now order the Memory Box dies, just ask). Next I added some glitter to the "snow" so it would glisten and then added it to my blue card stock. Once I had all of that attached to my card base I cut a Snowflake Doily from the Cricut Paper Trimmings cartridge. This was cut at 1 1/2" out of blue card stock. I then cut a 1" circle out of white card stock and embossed my Happy Holidays sentiment using some Bodacious Blue WOW! glitter embossing powder.
Thanks so much for visiting today. Be sure to come back tomorrow for day 10 and another great project from the Design Team. Please leave us a comment and let us know what you think of our projects.
Sunday, December 8, 2013
12 Days of Christmas, Day 8 by Michele
Saturday, December 7, 2013
12 Days of Christmas, Day 7 by Cindy
Today the Cutters Creek Design team has a 12 Days of Christmas. Today is Day 7 and I have a simple and fun project to share.
Thanks for visiting me today. Be sure to visit the Cutters Creek store order this awesome glitter.
Also, visit the Cutters Creek Design Team blog tomorrow for the next day in the 12 Days of Christmas.
Friday, December 6, 2013
12 Days of Christmas, Day 6 by Cindy
If you are interested in these products be sure to visit the Cutters Creek store. Be sure to visit the blog again tomorrow when we share another project.

Thursday, December 5, 2013
Twelve Days of Christmas–Day 5 by Fran
Welcome to the Cutters Creek Design Team’s “Twelve days of Christmas”. We are so happy you are joining us. Today is the 5th day of our event. Here is my contribution.
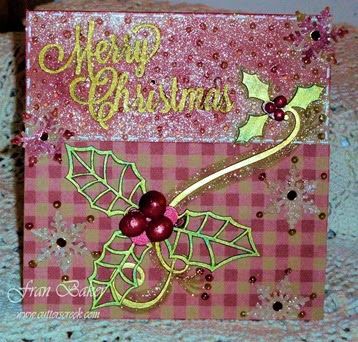
Details: The Card and Front Panel are made from Kraft Card Stock. The checkered paper is from my stash to match the Kraft Card Stock. The Holly embellishments are by Kaiser Craft Wood Flourishes. I added the berries for more dimension and they are made from paper clay. I colored the berries using Festive Berries Distress Paint by Tim Holtz. The holly leaves were painted with Evergreen Bough Distress Paint also. And for a little extra pazazz I used Inka Gold by Viva (Gold and Green yellow) on the Holly embellishments.
The snow flakes were punched using a Martha Stewart punch. I coated the snowflakes with Inkssentials Glossy Accents and covered them with Clear Rock Candy Distress Glitter (this glitter is awesome – I love it!). On the centers of the snowflakes I used vinyl sticker dot sparklers in red. And added Glossy Accents to the tips of the snowflakes.
The sentiment was cut using the Silhouette Portrait. I used a Wink of Stella glitter brush in gold to color the sentiment. And behind the sentiment is covered with the Clear Glitter using the Wink of Stella brush (you can use a Glitter Pen to get the same affect). Then I added Glossy Accents dots in background. And finished off the card using a Gelly Roll pen in white to make the dashes.
You are probably thinking I went crazy with glitter and glossy accents and you are right! I couldn’t stop, lol. But I love how it turned out. I hope you do too.
Thank you so much for visiting today. Be sure to come back tomorrow for day 6 to see another great project from the Design Team. Please leave a comment and let us know what you think of our projects.
And if you have any questions about the products I used you can contact Kim Bush of Cutters Creek.
All linked products can be purchased at the Cutters Creek Online Store.
Fran
Wednesday, December 4, 2013
12 Days of Christmas (Day 4) by Jearise
Today I have decorated a paper Mache ornament. I started decorating these ornaments a few years ago and have improved drastically in my ways but yet what I do is simple enough and doesn't take up days of your time.
After tracing and cutting out my paper, I glued the paper on and inked the edges. Then I added the ribbon and embellishment. I just love how elegant this ornament looks.
I continued around the outside of the ornament with the same ribbon.
Cutter's Creek Products List:
Aleene's Original Tacky Glue for the ribbon
Anna Griffin 6 x 6 paper pad Yuletide Greetings which was part of the 6 x 6 paper pad group - contact Kim if interested
Trim is from Cardmaking for Connoisseurs - contact Kim about ordering it.
Thank you so much for stopping by today and Happy Holidays!
Monday, December 2, 2013
On the 3rd Day of Christmas... by Mindy
12 Days of Christmas, Day 2 by Michele
Saturday, November 30, 2013
12 Days of Christmas, Day 1 by Anne
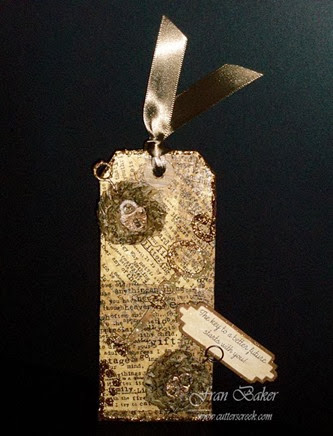
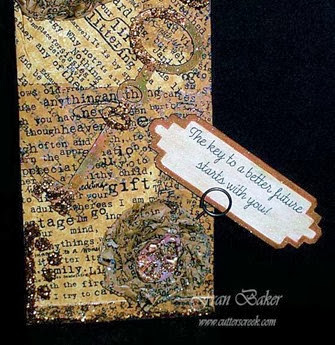
The Key To A Better Future Starts With You!
That’s the theme for my tag. I really had fun making this tag. I basically stayed with one color. And what made it so easy were all the products I had in my stash to get that monochromatic look.
(you can click on the photos to get a larger view)
What I did first was use some collage tissue paper by 7 Gypsies from the Journey Collection. I used mod podge to adhere the tissue to a piece of card stock. Then I used Glue N’ Seal by Inkssentials in a matte finish to protect the tissue paper from moisture. I cut several strips of the tissue to make the small flowers. The steampunk padlocks were made using a silicone mold and paper clay. I embossed the padlocks with Aged Ochre Embossing Powder by Stampendous. The memo pins in the flowers are from Tim Holtz’s idea-ology line. I covered one of the pins also with Aged Ochre Embossing Powder. The other memo pin holds the theme message created on the Silhouette. The wooden Key is by KaiserCrafts. I painted the key with three shades of *Distress Paints to get a patina look (pumice stone, rusty hinge, & peeled paint). Then I added some *Distress Glitter (tarnished brass).
*The Distress Paints and Distress Glitter were purchased through a club. Kim often sells products by offering her customers a chance to join clubs where you pay a reduced cost over a 6 month period. The clubs help you build on your craft supplies. Its an unique way to get the items that are popular. You can join these clubs by being part of the Cutters Creek Yahoo Group.
Stop by the Cutters Creek Online Store and see all the awesome products Kim offers. And if there is something you are looking for and it’s not available in the store you can contact Kim and she may be able to special order it for you.
Thank you for stopping by, Fran
Wednesday, November 27, 2013
Christmas card by Cindy
My project today, uses a new Anna Griffin paper pad Yuletide Greetings that I got as part of the 6x6 paper pad club.
Be sure to watch the video to get the full recipe and see how it all gets put together.
My die cut is from Create a Critter 2 but I only cut the one layer for the wreath. My sentiment is stamped in white pigment ink. So simple but I think that it will make a very nice Christmas card. To get the products that I used today, be sure to visit the Cutters Creek store.

Monday, November 25, 2013
O' Christmas Tree by Deanna M
My card base is 4 1/4" X 5 1/2" white Bazzill card stock. My pattern paper is from the Echo Park Holly Jolly 6" X 6" paper pad. My red pattern mat is cut at 4" X 5 1/4". I cut a piece of green card stock 3" x 5 1/4" and used a border punch on each side. The music paper is the back side to the red paper and I cut it so it would fit on the green punched mat but it too is 5 1/4" tall. My tree, is from the new Sizzix Framelits Dies and Stamps Tim Holtz Christmas Tree set. I love the versatility of these sets. For this card I opted to not use the stamps but just the dies. But I just as easily could have stamped and cut, or just stamped.
I used three different shades of green card stock one for each layer with each layer getting a bit lighter. The star is cut from some gold paper and then sprayed with some Gold Glitter Dust. ( Be sure to stock up on the Glitter Dust spray, it is a holiday must have). To decorate my tree I added some random pearls using a variety of colors of Liquid Pearls.
I stamped my sentiment on some white card stock using some Memento ink. This color is called Love Letters and is a gorgeous red.
Thanks for stopping by today. I hope you have a Happy Thanksgiving everyone.
Saturday, November 23, 2013
Happy Thanksgiving Turkey Box by Michele

Here is the finished products of the turkeys boxes. Hope you enjoyed this Thanksgiving project. Have a Happy Thanksgiving.
Please stop our store for the Black Friday sale and come back to our blog for the Twelve Days of Christmas staring December 1st.
Wednesday, November 20, 2013
It's Beginning to Look...
Thanksgiving Card
Sunday, November 17, 2013
With Thanks
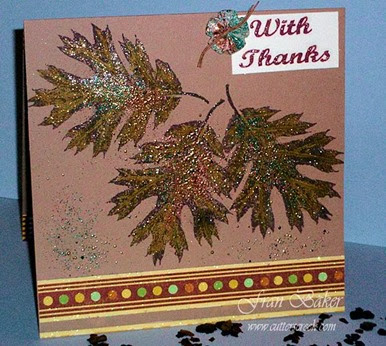
Clean and Simple is what my card is all about. I dug out an old leaf image rubber stamp to use as my focal point. I used Memento Rich Cocoa Ink for the leaf. Then I colored it with a Spica pen in Melon Green. And added orange and clear glitter with my *Wink of Stella Brush. (I am so addicted to these glitter brushes). I added Aged Spice and Aged Hunter embossing powders by Stampendous called Fran-Tage. The Border paper is from my stash. The button was made using a silicone mold and some Martha Stewart paper clay. And I added more Aged Spice and Aged Hunter to the button. My card is 5-1/2” square. And the base of the card is Kraft card stock. Everything is held together using a Tombow Adhesive Tape Runner.
The following products can be purchased from the Cutters Creek Online Store:
Copic Atyou Spica Glitter Pen – Melon
*Note: Kim will be carrying the Wink and Stella Brushes in the near future.
If you are interested in any of the other products I used you can contact Kim of Cutters Creek to see if she can special order it for you.
Have a wonderful day,
Fran
Saturday, November 16, 2013
Thankful for You card by Jearise
I hope you liked my card and I thank you for stopping by today.
Products from Cutter's Creek:
6 x 6 paper pad - Trail Mix Collection from BoBunny. It's part of the 6 x6 paper club and you would need to contact Kim for information on ordering.
Tim Holz Distress Ink in shaded lilac
Perfect Pearls Mist in pewter
ATG tape dispenser
Glue Dots
Cuddle Bug Embossing machine
Cuddle Bug embossing folder - Kassie's Brocade
Friday, November 15, 2013
Thanksgiving Rosette Wreath by Deanna M
I wanted to make a Thanksgiving Wreath for my house but wanted something a little different. So, I decided to make a Rosette Wreath! I love how it turned out.
For my wreath, I started with six sheets of 8 1/2" X 11" card stock. I chose to use two different colors for my rosette wreath. Using my Scoreboard I scored on the paper every 3/4" of an inch on the 11" inch side. Once I had all my paper scored, I folded it accordion style.
To adhere my rosette together I used some 1/2" Kool-Tak. It is very similar to scor-tape. I then cut two 6" circles and hot glued them to the front and back of the rosette to hold it in place.
My turkey is from the Silhouette Store and was cut using my Cameo and some brown card stock. I used the offset feature in the Design software to create a shadow for my turkey and cut that out of some light rusty orange paper. I sprayed the brown layer of my turkey with some Coffee Shop Glimmer Mist.
My letters were cut from the A Child's Year Cricut Cartridge at 4". I cut these out of the same card stock as the turkey's shadow. I applied some Glossy Glue and Seal to each letter and sprinkled them with some of the Rusty Hinge Distress Glitter. The distress glitter is a special order item, so just ask if you want some.
I finished the wreath with a bow at the bottom. I made a loop out of the ribbon and hot glued it to the top of the wreath so I could hang it.
The wreath actually went together really quickly so this is something you could put together for just about any occasion. You could also use patterned paper for an entirely different look. I thought these colors just gave the appearance of the turkey's tail all fanned out. Let me know what you think, I would love it if you left me a comment.
Wednesday, November 13, 2013
Gratitude Project by Cindy
Today, I am sharing a fun project using the smallest Graphic 45 matchbox and some leftover French Country paper. It was a super fun and easy project.
If you would like a more detailed look at my project, be sure to watch the video.
Here are some products that I used from the Cutters Creek Store:
Glue n Seal
Scor Tape
Graphic 45 French Country Paper
Tattered Angels High Impact Paint
Thanks for visiting,
Cindy
Saturday, November 9, 2013
Thanksgiving Place Holder
It is a little house that is about 11" wide, and the banner on top is the name of the person. I used all the paper I had at home. I made the houses in 2 different colors, light brown and a dark brown. The window and banner are out of white, and vellum was used for the window. The roof was some paper that had Thanksgiving colors I liked. The door paper was cut out of some paper that had turkeys on it. The door knob was a small rhinestone bronze.
 front view
The banner I used the mini glue dots to hold it in place on top of the roof. All others I used Scotch quick-dry adhesive. The opening in the back I put a small piece of candy, or you could put a tea-light(battery operated of course)it would look like some one is in the house.
Hope you liked this project for Thanksgiving. Have a great weekend all.

