Monday, March 31, 2014

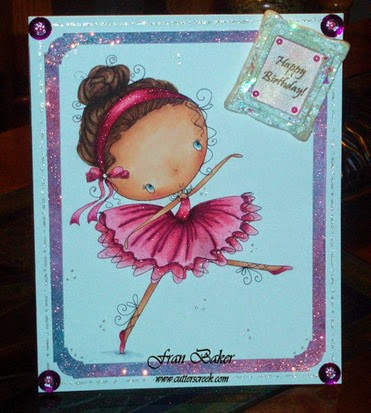
Ballerina by Fran


The Star of my card is Abi Ballerina.  She is a digital image by All Dressed Up.  Abi was colored using both Copic Markers and Promarkers.  The card base is made from 110# Solar White and measures 5-1/2” by 6-3/4” (portrait style).

OLYMPUS DIGITAL CAMERA

Abi was colored on 110# card stock, solar white.  The mat behind Abi is water color paper. What I did was take three shades of Distress Ink (Worn Lipstick, Tattered Rose, & Peacock Feathers) and rubbed the colors on my work mat.  Sprayed them with water and placed the water color paper on the distress inks.  I loved how it turned out.  Then I measured out a border to add Stickles around the edge (Dry Fine Glitter, Diamond) by Ranger.

The small frame was made using a mold and covered with Fran-tage Shaved Ice fragments by Stampendous.  I added a dashed lines using Gelly Roll Glitter Pen (stardust).  And more of the glitter pen on the TuTu and around Abi.  Remaining embellishments on the corners are sequins and pearls.  And I used Glossy Accents for my adhesive. 

There are so many neat products you can get from the Cutters Creek online store.  Stop in and look around.  And if you don’t see what you are interested in purchasing just ask Kim and she will try to get it for you.

Have a wonderful day!  Fran
Saturday, March 29, 2014

Easter Basket by Michele

Easter is almost here and I have a quick way to make a simple Easter basket.  I used paper from Moxxie- Just Hatched, this is double sided, while this paper isn't in the store check out some that is. I also used some 3-d pop dots, and stickles- diamond. The items I used can be found in the store, if not just ask Kim and she help you get them. I made a copy of the pattern I used. I used 6x6 paper to make the basket and about 1 more inch for both handles(1/2inch each). I scored the paper at 2" and 4" all the way around. Then one 1 side I cut to just the 1st score line, and did that again on the opposite side. In the diagram it shows to cut on the score line at 2 and 4" to the first line. Do the same on the opposite side. The middle square you cut about 1/4 -1/2 off. On each of the 4 corners you cut diagonal, so that you have triangles. Now on one side bring the triangle points to cross each other as much as you want and attached the 2 handles with a brad or a staple and do the same for the other side.
No that you have your basket, just fussy cut any of the chicks that are at the bottom of the paper and attached with a 3-d pop up dot, add stickles and let dry. Add anything to the basket you want.  I hope this makes sense.


Hope this helps in getting ready for Easter. 


Thursday, March 27, 2014

Celebrate Spring by Deanna M

A friend of mine ordered several of the new Memory Box stencils by mistake thinking they were dies. When she got them she had no idea what to do with them. I told her how I would use one so she told me to take it home and make something with it and bring it to show her. So this is what I came up with.

The stencil set was called Garden Birch Trees. Cutters Creek can now order Memory Box items so ask if you would like to order this.

I started with a white piece of card stock and used some Washi Tape to tape the stencil to my paper. I used my Foam blending tool and some Tumbled Glass and Broken China Distress Ink to create my sky. I then used Shabby Shutters and Mowed Lawn to create the grass on my card. When I removed the die I had these great white Birch Trees.

The next step was to figure out what to add to the card. I used a stamp with a bird on a branch from Hero Arts and stamped it with Mowed Lawn Distress Ink. I then used a small bird stamp and stamped it up into the trees using Broken China. Finally I add a small butterfly that I stamped in Mustard Seed Distress ink. I used my Lemon Spica pen to add some glitter to the butterfly. My sentiment was stamped with Broken China Distress Ink as well.

Tuesday, March 25, 2014

Pretty Kitty by Mindy

I was looking through my scrapbook room trying to decide what I was going to use for my project and I found a cute little stamp I've had forever but never used. Sadly, I have a lot of those. I decided to ink it up and color it.


I colored this little cutie with my Copic markers to coordinate with the colors in my papers. I used some core'dinations card stock and lightly sanded it to reveal the pattern as my background and a paper pack from My Mind's Eye for the layers. I added some rhinestones to the kitty's tiara and a little banner in the corner hanging from some twine. 
 
I've used the following supplies from the Cutters Creek online store. 


Saturday, March 22, 2014

Easter Card by Michele


Do you have lots of paper pieces and do not know what to do with them. Well I keep all my paper pieces, so when I need to do a project I am not always buying new sheets of paper. This is what I came up with.

Here is a card I made. I used a A2 card (4.25 x 5.5). I used paper from my stash that had some Easter items on it but it was not the size I needed. So I took some green card stock and did a two- tone layer. The green card stock was about 2 inches and the Easter paper was about 3 inches. I over layed the paper.


The saying is from a stamp I had in my stash. The basket, eggs, and flowers are from a die cut, I'm not sure which one it was, in my stash.  I used sticky thumb adhesive by Lifestyle Crafts, this is one I got from the adhesive club(Ask Kim about our monthly clubs). The bunny is a digital stamp I got online as a freebie from a company. I used brown fun flock for his tail and I used colored pencils to color him. I used pop up dots on him and the saying.  I am sure with all your scrap pieces you can make something wonderful. Please stop by the store for some of the items I used on this card, and can't find it just ask Kim and she will help you.

Wednesday, March 12, 2014

Lucky Leprechaun! by Deanna M

When I came across this cute little Hippo juggling shamrocks I just new I had to use him for a project. This is a print and cut image that I found in the Silhouette store. I used him at his default size which was about 5".

For my card I started with white card stock cut and scored to may a 4 1/4" X 5 1/2" portrait style card. Next I cut a green mat at 4 1/8" X 5 3/8". The white mat is cut at 3 3/4" 5 1/4". I wanted the sides of the green mat to show a bit more to help frame my image. I ran the white mat through my eBosser and embossed it with an Anna Griffin Circle of Gold embossing folder.  When I did the embossing I left about a 1/2" at the bottom end out of the folder so it would give me a smooth place to stamp my sentiment. I just love the look of the embossing on the white card stock. The embossing folder is a special order fold and isn't stocked in the store. There are several Cuttlebug Embossing folders that are carried in the store.

I used my ATG gun to adhere the mat layers together. I used some foam squares to add my hippo to the front of my card and some Scotch Quick Dry Adhesive to add the little shamrocks. Finally I stamped my sentiment with some Mowed Lawn Distress Ink.

Wednesday, March 5, 2014

Mardi Gras Time by Mindy

Ok, I know I'm a couple days late with this ( and a dollar or two short lol ), but I still wanted to share it.


I used a lot of cricut for this card. The mask, the jester's hat, and the sentiment all come from the Designer's Calendar cartridge.  I've never made a calendar with this cartridge, but it has some great extras on it. I colored my stamped image with Copic markers. I then added some stickles, sequins, and feathers to the mask to bling it up a little.  I also added some Mardi Gras beads to Tilda's hands. The purple paper behind the mask has been embossed with my Cuttlebug and sanded to bring out the detail more.  I thought the fleur de lis detail was perfect for this card.  This card is an easel card.  It will stand up when open, but closes flat. 
 
Cutters Creek Shopping List

Related Posts with Thumbnails