Showing posts with label Basic Grey. Show all posts

Thursday, August 29, 2013

Steampunk Spells Album in a Box by Cindy

Hi everyone,
Today, I am sharing a fun project using supplies from the Cutters Creek Store. The owner, Kim had a pre-order of Graphic 45's new Halloween paper Steampunk Spells. I used the 12x12 for this project. I also used a pre-made cardboard book box that I got from Michaels - it was found in the unfinished wood section.

To prepare the box, I painted it with Gesso and then black paint. After the paint dried, I rubbed Gold leaf Rub n Buff streaking it in places so the black would show through and I think that it looks aged. I cut the cover images from the paper and attached it to the book box using Glue n Seal. The flowers are also cut from the paper and I used gold stickles on it.

Many of the products that I used for the mini album, I received as part of the Cutters Creek Store Yahoo Group. If you click on the link, you can join the group and get information on how to join the many clubs available. What is nice about the clubs is you can grow your collection and get new supplies monthly in an economical way.


I created the album using scor-tape, Basic Grey magnets and Velcro from the adhesive club. I hope that you like my project today. Be sure to watch the video to see everything in action.

Thanks so much for visiting today,
Cindy

Monday, October 31, 2011

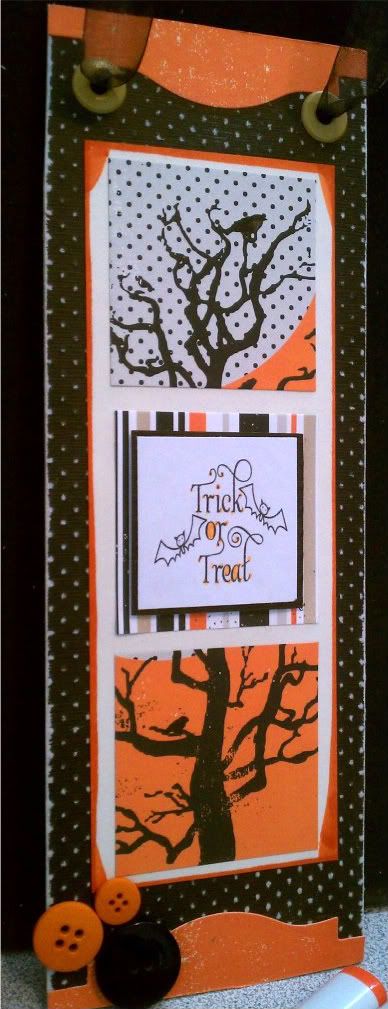
Melissa's Halloween Door Hanger

I started with an inspiration from the Sept/Oct issue of PaperCrafts Magazine (from page 60 if you have it).  I loved the idea of a holiday door or wall hanger.  My project ended up being 12" tall by 4" wide if you want to make one of your own. 

I took the cardboard from some empty cereal boxes and double layered for extra thickness.  I than cut some black paper from the Bazzill Dotted Swiss Pack and filed it down to make the dots pop.  Using my Spellbinders Labels 18, I cut out the largest shape on a sheet of orange paper from my Echo Park Apothecary paper pack.  I trimmed off the edges and added it to the top and bottom of my hanger.

I took a cream piece of paper from my stash and traced the edges of it with my copic YR18 for some added pop and added 3 squares of paper from the Echo Park Apothecary pack.  I added holes and eyelets with my big bite as the thickness of the cardboard and paper made it a little difficult with my cropadile. 

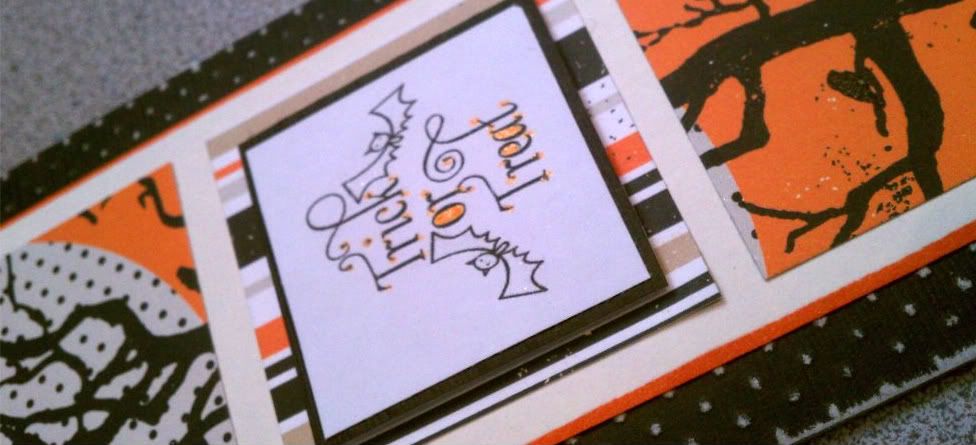
I added buttons from my stash and colored some white ribbon with my Copic 110 to add some black.  I printed the sentiment for free from here, trimmed and lined it with some left over black paper and used Kool Tak to make the sentiment pop up.

Then for extra, I went over the sentiment with my Spicas and the birds in the trees.

Hope you like it!! 


Image:  PaperCrafts Magazine Trick or Treat
Paper:  Bazzill Dotted Swiss, Echo Park Apothecary
Ink: Memento Tuxedo Black, Copics, Spicas
Embellishments: Spellbinders Labels 18,
Other: ATG, Big Shot, File Set, Kool TAC, Big Bite, Scor-Tape
Stash: buttons, ribbon, eyelets, cardboard, cream paper

Saturday, September 25, 2010

Spooktacular Layout by Laura C

This is a 12x12 layout that starts with the Basic Grey (BG) Lime Rickey collection.  The 12x12 lime green page is distressed around the edges and then inked in black.  The next layer is the orange polka dot from
Lime Rickey cut down to 6&1/4" by 8". This is also distressed and inked.  The photo is 4x6 and is double matted--first on a 4&1/4" x 6&1/4" piece of orange (from Lime Rickey) and then a 4&1/2" x 6&1/2" piece of lime green core'dnations from the Black Magic Spellcaster collection, that has also been distressed. The matted photo is then placed about 1&1/2" from the bottom and from the side of the orange polka paper.


From here, you can embellish and have fun.....I used a bat punch from EK success on a 1"x8" piece of black
cardstock, and placed this close to the bottom, then pleated and stapled on Halloween ribbon--the Tim Holtz Tiny Attacher is perfect! The medallions were made using the Cuttlebug A2 folder "Boo to You", and the same piece of Core'dinations cardstock. Once embossed, it was sanded to make the images "pop".  They were cut out with a 1 & 1/2" circle punch. The skeleton head circle is mounted on a 2" circle (distressed and inked) and then pop dotted.  The "boo" is just adhered with glue dots. An American Crafts pearl brad holds the "paper lace" in place (PS that was the bat punch that was punched on BOTH sides of the 1" strip of paper!).  The "scary" was adhered with glue dots, to a rosette made from a 1&1/2" x 12" piece of the polka dot from the Lime Rickey collection. After accordian folding this piece, I adhered the ends together with adhesive, and then the entire rosette, to a 2" circle of plain cardstock using glue dots.

Hope you get some inspiration for those "Spooktacular" fall and Halloween pictures you'll be scrapping soon!!

Available at Cutter's Creek:


Basic Grey Lime Rickey
Core'dinations Black Magic (Spellcaster)
American Crafts Pearl Brads (Earth Tones)
Cuttlebug A2 Folder (Boo to You)
Glue Glider (permatac adhesive)
Glue Dots (Dot n' go memory dots and pop dots)
Tim Holtz Tiny Attacher Stapler

Sunday, July 11, 2010

Fairy Card by Mandie


Today I have created this adorable fairy card using one of my favorite stamps sets and my much neglected Cuttlebug! I always forget how much I love the texture that it adds to my projects. So I dusted off my Cuttlebug and pulled out the folders and was inspired by the texture of the one from this Cuttlebug Plum Blossom Embossing Folders Set.

I embossed a piece of 4” x 4” Core’dinations Cardstock and then sanded to reveal the green underneath. Next I stamped my fairy from the Enchanted Lily Stamp Set onto a sheet of white card stock with my Memento Tuxedo Black Ink and colored her using some markers from my stash as well as my favorite flesh toned Copics. I bought the flesh colors first because they are so hard to get right. The colors I used here were: E00 and E11 for the flesh and R20 for her cheeks.


After I had her colored just right I added a little bling with my favorite Sakura Jelly Roll Pen! I use it to add a little sparkle to a lot of my projects! Then I used a oval cutter and cut out my image and used the next size up to cut the frame from the reverse side of my cardstock.

Then I cut a 1 ½” x 4” strip of patterned paper from the Basic Grey Origins Paper Pack. I am in LOVE with the gorgeous papers in this pack! Then I adhered it all to the card base along with that gorgeous green ribbon. Then I stamped my sentiment and added the little brackets around it by hand. Then for the finishing touch I added a few Twinkle Jewels along the side of my card with some Glue Dots. I hope I will inspire you to dust of your Cuttlebug and play with those embossing folders!


Products Featured:

Cuttlebug Plum Blossom Embossing Folders Set
Core’dinations Cardstock
Enchanted Lily Stamp Set
Memento Tuxedo Black Ink
Copic Marker E00
Copic Marker E11
Copic Marker R20
Sakura Jelly Roll Pen
Basic Grey Origins Paper Pack
Twinkle Jewels
Glue Dots

Thursday, June 24, 2010

Monogram Sign Project by Melissa


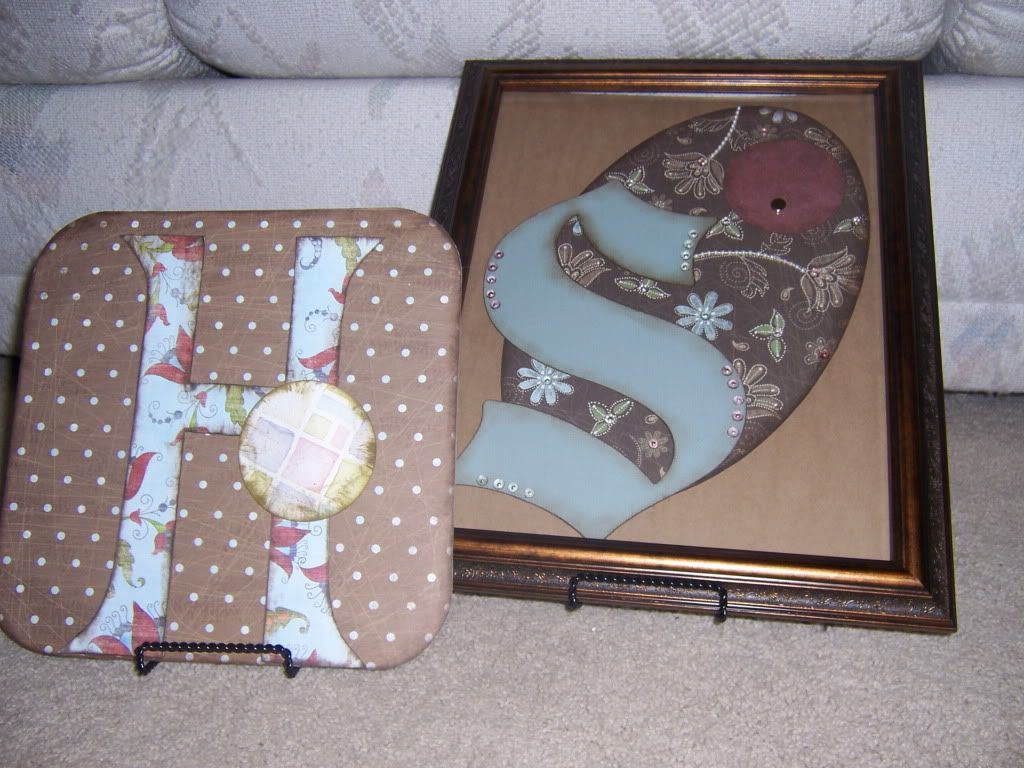
Here is another project I have been pushing off for a while at my house. Months ago, my mom and I had made Monogram signs to use as home decor. She finished hers; mine has been sitting on my craft shelf in the "to do" pile. I decided that it needed to be completed :o) The Letters were cut out with Make The Cut first as paper and than as two layers of chipboard. Mom chose a square background (H) while I did an elongated oval (S). Mom's is on a plate stand while I framed mine to hang on the wall. I attached a magnet to the front of the glass so I won't have to open the picture frame all the time to update the images. I haven't completed it yet as I still haven't found a background I like to go with my letter. I might eventually get a shadow frame with glass on both sides so I don't have to worry about it .. . .hmmmm . . . . .
100_3744.jpg
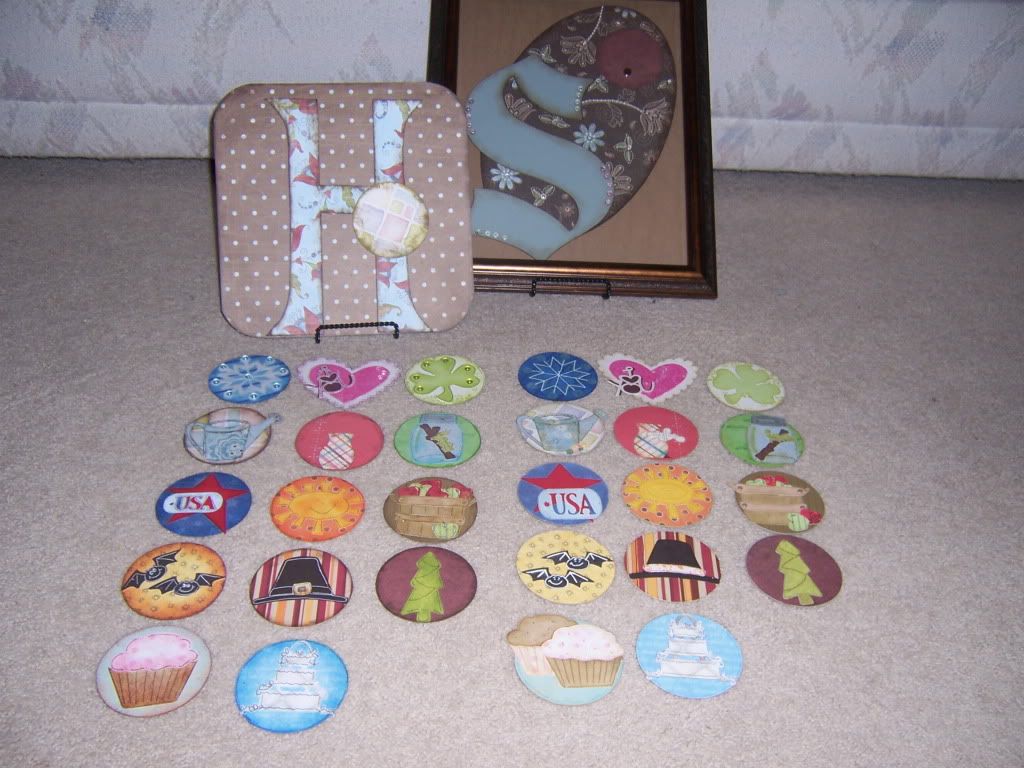
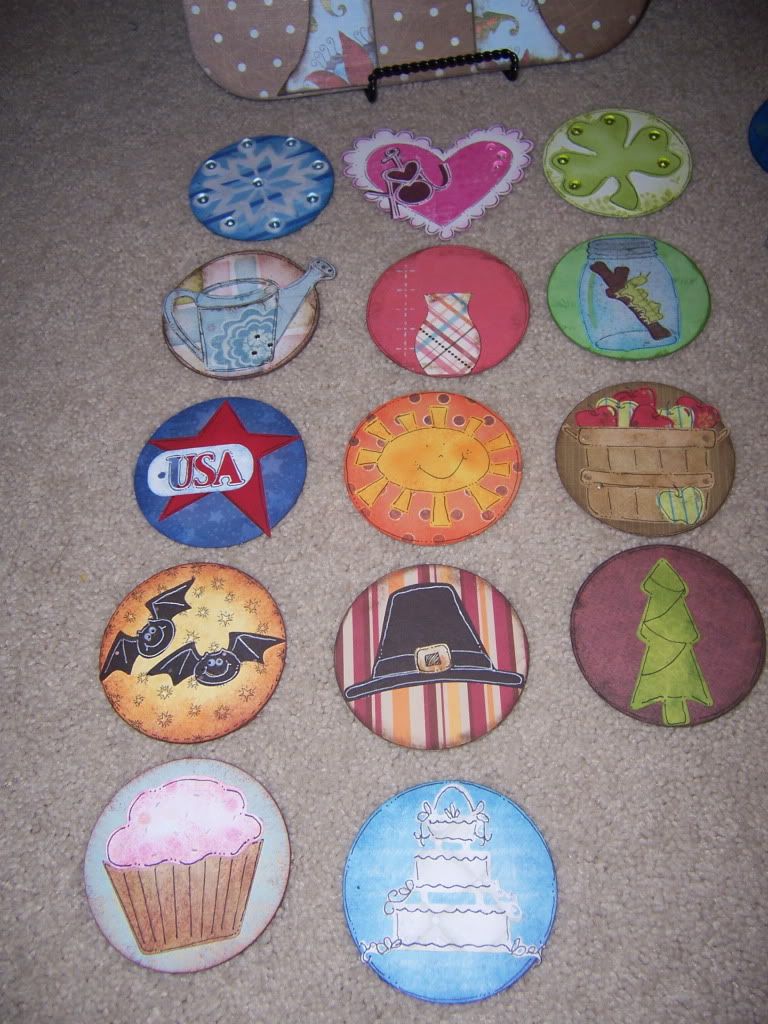
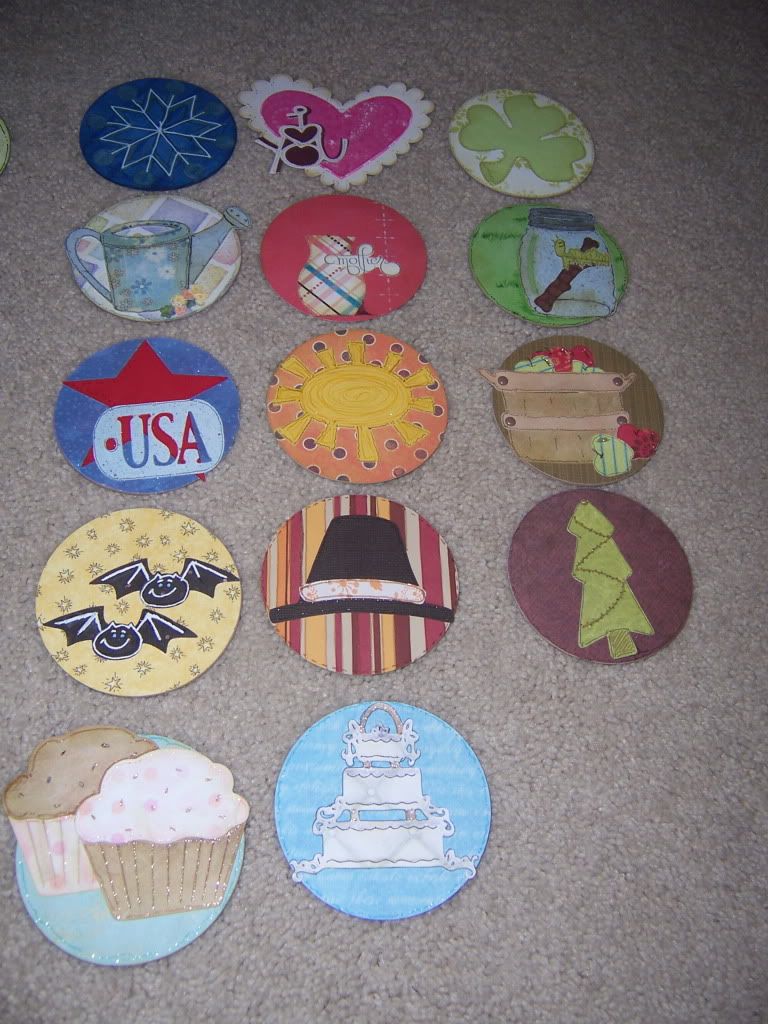
We than cut out 3 1/4" circles from chipboard and coordinating papers for backgrounds for the months and holidays. We only did 14 total circles but I know this something I can create new ones any time I want to! With Design Studio, I cut out multiple images for the coordinating month/holiday. I also listed alternatives or additional circles below- I am already thinking of other circles to create and design!
January-Snowflake/Winter/New Year's
February-Heart/Valentines
March-Spring/St Patrick's Day
April- "showers"/ gardening/Easter
May-"flowers"/Mother's Day
June-June Bugs/Father's Day
July-Popsicles/Fourth of July
August-water/sun
September-Back to School/Autumn/Harvest
October-Halloween
November-Fall/Thanksgiving/Veteran's Day
December-Winter/Christmas/Hanukkah
Birthdays-cupcakes/balloons/name
Anniversary-Heart/Cake/Wedding Bells/Rings
100_3747.jpg
I assembled all of the circles adding my own personal touch to them. In fact, in this picture my circles are on the right and my mom's are on the left. Can you tell where my creativity comes from? By the way, all of the paper used is from my stash and scrap pile - -this is a great way to use those scraps!! All other supplies can be purchased at Cutters Creek. Let me know if you need any measurements or picture close-ups. Thanks for looking!
100_3748.jpg 100_3749.jpg
Supplies Used:
Design Studio
Make The Cut
Chipboard
Adhesive
Atyou Spicas
Copics
Multiliner Pen 0.1
Inkssentials Pen
Twinkle Jewels
Quickie Glue Pen
Basic Grey Small Magnets
Carts-Blackletter, Home Decor, Doodlecharms, Paperdolls, Christmas Cheer, Accent Essentials, Walk in My Garden

Saturday, June 19, 2010

Two More Father's Day Cards

Father's Day is this Sunday, and I had a couple more cards I needed to get done. It seems masculine cards are always the hardest for me to do. Here is what I came up with:

This card was made with left over papers from other projects. I started with a standard kraft side-fold card. The background was a left over from some map paper I had from a travel project. I had a scrap of red card stock, and I stamped my compass image. I cut it out close using my Cutter Bee Scissors. They are the best for intricate work. I threaded my button and attached it using Glue Dots. The blue patterned paper was cut at 2.5" and I distressed the edges for a more aged look. I inked my edges as well for the well worn look.

I added my scrap piece of ribbon using my 1/4" Scor Tape. I used my 1/2" ScorTape put the cardstock pieces together, and then to attach the finished piece to my card front. Lastly I added my compass using a Glue Pop Dot.


For this card I got a bit fancier. I used all Basic Grey papers for my patterned papers, and they are available in the Cutter's Creek Store. These are from Green at Heart, Kioshi, and Indian Summer. I started with a kraft paper gate-fold card. I used my ScorPal to get the perfect folds. I cut my cardstock and distressed all of the edges on the patterned papers. I attached them using my Scor Tape.

I cut a 3.75" x 4" Kraft paper square, and I distressed those edges as well. I used a scrap piece of blue cardstock at 3" x 3.5" for the ocean/sky background, and drew curly circles on the bottom 3/4" of the blue piece using my Inkssentials White Gel pen. I cut out my stamped sailboat using my Cutter Bee Scissors. Lastly I adhered the piece together and then to the card using my Scor Tape.


I stamped my images and sentiment using the Tsukineko Cocoa Brown Ink on both cards.


All of the basic supplies I used to make these cards and the Basic Grey papers are available in the Cutters Creek Store.

Be sure to check out the full line of Basic Grey papers and kits. They have such amazing papers! I love the texture and weight of their line. There are even some Christmas papers available .

Remember Kim will always do special orders. If you are looking for special items, be sure to ask her about them. I am super excited about the new PINK ATG gun! Pink just rocks!

Monday, January 4, 2010

Mandie's Christmas with Grandpa

I love this layout! Look at how well Mandie has blended colors and textures to create a simple, yet eye catching piece that is a pleasure to share! This layout was created using the same exact paper pack, Basic Grey Eskimo Kisses, that I used to make Carrie's Christmas Cookies. By comparing these two projects you can easily see the beauty and versatility of this gorgeous paper. Just accent with a different color of solid card stock and you can completely change the entire palette for your project!

Also, before we get into talking about how you can
recreate this work of art on your own. I want to point out the Bazzill Dotted Swiss card stock that Mandie used to accent. The texture of this card stock adds dimension and class to the layout as a whole that is simply stunning! In fact, as this is not a product that I currently have in my stash, I think that I need to go an order some now! Click here to jump to Cutters Creek and check out the 60 sheet multi-pack that Kim has stocked for us.

Now, I'm going to be quiet and let Mandie tell us a bit more about this page in her own words:

Hello all! Here is my first project of the New Year! It was a blast to make and I hope that you all enjoy seeing it as much as I enjoyed putting it all together!

Let's start with the supply list!

Christmas With Grandpa Layout was created using the following products:

Bazzill Dotted Swiss card stock - dark red and green
Basic Grey Eskimo Kisses patterned paper packet - holly, strips and alphabet stickers
White cardstock
Sakura Glitter Pen
BG Eskimo Kisses Brads and Felties
Tombo Mono Adhesive

My 3 main photos are 4" x 6" and matted to 4 1/2" x 6 1/2", the 3 square photos are just a bit smaller than 3" x 3" and are matted at 3" x 3" and the far right photo is slightly smaller than 3" x 4 1/2" and matted at 3" x 4 1/2".

For the Left page:

Holly Paper is cut at 10" x 7"
Stripped Paper is cut at 11" x 8"
Dark Red is cut at 2" x 12"
Green is cut at 3" x 12" (along bottom) and 5" x 7"
Layer papers as shown and adhere with Tombo Mono Adhesive.
Add flower embelishment to upper left corner of focal photo

For the Right Page:

Holly Paper is cut at 5" x 10"
Striped Paper is cut at 12" x 4"
Dark Red is cut at 2" x 12" (Then I trimmed a little and rounded the corners)
Green is cut at 5" x 8"

Layer papers as shown and adhere with Tombo Mono Adhesive.
Spell out title with letter stickers and use the Sakura Glitter Pen to add little snowflakes to the letters for more bling.
Add deer emblishment and brads.

If you have any questions for Mandie or another member of the Design Team, just ask! We always love to hear from you!

Thanks Mandie for another beautiful project!

The supplies for Mandie's Christmas with Grandpa can all be purchased from Cutters Creek.

Sunday, January 3, 2010

Carrie's Christmas Cookies

Okay ladies...be kind. I now submit (for your enjoyment I hope :) my very first Design Team project. I had a blast making this, but I also learned a few things along the way.

1 - I need to figure out a better way to take pics.
2 - Scrapping is much easier once the 2 year old is in bed.
3 - Said 2 year old's new kitten thinks that my desk is a wonderland of fun things to chase off into the floor.

Definitely a learning experience! This layout was created using the new Eskimo Kisses paper from Cutters Creek. As soon as I saw this paper pack, I knew that I had to have it.
the colors are AMAZING! What is so perfect is that you have this delicate blend of colors that can be punched up with a bold cardstock as I did here, or blended with lighter elements for softer look. Beautiful blues, icy pinks, shades of greens and even purple all flow together to form a very versatile palette! Plus, the pack comes with 2 full 12x12 sheets of card stock stickers that you can use to accent your work. I love that the stickers are printed with the same patterns as the card stock to give you that perfect match.

I also got the chance to use one of my favorite techniques on this project. Look closely at the two snowflakes on the left hand page. To create those I took two sticker from the sheet that came with the kit and then, instead of sticking them to the page, I coated the backs with a corse white glitter. Then to give it a "pop" of color, I added Twinkle Jewels that coordinated with the rest of the layout. This is a great technique that you can use with any sticker. Especially if you have one that you like the shape of, but not necessarily the color or the print. You can dip them in glitter, flock, microbeads, or any other loose textured element!

To create the title, I called on my trusty Cricut! (LOVE my Cricut!) I cut "Christmas" using the new Winter Wonderland Cartridge while "Cookies" is off of From My Kitchen. I like the look of the two completely different fonts and feel that they add interest to the layout as a whole. Plus....doing it this way lets me play with more carts!

For me, the best way to attach the elements that I create with my Cricut is the one and only Wacky Tac! Trust me, if you try this product once, you will never let yourself run out. It gives you flawless, edge to edge coverage not matter how crazy or intricate the shape may be. Love it!

The finishing touch comes from the ribbon lacing on the right hand pic series. I set the eyelets and then threaded them with ribbon to draw the eye and tie the pics together.

I hope that you enjoy this project and would love to hear what you think! If you have any questions or comments, please drop us a line!

Carrie's Christmas Cookies was created using the following products:


Related Posts with Thumbnails