Showing posts with label Stickles Glitter Glue. Show all posts

Wednesday, April 9, 2014

Hanging Easter Eggs with Jearise

I am putting up Easter decoration and thought I would try my hand at decorating my own paper mache eggs. I was at the craft store and looking at how expensive already decorated ones are and I thought that I might as well try it myself and see what happens.

I was so happy with the way these turned out.


I started out by dabbing sections of the egg with Adirondack Acrylic Paint Dabbers. I did a section at a time so that I could turn the egg without getting paint all over me and it was easier to find something to put the egg on to dry. I used a shot glass. Once it was all painted and dried I went back and used Stickles Glitter Glue to create various designs on each egg. Finally, I attached a satin ribbon with hot glue and there ya go. You may want to seal them with acrylic spray paint so they last for years to come. You can use gloss or flat to create different finishes. 

Tomorrow I'll have two more eggs with very different designs from today to show you so please join me again. 


Thursday, January 30, 2014

Howdy-Do! By Fran


I really had fun coloring this image by Sassy Cheryl called a Simple Bunch of Flowers.  It was not hard to keep a smile on your face while coloring her.  Let me know what you think.


OLYMPUS DIGITAL CAMERA

(Click on photo for a larger view)


Details:  Card base is 5-3/4” square.  The shape of the card was cut using a Silhouette Portrait.  Card base is made from Bazzill Basics, Simply Smooth White.  The remaining papers are from my stash. The image was colored using Inktense Paint Pencils and Copic markers for the skin (E00, Eo1, E11, & R20) my favorite colors for skin).  The buttons on the dress and shoes were accented with Enamel Accents (dimensional faux enamel) made by Inkssentials, Ranger.  I used a Crop-A-Dile Corner Chomper (Deco) to create the corners of the image.  The rosette and button was cut using the Silhouette and the button is decorated with stickles and Scrappers Twine. The sentiment was created on the computer and then cut to create the banner. And I used Distress Ink to the edges of the banner.  On the image I used Glossy Accents to the centers of both flowers.  And some Wink of Stella Clear Glitter.

Supplies:    Bazzill Basics Paper

                      Stickles (starry night)

                      Tombow Adhesive

                      Glossy Accents

                      Distress Ink Pad

                      Copic Markers

I hope my card gave you some inspiration to do some coloring using digital images or your stamps.  To me coloring is so relaxing.

If there are any products noted in the Details that are not available from Cutters Creek Online Store you can always contact Kim to see if she can order it for you. I ordered my Silhouette through Kim and the process was so easy because Kim makes it easy.

Thank you for stopping by and I hope you leave a comment to let me know your favorite thing on my card.

Fran

Monday, September 9, 2013

We’re Lick This Together by Fran


Today I bring you a card designed for Cutters Creek Online Store.

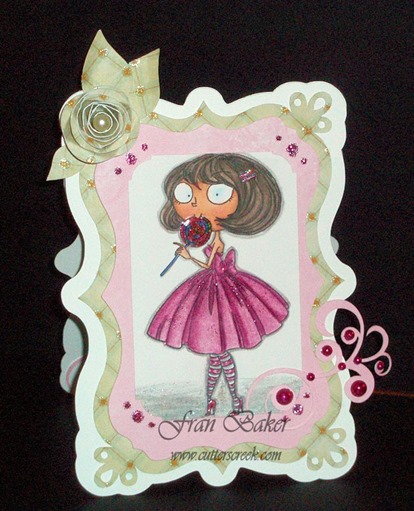
I really thought this stamp was so cute and the sentiment that comes with it “We’ll lick this together” can be used for so many things in one’s life.  I’ve been doing a lot of coloring using my Paint Shop Program but this time I dusted off my Prisma Colored Pencils and colored the image. Coloring can be so relaxing especially if it goes smoothly, lol.

And I did it again!  I just started coloring not even thinking if I had paper that matched the colors I used on the image.  Well I didn’t!!  But I improvised and I thought it still turned out nicely.  But it really makes more sense and easier to select your papers first and then match your colored pencils to the paper.  But I have to do things the hard way :)
 

OLYMPUS DIGITAL CAMERA


Card Details:  All papers used are from my stash:  Neenah, DCWV, and Recollections.  Card base and frames (Decorative Artisan) were cut using my Silhouette Portrait. The rolled rose (3D Paper rose); leaves (Leaf); and flourish (Miss Kate Flourishes) were also cut using the Silhouette.  The glitter dots were created using two colors of stickles to match the dress on the image.  The pearls are by KaiserCraft.  The one on the rose was left white to balance out the white card base.  The colored pearls were colored using a Copic marker V06, lavender.  I really thought it was a good match. Everything is held together using Glossy Accents and Tombow Mono Adhesive. The card measures: 4-3/4” wide (including the flourish).  And 5-3/4” long (including the leaves).

OLYMPUS DIGITAL CAMERA

Note:  Once I rolled the rose I took a pair of tweezers and curved the ends to give it more of a rose look.


Product Details Purchased from Cutters Creek Online Store

Stickles by Ranger (Lavender & Cranberry)

KaiserCraft Pearls (Champagne)

Copic Sketch Marker (Lavender-V06)

Inkssentials Glossy Accents

Tombow Mono Permanent Adhesive


There are so many awesome products sold by Cutters Creek.  Plus the owner, Kim has various clubs selling the most popular items.  The cost to join the clubs that normally run for 6 months depends on the product(s).

If you want to learn more about the clubs you can contact Kim here.  Or you can join the Cutters Creek Yahoo Group.


Thank you for visiting, Fran

Thursday, August 22, 2013

Get Well Card by Fran


I colored a cute Fairy and thought how nice it would be as a Get Well Card.  The image is called Peaceful Thoughts Fairy by Carmen Medlin for SCACD Digital.

OLYMPUS DIGITAL CAMERA

Note:  Color of dress is actually a deep pink.

The sentiment used on the inside of the card reads:  “Wishing You a fairy speedy recovery”.


Details:  The card measures 6” by 6-1/2”.   All papers are from my stash.  I used three circle dies measuring 5-1/2”, 5-1/4”, and 5”.  The digital image was colored using Prang Colored Pencils and Gamsol to blend the colors. 

The yellow butterflies were punched using a Martha Stewart punch.  The ribbon is made from seam binding and I colored it using Worn Lipstick Distress Ink Pad. 

All the tiny roses used are by Prima.  I added Baby Blue and Worn Lipstick Stickles to the roses and the center flower.  The center flower on the ribbon was hand made using a Retro Flower Punch. 

The digital image and butterflies have Star Dust Stickles on them for added enhancement.  The pearls are by KaiserCraft.  I rounded the bottom corners of the card using a Crop-A-Dile Corner Chomper. 

Framing the digital image are tiny dots of Baby Blue Stickles.  Everything is held together with hot glue and Glossy Accents by Inkssentials.  

The following list of products used on my card can be purchased from the Cutters Creek Store:

Tim Holtz Distress Ink Pad (Worn Lipstick)

Tim Holtz Distress Stickles (Worn Lipstick)

Tim Holtz Stickles (Baby Blue and Star Dust)

Inkssentials Glossy Accents

KaiserCraft Pearls (Bliss & Hot Pink)

Prima Roses

If you have any questions about the products you can contact Kim Bush here.

Thank you for stopping by, Fran


Sunday, July 28, 2013

Fun and Play Card by Fran


Today I have a really fun card to show you.  I was driven by the image to make the card colorful and playful.  The digital image I used is by Mo Manning called Come Out and Play.  When you see the image it will bring back lots of memories for us who were kids during the 50s and skating was the favorite past time.  I can remember going to the Shoemakers down the street from where I lived to buy skate keys because I would lose mine all the time.  Oh and the best shoes to use were saddle oxfords.  You know the ones that were black and white.  The skates would stay on better. Just a little skating down memory lane.

OLYMPUS DIGITAL CAMERA

OLYMPUS DIGITAL CAMERA

I colored the image using Prang colored pencils and the Gamsol technique.  I used a Spellbinders Mega Nestabilities, Curved Rectangles  to cut around the image.  I distressed the card with Tumbles Glass and Crushed Olive Distress Inks.  All the small flowers were punched using a Retro Flower Punch by EK Success,  Added lots of Stickles Glitter Glue to the flowers, words, and speech bubble.  The larger flower is from my stash.  I used the Silhouette Portrait to cut out the words: F-U-N and P-L-A-Y.  The frame of the card on the front and inside was also cut using the Silhouette called Notebook Edges.   Inkssentials Glossy Accents & Tombow Permanent Adhesive to hold everything together. Cardstock is from my stash. And the speech bubble and text was created in Paint Shop Pro.

Cutters Creek Products:  Distress Ink Pads; Stickles Glitter Glue; ASI Kool Tak; Inkssentials Glossy Accents; Tombow Permanent Adhesive.

Side Bar Info:  Kim of Cutters Creek offers her customers a special way of obtaining their favorite crafting products by way of clubs.  The clubs run approximately 6 months allowing the customer to pay each month with a lower shipping rate on the products from each club.  For instance I belonged to the Adhesive Club and each month I received 3 adhesives of various types.  I also belong to Tim Holtz Distress Paints Club.  This is a great way to build on your crafting supplies with affordable monthly costs.  If you have any questions about the clubs you can contact Kim here.

Thank you for stopping by, Fran

Sunday, June 30, 2013

Flower Girl by Fran


(Click on photos for a closer view)

OLYMPUS DIGITAL CAMERA

OLYMPUS DIGITAL CAMERA

I was in the mood to do something frilly so I chose a little girl digital  image called Flower Girl.  I used my Prang colored pencils to color her in a couple of my favorite colors (turquoise and lavender).  Her hat was colored using Paint Shop Pro.  I used Stickles glitter glue in turquoise and lavender.  All papers used are from my Stash.  Ribbon border and turquoise flower were cut using my Silhouette. Lavender and turquoise flowers were punched from two punches from my stash.  The mats on the front of the card and inside were also cut from my Silhouette. This card was so easy to make but it took some time to complete it because of coloring the image.  But when you have the right products to use your card will go together quickly. 

Card Dimensions:  5” by 5” Square. Light lavender mat is 4” Square and dark Lavender mat is 3-3/4” square.  The card base was made by welding two 5” square mats together using the Silhouette Portrait.  Mats on the inside of the card are 4-1/2” and 3-1/2” square.

Products Sold at Cutters Creek Online Store:

 Inkssentials Glossy Accents

 Glue Dots 3/8” Memory Dots

 Tombow Mono Adhesive Permanent Dispenser

 Stickles Glitter Glue by Ranger


If you have any questions about any of the products you can contact Kim of Cutters Creek.

Thank you for stopping by, Fran

Related Posts with Thumbnails


