Sunday, April 29, 2012

More Twine Fun...Note to Self....Gift Giving Ahead by Laura C


It's time for Mom's, Grads, and Dad's gifts!  This little set is an easy gift to make for any of these occasions!  Using the "Note to Self" collection by Echo Park, I made a quick and easy sticky note pad cover as you see above.  Super simple to do....if you are using a 3x3 note pad, you cut your paper 7.75" x 3.25".  Then score....leaving 1/4" sides for the note pad and a 1/2" for the "flap".  The "title" and the hand are stickers from the kit, and that cork board paper is so cute!  You can really see it on the "cork board" push pin tin here:


I used Scor Tape on the back of the cork board paper first, and used that to secure my twine around the piece in a criss-cross cork board pattern.  I added a bit more Scor Tape, then adhere this piece to the tin.  The tags are fussy cut from one of the patterned paper sheets from the EP Note to Self, and the letters are from the kit as well.  A few little black rhinestones finish the "board" and then more Scor Tape to wrap twine around the edge of the tin as a finishing touch....here's a close up:

A great little tin, you can actually put some push pins in to use with the note pad (would be cute to give with an actual cork board for an office or dorm room!) and/or you could use the tin for a gift card! 

And I just wanted to share a little "commercial" if you will....for the self adhesive "kool tak" tabs.  Wowzer, were these easy to use as the closure for my little note pad!!  Much better, and way less bulky than traditional velcro!   It was the first time I had used them....and they truly are AWESOME!! 
They are sold out in store, but I'm sure Kim would get them for ya! 


Hope you enjoyed this little gift idea...especially with all those occasions coming up!

Enjoy some crafty gift making time today!

Friday, April 27, 2012

Magnolia Card by Mindy


 Isn't this such a cute image. Did you know that  Cutters Creek now carries Magnolia stamps . For my card I used a Magnolia stampSpellbinder Nestabilities- circle, scalloped circle, and labels 4, stickles on her wings, and dew drops on the bubbles. Tilda is colored with Copic markers of course.

Thursday, April 26, 2012

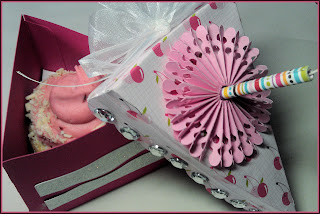
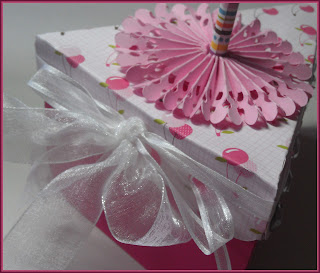
Cupcake Box by Tee


Hi everyone, this is Tee and my first project as a guest designer here at Cutters Creak. I am excited to share with you the cupcake box I made using the Sweet Tooth cartridge. Cricut made it easy to ensure a cupcake fits in each box by providing recommended cutting sizes on each project. I cut my box at 11" using cherry patterned paper and bazzill paper.
 I covered my icing with stickles and added two different widths of ribbon for a big bow on the back. I then cut a 2" rosette from the Ribbons and Rosettes cartridge and rolled paper with twine to make a candle. I then added some stickles to the top of the twine. I also added rhinestones to some extra bling. 


I hope you enjoyed my project as much as I enjoyed eating the cupcake I used as a prop for this box.

Monday, April 23, 2012

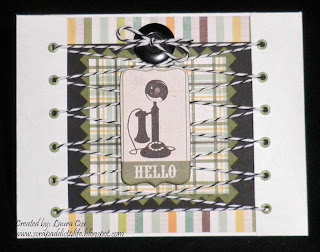
Twinerific Tuesday by Laura C

Today's "Tutorial Tuesday" has had a little "takeover"....lol.
It's still a "mini" tutorial, but it's mainly meant to show you
just how to think outside the box and have a little fun with
twine! It comes in a rainbow of colors (especially the fun
Doodlebug Twine in the store!) for all kinds of projects and
ideas, and the card above is a result of my playing with a few
of my twine ideas.

Step one....pretty simple....instead of cutting an 8.5" x 11"
piece of white cardstock in half to make a 8.5" x 5.5" piece,
I cut it into an 8.5" x 7.5" piece (left 2 extra inches). The
8.5" width was scored at 4.25" (as usual to make a card),
but I also scored the 7.5" width at 1" on each side (this
leaves a 5.5" width to the actual card after these are
folded). Next, I cut out the "extra rectangle" on the back
side of my card ONLY. The result is this piece:

Those extra "flaps" are then marked with evenly spaced holes....
I used a ruler for this and a paper piercer, then punched holes
with my crop o dile, creased and folded the flaps and had this:

Next, I set eyelets in those holes on each flap, then decorated the
front of my card (I used Echo Park This & That Charming, and
the new Spellbinders Square Swatches), then I put the twine
through the eyelet holes, as if I was lacing my shoes....I did
bottom to top on this card....and then added a button to the
twine, tied a bow, and secured the button, and the top of each
"flap" with some Scor Tape.

Here is a close up of the laced up twine:

And once more the complete card.....with a chipboard accent...
this could easily be a stamped image, flowers for Mother's Day,
any accent would be great!


Hope you enjoyed this little bit of twinerific fun!!

Never-ending Card Fun with Mandie

Hey everyone, it's Mandie from Mandie's Scrapping and I recently learned how to make Never-ending Cards and was talking about how much fun they are with a friend and she asked me to create one for her. She was going to surprise her daughter with a Disney Vacation for her birthday and wanted to let the card do the talking so this is what I came up with!

This is the first view of the card, I used my Memento Tuxedo Black Ink to stamp my Snow White (her favorite princess) and then colored her in with my Copic Markers. The "5" is cut with my Cricut and I stamped the background on the white pieces with a variety of clear stamps. Then I used my Stardust Gelly Roll Pure Glitter Pen to add the glittery swirls to the 5. To get to the 2nd "page" of  the card you simply open it from the center to reveal...


...Page 2! The princess here are cut from a sheet of patterned paper and I used some vellum stickers as an accent. I used my Stardust Gelly Roll Pure Glitter Pen to add glitter to my stickers and to my stamped phrase that reads "Where does a Princess say 'Dreams really do come true'?" To reveal the answer you fold back from the center again and the answer is....


...Disney World (of course)!If you'll notice that one page 3 your side images stay the same. It's one thing you will want to remember if you decide to try one of these yourself! I used more stamps and of course that amazing Stardust Gelly Roll Pure Glitter Pen for more - GLITTER - really, you can't have too much glitter, ever! From here you simply open the card out from the center again to reveal...


...the final page! I spent a long time coloring in these beautiful princesses. I used my Copic Cardstock and Copic Markers and practiced the techniques I recently learned. The images are all stamped in Memento Tuxedo Black Ink, of course. I left the 2 center squares blank so that my friend could write her own personal message to her little girl because I'm sure this card will be a treasured possession for a long time!

I even created a custom envelope with my Scor Pal, with a Velcro closure (I cut it into the shape of a heart) for the little girl to be able to keep her card in! I stamped all of my images in pink on pink cardstock and again used my Stardust Gelly Roll Pure Glitter Pen to add a touch more glitter. As I side note, you will want to make sure you are using a STRONG adhesive for this project. I would recommend either your Pink ATG or my favorite - Scor Tape! I hope you will give making a fun, interactive card a try soon!

Sunday, April 22, 2012

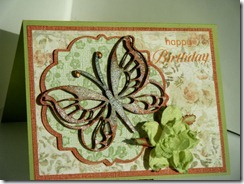
Birthday Card by Deanna M

20120413_1
I have for you today a birthday card I made for a friend to give to her Mom. My card base is a piece of green cardstock cut and scored to 4 1/4” X 5 1/2”. I added a mat from the Mod Squad Cut and Emboss paper pack cut to 4” X 5 1/4” and then a patterned paper mat from the Prima Botanical paper collection cut to 3 3/4” X 5. I then used Elegant Edges to cut a mat for my butterfly at 3”. I used the same paper as my first mat for the base layer of the mat for the butterfly. I then used a piece of paper from the Whitewashed Cut and Emboss paper pack for the top layer. I ran that layer through my Cuttlebug and embossed it with Sizzix Embossing folder called Dots and Flowers Embossing folder and sanded it so the colored green core showed through (and yes, Kim can order this for you. You get two folders in the package).
My butterfly on this card is once again one of the laser cut embellishments by Kaisercraft. I am so loving these embellishments. (And, yes Kim can order these for you too!) They are so easy to work with, are not too think and add a great dimension and elegance to a card. For the butterfly I started off by using my craft mat and rubbing some different colors of Distress Ink on my mat, spritzing with water and them placing the butterfly in the ink on my mat. I used Persimmon, Concord Grape and Broken China Distress Ink. I let it dry for a bit then spritzed it with similar colors of glimmer mist. Again I let that dry and then added some Glimmer Glam in Violet and a Copper color. Once again I allowed that layer to dry. I then added some Glimmer Glaze to the antenna’s and around the orange areas of the butterfly. I then went back with a bit more Persimmon distress ink. I let all that dry overnight (only because it was bedtime). The final layer I added some Pearl glimmer mist. This butterfly is so iridescent looking in person. I adhered my  the butterfly to my mat with some of the ASI Kool Tak tape clear gel foam tape.
The flower I added to the card is a Cutter’s Creek Gardenia. The flower was actually yellow but it just didn’t go with the card as well as I likes, so I spritzed it with some Honey Dew Mist glimmer mist, and problem solved. It softened the butter yellow of the flower and gave it a light green color which went much better with my card. I then stamped my sentiment with some Rusty Hinge Distress Ink. Finally I added some Copper Pearl liquid pearls to the tip of each antenna. Sure hope you have enjoyed my project and that I have inspired you to get out your goodies and make a project.

Friday, April 20, 2012

Numeral Birthday Card with Lori

So, a cute little girl I know just had her third birthday.  Since we've been out of town, I wanted to make something quick & simple that wouldn't take much brain power on my part!  And of course it had to be girly & cute too.

I pulled out my Cricut Gypsy and got to work (you could also use Cricut Craft Room).  I chose the Hello Kitty Font cartridge from my list, selected the Shadow feature and chose a 3.  Returning to my mat, I sized the 3 to 5" wide and copied it to make a second 3.  I selected a single 3 and flipped it vertically.  I moved the 3s around so they were touching along the top edge, and welded them together.  I cut this top-folding card from some bright pink CS in my stash.  Next, I chose the Silhouette feature and chose 3.  I sized it to 5" wide, and cut it from some American Crafts glitter cardstock in Carrot.  I layered this cut on the card front, using Scor Tape to attach it.   Finally, I dug out some matching paper flowers from my stash, layered them together on an American Crafts Pearl Brad, and attached it to the front of the card with a Glue Dot.  Finally, I stamped Happy Birthday inside, and I was done.


Pretty simple, but super cute with plenty of bling.  It took me longer to dig out matching flowers and a stamp than to make the rest of the card!

Items available from Cutters Creek:

Wednesday, April 18, 2012

Anniversary Card by Chris


Our fortieth anniversary just passed and I wanted to make a special card for my DH that was also a bit masculine. I decided on a z-shape card. I started with a slate blue piece of Bazzill cardstock cut 6 inches by 12 inches. I scored it at 3 inches from one end on the backside of the cardstock, flipped it over to the right side and scored it at 6 inches. I then creased the 6 inch score in towards the un-scored side and creased the 3 inch score back towards the left side. (If you place the scored sheet right side up, score the A line as a mountain fold and the B line as a valley fold.)


When the scores are creased and closed the card measures 6x6 inches. I then cut two pieces of Graphic 45 Proper Gentlemen Collection to cover the inside pieces (5-7/8 x 5-7/8 and 2-7/8 x 5-7/8) and glued them down with my ATG. [I’m sure Kim could order you this particular pad if you’re interested.] The front panel was also cut at 2-7/8 x 5-7/8 from my stash.

Using Spellbinders Beaded Circles I cut the largest circle and then layered it with two Spellbinders Petite Scallop Circles (large)—one from Silver American Crafts POW! Glitter paper and another from my stash. On top I layered a red vellum heart, which I attached with micro Glue Dots. I then add some silver Liquid Pearls on the beads. 


The front circle was made stacking the largest of the Spellbinders Petite Scallop Circles (large) with the largest of the Splendid Circles, the decorative element from Spellbinders Parisian Accents, and the smallest of the Splendid Circles. The silver glitter paper again was from American Crafts POW! Glitter paper. The smallest circle was adhered with a Glue Dots pop up dot; all others were glued with my Zig two way pen. I used my Copic Lipstick Red R29 to color the heart gem, which was glued down with Glossy Accents.

The sentiment is on the inside fold. It was printed on my computer and then cut with Spellbinders Labels Four –small and mounted on a Spellbinders Labels Four—large. All edges were inked with Vintage Photo Distress Ink.


Before I glued down the circles, the two short edges of the card were trimmed with Tim Holtz Idea-ology Tissue Tape. I then centered and glued the inside circle on the square and glued the outside circle on the Z so when closed it looks like one circle until pulled open. I had to have a bit more color, so a red ribbon finished off the card.

Tuesday, April 17, 2012

We Have Winners!

Our contest has come to a close, and after much deliberation by the Design Team (and random.org), our winners have been chosen.  Our "Top 2" winners are as follows, and in no particular order:

Kathy's super-cute bunny baskets

Karen's Hello Kitty guest book


And finally, our random winner is:

Alicia's alcohol-inked Easter eggs

Congratulations ladies!  Please email me with your full name and mailing address and I will get some Great Stuff mailed out to you ASAP!

Monday, April 16, 2012

Accordian Birthday Card by Pebbles

I made this card for my sisters birthday. She is always inspiring and encouraging me, so I wanted to do something extra special for her this year. Something that is just as bright and cheerful as her personality! I started with the base construction using 3 different, bright colored pieces of card stock. I made the flower embellishment using my eCraft Basic 12-Purpleberry, cutting out the circle, the pink flower background and the daisy. I used a Say it Pearls Flower Center to embellish the center of the flower. I applied Fruit Punch Stickles as a border and Firefly Stickles as some accent dots around the flower. 
For the inside left panel, I used the Fruit Punch Stickles again as a border around the butterfly and the word "Happy". I also used my eCraft Basic 12-Purpleberry to cut the butterfly and accented it with a couple of rhinestones. 
For the inside center panel I used some printed patterned paper and a couple of dimensional birthday stickers to suit the theme of the card. 
For the inside right panel, I applied Diamond Stickles as a border and used some printed paper and card stock to match. Here is the completed card.
e
This was a very fun and festive card to make, I hope she likes it!
Thanks for looking! :)

Sunday, April 15, 2012

Contest Reminder

Just leaving a quick sticky-note reminder about our contest.  Be sure to read the details and enter here!

Thursday, April 12, 2012

Love Bunny with Mindy

Mother's Day is approaching and I thought I would make a sweet little Mother's Day card. I love this House Mouse image called Love Bunny. I colored the image with my copic markers.


After I colored my image, I matted it with one of the fleur de lis square spellbinders. I embossed the square and then ran some ink ove the edges to highlight the embossing. I also inked the edges of all my papers to give it more of a shabby chic look. To finish the project off, I added a Cutter's Creek gardenia to the corner in yellow and grey to match the colors. I wanted to keep the card simple, so I didn't add a sentiment to the outside.

Tuesday, April 10, 2012

Mother's Day Card by Deanna M


Guess what I have for you today! Remember those wooden laser embellishments by Kaisercraft Kim shared awhile back? I was able to get some of the Dress Forms and have a Mother's Day card made with them. I am loving these embellishments. They are so thin but still add a bit of dimension to your card.

Check out the cute dress forms you get in the package. Don't be surprised to see more projects featuring these cute dress forms. (If you are interested in these please let Kim at Cutter's Creek know, she can special order them for you. If there is enough interest, we may be able to convenience her to carry them in the store.)

Okay, on to my card. I started with a cream colored card stock card base cut and scored to 4 1/4" X 5 1/2" My first mat is cut at 4" X 5 1/4" and it is from the Mod Squad Core'denations Cut and Emboss paper. I used the reverse side of one of the papers. To be frugal, I cut the base layer of my dress from the same piece of paper, I used the front side of the paper for the base layer. I cut the dress from the Nifty Fifties cartridge at 5 3/4". The patterned paper top layer for the dress is from the Howdy Doody My Minds Eye 6" X 6" paper pad. The patterned paper behind my dress is also from the same paper pad cut at 3 3/4" X 5".  I inked the edges of all of my papers with some Antique Linen Distress Ink.

The dress form I used is the first on on the left in the picture above. I used some Oil Slick Glimmer Glaze to paint the legs on the dress form and the top little circle. (Glimmer Glaze is a special order item that I know Kim would be very happy to order for you if you are interested, just ask) I sprayed the remainder of the dress form with some Old Lace Glimmer Mist and inked it lightly with some Antique Linen Distress Ink.

I used some Scotch Quick Dry Adhesive to adhere my dress layers together and adhere them to the wooden dress form and then adhered the dress form to my card.

To finish my card, I added a piece of lace from my stash. I adhered the lace with some of the 1/8" Scor-Tape. I added a small pearl to the center of the belt area of the dress, and then 3 larger pearls to the lower side of the card. I stamped my sentiment with some Walnut Stain Distress Ink.

Thursday, April 5, 2012

Tiptoe Through the Tulips! by Deanna M


I have a fun home decor project for you today. This is the Tulip Photo Display from Kaisercraft. Isn't it just too cute! (Want one for yourself, just ask Kim at Cutter's Creek to order you one.

I painted each tulip with a different color of acrylic paint, I painted the base with green and the fence in brown. The  Adirondack Paint Dabbers would work great for this project. I used some Flower Soft Adhesive and  Meadow Flower Soft on the front of the base. I covered the tulips in different polka dotted patterned paper from the My Minds Eye 6" X 6" paper packs.  I used my white gel pen to add some faux stitching to the tulips and the leaves on the flowers.


I used the new Spring Cottage Seasonal Cartridge and some scrap paper to cut some ferns at 1 1/2" and some grass(really flower leaves) and some flowers at 3/4". I added some Key Lime Liquid Pearls to the center of my flowers. I cut some birds at 1" also from the Spring Cottage cartridge (ask Kim if she can get this for you). Finally I cut Tiptoe Through the Tulips from the Bloom Lite Catridge and colored the different layers with the Bubblegum Stripes Imagine cartridge. I used the Key Lime Liquid Pearls for the dot over my "I" in Tiptoe. This cute little photo display comes with 3 mini clothes pins which I adhered behind each tulip and used to display my little sentiment from the middle tulip. Sure hope you like it. And don't forget to join us in the No Foolin' Contest that is going on through April 15th!

Tuesday, April 3, 2012

Easter Calla Lily Card by Chris


I saw these lilies on two different blogs and decided to mix and match the directions to make my own. I sketched three hearts—two small and one large and cut them out of grungepaper. (Check with Kim; she got me my pack. J) I painted them with a metallic pearl white acrylic paint, but I think Snow Cap Adirondack Dabber would have been better; they are a bit silvery instead of white.

Once they dried I used Butterscotch Adirondack Dabber to dry brush the lower-to-center inside of the heart shape and the green Earthtone Adirondack Dabber to dry brush the lower-to-center backside of the hearts. [Note that the pointed end of the hearts will be the bottom of the flower.] 


I set those aside and took my Flower Soft wires, Flower Soft glue, and some Citrus Crush Flower Soft to make the stamens. (Just drizzle some glue all around one end of the wire and sprinkle the flower soft over it. I dry let mine dry by sticking the other end of the wire in an old nail buffer.)

When all was dry, I cut three thin strips of green cardstock and tapered one end to lay inside the lower part of the heart with a drop of quick drying glue to hold it in place. I then cut a Glue Dot in half and stuck it over the cardstock and a bit above the pointy end of the heart, and pushed the wired end of the stamen into it. (Trim off any excess wire that sticks below the heart’s tail.) Then. I began rolling the left side of the lower half of the heart towards the center and the right side towards the center and the edges around the heart towards the back, shaping it to look like a calla lily. (Grungepaper is great for this as it is flexible and takes a lot of punishment.) When I liked how it looked, I put some quick drying glue on the rolled in left side, pinched the right side down onto it and used a clothespin to hold it together ‘til it dried. 


While it the three lilies dried, I made a double loop bow using seam tape that I colored with Scattered Straw Distress Ink and the card base. This card is 5x7, but as I wanted the 7-inch side to be the vertical, I cut two pieces of ivory cardstock. One measured 5x8 inches and the other 5x7 inches. I scored and folded the larger piece at one inch and then, using ScorTape, glued the small piece so the seam was on the inside. To make the border around the card I cut four pieces of yellow-orange cardstock with the border from Spellbinders Shapeabilities Parisian Accents. I laid it out and glued it down with Scor Tape and trimmed off the excess from each side.

I cut the largest of my new Spellbinders Nestabilities Splendid Circles from yellow cardstock and cut a the square shape from  yellow-orange cardstock using the Spellbinders Shapeabilities Parisian Accents. I glued the square into the center of the circle and the circle a bit above the center of my card front. I then used Glue Dots to adhere the lilies to the front and Glue Dots to raise and join the stems and Glue Dots to center my bow over the stems and hold the tails just where I wanted them. To finish the front I added some pearl accents.


To finish off the inside of the card and hide the seam I cut another Parisian Accent border and using Scor Tape covered the seam. The sentiment was a free one I printed with my computer and cut with Spellbinders Nestabilities Labels Twenty-Five, which I edged with Rusty Hinge Distress Ink. And not to leave the inside corners out, I cut the two corner pieces from the Parisian Accents set. The card is done and all I need to do now is figure out how to mail it to my mom—LOL.

Sunday, April 1, 2012

No Foolin' - It's Contest Time!

Hi there and Happy April 1!  There are no fools here, just a fun & friendly contest from Cutters Creek.  I'm keeping this simple and asking you to make anything BUT a card - got it? NO cards!  You can submit scrapbook layouts, mini albums, altered items and more - just no cards.  The only other rule is to feature product(s) available at Cutters Creek.  Prizes will be awarded from my own personal Great Stash of Stuff.  I will have the Design Team vote on the Top 2 favorites, and there will also be at least one random winner.  I may add additional winners based on the number of entries and the amount of Great Stuff I find in my Great Stash of Stuff.  Deadline is April 15, so get out your mojo and make something fun!

Need some inspiration?  Here are a few ideas from our DT members' personal blogs and previous posts here:
Lori's band-aid tin (Echo Park Paper)

Deanna's Memo Box (Kaiser Craft)

Laura's Layout (Echo Park Paper)

Chris (Graphic 45)

I think you get the idea here.  But of course don't feel you have to limit yourself!  Please use Mr. Linky to submit your entry.  Just be sure to feature item(s) available from Cutters Creek (including Kim's special request items) in your project!

Related Posts with Thumbnails