Wednesday, December 29, 2010

New Year's Hostess Gift by Laura C

Start the New Year off right, ring it in with a fun set of wine/drink charms, that can be a great hostess gift, or you may want to keep them for yourself!


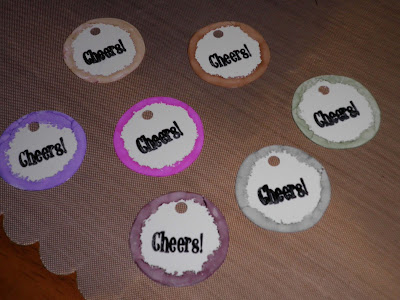
Start with shrink plastic (I used white), a small stamp of your choice (I had the word "cheers"), Staz-On Black Ink (must be a good permanent ink), Ranger alcohol inks or Copic Markers, an Tim Holtz Ink Applicator and felt and a Crop a Dile hole punch. I used a 1&1/2" circle punch to make my "stencil". Then I traced and cut out 8 circles from the shrink plastic. Then I stamped my image on the disc—some people will sand the shrink plastic to make this easier.....I did not....but it might slip a bit so don't push down too hard. Then use the Crop a Dile to punch a hole......I stacked them all up and did it with one punch (the larger hole)—love the Crop a Dile!! Then using the Tim Holtz Ink Applicator and felt....I brushed the edges of each disc with a different color of alcohol ink. You can get a similar effect with Copic Markers as well. Here is a look at the disks before shrinking:

Now, on your Bazzill Splat Mat or other heat safe surface, use a toothpick in the hole to keep the disc from blowing away, and use your embossing Heat Gun to shrink it. It will curl all up, but will return to a flat disc when it's done. Now you can do these up anyway you choose. You can use a thin ribbon or twine, I had a good wire in my craft stash, so I strung on some small beads that complimented the disc color, and I used a needle nose pliers to form each end into hooks. I used a jewelry ring to attach the shrink plastic charm so it will lay flat.


To make the "matchbook" to hold them, use a 8&1/2" by 5" piece of cardstock. Score it at 3&1/2", 4", and 7&1/2" on the Scor Pal, and fold to create match book. I used a small piece of Velcro to secure it closed. You can decorate for any holiday, I chose New Year's, used a celebrate stamp that I embossed using Tim Holtz embossing ink, and Super Fine Embossing Powder on a 1&3/4" by 2&1/4" piece of black cardstock, I then used Flower Soft glue around the edge, and applied Beadazzles in the Waltz color. I used American Crafts glitter cardstock (a 1&1/4" x 5" strip) and layered a 2&3/4" by 2&1/2" square and foam dotted the dry "celebrate" square on top. A 1/2" x 5" strip on the small flap finishes it off. On the inside, I used plain white cardstock and a ribbon slot punch to make the card to hold the charms. I fastened this piece on the bottom edge only, to hold it in place, but allow easy access to the charms.

This is a gift any hostess would love to receive!

Available at Cutter's Creek:

Suze Weinberg Beadazzles (waltz)
Tim Holtz Ink Applicator
Super Fine Embossing Powder (silver)
American Crafts Glitter Cardstock (silver)
Staz-On Black Ink
Bazzill Simply Smooth white cardstock
Bazzill Splat Mat
Copic Markers
Crop a Dile
Scor Pal
Flower Soft glue

Monday, December 27, 2010

New Year's Bottle Tag by Sandi

I made the Bottle Tag for a New Years Eve skating party. I started off with a thick white cardstock and made a hole big enough for the tag to sit on the largest part of the Champagne bottle so the 3D snowflakes could be placed on the top inside of the hole and sit on the top of the cork. I hope the photos allow you to really see the festive look of this tag.


I started with the Spellbinder Impressibilities Snowflakes Die for the background and covered it with Pebbles Pastels Chalks in pastel blue and white. I cut the fireworks from the Stand and Salute Cricut cartridge and applied more blue and white chalk on the edges. Then I added White Liquid Applique for dimensional snow on the edges of the fireworks and raised it by applying a Heat Gun. I used White American Crafts Glitter Paper to cut out the skates from the Joys of the Season Cricut cartridge and created the 3D snowflakes from the Christmas Cheer Cricut cartridge by gluing 3 cuts together with some Mini Glue Dots. I welded letters from the Plantin School Book cartridge to create ‘Happy New Year’ and added more blue and white Pebbles Pastels Chalks and dimension with White Liquid Applique on the bottom of the letters. On my Gypsy I found the perfect ‘Thank You’ from the Gypsy Wanderings cartridge. I finished with a Martha Stewart Paper Punch on the sides.


Cutters Creek Shopping List:
White Liquid Applique
Pebbles Pastels Chalks
Mini Glue Dots
Christmas Cheer Cricut cartridge
Joys of the Season Cricut cartridge
Stand and Salute Cricut cartridge
Spellbinder Impressibilities Snowflakes Die
White American Crafts Glitter Paper
Heat Gun

Saturday, December 25, 2010

Merry Christmas!!

Cutters Creek and the Cutters Creek Design Team wish everyone a very Merry Christmas!

Friday, December 24, 2010

Christmas Morning Layout by Mandie

I'm about 2 years behind in my scrapbooking and photo printing right now, I'm sure others are in the same boat! But the magic of Christmas morning can surely be seen in the photos so I wanted to create a layout to reflect that. The patterned papers I chose are by Echo Park from the Merry Christmas line.


I used my Tim Holtz Walnut Stain Distress Ink around the edges of all of my paper pieces and photo mats. Then I used my Create A Critter Cricut cartridge to cut the strands of Christmas Lights at 1". I was initially going to use my American Crafts Glitter Cardstock for the light bulbs but after the silver cut very nicely for me, I decided to use my Gypsy to remove the "shine" from the light bulbs. For some reason, even on Multi Cut 3 it didn't want to cut all the way through my paper. My Cricut doesn't seem to press as hard with the Gypsy connected but I will be experimenting more in the future with some larger cuts. So I opted for plan B! I cut the remaining bulbs from plain white card stock and after gluing them down I used my Christmas Red, Holly and Gold Stickles to color the remaining bulbs.


Next I created the "Christmas Morning" title with my Gypsy and the Nursery Rhymes Cricut Cartridge. Basically I just nudged and welded the letters together so you could easily recreate this title without a Gypsy. Then I used a little more Tim Holtz Walnut Stain Distress Ink to distress the letters a bit. Next I cut the present from the Christmas Cheer Cricut cartridge at 1 3/4". I used more Gold Stickles on my bow. To hide my journaling I made a little pocket from my scraps. I just rounded the corners with my Corner Chomper and scored it with my Scor Pal for the fold. I wrote my journaling and then accordion folded it to fit in my folder. Then I used a red photo turn to keep it closed. So remember to take lots of photos during the excitement tomorrow morning!

Cutters Creek Shopping List
Tim Holtz Walnut Stain Distress Ink
Create A Critter Cricut cartridge
Nursery Rhymes Cricut Cartridge
Christmas Cheer Cricut cartridge
American Crafts Glitter Cardstock
Stickles:
Christmas Red
Holly
Gold
Corner Chomper
Scor Pal

Wednesday, December 22, 2010

Sweet Treat Gift Card Holder by Laura C

Want to make a simple gift card a little more special? Give it in this sweet little
box! You need, plain white Bazzill Simply Smooth Cardstock, American Crafts glitter cardstock, some Diamond Stickles, a red Copic marker, and your favorite strong adhesive.


Start with an 8 1/2" by 7" piece of white cardstock. You then score the 8 1/2" length at 1/2", 4", 4 1/2", and 8". Then turn and score the 7" length at 1 1/2", 2", 4 1/4", and 4 3/4". Trim with a scissors all areas not needed to form box (see pic below).


Now, fold on score lines and assemble box. Then, cut 1/4" pieces of the red and white glitter cardstock, apply adhesive to the box front, and apply pieces at an angle. Trim excess with scissors. Repeat for back of box. For flap and top, use red glitter cardstock cut to size and trim flap with a 1/4" strip of the white glitter cardstock. A small piece of velcro under the flap keeps it closed. The peppermint candy embellishment was a 1" circle that I drew some freehand red "swirls" with the copic marker #R46 the brush tip makes this super easy. Then I poked 2 small holes, and tied with thread, then I sparkled it up a bit with diamond stickles. I punched holes in the lid with my crop a dile, and tied on some tulle, so I can hang it from my tree for a Christmas surprise!

This little box could be decorated any way you want to make a gift card more special for any occasion!


Available at Cutter's Creek:
American Crafts Glitter Cardstock (Rouge and White)
Diamond Stickles
Bazzill Simply Smooth Cardstock (white)
Score Tape
Copic Markers (#R46)
Crop a Dile

Tuesday, December 21, 2010

Gift Card Holders by Lori

So, hubby was in charge of getting some gift cards for a couple of nieces for Christmas.  Not knowing the importance of a good gift card holder, he got cards that are a weird size; twice as tall as a normal gift card.  What to do?  Lucky for me, the Wild Card Cricut cartridge has lots of cool envelopes that can easily be adapted to a gift card holder.  Just follow my steps below and you can create a gift card holder for any occasion using either the card or the envelope.

I chose the Christmas Tree envelope (it's on pg. 74 with the ornament card) as it seemed well suited to resizing.  You'll need to use either Design Studio or a Gypsy for this.  I used a Gypsy, so my directions are for that, but they should be very similar in DS.  First, place the Blackout feature image on the virtual mat.  Using measurements from your actual gift card, size the image up until the plain center section is larger than your gift card.  Here's a picture to show you what I mean:


Next, unlock your aspect ratio (on the Gypsy, this is the little icon that looks like a chain under the Height & Width boxes) so you can adjust one size at a time.  Make that empty center section a little larger than your gift card all the way around.  Add another layer to your virtual mat and add the regular image - no feature buttons on.  Resize it to match the blackout version.  Finally, add a third layer for the liner and any add-ons needed (my envelope needed a star and garland) and resize each to match the other layers.  Cut in desired colors of cardstock.

For the tree to show up well on the envelope, cut just the tree from the regular image envelope and adhere that to the Blackout feature envelope you cut.  Now is the time to cut tabs in the liner piece to hold your gift card if desired.  I have a tool for this, but you could also cut by hand with an Exacto knife, or just skip it if you don't want to cut.  Then adhered the liner and any add-ons.  Finally, use a Scor-Pal to score all of the fold lines on the envelope.  The little cut marks on the design make it super easy to score them in the right place.  Now add your gift card under the tabs or just stick it in with a Glue Dot.  Fold the envelope closed and just use a couple of Glue Dots to adhere.

Ta-da!  Since these were for teens, I stopped right here.  For someone more appreciative, you could add some bling in those round ornament cuts, using some Kaisercraft Pearls or Rhinestones.

Items available at Cutters Creek:

Monday, December 20, 2010

Chris' 3 Quick Card Ideas

Here’s 3 quick cards you can put together in moments with Graphic 45 Christmas Past and your stash. I cut out 3 card bases: a 10x7, 5x8.5, and 4.25x11. Score each at the halfway mark using your Scor Pal and then pick your colors from Graphic 45.


Two of the cards (the tree and the young girl) already have frames. All I did was separate them and use Glue Dots Pop Up Dots to raise the frame on the girl card and raise the picture on the tree card. I then used my Embossing Magic Pad to get rid of static and my Tim Holtz Distress Ink Pad for Embossing to edge the tree picture and embossed it with Superfine Gold embossing powder. To finish the tree card I chose another Graphic 45 paper and trimmed out just the sentiment, raised that with Glue Dots Pop Up Dots and edged with Holly Stickles.


The girl card’s frame is raised and I popped out another sentiment, trimmed it with 2 clear crystals and popped it up. I needed to use a double layer of pop dots on the bottom edge to make it lay evenly. In my stash I had these two poinsettias and they frame the top of the picture rather nicely.


The third card was even easier. I cut a Graphic 45 paper to 4.25 x5 and used a doily punch down the two long sides. I glued it down with ScorTape and then popped another image from the paper pack and laid it on top. Using my ScorBug Embosser I ran a row of dots along the top and bottom edge. The best part is that I could just keep going; I still have tons of images, frames, and trims. But this should solve my last minute card problems for now. Hope you have a very Merry Christmas.

Shopping List:
Graphic 45 Christmas Past
Scor Pal
Glue Dots Pop Up Dots
Embossing Magic Pad
Tim Holtz Distress Ink Pad for Embossing
Superfine Gold embossing powder
Holly Stickles
ScorTape
ScorBug Embosser

Sunday, December 19, 2010

Christmas Card by Vicki


My card today is another simple, but elegant way to say 'Happy Holidays' or whatever holiday you celebrate this season. I started with a simple kraft cardstock base, cut at 8 1/2 x 5, and folded in half using the Scor Pal. I cut a piece of white card stock one quarter inch smaller than the front of the card, giving a one-eighth border around the edge. I ran this white cardstock through the Cuttlebug, using the Swiss Dots embossing folder. To make the dots really stand out, I highlighted the embossing and the edges with Tim Holtz Distress Ink in "Barn Door". Using a simple ribbon, I wrapped the white embossed paper with a red transluscent ribbon, adhering the ribbon on the back of the white cardstock, hiding the ends. Finally, I attached the white paper to the kraft paper base using Glue Dots. I topped it off with a simple bow.

This leaves a nice open spot to add any embellishment desired. I chose to make the card more whimsical, so I chose candycanes. These were cut on the Cricut, using the Very Merry Tags cartridge, but any holiday themed image will work. I popped them up off of the white embossed paper using 3D dots, and made them 'hang' on white ribbon. I wasn't pleased with how plain the candycanes looked, so I highlighted the outer edge of them with Diamond Stickles. I added bling to a small number of the embossed dots on the white cardstock, using Xmas Red Stickles.

By leaving the front of the card plain, you can add any sentiment you desire on the inside of the card!

Cutters Creek Items Used:
Cuttlebug Swiss Dots embossing folder
3D Glue Dots
Ranger Distress Ink - Barn Red
Stickles - Diamond and Xmas Red

Friday, December 17, 2010

Featured Artist-Deb S. (Holiday Home Decor)


I have a BFF who is going through a tough time. I wanted to perk her up and let her know I care, so I made her this plaque for her for the holidays. I focused on the theme "Joy" and used Tilda angels to show her she is loved. The wooden frame is 18" x 5". I painted the frame and the letters with a metallic colored acryllic paint from my stash. The background paper is Bo Bunny. Because the paper was only 12" and the frame was 18", I matched the seams as carefully as I could and then covered those seams with green scrolls cut from TH's "On the Edge" die. I also used TH tissue tape to embellish the paper. I used matte mod podge as my glue for this portion and then put a layer on top of the Tildas and paper. I had colored my Tildas with copics and the mod podge had no effect on the colors. On the Tilda that is "sitting" on the edge of the frame, I glued her on chipboard and then cut her out. I wanted her to be strong enough to sit up straight! The rosettes were made using TH's rosette die. I wanted the rosettes to be a little smaller, so before folding them, I cut about 1/4" from the non-scalloped portion. At this point, I used either hot glue or Scotch Quick Dry Adhesive. The flowers on the rosettes are tiny little primas. The flowers in the "O" were cut from my stash of old silk flowers, and the copper key was also from my stash. The charm holder is from 7 gypsies, and the charms are from my stash. The metal snowflake was an old tree ornament, blinged up with gold sticky crystals.


Thursday, December 16, 2010

Sandi’s Christmas Card


I love the look of this card; it was easy to create with a simple layering effect and looks great. Simply create your card base from green cardstock. Use the Corner Chomper to round all 4 corners. Emboss the white cardstock with the Tim Holtz Snow Flurries Embossing Folder and use decorative scissors to make a border. Adhere this to your base with Tombow Mono Adhesive. Next use the Lace Punch to create a border strip and adhere. Cut a large green circle and a smaller white circle with the Spellbinder Scallop Circles Set. Stamp "Tis the Season" on the white circle with the Justrite Stamper 1 5/8 . Layer with Pop Dots and adhere. I left the inside blank so I can personalize each one.

You can purchase these products from Cutters Creek:
Tim Holtz Snow Flurries Embossing Folder
Diamond Stickles
Justrite Stamper 1 5/8
Pop Dots
Spellbinder Scallop Circles Set
Corner Chomper
Tombow Mono Adhesive
Other Supplies:
Decorative scissors
Martha Stewart Lace paper punch

Wednesday, December 15, 2010

Mandie's Poinsettia Card

This year I've been procrastinating mailing off my Christmas cards. I have no good reason, just haven't gotten it done yet. But I am still finding so many beautiful cards to inspire me! Have you ever really looked at some of the extra features on your cartridges? Unless they are fonts, I generally ignore them. But something on the Winter Woodland Cricut cartridge caught my eye... the Card Feature! I used it to make this stunning card:


I've had this cartridge for over a year and have made a few cuts with it here and there but never really thought about using the card bases. I really didn't know where to begin. I thought it would be nice if the layers were made to fit the card bases but I didn't see how to make them fit.... or could it be as simple as cutting the card and measuring the design? Couldn't be that easy, right? Well, it is! I cut my card base from the poinsettia cut on the Winter Woodland cartridge at 5". Then I used my Scor Pal to score my card.


Then I grabbed my Tim Holtz Design Ruler to measure the height of the poinsettia in the center of the card. It was about 3 3/4" tall so I cut the poinsettia at 3 3/4" with Real Dial Size off. Well, I looked at the cut that was way too small and turned Real Dial Size ON and tried again. Perfect fit! The cut normally has a set of leaves with it that aren't on the card front so that is what happened. Anyway, I didn't toss that 1st cut, I decided to layer it on top of the other one after I distressed them both with the Tim Holtz Frayed Burlap Distress Ink. I also cut the center of the flower at 5" (Real Dial Size OFF). Before gluing anything down though I pulled out a roll of packing tape and some clear micro beads that I've had unopened forever.... you could also use glitter for the same effect. Now, laid my card face down on my Bazzill Splat Mat (make sure you have a non-stick mat and NOT paper under your card) and carefully tore a strip of packing tape (don't get your fingerprints on it) and stuck it to the back of my design. You will need 2 strips to cover the whole opening, one strip for each side. Then pull your card up and add your beads or glitter to the sticky part. I love the stained glass effect my transparent beads created here.


Once it's totally covered I used my Zip Dry Glue to adhere my large poinsettia flat to the card base. Then I used some Pop Up Dots to attach the smaller flower after bending the petals a bit for more dimension. Then I used the Pop Up Dots cut in half to pop up the flower center. Finally to finish off my card I used my Crop-A-Dial to punch a hole about an 1" from the top and bottom along the score line and tied a ribbon through the holes. The directions seem like a lot but it took me about 15 minutes to whip up this card and I think it is so pretty!

Shopping List:
Winter Woodland Cricut Cartridge
Scor Pal
Tim Holtz Design Ruler
Tim Holtz Frayed Burlap Distress Ink
Bazzill Splat Mat
Zip Dry Glue
Pop Up Dots
Crop-A-Dial

Tuesday, December 14, 2010

"Joy"ful Greetings by Laura C.


For those of you still waiting to discover the joy of whipping a card together, that looks like you took HOURS, that people will ooh and aah over.....wait no more!! This is one of the Ecstasy Crafts cuties....the Creative Craft Christmas. Pop out....pop dot, and layer, and the sweet little snow person is done! A little embellishment, and it's a great card! For those that like the "numbers": the base is 4 & 1/4" by 5 & 1/2" white cardstock, the pink paper is 4" by 5 & 1/4", the striped paper is 2" by 5 & 1/4". The stamped word "Joy" has it's bling on, thanks to fruit punch Stickles. I added some pearls to the upper right corner because, I just love pearls!

Make sure to check out Cutters Creek for:
Ecstasy Crafts (creative craft Christmas)
Bazzill Simply Smooth cardstock (white)
Stickles (fruit punch)
Kaiserkraft Pearls (snow)

Monday, December 13, 2010

Red & Green Blog Hop Winner!

On behalf of the Cutters Creek Design Team, I just wanted to say Thank You too all of the wonderful people who participated in our 1st Blog Hop this weekend! Everyone left such wonderful comments on all of our blogs! I also want to thank Kim at Cutters Creek for sponsoring all of our blogs with great prizes. This is just the beginning for tons of fun coming up here at the Cutters Creek Design Team Blog ! Make sure you keep checking back here for new projects and inspiration. In January we are going to start some new challenges and other fun stuff so I hope you will play along with us!

Now with out further ado.... the winner of the Cutters Creek Design Team Blog prize, the Ecstasy Crafts Decoupage Book called Book #12 is....


And that lucky commenter is:


Congratulations, Sandy!!! I will be sending you an email shortly!!!

Thanks again to everyone who participated in the hop this weekend!

Here is the complete list of ALL of our winners:

Cutters Creek Design Team Blog - Sandy
Mandie's Blog - Bonnie
Laura's Blog - Josie59
Melissa's Blog - ScattyShirley
Sandi's Blog - Robin
Kim's Blog - Amanda
Vicki's Blog - Me-Ma Kim
Lori's Blog - Sandy
If you are one of our lucky winners contact either the blog owner or me at Mandas1610 at sbcglobal dot net with your mailing information within 48 hours or the winner will be redrawn. Thanks again!

~Mandie

Saturday, December 11, 2010

Red and Green Blog Hop!

Welcome to the Cutters Creek Red and Green Blog Hop! Our wonderful design team members have all created some fun Christmas projects to inspire you! The only requirements for the projects were that they must contain Red and Green. The hop starts here at the Cutters Creek Design Team blog with a fabulous project by Chris! Each blog will have a link to the next blog in the chain until you make it back here. Each blog will have a great prize to giveaway, so make sure you comment on each blog to maximize your chance of winning!

On our Cutters Creek Design Team Blog today we are featuring an Altered Cigar Box by Chris. Here's how she made this GORGEOUS PIECE:


I get to start the hop off with my Altered Cigar Box. I’ve had this box for a couple of years now, but when I saw the Graphic 45 Christmas Past Collection, I knew just what I wanted to do. First things first, I wanted legs on the box and went to the hardware store and bought 4 unfinished drawer knobs, which I inked with Vintage Photo and Tea Dye Distress inks. I accented the knobs with a line of green acrylic paint. These were glued to the base with Glossy Accents. I left it sit for about a half an hour and they are quite secure.

I chose 2 papers from the Graphic 45 set and cut them to size—one for the top of the box and the other inside where I put one side on the bottom and reversed the sheet for the inside of the lid. I secured these with Scor-Tape and boy does it hold beautifully. Next I cut out the vintage Santa from one of the pages dusted it with my Embossing Magic powder pad to avoid stray particles and then edged the gold frame with my Inkessentials Embossing Pen. I then sprinkled it with Gold Superfine Embossing Powder and heated it with my heat gun. I repeated the same step with the pine needles only this time I sprinkled them with Peeled Paint Distress Powder. Don’t forget when this cools to rub off the large crystals. It gives great texture. Santa’s beard got a bit of texture too. Here I used Polar White Flower Soft. I just highlighted the whiter areas with the Flower Soft glue and sprinkled on the flower soft. I again used Scor-Tape to set the picture on the lid.


Using SCAL I made two poinsettias and a flourish. I sprayed my poinsettias with a mixture of fired brick re-inker and gold pigment powder. The leaves were sprayed with peeled paint and a yellow-green pigment powder. The flourish was embossed with the peeled paint distress powder, heated, then, rubbed with some Forest Moss Distress ink. To make the large flower I used my Tim Holtz Alterations Tattered Florals. I cut it twice—once out of grunge paper and the second time out of upholstery fabric. I inked the grunge flower parts with Wild Honey, Aged Mahogany, and Barn Door. I ran the pieces through my Big Shot Express in Tim’s Regal Flourishes folder and then lightly rubbed some Peeled Paint over the raised parts. I rolled the tips of the grunge paper petals and on the two medium sized flowers I snipped between petals and overlapped them just like you do when making a grunge rose. I decided to alternate the fabric and grunge pieces laying down the largest fabric piece first. Again I used Glossy Accents to secure each piece and topped it off with a pearl from my stash. A final touch was a spritzing of Tattered Angels Pearl Glimmer Mist.

I used another page from the Christmas Past Collection and cut out the words “A Merry Christmas”, I outlined the first letter of each word with Glossy Accents to give it some shine and dimension. This I ran through my Xyron and then added a few drops of Glossy Accents to adhere to the front of the box. The last piece was the smallest part of the grunge Tattered Flower that I hadn’t used on the lid with a gemstone center.

Inside the lid I ripped two pieces of white paper, inked their edges with Tumbled Glass Distress ink. I used my Cricut Expression to cut three Christmas Trees from the Christmas Noel cart. I cut them from a green paper at 2.25, 3 and 4 inches. I then cut the star (using the shift key for the tree) at 4” from the American Crafts Gold glitter cardstock. I needed to cut this on a multi-cut of 4. The snow on the trees is more Polar White flower Soft and the pieces were glued with a spray adhesive.


When you've hopped all of the blogs, leave a comment, one per person on this post to let us know your favorite project! Comments left up until 11:59pm on Sunday December 12th will be eligible to win. All winners will be selected Monday and posted on each blog so make sure you check back to see if you have won! You will have 48 hours to respond before we choose another winner. Here on the Design Team blog we are giving away an Ecstasy Crafts Decoupage Book called Book #12. It's full of wonderful "Manly Man" images to create some awesome projects. One winner will be chosen on Monday using Random.org.

Hop on over to Mandie's Blog when she has a beautiful project to inspire you!

Here is a list of all the blogs in the hop in case you get lost along the way:
Cutters Creek Design Team Blog
Mandie's Blog
Laura's Blog
Melissa's Blog
Sandi's Blog
Kim's Blog
Vicki's Blog
Lori's Blog

Wednesday, December 8, 2010

Deanna M (Featured Artisit) Advent Calendar


Last Christmas I made my mom an Advent Calendar so this year she asked if I was making one for her this year. So, I thought why not. So off to Google I went and did a search for Cricut Advent Calendars. Here is the site I found for inspiration: http://www.bubblyfunk.co.uk/tracie-hudson-christmas-advent-a-39.html.

This calendar was made using small matchboxes. Of course I thought I can make those. I used the Tags, Bags, Boxes and More, Cricut Cartridge and cut 24 matchboxes. I cut the drawer part at 3" but had to enlarge the box part so the drawers went in easier. I resized the box part of the cut on my Gypsy and cut them at 3.08". The boxes were scored and assembled using Score-Tape. I added green and red brads from American Crafts. Directions on how to create this project can be found on the link above. I used two 6" X 6" pieces of chipboard for the top and bottom portions of the "cabinet". For the top I cut Christmas Wishes from the Winter Frolic Cartridge at 2 1/2". Cuts for the sides were cut at 1 1/2". I cut the numbers for the drawers at .45" using the Roly Poly font from the Plantin Schoolbook Cartridge.

The mittens were so small when I cut them I couldn't use the snowflakes that were cut to go on top of them. Instead, I used my white gel pen to draw in the snowflakes and then used my Quickie Glue Pen to apply glue and Martha Stewart Sugar Cube glitter. I also used the same glue and glitter for the white cuff's of the mittens.


Supplies:
Patterned Paper: DCWV Christmas Stack
Paper: Bazzill Card Stock, and Scraps from Stash
Cartridges:
Winter Frolic -Sentiment
Simply Charmed - Santa and Chimney
Jolly Holidays - Mittens, Noel Banner, Gingerbread Man
Doodlecharms - Stocking
Tree and Snowflake Buttons
Adhesive:
Beacons 3 in 1 Glue (buttons)
Scor Tape (boxes and cabinet)
ATG Gun
Scotch Quick Dry Adhesive
Quickie Glue Pen (numbers)
Foam Tape
Stickles:
Lime Green
Christmas Red
Stardust
Brads - American Craft Burgundy and Leaf Green
Martha Stewart Sugar Cube fine glitter

Monday, December 6, 2010

Warm Winter Wishes by Laura C.


Need a sweet little card to send out for the holidays? This one is a 4 & 1/4" by 5 & 1/2" white cardstock base. The next layer is a 4" by 5 & 1/4" sky blue color cardstock, that is embossed using the new Tim Holtz (TH) "Snowman" texture fade. Stormy Sky distress ink applied with the foam applicator gives the snowman and card a little definition. The snowflakes are made using the TH "Snowflurries" texture fade, and cut out 3 of the snow flakes. I used glue dots to adhere them to the card, and then embellished them with a rhinestone and stickles in "diamond". "Warm Winter Wishes" was printed on my computer in blue, trimmed to a 1 & 1/4"
square which I inked with stormy sky as well. A little bow is the finishing touch.


Available at Cutters Creek:
Tim Holtz Texture Fades (snowflurries/snowman)
Tim Holtz Distress Inks (stormy sky)
Inkssentials ink tool and foam applicators
Stickles (diamond)
Kaisercraft rhinestones (silver)
Bazzill Simply Smooth cardstock (white)
Glue Dots Dot n' Go (mini)

Friday, December 3, 2010

Christmas Gifts That Shine from Lori

Are you tired of giving the same old hostess gifts?  Stumped for an idea for the aunt who has everything?  Well, look no further!  Sparkly, shiny glassware is beautiful, and comes in all forms from decorative to practical.  What doe this have to do with Cutters Creek, you ask?  Let me tell you.

Cutters Creek has just the supplies you need to create beautiful, personalized glass items quick as a wink.  Glass etching is easy, permanent, and beautiful, and requires minimal supplies.  You can etch any glass surface, but I recommend something flat for a beginner.  For this project, I chose a glass block I've had sitting in my stash, along with a stand and a corded light.


For glass etching projects, here is all you need:
For this project, I used my Cricut Gypsy to choose a Monogram and a frame.  I cut them out of the vinyl on my Cricut Expression using the "kiss cut" method, so I cut only the vinyl and not the backing.  I weeded out the portions of the image I wanted etched.  (You can etch either the positive image or the negative space, depending on the effect you want.)  I then transferred my vinyl image onto my glass block and rubbed it down to make sure the etching cream wouldn't get underneath.

Important: Be sure to work in a well-ventilated area near water.  I worked next to my kitchen sink with the window open.  (Don't tell my hubby, though; the heat was running!) The directions on the cream say to brush it on in both directions.  I find it works best if I "pounce" on the etching cream first, then brush it up & down and side to side.  That way I make sure I get the cream in even the tiniest cut out areas.

One final tip: the directions say to rinse off the cream when you are done.  I use a plastic kitchen scraper to scrape off the majority of the cream and dump it right back in the jar for next time.  It can be reused, and if you know you're not "wasting it", you'll  be sure to use enough of the cream.

If you have any more questions about the etching cream, be sure to ask!  One of us will be sure to help answer your questions.

Thursday, December 2, 2010

Holiday Card by Vicki


With the holidays fast approaching, many crafters have holiday cards on their minds! I originally made this card for a card challenge, but didn't get a chance to put it up in time. The challenge was to create a holiday card with words only - no images. With my new Gypsy, there are a bunch of phrases on the Gypsy Wanderings cartridge that were possible to use! I started with some basic deep blue Bazzill card stock. I wanted to have this be a unique size, so I cut the card to 12x6. I folded the card in half with my Scor Pal. Next, I cut a piece of lighter blue cardstock one inch smaller on both sides, so that I had a full half inch border around it. Instead of cutting straight lines, I used the antique blade on my paper trimmer to give the edges a little interest. I folded this in half with the Scor Pal as well. To give the light blue cardstock some texture, I ran it through the Cuttlebug D'Vine Swirls embossing folder. The texture of the deep blue base and the light blue embossed card were begging for more interest, so I inked the edges of each of these papers, plus portions of the embossing, with a white ink pad. Before I attached the textured paper to the base, I added a shiny, transparent ribbon with a simple knot to the card. Next, it was time to cut the words. The shadow of the word 'Wish' was cut on American Crafts silver foil. The top layer of the "Wish" sentiment was cut on light blue American Crafts glitter paper. The knot of the ribbon makes it slightly more difficult to attach the sentiment, but to get around this, I used 3D Foam corners to make the verbiage the same height.
This is a simple, elegant and EASY card to make for last minute holiday sentiments!

Saturday, November 27, 2010

2011 Calendar Set With Gift Bags by Sandi


The easiest way to explain how I created these calendars is to list what I used to create each month. I used my Gypsy but they could easily be done with Cricut design studio or Make The Cut Software.


The covers were created with Adirondack Acrylic Paint Daubers and Tim Holtz Grunge elements and bound using the Zutter Bind It System. The Gift Bag Purse buckles were created with Spellbinders Ladies Fashion Buckles and Cuttlebug. The Purse Pattern is from Becky Roberts Purse-onally Perfect Purse. Any stamp image can be used, I do a different them each year.

The following products can be purchased at Cutters Creek:

January:
Cricut Cartridges
George and Basic shapes (Frame)
Wild Card (Cheers)
Plantin School Book (January)
Christmas (Snowflakes)
Gypsy Font (Happy New Year)
Cricut Embossing Folder (D’vine Swirl)
Stickles (Purple, Lavender, Xmas Red, Yellow, Silver)
Tim Holtz Adirondak Paint Daubers (Gold, Purple)
Copics (Skin White, Blush, Lipstick Red, Purple, Prune, Cool Gray No. 1 and No. 3)


February:
Cricut Cartridges
George and Basic shapes (Frame)
Plantin School Book (February)
Gypsy Font (Decorative Ovals)
Gypsy Wanderings (Rabbit)
Glossy Accents (Glaze on Rabbit, etc.)
Copics (Skin White, Blush, Lipstick Red, Sugared Almond Pink, Shock Pink, Prune, Frost Blue, Apricot, Pale Yellow, Golden Yellow)


March:
Cricut Cartridges
George and Basic shapes (Frames)
Plantin School Book (March)
Cricut Sampler (Route 66)
Butterfly (Martha Stewart Combo Punch)
Pan Pastels (Pink and Purple on flower)
Flower and Glaze (George and Basic shapes and Glossy Accents)
Stickles (Lavender, Silver)
Embossing Folder (Diamonds In The Rough)
Copics (Skin White, Blush, Lipstick Red, Purple, Prune, Cool Gray No. 1 and No. 3)


April:
Cricut Cartridges
George and Basic shapes (Frame)
Plantin School Book(April)
Graphically Speaking (Clouds)
Wild Card (Umbrella)
Embossing Folder (Distressed Stripes)
Stickles (Silver and Waterfall)


May:
Cricut Cartridges
George and Basic shapes (Frame)
Plantin School Book (May)
Gypsy Wanderings (Fabulous Friends)
George and Basic shapes (Flower)
Plantin School Book (Leaves)
Stickles (Purple)
Embossing Folder (Perfectly Paisley)
Copics (Skin White, Blush, Lipstick Red, Purple, Prune, Cool Gray No. 1 and No. 3)


June :
Cricut Cartridges
George and Basic shapes (Frame)
Plantin School Book (June)
Graphically Speaking (Queen of Everything)
Gypsy Wanderings (Dress, Shoes, Hat)
George and Basic shapes (Flowers)
Stickles (Lavender)
Glaze (Glossy Accents)
Pan Pastels (Pink, Purple)
Embossing Folder (D’Vine Swirls)


July:
Cricut Cartridges
George and Basic shapes (Frame)
Plantin School Book (July)
Stand and Salute (Liberty & Justice for all)
Stand and Salute (Fireworks)
Butterfly (Martha Stewart Combo Punch)
Glaze (Glossy Accents)
Stickles (Xmas Red)
Embossing Folder (Swiss Dots)
Copics (Skin White, Blush, Lipstick Red, Purple, Prune)


August:
Cricut Cartridges
George and Basic shapes (Frame)
Plantin School Book (August)
Butterfly (Martha Stewart Combo Punch)
Stickles (Yellow, Purple, Xmas Red, Green)
Clouds (Sakura Gelly Roll Stardust Silver Pen)
Copics (Skin White, Blush, Lipstick Red, Purple, Prune, Pale Yellow, Golden Yellow, Mignonette, Pea Green, Apricot)


September:
Cricut Cartridges
George and Basic shapes (Frame)
Plantin School Book (September)
Beyond Birthdays (My Friend)
Wild Card (You’re Simply The Best)
Stickles (Yellow, Copper, Xmas Red, Purple)
Chair (Sakura Gelly Roll Stardust Green Pen)
Bracelets (Sakura Gelly Roll Stardust Silver Pen)
Cigarette holder (Sakura Gelly Roll Stardust Red Pen)
Embossing Folder (A2 Birds and Swirls)
Copics (Skin White, Blush, Lipstick Red, Purple, Light Prawn)


October:
Cricut Cartridges
George and Basic shapes (Frame)
Plantin School Book (October)
Gypsy Wanderings (Pumpkins
Wild Card (Bat, Spider)
Stickles (Black, Purple)
Embossing Folder (Distressed Stripes)
Copics (Skin White, Blush, Lipstick Red, Purple, Apricot, Golden Yellow)


November:
Cricut Cartridges
George and Basic shapes (Frame)
Plantin School Book (November)
Gypsy Font (Warm Winter Wishes)
Stickles (Green, Waterfall, Turquoise, Yellow, Xmas Red, Purple, Diamond)
Embossing Folder (Diamonds In The Rough)
Copics (Skin White, Blush, Lipstick Red, Prune, Mignonette, Apple Green, Pale Yellow, Golden Yellow, Frost Blue, Robin’s Egg Blue, Sugared Almond Pink)


December:
Cricut Cartridges
George and Basic shapes (Frame)
Plantin School Book (December)
Christmas (Tree)
Gypsy Font (Tis The Season)
Stickles (Purple, Xmas Red, Green, Gold, Diamond)
Purse and Bag (Outlined with Sakura Gelly Roll Stardust Silver Pen)
Embossing Folders (A2 Snow Dots and Holly Wreath Combo)
Scent My Card (Christmas)
Copics (Skin White, Blush, Lipstick Red, Prune)

Thursday, November 25, 2010

Homecoming With Vicki & Her Special Daughter

Scrap Project 009

My daughter is one of my favorite subject to scrapbook, because she is very photogenic. I thought it would be nice to highlight her great homecoming outfit...and all the girly 'trimmings' that go along with it!!

I started with some paper from my stash. This paper already has a lot going on with it - so I knew I didn't need a lot of embellishments. However, the black and white design would really serve as a great background for her bright red dress. Since this was an opportunity for the kids to really dress up, what better way to highlight the occaision, than to use some of that great American Crafts foil paper!

Scrap Project 008

The title was cut using the Cricut Locker Talk cartridge, using the "Homecoming" title out of basic black Bazzill cardstock, set on top of the title shadow, cut on the silver foil paper. On the second page, the year was cut out of the same black cardstock from the Gypsy Font from my brand new Gypsy! It turned out that there was a border on the Gypsy Wanderings cartridge that matched the floral pattern perfectly. I cut it at 11.5 inches, which isn't quite a full border, but it worked with the background paper. (If I really wanted a 12 inch border, I could have used my 12x24 mat on my Expression.)

Scrap Project 007

I set my photos before adding my embellishments, as I wanted to layer some of the fun Petaloo Color Me Crazy flowers on top of the pictures. I colored my two flowers with my Copic markers, using R24 (Prawn) for the base, and R29 (Lipstick Red) for some highlight lines and edges. Using Copics on these flowers is really easy - the blending occurs naturally because the paper is so porous. (HINT - always color on a mat or scrap paper because the color WILL bleed through these flowers!) The flowers were placed with a drop of Glossy Accents, and then a simple Twinkle Jewel was added to the centers of each flower. It still needed a little BLING - so I accented the inside edges of the "2010" using a simple silver metallic Sharpie. I also added dots around each of the Petaloo flowers to make them stand out. Finally, I used some Liquid Pearls in Pewter to add centers to several of the floral shapes on the background paper, just to make them stand out a little bit more.

So get out there and step outside the 'boxy' look of layouts. Place your pictures at fun angles, overlap embellishments, and don't be afraid to draw a little bit!

Cutters Creek Items Used:
Locker Talk Cartridge
Cricut Gypsy
Cricut Expression
Petalloo Color Me Crazy Flowers
Copic markers - R24, R29
American Crafts Foil Paper
Liquid Pearls - Pewter
Twinkle Jewels - Clear
Glossy Accents

Wednesday, November 24, 2010

Mandie says "Can You Imagine..... "

...winning your very own Cricut Imagine??? Remember the Empty Brown Paper Bag that Kim has for sale in the store? If you haven't picked up a couple you really should consider it! On Black Friday a Cricut Imagine Machine will accidentally fall into one of the Empty Bags... rumor is that other things *may* fall into some of the other bags as well!


In honor of the Empty Brown Paper Bag Sale, I decided to use my Cricut Imagine to highlight what you can do with this awesome machine! For those of you that follow my blog, Mandie’s Scrappin you may know that Monday was the first time I've actually broken down and made a real project with my Imagine.


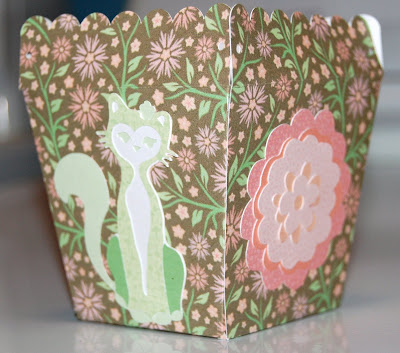
If you don't have an Imagine you can also make this project very easily with patterned paper, card stock and your Cricut Expression Machine . I used the Cindy Loo Cricut cartridge to first cut the Flower Pot Box. I thought this was such a cute little box! I used my Imagine Nursery Tales cartridge to add the pattern to the box (and the colors and patterns to all of my cuts) but you can use patterned paper or cardstock. I'm not sure what size this is because I used Fit to Page but I'm guessing it would be about 7", after folding it ends up about 3 1/2" tall.


Then I cut my flower, squirrel, deer and cat all from the Cindy Loo cartridge. This was a super simple project and would be cute to put a little gift inside. My idea is a gift card and some paper shred for teachers or neighbors or maybe as a hostess gift when you go to holiday parties!


Now that you are inspired, don't forget to go buy an Empty Brown Paper Bag and maybe you will be the lucky one! Can you Imagine?

Friday, November 19, 2010

Snow Forts 101 by Laura C.

OLYMPUS DIGITAL CAMERA

This scrapbook page is made using a technique called "faux silk" and the new Tim Holtz "Snowflurries" texture fade. I cut 3 mats from white cardstock: 4"x6&1/2", and two 4 1/2"x5 1/2". These were run thru the cuttlebug using the TH snowflurries folder. The technique is then to take white tissue paper, cut about 1" larger than the above pieces, and then crumple it up. Gently flatten it out (not too much!). Now, using a glue stick, doing only ONE piece at a
time, generously cover the snowflake embossed piece (make sure to get in all the nooks and crannies as best you can!).

PB040069

Then put the tissue paper on top and smooth it over.....again, you WANT WRINKLES!! Finish
all three pieces of cardstock, then use a heat gun to help dry the glue. Once dry, cut the excess tissue down to about 1/2", then adhere to the back with your favorite adhesive (this is like "wrapping a present" and you can miter the corners (clip the point off) to make it a bit easier). Next step.....use TH distressing ink in stormy sky (or whatever color matches your project!) with a touch of forest moss, applied with a foam applicator.

PB040073

I then centered red cardstock pieces--I cut 2 smaller red 3 1/2" by 4 1/2" and one larger red 3 1/2" by 5 1/2". The pics were trimmed to fit the red exactly lengthwise and they are all 3" high. The strip on the left is 2" wide and there is a strip of red under the ribbon that is 1 1/2". I embellished with buttons and bling from my stash. My letters are thickers....but a perfect touch would also be letters cut out on the cricut, using AC glitter paper in rouge!!

The faux silk technique is wonderful.....try just sponging backgrounds, whatever.....you can get so many looks from this, whether you are making pages, or cards.

Available at Cutter's Creek:
Tim Holtz Texture Fades (snowflurries/snowman set)
Tim Holtz alcohol ink applicator tool
Inkssentials foam applicator pads
Tim Holtz distress ink (forest moss and stormy sky)

Wednesday, November 17, 2010

Ecstasy Crafts Free Style Wreaths with Kim B

ecstasy craft wreath rev

This was one easy and fast card! I used the Ecstasy Craft Free Style Wreaths and American Crafts Foil card stock on my card blank. You should be able to see the dimension of the wreath on this card. All the pieces were popped out of the sheet and layered with foam squares (also from Ecstasy Crafts). Then I cut a piece of American Crafts foil card stock and put that on my card blank. I popped out one of the borders on the Free Style Wreath sheet and gave it a little trim to fit along the edge of my card. I then attached the wreath. Then upon scoping out what else was available on the sheet, I punched out the pine cones with leaves and attached that. And for my final item. I picked a little festive background and sentiment and attached the sentiment with foam squares and then put that on top of my pine cones. Trust me, it took me longer to type up what I did, than make the actual card. Is is so sparkly and shimmery and I hope someone will love getting this holiday card!

Items required: Foam Squares, American Crafts foil card stock, Ecstasy Crafts Free Style Wreaths, and your personal touch!

Friday, November 12, 2010

Glass Etching with Chris

givethanks

I finally tried etching glass and am wondering whatever took me so long. I wanted to make a dish for my sister and fill it with snacks that go with the Thanksgiving Blessing. I found a free png file online with several Thanksgiving sayings and using Scal I imported the file “Give Thanks”, adjusted the size to about 3 inches and simplified the number of nodes so it would cut better. I made sure that I moved my blade about a half-inch in from the edge so I would have a border around the saying when I lifted it from the mat. I then set my cricut at a blade depth of 3, speed and pressure at 3 and cut. It cut perfectly. I did not have transfer tape, but was able to easily lift the outline of the words. I did have to use tweezers to move the inside piece of the “g” and the “a” onto the glass, but it worked out alright. (For more complicated cuttings I would recommend using transfer tape.)

I laid the vinyl on the dish and used my fingernail and an ice cream stick to rub around each letter, making sure the vinyl was pressed firmly down so no cream could get underneath. Using an old paintbrush, I put a thick coat of Armour Etch cream over the letters. While the bottle says to remove it after 5 minutes, everything I’ve read and watched online said to leave it on longer. I left it on 35 minutes. I scooped the excess cream back into the bottle using the paintbrush (learned that online too) and rinsed both the brush and the bowl under warm running water. I let it air dry and worked on the Blessing Card.

blessingframe

To make the Blessing Frame I used an old frame painted it with distress crackle ink; cut apart some old silk flowers and using my glossy accents glued them around the edges. The saying was printed on my computer and the title I embossed with gold embossing powder. Added a few gems and just need to fill with the snacks—and another hostess gift done!

Cutters Creek Resources:

SCAL

Glass Etching Cream: Armour Etch

Vinyl Roll (color doesn’t matter for this project)

Antique Linen Distress Ink

Inkssentials Glossy Accents

Super Fine Embossing Powder--Gold

Tuesday, November 9, 2010

Place Tags by Chris

P1040229

P1040230

This project is a piece of cake. All you need is the Cuttlebug Embossed Tags, chipboard letters, and some distress inks. The embossed tags die not only cuts and embosses, but also has a plastic sleeve that you lift and can ink the embossed area and not get any on the rest of your tag. Just wipe it off with a baby wipe after you remove the tags. The set has 5 tags. (There are also embossed labels and Vintage collage sets that I love.)

Using fired brick, scattered straw, rusty hinge, walnut and spiced marmalade distress inks, I randomly colored my chipboard letters and the tags, glued my letters down with glossy accents, wrap some twine around the napkins, tucked in some bits of silk flower parts and have a hostess gift for Thanksgiving! Easy-peasy as Kim says!

Cutters Creek Resources:

Cuttlebug Embossed Tags (Labels & Vintage Collage)

Tim Holtz Distress Inks: fired brick, scattered straw, rusty hinge, walnut and spiced marmalade

The Tim Holtz applicator

Inkssentials Ink Blending Foam

Glossy Accents

Related Posts with Thumbnails