The winner of the Cutters Creek Design Team Holiday Blog Hop blog candy is.....
#2 Karen Stark!!!
Congratulations Karen. Please email me at deannamulder @ live dot com and your stamp set will be shipped to you within the next two weeks. We are asking for additional time because of the effects of Hurricane Sandy. We hope everyone who hopped with us enjoyed yourself. Thank you so much for taking the time to hop with us.
Tuesday, October 30, 2012
Happy Birthday Card For My Grandson
I don’t know if you ever ran out of ideas of making a card for the man, grandson, nephew, etc. in your life. Well it happened to me. The next masculine card I needed to make is for my grandson Hunter. Lots of you know him and know how much he loves to craft. But one thing you don’t know about Hunter is that he has been driving those battery operated trucks/cars since he was 2-1/2 years old. He is now 5 and if he could he would drive any car or truck he was allowed to drive. And I am not being biased at all but that little boy can drive. He has a child size 4 wheeler and boy can he go on that thing. I get so scared watching him. Of course he is well protected but it still scares me to see him go so fast. And he helps Pop Pop drive the tractor too.
So I thought I need to make him a special card that I know he thought would be neat (well I am hoping he thinks its neat). So doing a lot of research and seeing cards my other card maker friends have done for their men I finally became inspired through their ideas and my research. It took me over two weeks to make this card. Not because it was hard but because I had to wait for things to dry completely. And I had to order some embellishments I did not have in my stash. Below are the photos of the final results and the recipe I used to make the card. If you are wondering if I had fun making this card well I can say that now that I am done I feel relieved. I just did not know what I was doing half the time. So everything was trial and error. And really had to dig deep in my creative portion of my brain. I will say this the main element of this card is Aluminum Foil and my personal Cutting Machine. So with all that said here are the photos.

I used SCAL to draw the card and add the gears border. The border was welded to the edge of the card so that it will cut out with the gears attached. Then I took the gears border and re-cut it out of black metallic paper and glued the black metallic border to the white border on the edge of the card (used Neenah paper for card base). I took a piece of heavy aluminum foil and used an embossing folder by Tim Holtz called Riveted Metal Set. I glued the embossed foil to the front of the card. Once it dried I painted it with Black Paint Dabber paint (I love this paint and so easy to use) and then removed most of it with paper toweling and left some black in some areas to give it a metal look. I waited 24 hours for the paint to dry completely. At this time I had no embellishments to add to the front of the card so I cut 1/2” circles and covered the gap between the two embossed pieces to cover the seam.

OK so here is a side view of the card. I had no clue what I was going to do to the inside to pull the theme together. So off to the Internet to do some research on how to make aluminum foil look like forged metal. Well a found a You Tube video on it. What you do is take a piece of foil larger than what you need and crumple it. But do not crumple it to tightly or it will be too hard to pull apart. Pull it apart and then use a brayer or something like a brayer (rolling pin for example) and smooth out the crumpled foil. Once I got it where I liked the look I painted it with more Black Paint Dabber. I wiped the excess off with a paper towel and waited another 24 hours for it to dry completely. I made another border of gears and glued it to the inside to pull the theme together. And I found a digital image of a gear with embellishments and the center was left white for my sentiment. Now how do I embellish the front of the card. Well I ordered a small bag of Steampunk gears. Waited for them to come which took a week to get to me.
VOILA!

I found a FREE Font called Gears and cut out Happy Birthday using my personal Cutting Machine. And added the steampunk gears to the corners. Even though this card took me a couple of weeks to get done it was all worth it. And I know Hunter is going to love it!
He better, lol.
Thank you for reading all about how I made this card and I hope that I inspired you in some way.
Fran
Sunday, October 28, 2012
Merry and Bright!

This will be my second year at attempting to make all of my own Christmas cards to give to family, friends and clients. This is what I like to call a nice clean and simple design. Very easy to make and fast!

Here's a list of the products I used or variations you can find in our store, thanks for looking!
-Distress Ink
-Card Stock
-Gems
-Christmas Stamps
-Stickers/Die Cuts
Saturday, October 27, 2012
Holiday Blog Hop-Mousetrap Memo Keepers by Chris
Welcome to the Cutters Creek Design Team Holiday Blog
Hop! We want you to hop along with us and play for some awesome Blog Candy. The
objective for our Blog Hop this weekend is to provide some inspiration to help
you get your holiday crafting underway! Our Design Team has come up with some
fabulous projects and we have a little bit of everything, from cards to gift
ideas, and home décor items. So we invite you to hop along with us and get your
creative juices flowing!

I first used a pair of pliers to remove all extra hardware
from wooden mousetraps (leave just the mouse clip) and then, painted the edges with paint dabbers and
under the middle spring. I cut two pieces of decorative paper for each trap—one
at 1 3/4x2” and the other at 1 3/4x1 5/8”. Edges were inked and then pieces
were glued down with my ATG. I wrapped each base with ¼” scortape with which I
adhered the chosen trim. Each trap was decorated differently (see below) and
magnetic strips were added to the back so they could be hung on a refrigerator.
Ornament: Red
Pepper Paint Dabber with Ideology Holidays Past base paper, inked with Festive
Berries Distress Ink. Christmas Cheer cartridge: ornament cut at 4” from
Inkessentials Shrink Paper. Image was colored with Copics: R29, YG67, Y28, B05,
shrunk, and decorated with Gold Stickles. Red Tinsel Twine used for edges.
Snowman: Sailboat
Blue dabber with MME Winter Wonderland base paper, inked with Tumbled Glass
Distress Ink. Christmas Cheer cartridge: snowman cut at 1 ¾”. Decorated with
Stickles: Cinnamon, Orange Peel, Black Soot, Tumbled Glass Distress stickles
and Marvy Liquid White.
Snowflake: Snow
Cap paint dabber with MME All is Bright, inked with Peacock Feathers Distress
Ink. Joys of the Season cartridge snowflake cut @ 2”, embossed with Wow Neutral
Ultra Shimmer. Blue Tinsel Twine edging.
Tree: Bottle
paint dabber with MME Winter Wonderland and covered with Picket Fence Distress
Stickles. Christmas Cheer cartridge tree cut @ 1 ¾” embossed with Peeled Paint
Distress Embossing Powder. Gold stickles and green Tinsel Twine to finish.
Candy Cane: Red
Pepper paint dabber with MME All is Bright paper, MME Winter Wonderland Tape,
and Festive Berries Distress ink. Christmas Cheer cartridge candy cane cut at 1
¾”. Bottom layer embossed with red embossing powder and red Tinsel Twine used
as the edging.
Poinsettias:
Bottle and Snow Cap dabbers used with Ideology Holidays past paper and MME All
is Bright paper. Spellbinders Poinsettias cut from mulberry paper. Stickles:
Silver, Gold and green Tinsel Twine to decorate.
Poinsettia Print:
Snow Cap paint dabber with MME All is Bright paper. Picket Fence Distress Ink,
and edged with blue Tinsel Twine.
Check out Cutters Creek Store for:
Paint
Dabbers, My
Mind’s Eye papers, Ideology
Holidays Past paper, Distress
Inks, Stickles,
Distress
Stickles, Wow
Embossing Powders, Ideology
Tinsel Twine (Winter), Marvy
Liquid White, Scor
Tape, Glossy
Accents
Now for details on blog candy! In honor of Breast Cancer Awareness Month we are giving away the Ink Pink Collection by Jillan Vance.

The Ink Pink Collection includes:
• Pray for the Cure Stamp Set in your choice of Round or Rectangle
• Pink Acrylic Stamp block in either 3x3 for the Round set or 3 x4 for
the Rectangle set
• 5 Charming Jilly Charms, Breast Cancer themed, made of fine pewter
right here in the USA!
• 5 A Jillian Vance Design Pear Pins to attach the Charms onto your
projects.
• A sample of Rinkle Ribbon, vintage ribbon to wrinkle and crinkle, ½”
wide and Made in the USA.
This collection is worth over $45!!• Pray for the Cure Stamp Set in your choice of Round or Rectangle
• Pink Acrylic Stamp block in either 3x3 for the Round set or 3 x4 for
the Rectangle set
• 5 Charming Jilly Charms, Breast Cancer themed, made of fine pewter
right here in the USA!
• 5 A Jillian Vance Design Pear Pins to attach the Charms onto your
projects.
• A sample of Rinkle Ribbon, vintage ribbon to wrinkle and crinkle, ½”
wide and Made in the USA.
In addition to all the wonderful products in this collection, they
coordinate with Spellbinders Nestabilities!!!
The Round Set coordinates with:
Spellbinders Nestabilities
Beaded Circle S4-292
Classic Scalloped Circles S4-124
Standard Circles Small S4-116
The Rectangle Set coordinates with:
Spellbinders Nestabilities:
Large Labels S4-168
To enter to win all you need to do is leave a comment on each blog as you hop along.You will have until 12:00am on Monday October 29th to leave a comment with a way for us to get a hold of you. We will use Random.org to select a winner on Tuesday, October 30th and will post the winners name by 9:00am.
Here is the complete blog hop line up in case you get
lost along the way:
Cutters Creek Blog (Chris) - http://www.cutterscreekdesignteam.blogspot.com/
Kim - http://kreativekim.blogspot.com/
Pebbles - http://sheissocrafty.blogspot.com/
Kim - http://kreativekim.blogspot.com/
Pebbles - http://sheissocrafty.blogspot.com/
Don’t forget to leave a comment before hopping along to Kim’s blog. Thanks for hopping by and we hope you enjoy the hop and get many wonderful ideas!
Wednesday, October 24, 2012
G45 Halloween Ornament with Lori
Today I have a fun project for you - and while mine is for Halloween, Graphic 45's papers are all well-suited to a project like this. One of my favorite things about their papers are all the fun images that are perfect for fussy cutting. And since you get two sheets of each design, you can cut the entire image from one sheet, and just portions from the other sheet for some awesome layering!
I started with another fabulous find from a local Goodwill, some Happy Haunting papers from Graphic 45, a Scor-pal and some Stickles.

Since I was using a 12x12 paper pad, I was able to use one of the sheets with smaller images on it. With an 8x8 pad, I would just choose a sheet with a larger image (or make a smaller ornament). First, I cut a base image in a circle to fit the center of my Goodwill tray (I used the Center Point feature on my Cricut to get the portion of the image that I wanted), then I cut portions of a second image which I could pop up on some 3-D foam adhesive. I cut 2 strips of the fence paper, being sure to have the "Halloween" sentiment at the upper edge. I used the Scor-pal to score both strips every 1/2", adhered them together and created a rosette. I mounted my circle image in the center and adhered the whole thing to the center of the tray. I added my "pop-up" portions of my image using foam tape, and I glittered it all up using Stickles. Lastly, I used some ribbon from my stash to make a bow and a hanger.

You can see in this view where the "pop-up" pieces are, and where I added the Stickles on the hat, broom, coat, and cat's bow.

Items available at Cutters Creek:
- Graphic 45 papers and chipboard tag
- Scor-pal
- Foam adhesive squares
- Stickles
Sunday, October 21, 2012
Halloween Decor Graphic 45 Style

I found these cute little canvas's and easels at a local craft store and just had to get them. I painted the easels and the canvas with some black acrylic paint. I then used the Graphic 45 Happy Haunting's Paper Pad for my images. I cut around part of the image and used some Matte Inkssentials Glue N Seal to seal my canvas and adhere my image. Then it was time to decorate.

For the square canvas I made some roses using a tutorial found here. I adhered them to the canvas with some hot blue and added some Diamond Ice Stickles to the edges of the flower petals.Then I added a couple of Rhinestone flourishes. I then embossed the edges of the canvas with some Black Glint WOW! Glitter Embossing Powder.

For the other canvas I again used the Matte Inkssentials Glue N Seal to seal my canvas and adhere my image. For this one I also made a rose and used some Stardust Stickles along the edges of the petals. I had some black tulle with some purple glitter in it and that cut and gathered to put behind the rose. I used some Majestic Purple Liquid Pearls to add some dimension to the canvas. I then outlined the edges of the canvas with some Black Diamond Stickles.
Saturday, October 20, 2012
Monochromatic Card
Hi! I have a simple project today. I was recently challenged to create a monochromatic card. I thought it would be easy as I love coloring in shades of browns and grey. However, the rules were to color any shade BUT greys and browns. So, I went to my next favorite group and colored from the BG family.
This was actually much harder than I thought it would be as I wanted different shading for each area and not one gradual change from light to dark. I started with a Kraft base and added a page from the Prima Fairy tales paper. Next I added three strips of AC Glitter Tape in shades Aqua and Peacock for added depth. My aqua strip was actually the half-inch size so I cut it down into two 1/4" lengths. This isn't found in the store, but you can sign up here for the next Glitter Tape club . . . totally worth it!
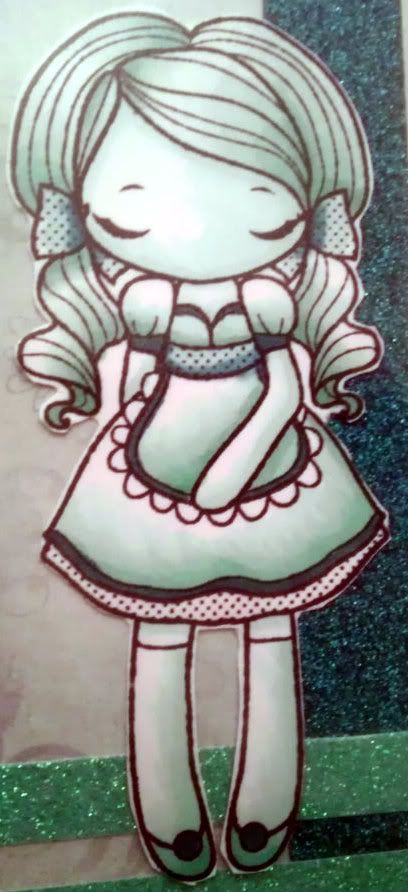
After coloring my image, I trimmed and placed so that there is room for a sentiment at a later time. Right now, this is in my Copic Portfolio which I update pretty frequently so it's always good to leave them slightly neutral so you can customize it at a later date for last minute cards.
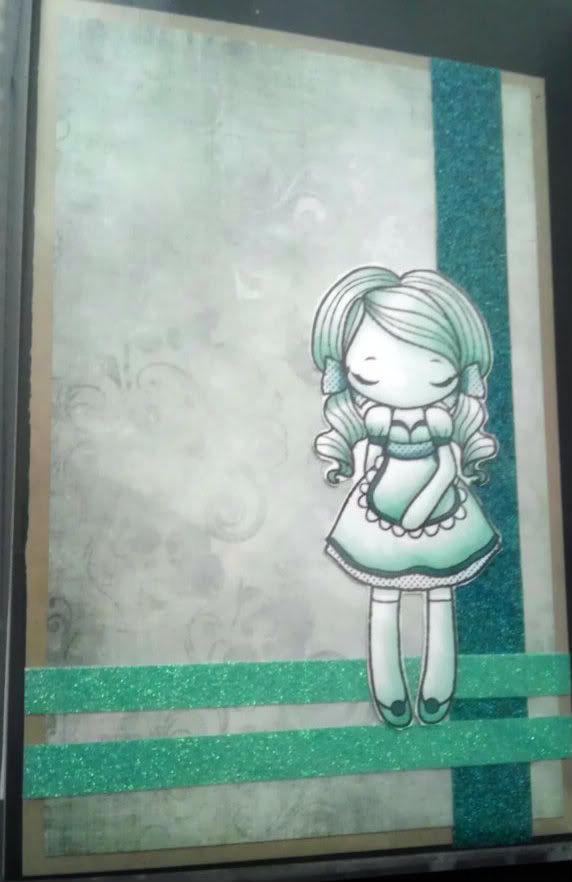
Thanks for looking and hopefully I have inspired you to try something out of your comfort range. Feel free to share your projects!
Image: TGF -Miss Anya Dressy
Paper: PrimaInk: Memento Tuxedo Black, Copics,
Embellishments: AC Glitter Tape, Peacock and Aqua
Other: ATG
Stash: Kraft Paper
Dress: BG000, BG10, BG11, BG32
Skin: BG000, BG10
Hair: BG000, BG10, BG11, BG32, BG23, BG34
Legs: BG000, BG10, BG11, BG32
Shoes: BG23, BG34, BG13

Wednesday, October 17, 2012
Happy Haunting! By Laura C
Do you LOVE Halloween? It's such a fun
low key holiday! And any holiday with
candy....that's a winner hands down....lol.
It's also a great crafting holiday.....so many
great collections to play with....including
the Happy Haunting collection from
Graphic 45. I used this yummy collection
to make this card:
 I used several of the papers, the alpha
sticker sheet (for the "Boooooo"!), and
the chipboard for the frame and the
Halloween Greetings tab that is the top
of my "clock"....yes, there is a clock
peeking from behind the gate:
 The clock and gate, were fussy cut from
the G45 paper, the clock face is covered
with acetate to give it a glass look....tho it
didn't show too much in the pic. I added
Tim Holtz spinners as hands....more TH
makes the gate closure hardware. All the
paper pieces were inked up with Black Soot
Distress Ink, the extras are the TH Tinsel,
Tiny Attacher staples holding it in place, a
TH stick pin, holding the little "Booooo" sign.
Make sure to check out the Graphic 45 Kim
has in the store....so many fun collections!
She can order anything for you too....if any
of the paper pads have already sold out, or
you are interested in the hardware!
Hope you get some spook-tacular crafting time!
low key holiday! And any holiday with
candy....that's a winner hands down....lol.
It's also a great crafting holiday.....so many
great collections to play with....including
the Happy Haunting collection from
Graphic 45. I used this yummy collection
to make this card:

sticker sheet (for the "Boooooo"!), and
the chipboard for the frame and the
Halloween Greetings tab that is the top
of my "clock"....yes, there is a clock
peeking from behind the gate:

the G45 paper, the clock face is covered
with acetate to give it a glass look....tho it
didn't show too much in the pic. I added
Tim Holtz spinners as hands....more TH
makes the gate closure hardware. All the
paper pieces were inked up with Black Soot
Distress Ink, the extras are the TH Tinsel,
Tiny Attacher staples holding it in place, a
TH stick pin, holding the little "Booooo" sign.
Make sure to check out the Graphic 45 Kim
has in the store....so many fun collections!
She can order anything for you too....if any
of the paper pads have already sold out, or
you are interested in the hardware!
Hope you get some spook-tacular crafting time!
Tuesday, October 16, 2012
It’s That Time OF The Year…..
When we start thinking about all the holidays that are coming up. My project today can be for any Fall Theme holiday like Halloween or Thanksgiving. It depends on the type of elements you use. My project leans more to a Fall Theme where you can use it for that very special Trick or Treat person in you life. Or it can be used for favor bags if you are hosting a Thanksgiving Dinner.
It has a formal flair to it because I just love making flowers and so I added a flower using the Spellbinders Rose Creation Die (S5-050). I cut the flower out using my Ebosser cutting the flower petals and leaves in one pass. Really easy peasy!
Instead of making a rose out of it I just layered the petal layers and attached them with a pumpkin eyelet and brad. Then I sprayed the layers with with water and scrunched them tightly. I used my heat gun to dry the layers and then separated each layer gently so they would not tear. I held the layers together with a small pumpkin eyelet in the center and then added a tiny brad to hold it all together. I attached the flower to the bag/box by punching an 1/8th” hole to the bag/box and slipped the brad through and secured it in the inside of the bag.
Once the flower was all dried I dabbed the edges with Stickles (Orange Peel). I used a small paint brush to paint on the stickles to the edges of the petals. I used Distress Stickles (crushed olive) on the edges of the leaves. I creased the leaves and used Distress Ink Pad (Pine Needles) on the center crease. Thanks Tee for this great idea you shared on one of your videos.
(click on photos for larger view)


NOTE: The template was printed using my printer on card stock (8-1/2 by 11”) and I printed the diagram of the template on the wrong side of the paper. This way you will not see the black lines on the good side of the paper. If by chance you use double sided designed paper you can color the lines to blend with the paper. This can be done using any imaging program like Photoshop, Paint Shop Pro, Gimp, etc. And I would be glad to help you if you have any questions. You can direct your questions to me privately at francesb100@gmail.com.
You can also request the template by going to my blog on the Templates Page.
I hope I have inspired you in some way. And thank you for stopping by the Cutters Creek Design Team Blog.
Fran
Sunday, October 14, 2012
Happy Halloween!
Hello everyone! Here's a quick and cute little sign I made to put on my front door for the Halloween season.
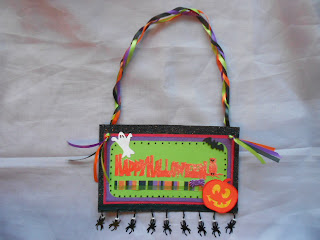
I know I've said it before, but I will say it again......I LOVE MY eCRAFT PURPLEBERRY!!!! :)
I was really stumped on what to create. When I came in the house yesterday and realized I hadn't decorated my door for the holiday yet, that's when it hit me to make a Halloween sign.
 I used eCraft to cut the title and then I went from there. After layering the different color card stock, I used some Stickles-Black Diamond to add little dots around as a border.

 I downloaded and cut the little ghost and the jack-o-lantern. I also used Mustard Seed Distress Stickles to enhance jack's eyes and winning smile! The dangling spiders at the bottom of the sign is a piece of ribbon I received in a swap last year. I really like how this turned out and I had such fun creating it this morning! Thanks for looking!!!! :)

I know I've said it before, but I will say it again......I LOVE MY eCRAFT PURPLEBERRY!!!! :)
I was really stumped on what to create. When I came in the house yesterday and realized I hadn't decorated my door for the holiday yet, that's when it hit me to make a Halloween sign.


Saturday, October 13, 2012
More MME Fall Goodness!
A little Halloween fun coming your way today!
Do you like this time of year? I must say, fall
is a favorite, and I love Halloween. So many
adorable collections to scrap or craft with,
and MME Lost and Found Halloween is
no exception! I posted a LO a bit ago,
and here is a card from the same set:
 Even if you don't send cards for Halloween,
this one could easily become a fun fall
"hello" or Birthday, or anything at all, just
change the sentiment!
I love the distressed look, so I used a
distress tool on the edges of the MME
papers, and then inked them using the
Black Soot Distress Ink. I also went
ahead and ripped the paper a bit...
then put another small piece behind
to add more interest and texture. The
banner is just freehand cut and then
embellished with some of the punch
outs and chipboard from this fun MME
collection. If you want an easy way
to make a banner.....cut a rectangle
in 2 from corner to corner.....then
trim the wide end down so it's flat/
straight. Easy peasy! Twine and
Tiny Attacher staples add the finishing
touch....and the sentiment and piece
with the pumpkin is more of the MME
chipboard (psst....Kim can order these!).
Sweet and simple....a great little card
to send to a special someone!
Do you like this time of year? I must say, fall
is a favorite, and I love Halloween. So many
adorable collections to scrap or craft with,
and MME Lost and Found Halloween is
no exception! I posted a LO a bit ago,
and here is a card from the same set:

this one could easily become a fun fall
"hello" or Birthday, or anything at all, just
change the sentiment!
I love the distressed look, so I used a
distress tool on the edges of the MME
papers, and then inked them using the
Black Soot Distress Ink. I also went
ahead and ripped the paper a bit...
then put another small piece behind
to add more interest and texture. The
banner is just freehand cut and then
embellished with some of the punch
outs and chipboard from this fun MME
collection. If you want an easy way
to make a banner.....cut a rectangle
in 2 from corner to corner.....then
trim the wide end down so it's flat/
straight. Easy peasy! Twine and
Tiny Attacher staples add the finishing
touch....and the sentiment and piece
with the pumpkin is more of the MME
chipboard (psst....Kim can order these!).
Sweet and simple....a great little card
to send to a special someone!
Thursday, October 11, 2012
Trick or Treat!

Monday, October 8, 2012
Cricut Flower Shoppe Flowers - Two More! Video
Here are two more flowers made using the Flower Shoppe Cricut Cartridge. The technique used in both of these flowers are the same, just different flower cut, size and paper type.
Hope you enjoy and it inspires you to make your own. (share if you do).
~Tee
Bird Song Card with Lori

I cut the fan shape, greenery, and all of the flowers using my Cricut and the Pagoda cartridge. The circles are also cut using the Cricut; I used the Center Point feature to cut the circle around the portion of the geisha image I wanted. I outlined everything using a gold leafing pen, and embellished with brads and ribbon from my stash. Everything is adhered using ATG tape and the Kool Tak clear foam adhesive pads. Finally, I used my Copic Spica pens to glitter up lots of stuff! I used the red on the designs on the fan, clear to outline the flowers on the background paper, and both colors on my focal image. It's very difficult to get the glitter to show up in photos, but this one shows it the best:

I hope you enjoyed today's card! I'd love to hear your comments on it.
Sunday, October 7, 2012
Christmas Card by: Ms. Pebbles
Hello everyone!
Here's a quick Christmas card I made. It really didn't take me that long and with minimal supplies. Great time saver! :)
 My goal was to design this to look like a wrapped present. The background paper is from my stash and I used Distressed Ink on the edges of the card base. After cutting out a couple of solid color strips of card stock, I used my eCraft Purpleberry to cut the circle and I attached my hand tied ribbon bow using Scor tape.
 Thanks for looking! :)
Here's a quick Christmas card I made. It really didn't take me that long and with minimal supplies. Great time saver! :)


Saturday, October 6, 2012
Welcome to World Card Making Day!
Today is World Card Making Day and the Cutter's Creek Design Team is
asking all our card making friends out there to come play with us. We
are encouraging all card makers to make a card and link it up to this post.
There are no prizes or giveaways. we wanted this day to be about you
the card maker. We wanted to give everyone a place to share their
creations and help inspire each other.If you don't have a blog and want to share your card please feel free to email it to me at deannamulder at live dot com.
To help get you started, some of your Cutter's Creek Design Team members offer up the following inspiration:
Chris
 Deanna

Fran
 Pebbles
 Tee
Tee

Now it is your turn! Create a card with any colors and theme you like and post it here. Help inspire and honor your fellow card makers. Thanks so much for playing along with us.
To help get you started, some of your Cutter's Creek Design Team members offer up the following inspiration:
Chris


Fran


Now it is your turn! Create a card with any colors and theme you like and post it here. Help inspire and honor your fellow card makers. Thanks so much for playing along with us.
Subscribe to:
Posts (Atom)


