Showing posts with label Want2Scrap. Show all posts

Friday, March 22, 2013

Ahh the Country.....

Graphic 45 French Country that is!!  I've made a mini album
using the 8x8 pad, sticker sheet, and the two 12x12 sheets,
"A La Carte" and "Bon Appetit".   Another option from this
 collection (or any G45 collection) is matching chipboard pieces,
you can find them HERE.  G45 collections are great
to use for a mini album.....so many options!

I've included a picture of each page....this is a simple
6x6 album, that I made from a 12x12 chipboard sheet. 
You get 4 pages  from one sheet if you cut carefully, 
and I added a couple of die cut tag pockets too.
Instead you can use a paper lunch bag folded in half, 
it works great....folds to almost a perfect 6x6, and the 
opening of the bag serves as the pockets.  The album is ring
bound. Just two holes punched in the left side, bound with
metal book rings, then dressed up with ribbon.

So starting with the cover:


I like having a lot of tabs sticking out to give it interest....some
ribbon, some stickers, some paper folded and staples using
the Tiny Attacher.  They give it a lot of texture and fun!

Pages one and two....you can see the tag pocket on
the right.....next picture.....

shows the card pulled out of the pocket....just made with 
cardstock and decorated on each side, here is the back:

And the pic of the full page:
 

Pages 5 and 6.....and leading into the next tag pocket:


And the slide out....it's a good idea to keep a low profile
and minimal embellishment on the pocket pages to make
them easy to slide in and out:


And yep, you guessed it....back of the pocket page:


Pages 7 and 8:
 

Pages 9 and 10:


And last but not least.....the back cover....


I did add a bit of Want2Scrap pearls here and there....
always a nice, but low profile embellishment for a mini.
Also distressed all the edges with Black Soot Distress Ink.
I also used Scor-Tape to put these together....because 
even with people paging thru them over and over, they
will stay together....Scor-Tape holds really well!

Do you have a special event to make a mini album for?
Or just want to try one for fun?  Check out the G45 
collections....there is probably one that will work perfectly!

Thanks for stopping by today! 

Friday, March 15, 2013

Quick Cards by Laura C

One of the best ways to build a stash of cards to have on hand
is to grab a paper kit and enjoy an hour or two of creative bliss!

I absolutely love Echo Park paper collections....they contain
stickers (usually 2 sheets, one with alphas) and of course,
the gorgeous and versatile Echo Park paper!  I'm a huge
fan of their journal boxes too....they are great starting
points as inspiration for quick and easy cards!

This particular set was made using the "Note to Self" collection
from Echo Park....many to choose from at Cutter's Creek,
and a great quick craft if you only have a little creative time,
 but are itching to have some crafting fun!!

 And here are the close ups:


Just a few Want2Scrap pearls, a bit of twine and Black Soot
Distress Ink, is all I added to this kit....they are great for
card making, in addition to scrap booking--give it a try
sometime....it's definitely a great way to use your scraps too!

Remember, it's National Craft Month....grab a kit and get crafting!

Tuesday, January 29, 2013

Inspiration for the New Year...by Laura C

Do you have goals or dreams you'd like to accomplish
in the next year? Maybe ideas you'd like to keep track of?
This project is a small "reminder" of those things you want
to keep in mind. I've included a simple "how-to" so you
can make your own mini inspiration board:
 
And a close up:


I started with an inexpensive wooden frame from
the craft store and my supplies:
 

I painted the frame, using the Adirondack
daubers in Aqua...I used a pouncing method
to do this....hopefully you can see the bumpy
texture in this pic....(you can see in the first
pic of the finished project, I added some color
around the edges with Sunset Orange as well):


Once that dried, I turned over the frame
applied Scor-Tape to the entire inside
edge, and then cut and stuck my twine
down in the pattern I wanted (making
sure it was VERY tight!) making this:


Next up....2 layers of foam tape on top of the
Scor-Tape and twine layer:


Then I made a backing piece out of left
over chipboard from a paper pack (I'm a
pack rat, what can I say?) and some
pretty patterned paper....so many options
in Kim's store....Graphic 45 or Echo Park
collections lend themselves to these projects!


The paper was adhered with Scor-Tape, and
then the entire backing adhered to the foam
tape on the back of the frame....it gave just
enough depth to be a usable memo board,
which you can hopefully see from this pic:


Now for embellishing....the FUN part!!
I die cut little memo pieces....dressed
them up with embossing powder, and
Distress Ink (I used Rusty Hinge and
WOW embossing powder--some ovals
I stamped reminder messages on).  The
roses are Prima Fairytale Roses (I used
the Poppyfield and Baby Pink), the bird
was embossed with the WOW and then
inked with Distress Ink--this pic below
shows that, and how I embossed my
sentiment, then traced around it using the
inside of the Spellbinders die (Fancy Tags Two)
so I could cut it to fit the die cut frame:


And more embellishing goodies....Want2Scrap
Nestabling (the tag after being diecut was attached
to the matching Nestaboard as well....this stuff is
awesome if you've never tried it!).  The stick pin
made from beads in my stash, buttons, some twine,
Want2Scrap swirl bling was cut apart to fit the top of my
frame. And the tiny clothes pins are from Canvas Corp,
the Mini Clothespins in Natural (YES...Kim has these
in the store!)....I painted them with the Adirondack
Sunset Orange paint.

So there you have it....a great project to jump start
a creative, productive New Year!  Would be a
cute project for small school photos too!

Happy Crafting!!

PS....remember, if one of these items is not in store and
you'd love to have it....you can always ask Kim!!

Wednesday, December 28, 2011

Happy New Year!

I sure hope everyone has been having a great holiday season. I had a little time to craft and put together this New Year’s card to send to a friend.
New Years
My card is 4 1/4” x 5 1/2” portrait card made from Smooth Bazzill Card stock. The solid colored paper is from my scrap bin. I cut a purple mat at 4” X 5 1/4” and the patterned paper is cut at 3 3/4” X 5” and is from the Echo Park Summer Days paper pad. Finally I cut a pink mat 1 1/2” X 3/3/4” and a purple mat at 1 1/4” X 3 1/2”. I used my ATG Gun to adhere the layers together. I cut the bird at 4” from the 3 Birds on Parade Cricut cartridge and adhered the layers and added some white stitching with my gel pen. This image has a cupcake it cuts out in the birds hand but I didn’t want the cupcake so I cut it off and did not cut the other cupcake layers. To finish off my card, I added some Want2Scrap Rhinestones to the birds eye and the four corners of the sentiment layer. I stamped the sentiment in some Memento Tuxedo Black ink. I added the bird to the front of my card with some foam tape. I hope every had a great and prosperous new year!
Items from Cutters Creek:
Smooth Bazzill Card stock
Echo Park Summer Days
ATG
Want2Scrap Rhinestones
Memento Tuxedo Black

Tuesday, November 15, 2011

Holiday Cards....Day 2


Today's cards.....more simple easy designs, and
again, all from that same awesome paper set...
the Echo Park (EP) Season's Greetings collection.

These 2 cards are a similar design....but have a very
different look.

The card above, starts with a kraft base. The strip
on the left, with the poinsettias, is from the border
strip paper in the set....I just love the variety on
that sheet for making cards!! The punched edge
adds a bit of elegance to the card, along with the
pretty bling swirl from Want2Scrap. I used the
"Merry Christmas" sentiment, from the EP
Season's Greetings chipboard.

I did "fussy cut" the large poinsettia that is
under the word "Christmas" from the same
poinsettia paper the base piece is cut from.
The papers were inked with Vintage Photo
Distress Ink.

The next card:

starts with a red cardstock base, I added the green/dot
paper, a rectangle of red in the middle, and then layered
on another piece of the border strip....that pretty holly,
then simply added the Season's Greetings sticker from
the set, a bit of Doodlebug Twine wrapped on the left
side, and Want2Scrap red pearls finish the card off, as
yummy berries, and an accent on the upper left corner.

Hope you enjoy today's cards....and maybe get a little
inspiration to make your own cards this year! It can
be a fun, quick project, and friends and family
will appreciate the special touch!!

Come back tomorrow to see what's in store....and
make sure to leave a comment here AND on my
blog HERE for a chance to win some blog candy
this week!!

Shop Cutter's Creek for all your cardmaking needs!!
Echo Park Season's Greetings 12x12 paper
Echo Park Season's Greetings chipboard
Distress Inks (Vintage Photo)
Want2Scrap Bling (Pearls and Swirls)
Doodlebug Twine

Tuesday, September 6, 2011

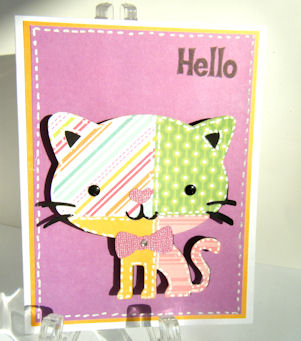
Patchwork Kitty-By Deanna M

So for Tutorial Tuesday I wanted to give you an idea on how to use some of those scraps building up in your scrap bin. If you are like me, you hate to recycle a piece of paper that you just might be able to use on another project. Here is what I have for you.
To make my patchwork kitty, I started with a 4" X 6" piece of regular bond, printer paper and ran it through my Xyron. You could also use a large adhesive label but I didn't have any so had to improvise and it worked beautifully. I then cut 2" X 2" squares from some of my scrap paper. My paper for this project is from several Echo Park Paper Pads.
 I then randomly picked up my squares and attached them to my paper using the adhesive applied by the Xyron. Here is how it looked.

I then selected my image which was the Kitty from Create-a-Critter. I cut the base layer out of black card stock (another scrap) and then the top layer from my patchwork paper I made. I grabbed a scrap of pink for the bow and the kitty's nose. My card base is  4 1/4" X 5 1/2" white card stock. The yellow and purple paper are from the Echo Park Summer Days Paper Pad. I used my white gel pen to add some faux stitching around the outside of the card as well as to "stitch" all the seams and along the outside of the kitty. I added some black nail head embellishments from my stash for her eyes and a silver rhinestone from the new Want2 Scrap embellishments, to the kitty's bow. I used some Memento Tuxedo Black Ink to stamp my Hello. I attached my kitty to my card front with an Action Wobble I hope I have inspired you to trying something new with those scraps. Thanks for stopping by. Be sure to come visit us again as we will be featuring projects using the Echo Park Paper Pads all month.

Related Posts with Thumbnails