I recently signed up for Kim's 6 X 6" paper pad club and received this gorgeous Authentic paper pad called Remembrance. It is filled with lots of dark deep purples and light lavenders and greens. I absolutely love it!!
So today I have a card I made using several papers from that paper pad. In fact the only paper not from the pad, is the white card stock card base. I hope you love it as much as I do.
I started with a white card base cut and scored to make a 4 1/4" X 5 1/2" card base. I then cut a dark purple mat also 4 1/4" X 5 1/2" and adhered it to my card. I wanted the dark purple to show but not the white card base. I then picked 4 patterned papers from the pack and cut them at 2 1/2" x 1 7/8" and adhered them to my purple mat. I used my ATG gun to adhere the mats down.
I was browsing through the silhouette store and came across this lacy butterfly and flower cut out which I fell in love with. Of course I had to use it for my card. I cut the top layer out of more of the dark purple paper from the paper pad. The cut did not come with a back layer so I used the offset feature in the software to create a back layer which I cut out of white card stock. I used my Scotch Quick Dry Adhesive to adhere these two layers together. I allowed it try and then sprayed it lightly with some Iridescent Glitter Dust. (Another favorite product of mine!).
I had this little wooden butterfly in my stash so I painted it with some Seedless Preserves Distress Stain. (This is a special order item, contact Kim through the store customer service link for information on how to order). Once that dry I spritzed it with some Lavender Fresh Glitter Mist spray. I attached the circle to the center of my card using some foam pads I received from Kim as a gift for being in her Adhesive club. (That was an awesome club to be a part of. Be sure to sign up for the Cutters Creek Yahoo group to get the inside scoop on the clubs.) I used some small glue dots to attach my butterfly to the circle.
I haven't added a sentiment to my card because I think it could be used for many different occasions, like Birthday, Thinking of You, Get Well, or even a Sympathy card.
Showing posts with label Tim Holtz Distressed Stains. Show all posts
Tuesday, July 30, 2013
Saturday, May 11, 2013
My Version of Gate Fold Card by Deanna M
When I set out to design this project, I knew I wanted to do something a bit different then my typical A2 card. I did some blog hopping and decided I wanted to make a gate fold card. But I decided I wanted to create my own version of a gate fold card and that is what I did.
I started with a piece of white card stock cut to 5 1/2" X 12". I die cut one edge using a Tim Holtz on the edge butterfly die. (Check with Kim if you are interested in this die). My next thought was how to dress up the butterlies. Once again Tim Holtz to the rescue. I placed several different colors of distress stain (I used Peacock Feathers, Squeezed Lemonade and Shaded Lilac) I then spritzed the distress stains with water and and swished my butterflies in the stain. I then let them dry. I added some Buttercup and Lavendar Lace Liquid Pearls to the bodies of the butterflies.
Once the butterflies were all dried I scored my card stock at 3 1/2" from each end. I heavily inked all the edges of my card with Peacock Feathers Distress Ink (this is one of my favorite colors). I added a black mat and then my patterned paper mats. I also did the inside of the card.
My next dilemma was how to finish the card. It just needed a bit more. I took another piece of white card stock and again applied some distress stains to my mat. This time I used Peacock Feathers, Seedless Preserves, Salty Ocean and the Burnish Pewter Metallic stain (again Kim can order these for you, just ask). I again squirted the stains with water on my mat and just swished the paper across my mat to color the entire page. I then spritz the paper with a bit of water to get the colors to flow. I allowed the paper to dry thoroughly. I cut two butterflies using my Silhouette cameo. I cut the base layer using the stained paper I created. The top layer was cut using the tracing paper I have it is a bit transparent.
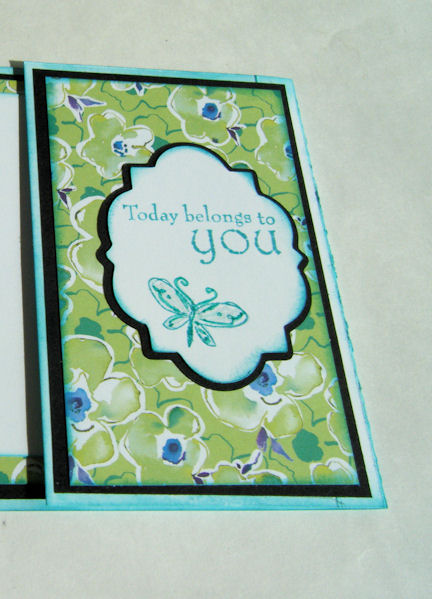
To finish the front of the card, I cut a mat using Elegant Edges (again Kim can order this for you) at 3". I cut the shadow out of black and the base layer out of white. I inked the white mat with the Peacock Feathers distress stain and stamped my sentiment and the butterfly. I used my Turquoise Spica pen to enhance the lines of the butterfly and use the Clear Spica pen to add sparkle inside the wings.
I sure hope you enjoyed my version of a Gate Fold card. I would love to see you all create your own version as well and share it with me. I think this card would work great for a Mother's Day card, Birthday card, or even a Graduation card. What do you think?
I started with a piece of white card stock cut to 5 1/2" X 12". I die cut one edge using a Tim Holtz on the edge butterfly die. (Check with Kim if you are interested in this die). My next thought was how to dress up the butterlies. Once again Tim Holtz to the rescue. I placed several different colors of distress stain (I used Peacock Feathers, Squeezed Lemonade and Shaded Lilac) I then spritzed the distress stains with water and and swished my butterflies in the stain. I then let them dry. I added some Buttercup and Lavendar Lace Liquid Pearls to the bodies of the butterflies.
Once the butterflies were all dried I scored my card stock at 3 1/2" from each end. I heavily inked all the edges of my card with Peacock Feathers Distress Ink (this is one of my favorite colors). I added a black mat and then my patterned paper mats. I also did the inside of the card.
My next dilemma was how to finish the card. It just needed a bit more. I took another piece of white card stock and again applied some distress stains to my mat. This time I used Peacock Feathers, Seedless Preserves, Salty Ocean and the Burnish Pewter Metallic stain (again Kim can order these for you, just ask). I again squirted the stains with water on my mat and just swished the paper across my mat to color the entire page. I then spritz the paper with a bit of water to get the colors to flow. I allowed the paper to dry thoroughly. I cut two butterflies using my Silhouette cameo. I cut the base layer using the stained paper I created. The top layer was cut using the tracing paper I have it is a bit transparent.
To finish the front of the card, I cut a mat using Elegant Edges (again Kim can order this for you) at 3". I cut the shadow out of black and the base layer out of white. I inked the white mat with the Peacock Feathers distress stain and stamped my sentiment and the butterfly. I used my Turquoise Spica pen to enhance the lines of the butterfly and use the Clear Spica pen to add sparkle inside the wings.
I sure hope you enjoyed my version of a Gate Fold card. I would love to see you all create your own version as well and share it with me. I think this card would work great for a Mother's Day card, Birthday card, or even a Graduation card. What do you think?
Labels:
atyou spica,
Deanna M,
Liquid Pearls,
Tim Holtz Distressed Ink Pads,
Tim Holtz Distressed Stains
Saturday, March 9, 2013
Ye Olde St. Patty's Decor by Laura C
Have you enjoyed our National Craft Month posts this week?
Hopefully you are inspired to get crafty this month!!
One of my favorite things to do is altered art projects, so for
our special National Craft Month posting, I mixed the fun of
altered art with the idea of home decor for one of my favorite
holidays.....St. Patrick's Day! And so, St. Paddy's Pub was born:
This project is the kind of thing National Craft Month is about,
to me....just playing!! With paper, and ink, and tools....it's
all about fun! I have a few close ups of the steps along the way:
I started with a divided box I picked up on clearance, it's
similar to a Tim Holtz Configurations Box, the edges are
painted with an Adirondack Paint Dauber (I used Lettuce)
And here is the side view:
I covered the sides and the B&W strip in each cubby
using Core d'nations embossed cardstock, you can do
this yourself or use a pre-embossed type, then sand to
bring out the embossing. And then I started the cubby
decorations, using bits and pieces of different items:
I used a lot of different Idea-Ology products.....everything
you see here plus a few others on the finished project.
Lost & Found Paper pad, Cash Keys (charm on the calendar
with shamrock sticker inside),Clock Keys (lantern "hanger"),
Corked Vials (small glass jars in small cubby), Game Pieces
(bingo #17 in red), Plaquettes (porcelain looking #17) ,
Lost & Found Paper pad, Cash Keys (charm on the calendar
with shamrock sticker inside),Clock Keys (lantern "hanger"),
Corked Vials (small glass jars in small cubby), Game Pieces
(bingo #17 in red), Plaquettes (porcelain looking #17) ,
Ornate Plates (in lower cubby with Ruler Ribbon inside),
Locket Keys (metal piece on Pub Sign under shamrock),
Ruler Ribbon (inside ornate plate), Memo Pins (stuck into
wooden spools lower right cubby) and Hanger Clips (holds
small piece of burlap with shamrock sticker in lower cubby),
Salvage Stickers--Crowded Attic (label on mini vial).
Locket Keys (metal piece on Pub Sign under shamrock),
Ruler Ribbon (inside ornate plate), Memo Pins (stuck into
wooden spools lower right cubby) and Hanger Clips (holds
small piece of burlap with shamrock sticker in lower cubby),
Salvage Stickers--Crowded Attic (label on mini vial).
Kim can order you any and all of these fun goodies!
The vials are colored using Adirondack alcohol inks
in Meadow and Sunshine, the calendar is distressed
The vials are colored using Adirondack alcohol inks
in Meadow and Sunshine, the calendar is distressed
with a Tonic distress tool, and Distress Ink in Walnut Stain
and Black Soot. Tiny Attacher staples finish it.
In the close up of this cubby, you'll see I added one of the
Idea-Ology Woodlands Miniatures dyed with re-inker in a
Mini Mister bottle mixed with water, accented with Paper Twine,
and you can see the Mini Lantern hanging from the clock key
(Yes it's lit up....the battery pack is attached to the back!):
A close up of the left side....
I used saved corks (love to recycle!) in addition to the
Tim Holtz goodies.....each cubby is outlined with
Tinsel Twine.....this is FUN stuff....so many different uses!
The top of my little "pub" is a medallion stamped on black
cardstock and embossed with WOW embossing powder
(the Metalline Green color), the letters are cut out of the the
Lost and Found pad, inked with Black Soot Ink, layered onto
chipboard and then painted with Rock Candy Crackle Paint to
give them an old antique tile look, you can see in the close up:
And a close up of the last two cubbies....a little twine,
and Glossy Accents on the bottle cap....and Distress
Stain in Peeled Paint on the wooden spools:
And a final look from a different angle at the finished project:
My "go to" adhesives for a project like this are Scor-Tape
and Glossy Accents. They really hold, and are both
available in Cutter's Creek. Same goes for the products
used in my project....many are already in-store, and the
others can be ordered any time!
Hope we have inspired you this week to join in our
National Craft Month fun with some projects of your own!
Tell us what you are inspired to make!!
Wednesday, December 5, 2012
Christmas Configuration Box by Deanna M
I picked up a small Tim Holtz configuration box and decided to do it up for Christmas. I started with the Idea-Ology Woodlands Miniatures. I sprayed these with some Meadow Adirondack Color Wash spray. This is a special order item but just ask. Once they were dry I used some Glossy Accents to adhere some of the Ranger Tinsel to my trees. I then added some "ornaments" to my trees and red "berries" to my wreath. My ornaments are beads and are adhere also with Glossy Accents.
While that dried I covered my box. I used the Tim Holtz Pap(er Stash Holiday Past paper pack. (Looks like Cutters Creek is out of this but please ask if you want it.) I used Inksenntials Glue and Seal to adhere my paper. I then used some Tissue Tape to cover all the seams. I inked the tape with some Festive Berries and Evergreen Bough Distress ink.
Once everything was dry I used some Glossy Accents to adhere my trees and wreath in my box. I also cut the word JOY out at 3/4" and inked it with some distress stains in barn door and brushed pewter (another special order item but don't hesitate to ask). I adhered them to my box as well with Glossy Accents. I also added the mini lantern to my box. Doesn't it look cute all lit up?
For my corners I used some WOW! Silver Ultra embossing powder to create several layers and then etch them with a damask stamp from my stash. (Here is a link to the video I did showing this technique.)
I also applied some foil to some white card stock and die cut some snowflakes using my eBosser. I adhered the snowflakes and the corners with some Glossy Accents. Finally for my feet, I took some wooden beads and stained them with some Brushed Pewter Metallic Distress Stain (another special order item but please ask) and applied them with some Glossy Accents. I cut the Christmas Blessing from the Tis the Season Cartridge and applied it with Glossy Accents. I covered the word Blessing alos with the Pewter Metallic Distress Stain.
Monday, December 26, 2011
Mini Album by Chris
A KaiserCraft Beyond the Page album and lots of goodies from my art room came together as a Grandma album. (Check out these catalogue and idea magazines that Kim has been putting in her packages.)
Albums are a piece of cake to do; you just need some imagination (which every one of you has!), glue, and a variety of supplies. All the pages in this album are covered with Echo Park paper, sanded, coated with some Picket Fence Distress Stain and edged with either Tattered Rose Distress Ink or Mustard Seed Distress Ink. The gems adorning the different pages are I-Rocks and Silver Pearl Liquid Pearls. I used my Alcohol Inks—willow and Citrus to color the metallic letters (grandchildren) and Xmas Red Stickles to outline one rose. The white photomats on the last two pages are edged with Ripe Persimmon Distress Ink and run through either the swiss dot cuttlebug embossing folder or the Tim Holtz Regal Flourish one and the flourish is using the flourish die and white glitter cardstock. To finish it off, I sprayed each page with Tattered Angels Old Lace Mist and used 1/8 inch scor tape to adhere the green ribbon around the edges of the largest page.
Supplies from Cutters Creek:
KaiserCraft Beyond the Page Album
Echo Park paper
Tim Holtz Distress Stain—Picket Fence
Tim Holtz Alterations—Elegant Flourishes
Tim Holtz Distress Inks—Ripe Persimmon, Tattered Rose, Mustard Seed
Ranger Liquid Pearls—Silver Pearl
IRock
Stickles
AC Glitter Cardstock
Tattered Angels—Old Lace
Scor Tape
Subscribe to:
Posts (Atom)