Showing posts with label Ecstasy Craft Kits. Show all posts

Sunday, June 2, 2013

Masculine Project With Kim B

I hope everyone has enjoyed our Design Team bringing you some wonderful masculine projects.  As crafters and a large majority of us being women, I know a lot of us struggle to make these type projects because we are drawn to the "pretty" and things like florals, pinks, frilly, etc...  Some of you crafters out there only have males to craft and scrap for so I am sure it is a bit easier for you to accomplish what a lot of us struggle to do.  I still use flowers, ribbon, glitter, etc... when doing masculine projects, I just try and tone it down a bit..............lol!  I just can't give up my bling!

So here are two Father's Day cards I created for a new friend if mine who has recently started purchasing cards from me.


I should have taken photos of the inside, however I forgot to do that so you could see how I completed the interior of the cards.  I used Ecstasy Crafts products for the front and some Flower Soft Peel Offs for the corners.  The ribbon was from my stash and the papers were scraps in my stash.  These cards went together so quickly because I used Ecstasy Crafts so the thinking was removed for me.  I just had to match up the rest of the items to complete my cards. 
 
Thank you for looking and I hope you enjoyed our projects!  Please leave the team a comment on the items you liked and tell us what you would like to see more of.  Thank you!


Friday, September 7, 2012

Quick and Easy Cards by Chris


What does Ecstasy Crafts 3D Sepia Card Kit + Flower Soft Peel Off Stickers + Iridescent Glitter Dust equal? Really easy, really lovely, 3D shimmery cards. Try them. These two went together in a night and there are two more in the kit. While the Glitter Dust doesn’t show up that well in the photos, believe me when I say it really adds to the effect of a winter scene.

Monday, August 6, 2012

Another Ecstasy Craft Project by Deanna


Isn't this Morehead Ecstasy Craft just the cutest! Kim has some of these in the Ecstasy Craft section of the store and I believe there are new ones still be be loaded to the CHA section so be sure you shop both places. I have for you today a quick Get Well card I made for friend recovering from knee replacement surgery.

My card base is white card stock cut and scored to make a 4 1/4" X 5 1/2" card base. This card is a portrait card. My patterned paper is from the My Minds Eye On the Bright Side One paper pad. I cut the blue mat at 4" X 5 1/4". I then used my Elegant Edges cartridge to cut the mat my Image is sitting on. I cut the shadow and top layer using the Oblong creative feature at 3 1/5". I adhered the mat with some foam tape to my card front.

I put my little kitty together using  the Joy! Foam pads. I strongly recommend that you get at least one package of each of the sizes of these foam pads. They work great with the Ecstasy Craft images for layering. I used some Scotch Quick Dry adhesive to attach my kitty image to the mat.

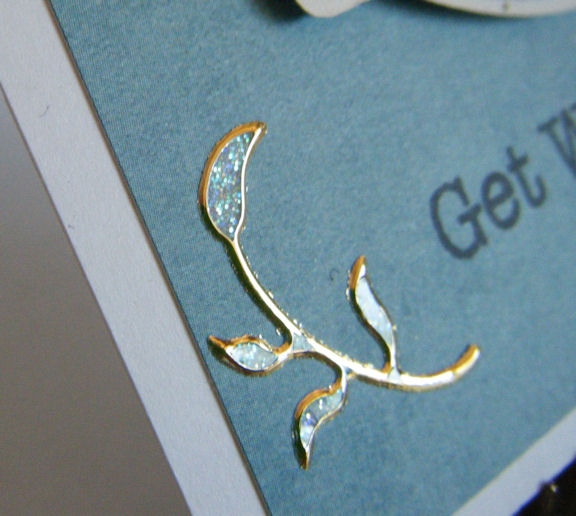
To dress up my card a bit I used some of the Peel Off Flourishes. The ones I have are gold with an iridescent look to the leaves. Here is a close up of just one of the flourishes.

Aren't they beautiful? And still this picture does not sow of the shimmer and shine of the flourish. You will have to get some for yourself to really see their loveliness.


Tuesday, July 31, 2012

Ecstasy Craft Sneak Peak-Part 2 by Deanna

I have another sneak peak for you of some of the awesome holiday Ecstasy Craft items that Kim has just added to the store.


These are called Reddy Die-Cuts and this is Popcorn the bear. As you can see I got 4 cards from one package. As you can see they come with a background paper to build your image on. Building the image is easy as 1,2,3. All of the punch out items are numbered in the order that you layer them. It took me just about an hour to make all 4 cards which is fast for me. The individual card toppers measured just under 4" so I cut 4 white card stock card bases at 4 1/4" X 8 1/2" and scored and folded them to make four 4 1/4" square cards and rounded the corners. These will fit in a standard size A2 envelope so you won't have to pay extra postage to mail a square card.

On this little guy I added some Frosted Lace Stickles between the snowline and the sky and also on the 4 larger snowflakes. (sorry it doesn't show up better in the photo).

On this one I again added some Frosted Lace Stickles to the snowline and I also added some Stardust Stickles to the stars by the moon.

For this one I added some Ultra Fine White Flower Soft to the snow along the top of the fence and also to some of the snow on the tree limbs.

On this one I again added some Stardust Stickles to the fireworks in the sky.

Check out the dimension you get with these wonderful little layered images.These were quick and easy to make and are beautiful as is without any additions. It is a fun and quick way to make some cards to give as gifts or to mail to family and friends.


There are some great new Flower Soft products that have been added to the store just in time for your holiday crafting so be sure to check them out. Also be sure to check the  new CHA 2012 Release section of the store to find out the latest and greatest additions including these wonderful Ecstasy Craft items.


Sunday, May 13, 2012

My Mind's Eye & Ecstasy Crafts with Kim B


My craft room seriously looks like hurricane Kim blew through it and left a mess for me to clean up!  Although I was so productive and got a lot done in a couple of days, I so need to clean up so I can begin once again.  Are you like me and are one of those crafters that loses their mojo when you can't even see your craft table any more?  Please leave me a comment regarding my project or any awesome "clean as you go tips" that you would like to share.  So on with my project!

I actually made two cards as I really loved the new My Mind's Eye papers (and more releases are coming!) that recently shipped to Cutters Creek.  I used the Follow Your Heart Be Happy 6x6 paper pad.  It is just simply scrumptious!  Both of my cards are 6x6 and I loved cutting two color blocks from one side and the cutting the other two color blocks from the other side.  This is one of the things I so love about double sided paper, you just can't go wrong!  The floral embellishment is from Ecstasy Crafts and so is the "happy birthday" in the corner.  I just love these peel off sentiments because I don't have to search for an ink pad, ink, acrylic block, etc...  And I also love that you can color these right in the sheet with your copic markers and change the color any way you want.  "Happy Birthday" started off as gold and now it is blue!


Here is my second card and it is also done with all the same products.  It just amazes me that you can get so many different looks out of the same products!  Although this time I left the sentiment gold. 

I hope you have enjoyed my cards today!  Please leave me a comment, even if it is a great "clean as you go" tip!  Thank you so much!


Tuesday, February 7, 2012

Tuesday Tutorial


So the other night I couldn't sleep and got to thinking about how I have seen people make a marbleized looking paper with reinkers and photo paper. I got to wondering what I could come up with if I used the distress inks on photo paper, so I set out to find out. I started with several different Distress Inks. I used Spun Sugar, Victorian Velvet, Shabby Shutters, Peeled Paint, and Seedless Preserves which was part of the Fall Limited Edition colors. I also used my Foam Ink Applicator. I randomly applied the ink to my photo paper. When I finished I spritzed it lightly with water and then went back over the entire area with the Spun Sugar to be sure there were no white spots and to light blend the colors together.


I then cut a mat from the Elegant Edges Cricut Cartridge (I believe Kim can special order this if you are interested) out of the photo paper and also from a dark burgandy scrap paper for the shadow. For my card base, I started with Kraft card stock I cut, scored and folded to make a 4 1/4" X 5 1/2" card stock base. I then cut a mat our of the same burgandy card stock 4" X 5 1/4" and then cut a mat from the Prima Botanical 6" X 6" paper pad. For the image on my card I used an image from the Morehead Decoupage Ecstasy Craft line. While the particular set I used is not available the Ecstasy Craft images are great to put together a quick card. Check out the dimension you get once you are done layering the image.


I really love how the photo paper turned out and it works great with my image and paper. What a great way to create custom back grounds for your images. I hope you will give it a try and tryout the Ecstasy Craft line.

Pin It

Monday, January 30, 2012

Super Fast Valentine Card with Lori

If you're like me and short on time, it's great to be able to get a card made RIGHT NOW.  But I'm sure you still want it to have some WOW factor.  Cutters Creek to the rescue!  All you need are some Reddy Pyramids from Ecstasy Craft, some Joy Foam Pads or ASI Kool Tak, and scraps of your favorite pattern paper and American Crafts glitter cardstock (or POW!).  This card literally took me no more than TEN MINUTES to put together.

Note: This particular Pyramid image is no longer in the store (I've had it for a while... things go missing around here sometimes), but I see some awesome flower Pyramids that would also be great for Valentine's day.

So, punch out your Pyramid image, layer it up with the Joy Foam Pads or Kool Tak, then add a mat of the American Crafts glitter cardstock (or POW!).  I used lavender glitter cardstock (and cut the mat with my Cricut), and my pattern paper is from the Echo Park Paper Springtime collection.  I stamped a quick sentiment on my paper (stamp from Close To My Heart), then adhered everything to a 5"x5" card base.  Quick, simple, and beautiful!

You still have plenty of time to get an order in time to make some great Valentine's Day cards - here's what you need to look for in the Cutters Creek store:
Thanks for stopping by to see us today!  We love to read your comments - and be sure to let us know if there is a product or technique you'd like to see us feature.

If you Like it, Pin It!

Wednesday, December 7, 2011

Quick & Easy Cards with Lori

So, we're getting closer to Christmas here - who else needs some quick & easy cards?  Ecstasy Crafts to the rescue!  Some of my favorite images are "Gorjuss Girls", and Cutters Creek carries a beautiful sheet of "Winter Friend" images to make two cards.  Best of all, they are currently on sale for 15% off - but you better hurry, there are only 4 left in stock as I type this!  Of course, if those are all gone, there are lots of other awesome choices from Ecstasy Crafts available; just have a look around.

Here are the two cards I made, keeping it simple:

Using a white 5"x7" card base, I assembled my EC image.  Then I used a pin clip to hold my "title" like a sign, and added a little bow of Doodle Twine to it.  I added some black organdy ribbon beneath the image, then layered on some ribbon printed with a sentiment from my stash.  I colored over a few little details in the image using a Copic Atyou Spica glitter pen in Black for a tiny bit of bling, but it doesn't show well in the photo.

Again I chose a 5"x7" white card base and layered my image onto it.  I repeated the layered ribbon and added an accent made of white & black paper flowers and a blue plastic flower, held together with a black brad center.  I again posted my "title card" in a pin clip and tied it with some Doodle Twine.  This time, I highlighted some areas of the image using a Sakura Jelly Roll Stardust pen in clear.

Thanks for stopping by and checking out my quick Gorjuss Girls!  I have a more time-intensive, stamped and colored image over on my personal blog today if you'd like to check it out.

Saturday, September 3, 2011

Wedding Card & Hurricane Irene

Hurricane Irene has been rough on a lot of us on the East Coast. When you lose electricity, you lose so many things that you take for granted each day that are just "there". Running water was the one thing that was the hardest for us. We could not clean, give animals fresh water, flush, cook, and so much more. You also find out that you have to communicate with people the old fashion way, actually talk face to face. I think our world of internet and smart phones has made it so we no longer have to interact with people the old fashion way. I for one, loved running into strangers and chit chatting as we all were searching for water and ice. So I am one to have any excuse to craft and Irene gave me that chance. I made this wedding card for our neighbors. They are getting married next week. Since I had so much time on my hands, I really put a lot into this card, including time. I am more of a scrapbooker, so as my card morphed before my very eyes, I was so pleased I spent the time I did on it. Here is the front of the card:


I used an Ecstasy Craft kit for the wedding image and put that together with foam squares. I then hunted through my massive paper stash and found a piece of pearlized 12x12 paper and some American Crafts glitter cardstock in ocean. I cut down the white paper to a 5x7 card base. I then took one of my punches and created a lacy edge down the front of the card. I then took my butterfly punch and punched a butterfly and glittered it and added KaiserCraft pearls in denim for his little body. I mounted my Ecstasy Crafts image on the glitter cardstock and also cut a strip and adhered it to the inside edge of my card. I then attached my butterfly with foam squares under the wings to make it look like it was in flight and then added some more denim pearls on the bottom front of the card.
Here is the interior:

On the interior I took a piece of the leftover pearlized paper and stamped a sentiment and found a scrolly heart stamp and stamped that below the sentiment and added tiny denim pearls to each end of the scroll and in the four corners of the sentiment and mounted that on glitter cardstock. I also took one of my bonus images in my Ecstasy Crafts kit and mounted it on glitter card stock and adhered it to the interior as well. 

All in all, I am pretty pleased with my finished card and took so much time as I know the bride will save all her cards she receives.

All of these items can be purchased at Cutters Creek!


Tuesday, August 23, 2011

Tutorial Tuesday with Mandie

Welcome to another edition of Tutorial Tuesday here on the Cutters Creek Design Team blog! Today I decided to play with a few of my favorite products: Echo Park Paper, Ecstasy Crafts Kits and Flower Soft!


I assembled this adorable little penguin image from the Christmas Penguins and Hedgehogs Set from Ecstasy Crafts. I love the adorable characters on this sheet! It only took me a couple of minutes to layer this little penguin with the Joy! Foam Pads. Then I grabbed my Flower Soft Glue (after a short hunt all over my desk for it) and my Polar White Flower Soft and added it to the white parts of his hat to make it extra fuzzy!


For the card I used the Echo Park Paper Winter Wonderland set. Cutters Creek is currently sold out of that line BUT the new Holly Jolly kit will be in stock soon and it's another GORGEOUS kit! I just used the "Merry Christmas" words from one of the border sheets and added a little of the peppermint paper and of course inked my edges in black to make it pop and in just a few minutes I have another Christmas card finished and ready to send in just a few short months!

Thanks for reading today and if you have a minute to pop over to my blog you can check out my next giveaway!

Monday, August 22, 2011

Flower Soft Peel Off Stickers with Kim B


I find that not all card makers are scrapbooks and not all scrapbookers are card makers, however there is a group of us scrapbookers who love using our supplies and extra scraps and turn them into cards and other paper crafts. I am one of those people. Scrapping is my "thing" and I will never make stunning cards like the cardmakers on my Design Team. Although once in a while, I will knock one out of the park................lol! At first glance, you may think what does this project have to do with Flower Soft Peel Off Stickers. Well, this is one of those cross over projects, that yes, I mostly use my peel off stickers to make cards, but I will also use them in my scrapbooking. (After all, you do get a ton of them on one sheet for a couple of dollars!) And what is a peel off? It is a delicate border sticker! One of the things that I love about peel off stickers is, if you don't get it on straight, you can pick it up and put it back down until it is just so. I sure do hate when I put down stickers and they are not straight. So here is a close up of where I used my peel off stickers:

I just love how that delicate gold peel off sticker sets off my photo and gives a bit of elegance to my double scrapbook page layout. What do you think? Do any of you out there use your peel off stickers in your scrapbooking? I would love to hear from you! 

If you are interested in the peel off stickers that Cutters Creek carries, you can find the ones from Flower Soft ones HERE. Also, we carry peel off stickers from Ecstasy Crafts in the form of sayings and shapes. You can find those HERE & HERE. And one more tip, you can use your copic markers to color your peel off stickers to match your projects!

Sunday, August 21, 2011

Chris' Rose Sympathy Card

Unfortunately I needed to do a sympathy card this week; fortunately I had the Ecstasy Crafts Reddy Cards kit: 3D Diecut Condolence Roses with Crosses. All I needed to do was decide what my card base would be and put it together with a sentiment.


After choosing some burgundy Bazzill cardstock and cutting it to a 4.25 x 11 to fold into an A2 size, I then cut a piece of Charcoal American Crafts POW! Glitter Paper to mat my card. (Let me tell you, I love their glitter paper and this style cuts like butter.) I glued the mat to the cardstock and the ecstasy base to the glitter mat and then began building the flower. Each layer is clearly numbered and it is a matter of sticking pop-ups behind the pieces and aligning with the previous layer. Super easy. Fortunately, I had all the needed supplies at home; unfortunately I did not have the fantastic new Clear Pops from ASI Kool Tak. I bet when those arrive these layers will look even more fabulous than they do now.


The card is so amazing (and quick and easy) that I, who am not one usually for kits, have decided this will become a staple in my stash.

Thursday, August 4, 2011

It's A Flower Soft Christmas with Kim B


For my project, I used two of my most favorite products, Flower Soft & Ecstasy Crafts.  My card base is a 6x6 piece of white cardstock and then I cut a piece of brown cardstock and layered that on top of my card base and then added four cardstock squares to add some interest.  I made that cute koala bear from one of the Ecstasy Crafts decoupage kits and added some gorgeous Polar White to his pom pom and hat detail.  I know it does not convey well in the photo, however Polar White Flower Soft has glitter in it and gives you a beautiful sparkle to where ever you add it, not to mention that fluffy white look.  I used Flower Soft Peel Offs around the edges of the card base and corners in the red squares and then used the Ecstasy Crafts peel offs for my sentiment.  This card is clean and simple and not only the look but also making it.  Both Ecstasy Crafts and Flower Soft products are inexpensive and just make anyone from beginner crafter to the most experience crafter look like a Rock Star!  I hope you love my project!  Please leave me a comment if you like what you see or have any questions.  All these products can be found at Cutters Creek.

Products Used:
Cardstock (from my stash)

Friday, July 22, 2011

More Christmas in July! With Laura


Do you like to get a jump on making those holiday cards? I do!!
Things get so busy, it's hard to actually find the time during the
holidays. These Ecstasy Card Kits are a wonderful way to do
just that! They have a pre-printed sheet, that you just punch
out each piece, in order (it's paper piecing by number!) and
attach it to the base piece with foam dots. Ecstasy has the
perfect foam dots for the job, which makes this craft even
easier....but it looks so amazing!

I made this card in minutes.....blinged it up a little with
Stickles (Christmas Red to the berries and Icicle to the
white berries and candle flames) and a bow, and you have
one beautiful holiday card....ready to give!!

Check out the Ecstasy Crafts section in Kim's store....and if
you have already.....check back soon.....lots of NEW coming
from CHA!!!!

Happy crafting!!

Available at Cutter's Creek:
Ecstasy Kits (3D diecut Christmas-Old Parchment)
Ecstasy crafts foam dots (lg and micro)
Ranger Stickles (Christmas Red and Icicle)

Sunday, June 5, 2011

Father's Day & Ecstasy Crafts with Kim B


This month the Design Team is doing projects using some of their favorite things!  So my project features one of my store favorites, Ecstasy Crafts.  If you have not discovered Ecstasy Crafts products, you are missing out on so much fun!  I often put these decoupage images together while watching tv, and then when I get a chance to get into my craft room, I love making these into cards or using them on scrapbook pages.  These items always make you look like you have spent hours on your craft and are so easy to assemble.  Each package has any where from 2-9 images and are numbered to let you know how to adhere each piece.  They are also very affordable and range from $2.99 to $5.99.  The metallics are the most expensive.  These three images were done from one package and are metallics.  It was a bit difficult to get the photos done due to the blinding shine they give off, however I hope you can see how bling they are.  All I added was a bit of card stock and ribbon from my stash and all three cards were created in under 30 minutes.  Father's Day is right around the corner, so don't forget to make those Dads out there a great card!  Cutters Creek does cater to those who need to craft for men, so please check us out!


Products used:

Cardstock
Ribbon


Saturday, May 14, 2011

Ecstasy Craft Cards by Kim B

I have had so many birthdays in these last few months, I have depleted my premade stock of birthday cards so I decided to sit down and make some more up.  I had already put these florals together from two different Ecstasy Crafts decoupage sheets and thought I would sit down and use these first.  It doesn't show well in the photo, however on the right card, I used Pearl Glimmer Mist on the flowers to give it a shimmery look.  The sentiments are also from Ecstasy Crafts, as I love hoe easy it is to place a peel off sentiment on my card instead of looking for a stamp.  It sure saves me a lot of extra steps!  These are both pretty plain and simple cards and were very quick and easy to put together, as I usually don't go to a lot of trouble making cards unless it is for a close relative (like mom and dad) who I know save my cards and don't throw them away.  So now I am off to make more cards, so I can get back to scrapbooking!

Products Used:
Cardstock Scraps
Glitter
Butterfly Punch
Ribbon

Saturday, May 7, 2011

Baby Wall Hanging by Deanna

Baby Wall Hanging
I started my project with an unfinished frame that I picked up at my local craft store for $1. I painted it with some Wicker White acrylic paint and then sprayed it with some Honey Dew Mist Glimmer Mist. After I sprayed on the glimmer mist I rubbed it with a paper towel like you would stain. I did this twice. It doesn’t show up well in the photo but it gave the frame a pretty light pale green color and the gold glimmer shows up in the light and makes the frame just shimmer.
For the picture I put inside the frame I used a Reddy Card image from Baby and Birth Ecstasy Craft .  These are so simple to use and look wonderful when you get done.  All of the images punch out and are numbered in the order you layer them. For my image I layered the images using the Joy Foam Pads between the layers to give that 3d effect.
I covered the chip board backing for the frame with some two toned green striped paper and mounted my  picture to the chipboard piece with my ATG gun. I used a cut from the Cricut Imagine Nursery Tails cartridge. For the flowers, I used some Flower Soft Wires that I covered with the Flower Soft Adhesive and then I sprinkled the adhesive covered wires with the Sweet Pea Flower Soft turning the wires as I sprinkled the  Flower Soft over them to ensure that all sides were coating. I used a 2” square of pink tissue paper to create a cone shape to put the flowers in, tied a narrow sheer white ribbon around the cone and glued it to the frame with the Flower Soft Adhesive. The Ecstasy Craft items are a great way to make a quick project that looks fantastic. I hope you give them a try.

Tuesday, March 29, 2011

Tutorial Tuesday-Peel Offs With Kim B. & A WINNER


I hope you enjoyed my tutorial and here are two examples of cards using peel offs. You can also use peel offs on scrapbook pages to frame titles, mats, pages, etc…


This first card, I made it up a while ago however put it aside as I thought it was missing something. And then I thought, peel offs! So I used the silver corners and borders sheet and added the corners and then added the borders and now I think this card looks done and elegant. This card was made from Flower Soft Toppers, Scenic Windows. I think this turned into a gorgeous Spring card, adding the peel offs to it!

This next example, I did something very simple and turned this simple card from drab into elegant using peel offs. The pansies are from an Ecstasy Crafts Decoupage Book, the sentiment is from the Ecstasy Crafts peel offs (and I used a Y15 copic marker to color the sentiment to tie it in with the yellow of the pansies), the corners from the gold Flower Soft peel offs, and gold borders from another gold peel off sheet option.

I have enjoyed taking you through using peel offs today and hope you enjoyed learning all about these little gems. They will take any paper craft project you made from drab to fab, in a matter of minutes! Please go to the Cutters Creek store website and check out these products and many more!

Products Used:
Flower Soft Peel Offs
Ecstasy Crafts Peel Offs
Flower Soft
Flower Soft Glue
Flower Soft Scenic Windows Toppers
Stickles
Foam Squares
Pink ATG
Ecstasy Crafts Decoupage Book
Copic Markers
Card Stock


We's also like to announce our WINNER of the CHA swag bag is....


And that commenter was....


Congratulations, Bradleysgirl!!!!!!!!!! I will be emailing you for your information shortly! I would also like to say THANK YOU to all of the people who came and hopped for all of the lovely comments, and to all of the design team members for their hard work!

Tuesday, March 22, 2011

Tutorial Tuesday - Flower Soft with Mandie

Welcome to another Tutorial Tuesday here on the Cutters Creek Blog! We all hope that you are enjoying learning about ways to use Flower Soft in so many projects! Make sure you keep checking back because we still have LOTS of great projects in the works. This weekend will be the Cutters Creek Spring Blog Hop! Make sure you don't miss it!

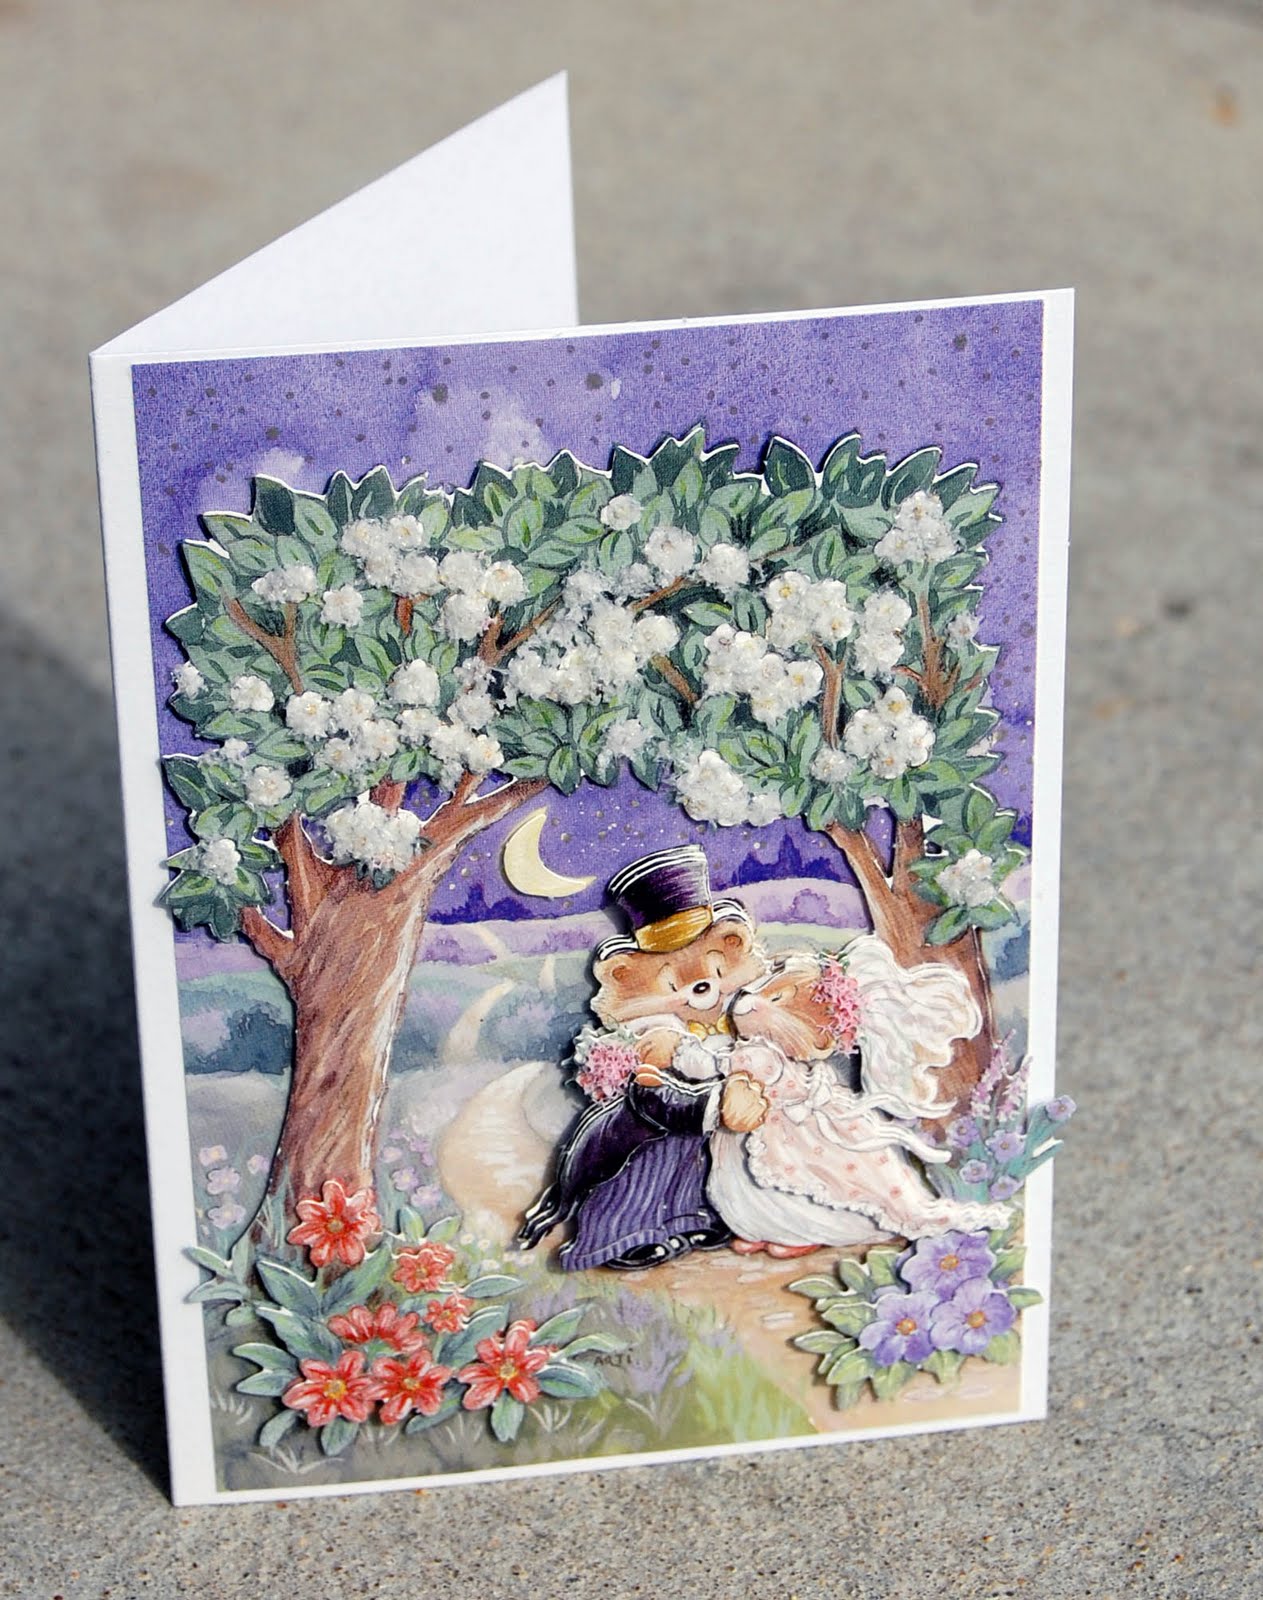
For today's project I decided to show you that you can use other images besides the Flower Soft Toppers with your Flower Soft. I chose to make a card with one of the three adorable images from the Wedding Bears & Cats diecut set from Ecstasy Crafts. Here's a look at my finished card:


To begin I cut out the backing image and began punching out all of the shapes that belong with it. I love that I'm not trying to cut these shapes, you just need to punch them out (and they punch out great)! Then you add the Ecstasy Crafts Joy! Foam Squares to the back. These are really cool because they are thin and give just enough lift for really nice dimension.


Notice I only added the very first layer to my card before I added my Flower Soft. I thought it would be easier to add my Flower Soft with out the other stuff on there... and there would be less chance of me making a boo-boo :) So I grabbed my Flower Soft Adhesive and a jar of Polar White Flower Soft to add to my tree.


Next I added small dots of glue to the flowers on the trees. You want to make sure you keep the bottle upside-down the entire time you are using the glue. And you really don't need a ton, just make small dots. Then just sprinkle your Flower Soft over the top. You can either use a small spoon or just pinch it with your fingers.


Here you can see I divided my tree in thirds. On the left is the Flower Soft added to the glue, in the middle is just my glue dots and the right is waiting to be done.


Yes, Flower Soft should be "fluffed up" a bit before you use it. Notice how fluffy it gets... yep, I just stuck the lid on top and it went right back on! And no, this isn't a brand new jar! I've actually used this on several projects! You can get a LOT for mileage out of one jar!


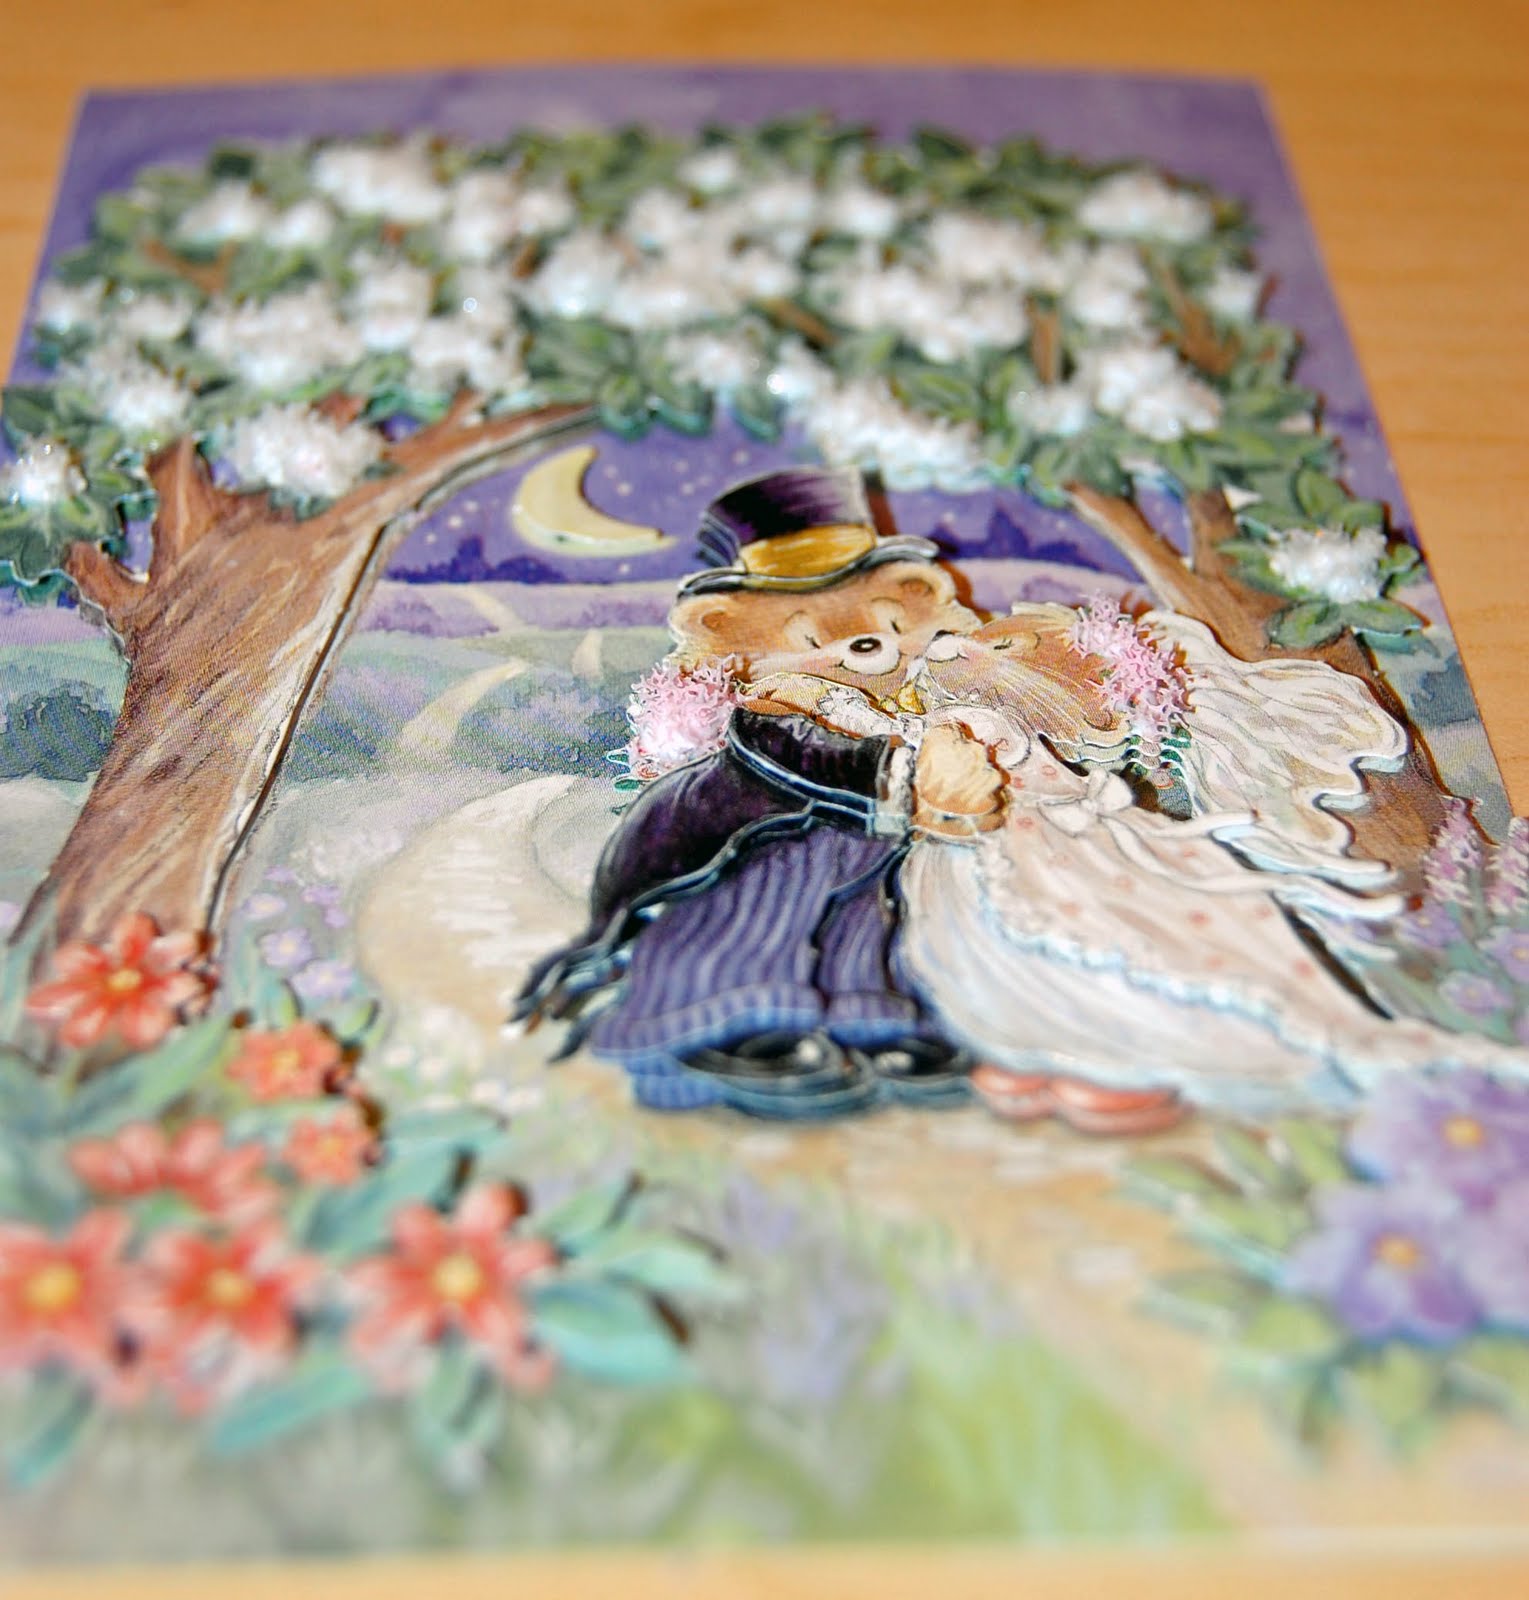
Here's the image at an angle, you probably want to click on it to make it larger so you can see the layering. Notice I decided to add some of the Baby Pink Flower Soft to the brides headband and bouquet too.


To finish off my image I added stars to the sky with my Gelly Roll Stardust Pure Glitter Pens. I just made little dots all over. I also added a little glitter to the inside of the flowers but it didn't show up in the photos... it looks great in person tho! Then I simply stuck it to a plain white A2 card base with my Pink ATG!


Here's one more look at the finished card! Don't be afraid to try your Flower Soft on ANYTHING!

Don't forget that every comment this month will be entered into the drawing for the Flower Soft prize package. If you missed the reveal click HERE to see what you could win! You can comment once per post so you actually have a LOT of chances to win if you are commenting on every post this month!!!
Related Posts with Thumbnails