Friday, August 31, 2012

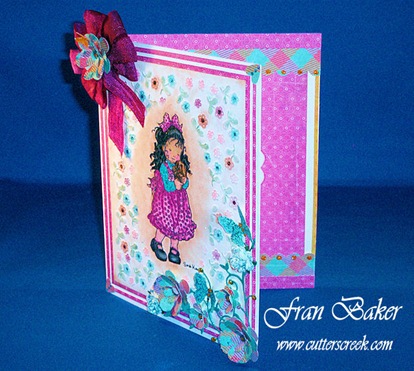
Fanny’s Cuddle


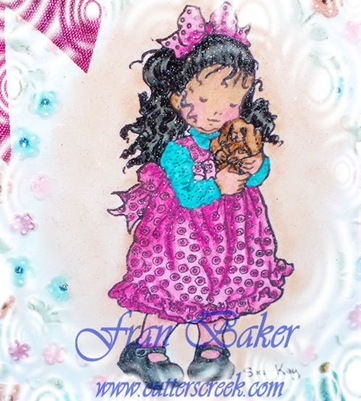
I fell in love with this Sarah Kay Stamp when I immediately saw the name of it – Fanny’s Cuddle.   You see my Mom’s name was Fanny.  And so I dedicate this project to my Mom. 

(click on photos for a closer view)

FullCard_Side View

      FannyCuddles_Close-up 

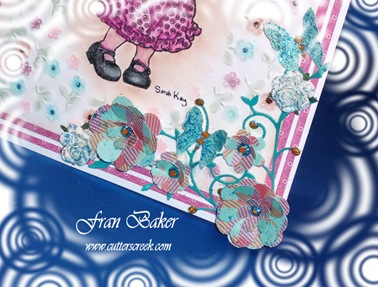
Flowers and Butterflies Close-up

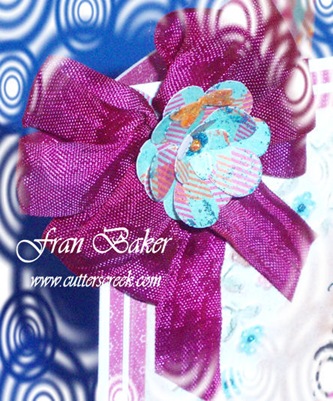
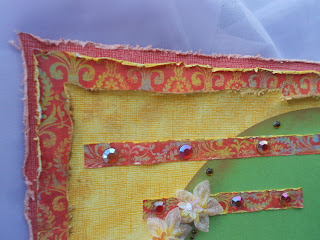
Ribbon and Flower Close-up


All papers used are Basic Grey’s indie bloom. Except for card base which is made by Neenah.  Homemade flowers were made from the indie bloom papers using a retro flower punch except for the two roses (Prima). Flourish and butterflies are from my stash.  Entire card front was sprayed with Glitter Dust.  And stickles was used on all the flowers, flourish and butterflies. Bow was made from seam binding and dyed to match card using Distress inks.  Image was colored with Prisma colored pencils.  Front of card was embossed with a Sizzix embossing folder (cannot remember name of design) but made of tiny flowers (Cutters Creek carries other Sizzix Embossing Folders).   And center of embossing was left smooth using an oval shaped diffuser.  Embossed flowers were colored using Pebbles pearlescent chalks.

Cutters Creek  Additional Supply List: 

Distress Inks  -  Stickles Glitter Glue  -  Therm O Web Glitter Dust (Iridescent)  -  Sarah Kay Stamps

NOTE:  If there is any item that I used that you are interested in please contact Kim of Cutters Creek and she may be able to special order it for you.

I hope that I have inspired you through my project and will try out some of the amazing items I used to make my card.  Thank you for stopping by,

Fran
Wednesday, August 29, 2012

GRRRRR

Today is my daughter’s birthday, so I wanted to make her a special card.  She is a real wild child, so I thought this Tiger Tilda image would be perfect. 

grr tilda [1280x768]

The paper I used is from My Mind’s Eye.  This pack is called Miss Caroline All Dolled Up.  I love the chevron pattern in this pack.  It’s my new favorite pattern.  I used some of the other patterns to add some more color.  I love double sided paper packs like this because all the papers coordinate so perfectly together.  I colored Tilda with my copic markers in colors to match the papers  I finished the card off with a sentiment and a Cutters Creek Gardenia. 

I hope my daughter likes her card and that her birthday is as wild as fun as she is. 

Cutters Creek Shopping List

My Minds Eye- Miss Caroline All Dolled Up

Copic Markers

Cutters Creek Gardenias

Monday, August 27, 2012

What do you do with your scraps?

For the longest time I used to hang on to every little scrap of paper/cardstock I had left after a project but it soon became a big box of unused stuff and no idea what I had in there so I decided I would hang on to my scraps for a month and reserve one day a month to use them up and making cards... I wish I could say kept this up over the year but I would be lying! So, tonight I decided it was time to break open that box and start using up those scraps..... Here is my first card for the night..

I hope this inspires you to use up those scraps and build a nice supply of cards!

~Tee


Sunday, August 26, 2012

Altered Halloween Treat Box


Today I have for you a fun Halloween Treat Box. I picked up this wooden coffin at my local box store and spray painted the whole thing black. I cut some paper to fit the inside of the lid and bottom of the box and used some Glue and Seal to attach and seal the paper on the inside of the coffin . I cut the word Beware from the Happy Haunting cartridge at 1 1/2" and attached it to the inside lid. I  then painted it with some Rock Candy Crackle Paint which gave it an aged look inside.


On the outside I cut some images from the Happy Haunting Cricut Cartridge and glued them to the outside of my box. I then sprayed the entire outside of the box with the Iridescent Glitter Dust. I think  you can see the sparkle in the photo.

Saturday, August 25, 2012

Something A Little Different This Time!


I may have mentioned it before but many years ago when I retired in 2001 I had no clue that I would be making art out of paper.  I first started making boxes and bags.  I used to belong to Groups where some of the members drew templates and they would share them with us.  But in order to make anything with them I had to learn a new program.  So I chose Paint Shop Pro (PSP).  After a couple of years I wanted to learn how to draw templates so I taught myself how to draw using PSP.  So I did this for about 6 years.  I have drawn many templates.   And would love to share them with you.

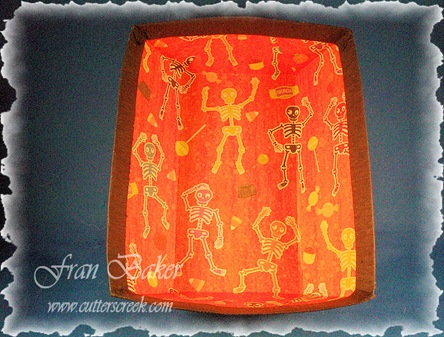
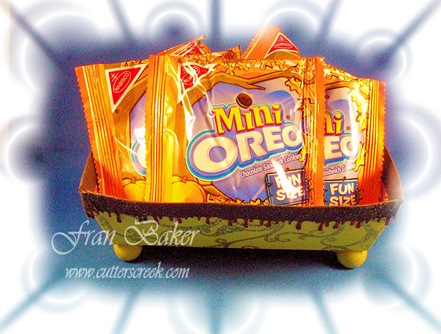
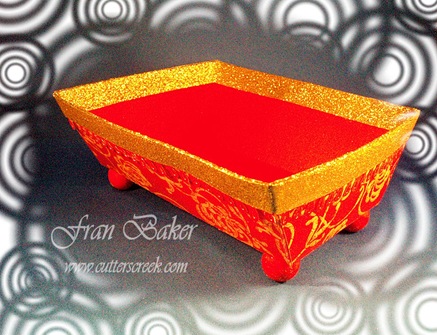
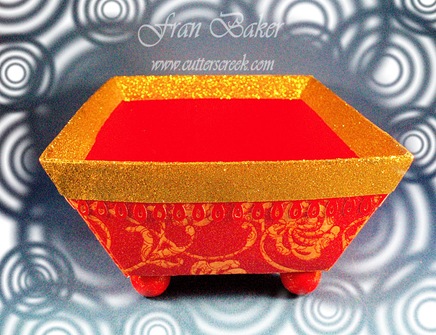
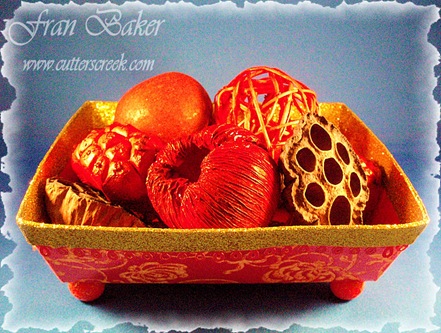
I wanted to start off easy so I used a container that I call a basket that will hold whatever you like that is light in weight.  I made two of them.  One is using a Halloween theme.  And the other has more of an Asian flair to it.  I made two for each theme so that the inside is decorative too plus it makes them more sturdy.  I will show you photos of them with nothing in them.  And photos with Halloween snacks and Potpourri.  I will also share all the details with you below the photos.

If you are interested in the template you can go to my personal blog to get the download link for the template and  the instructions on how to put it together.   It was fun deviating from making a card to making these containers.  I have to do this type of crafting  more often in the future.

Halloween Basket

Halloween Basket Front view

Halloween Basket Inside

Halloween Filled Basket


Potpourri Basket


Potpourri Basket Side View

Potpourri Basket Long View

Potpourri Basket Filled

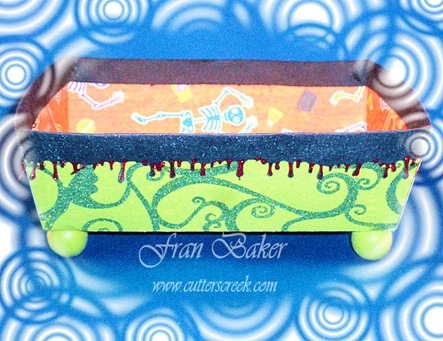
Products used:  Stickles Glitter Glue, Glitter Dust, Glitter Tape*, Papers and wooden beads for the legs are from my stash.  I painted the wooden beads using Adirondack Acrylic Paint Dabbers (Citrus and Watermelon.

*Purchased from Cutters Creek as a monthly club purchase.  You can contact Kim Bush of Cutters Creek if you are interested in purchasing the Glitter Tape or joining some of the clubs.    This pr0duct is amazing!

 I hope you enjoyed seeing my projects and how versatile the basket is for many things. And Cutters Creek sells beautiful papers that may inspire you to make one of these baskets or something similar.  Check out all the beautiful papers.  Here are a few for you to view:  Graphic 45, My Minds EyeTim Holtz.  And if you want to add some awesome dimension to your projects check out the NEW Cherry Lynn Designs.  In addition, go and see all the new CHA 2012 New Releases!

Thank you for stopping by,

fran red

Friday, August 24, 2012

1 Sketch + 1 Paper Pad = 2 Looks with Lori

Do you ever wonder how you're going to use a single paper pad and manage to get a variety of looks from it?  Luckily, the 6" x 6" pads from My Minds Eye make it easy, and I have a few additional tips for you to carry it through.

I started with the Miss Caroline Dilly Dally paper pad and this weeks sketch from Mojo Monday.  --Just an FYI, I am the Queen of Sketches!  I love to take a sketch or pattern and use it to make my own creations. Sometimes I will just use it for the basic idea and completely change things up, but other times I will use it pretty much as is to make my life easier.  So, as I was recovering this week from a self-inflicted foot injury, I decided the easier my life, the better!  Here's the sketch I used for my two cards:

Using this sketch, I decided to make one masculine and one feminine card.  I left them sentiment-free for now so I can use them for whatever in the future.  Since the MME papers are double-sided, I used a single sheet of paper for each card (plus a small scrap for my flower center).  I made my cards 5" x 7", as  I prefer the larger size, and cut each panel to 3" x 5".  So, here are my two cards:


Even with the same overall design, kraft base, and distressing, I think they look pretty different.  The difference is all in the pattern paper I chose from the pad and the additional supplies I chose to use with them.

 For a more masculine look, I chose a more graphic paper, with a fairly simple pattern on the other side.  I added metal embellishments, which I distressed with a W5 Copic Marker.


I added trims in basic neutral colors, leaving frayed ends on the ric-rac and tying a simple knot in the hemp cord.  My additional embellishments were basic tickets, repeating the graphics from the paper without adding anything frilly.

For the more feminine look, I chose a floral pattern with a happy polka dot on the back side. I added some vintage crochet trim, sparkly glitter tape, and some paper flowers colored with Glimmer Mist.  The flower center is a clear button backed with a paper scrap and a few Kaisercraft Pearls in the center.  To enhance the feminine look even more, you could leave off the distressing and sponge the ink around the edges of the papers rather than the direct-to-paper techniques I used.  But I love a vintage look, especially paired with sparkly bling, so I kept the distressing. It reminds me a bit of my grandmother's kitchen!

I hope you enjoyed today's cards!  If you decide to follow my lead, I'd love to see your cards too.  You can snap a pic and send them through to the Cutters Creek Yahoo Group where we can all ooh and ah over them!

Supplies used for these two cards:

Wednesday, August 22, 2012

Back To School Notebook by Laura C

Summer is fading, and here comes back to school!!

This notebook is a great way to start a student off
right, or to make a fun teacher's gift, or make a
journal or memory book for a child's school year:

It was a simple plain composition book I bought
on clearance last year (now is a good time to start
keeping an eye out!):

The paper is MME Six by Six pads--some are
 in the store, and any of the others coming soon,
or Kim can order.  They are the PERFECT size
for this project....one piece for the top....trimmed
just about 2 inches off the other piece for the
bottom, layered a border strip piece in the middle
(you can see it peeking out!) and then used the
wood look piece, and turned it into a piece of
notebook paper using a punch.  One red strip
of cardstock down the side finished off the cover.
All pieces were inked with Black Soot Distress Ink.

To decorate....using a Scor Pal to score two
1" paper strips, then Scor Tape to hold them
together to form the rosette. I added a few
banners and the apple....just cut free hand
from the other cute papers in this MME pad.
The little flags are fussy cut from this same
pad (these are SO versatile!!) and adhered
with Scor Tape to toothpicks and tied with
twine.  Letters from my stash finish it off.

And once more the finished project:


Hope this quick simple project will inspire
you to make a special teacher or student
a gift.....or let your student make their own
special book!  We just had so many talented
kids join us for our kids crafting contest!! 


Tuesday, August 21, 2012

Embossing Tutorial

I was asked to do a quick video on embossing with the WOW Embossing powder. So here you go. ( by quick I do mean quick). One tip I would give you is to let your heat gun warm up before you start embossing your project. You might find it helpful to turn it on before you ever get started and let it run for a few seconds. You can tell in the video how much longer the first project took to emboss then the last one.


Monday, August 20, 2012

BOO- Time to Start Thinking About Fall

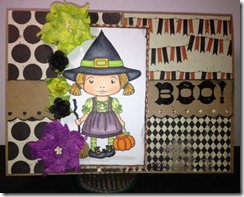
Halloween is one of those holidays that always sneaks up on me.  It seems like Summer just starts and then the next thing you know, it’s gone and it’s time for Fall.  Kim has added some great new holiday stamps and papers to the store and I couldn’t wait to try some of them out.  For this card I used one of the new La La Land Crafts stamps- Witch Marci.  She’s such a cute little with. 

photo(8)

Marci is colored with Copic markers.  I added a little bit of bling with my copic spica pens to the lace on her dress and the buckle on her hat and her shoes.  The paper I used is my new favorite Halloween pad.  It is called Mischievous and it’s from My Mind’s Eye.  I added some Cutters Creek Brand flowers to one side and my sentiment to the other.  My sentiment is stamped with Wow black embossing glitter.  This stuff is so cool.  I wish the sparkle showed up more in the pictures. 

Don’t let Halloween sneak up on you.  Get some fun new papers and get some projects started. 

Cutters Creek Shopping List

My Mind’s Eye- Mischevious

Wow Embossing Glitter

La La Land Crafts stamps

Cutters Creek Brand Flowers

Sunday, August 19, 2012

In Loving Memory by Ms. Pebbles


Good day everyone! I would like to share a layout featuring a good friend of mine from high school that also became one of my clients at the salon. That's me standing behind her holding the mirror. :)
I love my eCraft Purpleberry not only because it's PURPLE, but I love those big circles I can cut without having to trace first! lol I inked the edges of the circle with Tea Dye and added some small gems.


Every flower used in this section is from the Color Me Crazy flowers except the rust colored ones. I love the Color Me Crazy flowers, because as you can see, you can make them any color to match your project! I added some Stickles to the edges and centers of some to enhance them a little.


I picked these flowers up from my local dollar store and altered them. I also added some Stickles to the edges of these as well.


I distressed the edges of my layers and inked them with Distress Ink. I used Tea Dye on the Core'dinations card stock and Mustard Seed on the pattern paper. I used the same technique on the strips I added using the pieces from the edges I trimmed off for the layered effect.

I had this label and ribbon in my stash and for a more creative way to add her nickname "Buttons", I added a couple of buttons to match.

Thanks for looking and remember, if there's any product that we are sold out of, email Kim and see if she can special order it for you. Have a good day! :)

Saturday, August 18, 2012

And the WINNERS Are??????

The Cutters Creek Design Team would like to thank all the young crafters that participated in our challenge. We are so glad Random.org selected the winners! All of your projects were awesome and it is great to see you all enjoying crafting. You are all winners in our eyes!

Now for the winners:

For the 1 to 7 age group the winner is Emma age 4, entered with the help of her Aunt Danielle. Here is her winning entry.


For the 8 to 11 age group the winner is, Erin Age 9.  Here is her winning entry

The winner of the the 12 and older age group is Sarah age 12. Here is her winning entry.
Didn't they do an awesome job!!! Congratulations.

If you could email me the mailing information of where to send the prizes we will get them out to you. deannamulder @ live .com.

Thursday, August 16, 2012

You're Special Card by Deanna M


Today I have for you this cute Gnome Home card. My card base is Kraft card stock cut and folded to make a 4 1/4" X 5 1/2" card base. My patterned paper is from a My Minds Eye Six by Six paper pad called Gnome Sweet Gnome. This paper is not yet in the store but Kim can order it for you. I added a Green patterned paper mat cut at 4" X 5 1/4" and then the striped cross stitch patterned paper cut at 3 3/4" X 5". I then cut a strip of the reverse of the green patterned mat that had the flowers on it at 5" in width and ran that across my card.

My Gnome Home is from the Gnomes and Mushroom Cricut Digital cartridge but I just thought it was so cute. I cut the Gnome Home at 3" and all the layers are cut from scraps. I adhered the home to the card with some foam tape and added a small onyx liquid pearl for the door knob. I inked all my edges with some Tim Holtz Tea Dye Distress Ink. For my sentiment I heavily inked a small white piece of card stock that I used Faded Jeans Distress Ink to stamp my sentiment. I mated that with a piece of brown card stock and added a couple of buttons from my stash.

Wednesday, August 15, 2012

Calling ALL Young Crafters!

Cutters Creek Design Team is please to offer you the opportunity to show off your crafting talent and have a chance to win some wonderful goodies too!!!

Our challenge to you is to make a project, any project and post it to our blog through the Mr. Linky below. Your project can be anything you want, a card, a scrapbook page. . . We would like you to use at least one product that is sold by Cutters Creek. The contest runs between August 1st and August 15th. We will draw one winner from each of the age groups below using Random.org and they will be announced here on August 18th. When posting your project to Mr. Linky please include your name and age so we can be sure we get you in the right group for the drawing.

Our age groups are:
1 to 7
8 to 11
12 and older

Want to see the prizes? They are awesome!!!!!!

Prize for the 1 to 7 age group


Prize for the 8 to 11 age group


Prize for the 12 and older age group


So get your creative thinking caps on and start creating. we are excited to see what you make. If you need help with posting your project to Mr. Linky please email me at deannamulder @ live.com


Tuesday, August 14, 2012

All Occasion Card by Tee

I love to make "all occasion" cards and keep them in my stash for when I need a last minute card for a Thank You, Get Well Soon, Congratulations or whatever the occasion might be. 

Below is a sample of one of my recent "all occasion" cards using Echo Park paper, Cricut Art Nouveau, Diamond Stickles and some tulle for a bow. I usually make a batch of these at a time, I did 6 of these cards and used scraps of cardstock for the flowers in red, pink (as shown here) and yellow.


Sunday, August 12, 2012

Glitter and Gleam, Sparkle and Shine!


My card today is all about glitter.   American Crafts makes a beautiful craft glitter tape in vivid colors.  All the glitter tape I used on my card is from Cutters Creek.  I got my tape by joining a club and on a monthly basis I get three rolls of glitter tape in three various sizes and in different colors.  The Cutters Creek Store does not carry the tape at this time but if you ask Kim, (owner of Cutters Creek) Cutters Creek Contact Page I know she would be glad to order it for you.

I didn’t want to make a frilly card. I just went with a plain cream colored background and base card.  On it I added several colors of glitter tape and glitter hearts.  I even added the tape and glitter hearts to the inside of my card.  And a little machine stitching. Plus I inked the edges of the base card with a muted gold ink.

The sentiment used was created on my computer and placed it in an oval shape.  Printed it out and cut it for the front of the card.  The sentiment says:  “You glitter and gleam, sparkle and shine”.  It expresses the design of the card.  Here is the finished product.  Let me know what you think of all the colors I used of the glitter tape.  I am a big Stickles lover but I think that this glitter tape is right up there with Stickles.  You just have to get some of this tape and see how beautiful it is and so easy to use!

Glitter Gleam Sparkle Shine Card

Note:  There are two new clubs being featured over at Cutters Creek: 

1.  Liquid Pearls Club

2. Copic Spica Glitter Pen Club

All you do is go to Cutters Creek Store Contact Page and contact Kim Bush or if you are in the Cutters Creek Yahoo Group send an e-mail letting Kim know you are interested in both or one of the Groups listed above.  Hurry because the clubs are filling up quickly.

Thanks for stopping by and hope to see you back here again,  Fran

Friday, August 10, 2012

Curious Decor with Lori

I recently hit the local Goodwill again, and found another item begging to be altered.  I found this cute (but boring) little silver-toned tray for a whopping $1.99, so I threw it on the ever-growing pile in my cart.  Once I got it home, I pulled out some supplies from Graphic45 and turned it into a fun piece of art.

Using the Olde Curiosity Shoppe 12" x 12" paper pad, I started by cutting four strips of the polka dot paper at 5/8" and pleating it.  I did this by hand rather than using a scoring board for a more random look to the pleats.  I adhered it around the inner edge using 1/4" Scor Tape.  I then used my Cricut to cut an oval approximately 5" x 7" from the red & cream number paper to fit the center of the tray.  I distressed the edges of the paper with a distressing tool, then rubbed a Distress Ink pad in Tea Dye along the edges for an aged look.

I cut the center panel and the "45" piece from two additional papers, and distressed the edges with both the distressing tool and a Distress Ink pad in Antique Linen.  I backed the center panel with black cardstock and adhered it to the tray with adhesive foam. I then adhered an embellished chipboard tag and the "45" piece using more adhesive foam.


I decorate the top of the tray using 2 sizes of metal butterflies from Graphic45 Staples and a butterfly image cut from one of the papers.  Once I had my image cut, I used some Ranger Inkssentials Crackle Accents over the entire image.  When dry, I pierced the center and stacked it with the metal butterflies on a G45 Staples metal brad.  It is adhered to the tray using adhesive foam and Scor Tape.


Finally, I added some additional embellishments from my stash, and it is ready to display.


I hope you enjoyed my little piece of art decor!  If you'd like to make something similar, you can use as few or many of the following supplies as you'd like.

Available from Cutters Creek:
Other Supplies Used:
  • Graphic45, Olde Curiosity Shoppe Chipboard Die-Cuts 1
  • Graphic45, Staples metal butterflies and decorative brads
  • Tim Holtz, Idea-ology, Clock Key
  • black mesh ribbon and "feathery" flower - from my stash
Thanks for stopping by today.  I hope to see you again soon!

Wednesday, August 8, 2012

A Birthday Card by Chris


All the papers for this card are from Graphic 45’s Little Darlings. Used my ATG to adhere the blue base. I then used the largest die from Spellbinders Blossom Four and edged it with Tattered Rose Distress Inks. To give the flower a bit of depth I ran it through my Big Shot in the Whimsy M Bossabilities embossing folder and glued it down. Then I made the Happy Birthday sentiment, first cutting the paper with my Cuttlebug Embossing Plus Fanciful Labels folder, then inking (again with Tattered Rose), and embossing the sentiment with WOW! Suzy West Pantry Collection—Blueberry. This label is raised up on Glue Dots Pop Up Dots. A bit of lace trims the bottom.

I fussy cut an image from two sheets of Graphic 45 Little Darlings. I used one as a base and the other cut out parts that would give the image some dimension, using ASI (Kool Tak) 3D Foam on a Roll. Her bow is embossed with WOW! Embossing Glitter—Angel Wings. (I just love this color and sparkle!). To finish the card off I took apart some old flowers and rebuilt them with a pearl in the center. Petals and pearl were glued with Glossy Accents. Two punched butterflies edged with Tattered Rose and a touch of Spica Gold on the bodies and the card is done.
Related Posts with Thumbnails