Tuesday, May 31, 2011

Tutorial Tuesday - Faux Metal with Lori

Welcome to another installment of Tutorial Tuesday!  Today I have an awesome embossing folder technique for you - faux metal!  Do I sound excited?  I totally am; this is one of my all-time favorite techniques to use with embossing folders.  In fact, I got so carried away I made three cards!

First, let me say that, yes, I know there are metallic papers and such available to buy out there.  But I can guarantee that they look nothing like this!  This technique uses just a few supplies:

  • metallic ink pad (my samples are shown in copper, gold, and silver)
  • Glimmer Mist in complementary colors (more details below)
  • heat gun
  • embossing folder of your choice (Cuttlebug or Tim Holtz/Sizzix)
  • cardstock (more details below)
OK, let's jump in!  First, choose your cardstock based on the type of metal you want.  For gold I use light brown; for silver, light gray; and for copper, dark orange.  Next, lightly spray the cardstock with one or two colors of glimmer mist:

Based on what I had on hand, I used Pearl for the gray CS, and Bronze for the gold.  (I used both Bronze and Patina for the copper, not shown.)  After the CS is damp, place it right-side-up on the embossing folder and emboss, then dry with the heat gun.

After drying the cardstock, I used my metallic ink pads and rubbed color over the cardstock directly from the ink pad.  You will want to cover the cardstock pretty well, but unevenly if possible, so some areas are more "inky" than others.  Finally, dry the ink with the heat gun.


At this point, it isn't going to look like anything very special, just some inky cardstock.  So we are going to spray on more layers of Glimmer Mist for depth and highlights.  You can also use a metallic white ink for some added highlights; just be sure to dry with the heat gun between Glimmer Mist and ink pad!


For the gold, I used both Bronze and Chocolate Glimmer Mist.  For the silver, I used Pearl and Denim Blue.  For copper, I used Bronze and Patina, not shown.

Gold
Silver
 OK, now for one of the finished products!
For this card, I made my copper sheet using the Tim Holtz/Sizzix Steampunk embossing folder.  I love how the Patina Glimmer Mist really makes it look aged!  And the different amounts of ink covering the cardstock really give this piece some depth.  I just loved this panel so much, that I had to use it on an entire card front!  My patterned papers are from the Graphic 45 Steampunk Debutante paper pad.  My main image uses a technique called "cracked glass", but that's a story for another post, lol.


Thanks for stopping by today - we look forward to seeing you again next time!  If you'd like to see the other two cards I made, they are on my blog here.

Monday, May 30, 2011

Melissa's Miss Anya

So, I decided to try again with a purple colored card.  I think this one went a little smoother :o)  I started with one of the images from the Miss Anya Dressy Collection - -I love these images by The Greeting Farm!  I also stamped it on a post it so I could stamp the leaves and flowers without worrying about my image being ruined. 

I colored my image with my copics and used B000 and G0000 to blend in the background as sky and grass - - just very light colors, but enough to show the white edges on the Curved Rectangle where is was embossed.  The background paper is from Prima Reflections and I used different papers in the collection for the butterflies as well.

Hope you like it!!


Paper: Bazzill Simply SmoothPrima Reflections,
Ink: Memento Tuxedo Black, Copics,
Embellishments: Martha Stewart Punch (Stash)
Other: ATG, 1/4" Scor-Tape, Glue Pen, Curved Rectangles, Big Shot
Stash: Purple Cardstock, Post-it Notes

Hair: E11, E97, E99, E19
Skin: E50, E00, E21, E11
Dress: BV0000, V93, V95, V99
Flowers: Y000, Y11, Y15
Leaves: YG13, YG17, YG23
Background: G0000, B000
Shadows: N0, N1, N3

Photobucket

Friday, May 27, 2011

Simple & Elegant Congratulations Card with Vicki


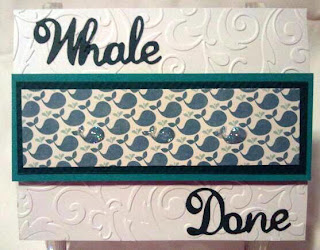
When you need a card in a hurry, the Cuttlebug is a great, easy way to put a simple and elegant card together.

I started with a standard white A2 card. I used the Cuttlebug Emboss A2 Musical Flourish
(http://cutterscreek.com/store/index.php?main_page=product_info&cPath=350_399&products_id=4241&zenid=7qtvhu05i9jihv4n6s76f0k2s6)
to emboss the entire front of the card. Next, I found a paper print I liked from the Echo Park Splash 6x6 Paper Pad (http://cutterscreek.com/store/index.php?main_page=product_info&cPath=380_402&products_id=4267&zenid=7qtvhu05i9jihv4n6s76f0k2s6).
As soon as I saw the little whale print, I knew that was the one! I found two solid coordinating papers, and made two nested rectangles with a slim 1/8" border. I then nexted my whale paper within those rectangles, with the same slim border. I wanted this ribbon-like strip to stand out, so I attached it using 3D Foam dots similar to the Joy! Foam Pads carried in the store
(http://cutterscreek.com/store/index.php?main_page=product_info&cPath=304_316&products_id=3764&zenid=7qtvhu05i9jihv4n6s76f0k2s6).

Next, I pulled out my Gypsy, and created a title using the Quarter Note cartridge. I thought it would be fun to do a play on words with the print. The title "Whale Done" was cut on plain coordinating card stock. I attached it with my Sakura Quickie Glue Pen
(http://cutterscreek.com/store/index.php?main_page=product_info&cPath=118&products_id=982&zenid=7qtvhu05i9jihv4n6s76f0k2s6).

The result is a quick and easy card, that can be used for any job well done!

Thursday, May 26, 2011

Mandie's Butterfly Card

Have you ever had one element that you made just to try out a technique and end up loving it sooooo much that you then create an entire project around it? When I experiment I usually make something I like and put it in the "Someday" pile... and for most of that stuff Someday hasn't come yet. But when I was playing with my embossing folders and Glimmer Mist I created a super cute paper that I LOVED and had to create a project with it! Add my Cricut (of course), the GORGEOUS Echo Park For The Record papers and a few odds and ends and I came up with....


... this beautiful card! So here's what I did to create this. It all began with a one of the Tim Holtz Texture Fade Embossing Folders. The one I used is called Patchwork Card which isn't currently in the store but a great substitute would be the Postal Folder. First I embossed a sheet of plain white cardstock which I had cut to fit the folder (4 x 5.5 if I remember right). Then I grabbed my Yellow Daisy, Walnut Gold and Coffee Shop Glimmer Mists and started spraying. I dried everything with my Heat Tool and then used the Tim Holtz Walnut Stain Distress Ink with my sponge dauber to bring out the embossing even more. Then I tore the edges off my paper down both sides and inked those too.


Then I grabbed my Echo Park For The Record 6 x 6 Paper Pad and started flipping through it. I will admit, I LOVE the smaller paper pads for card making not only because of the scaled down size but also I don't feel like I'm *wasting* a whole sheet of 12 x 12 paper that I may want to use in my scrapbook one day (yes, I'm a TOTAL paper hoarder)! Anyway, I selected a few sheets and decided that I wanted a big butterfly for the front of my card. I used the Once Upon A Princess Cricut cartridge to cut out my butterfly and inked all the edges of my cuts with the Walnut Stain Distress Ink. I actually used a makeup sponge to get into the small spaces on my cut. Then I added the patterned paper to the background of my card and decided to adhere my Glimmer Misted Patchwork Card at an angle. I trimmed it to fit and inked all the way around the card. To adhere my butterfly I used some Pop Up foam only on the body of the butterfly so the wings can flap. I inked my Baker's Twine a bit and wrapped it around my card 3 times and tied it off. Then I decided to add antenna to the butterfly with a scrap of the twine. I wish I had thought of it before I had adhered the butterfly but I just tied a knot in it and stuck it on with a Glue Dot. Then I stamped "Fly" on a scrap and matted it with another scrap after inking them both. Finally I added my green buttons with more Glue Dots. I love the way my "experiment" ended up and I can't wait to play more!

Wednesday, May 25, 2011

Chris' Key To My Heart Card

Have you tried the Cuttlebug Embossing Plus folders yet? They make putting together a card or a layout a breeze allowing you to cut and emboss in one step. Here I used the Vintage Collage set to make my DH’s Father’s Day card. To start I used a Kraft paper base cut and folded to a 5x7 size. I then used one of the Oriental Weave embossing folders with Core’dinations Cardstock, which I sanded to bring out the blue core. This embossed layer was matted on two slightly larger rectangles—one blue and one red—using Scor-Tape.


I then took two chipboard letters and sprayed them with Rum Punch Glimmer Mist (a fantastic new color), and set them aside. I also cut a length of seam binding and sprayed that with the mist and scrunched it up as I dried it with my heat gun. I then tied 3 knots in it and adhered it to the left edge of the card with Glue Dots.

Next I used my Vintage Collage set to cut out the pointing hand, the key, and the heart. Since I wanted each one to be different colors, I cut three times. Before I removed the finger from the folder, I lifted the inking panel and used Tea Dye Distress ink on the hand and Faded Jeans Distress ink on the cuff of the shirt. I used American Crafts Glitter Cardstock (Chestnut) for the key (you can’t really see the embossing, but the glimmer is sufficient for me), and a piece of scrap red cardstock for the heart.

To assemble the card I Scor-Taped the rectangle close to the upper right-hand corner. Using quick-drying glue and some pop dots, I laid out the letters, hand, and key, added a few words typed and colored on my computer and edged the heart with Christmas Red Stickles. And since my DH is an oldies fan, I think he’ll love having a line from the Isley Brothers song on the cover of his card.

Monday, May 23, 2011

Tutorial Tuesday: Cuttlebug Tapestry by Laura

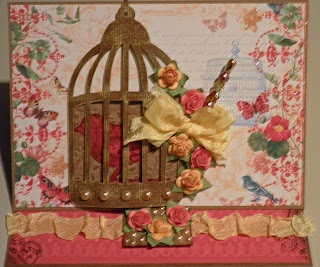
You've seen so many great tutorials this month!! The trick today, is a super easy way to add dimension.....but at the same time, losing it. Um, confused yet?....lol. Well the above card, is made using this technique!!

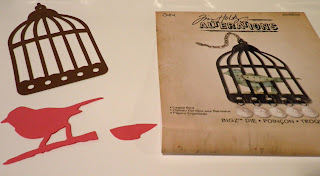
It all started with the Tim Holtz Sizzix Bigz Die: Caged Bird.....

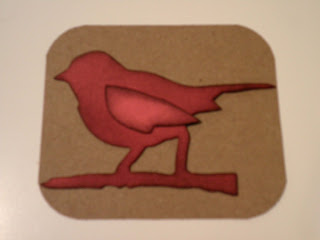
I cut the cage out of the Chocolate Box Core'dnations Cardstock and the bird out of a warm red color from my stash (I used 2 B plates with the die to do this). Next, I sanded the birdcage for a distressed look, and then inked the bird with an ink tool to apply Tim Holtz Distress Ink in Walnut Stain. The bird was placed on a 2 1/2" square of kraft cardstock with rounded corners, which gave me this:

Nice, but then, I taped the bird down with Scor-Tape, and then used a tapestry type of A2 Cuttlebug Folder and ran the entire piece through the Cuttlebug. The result, after being swiped with a bit of the Walnut Stain Ink was this:

The image is almost imbedded into the other cardstock, it looks like it was printed that way. So much more interesting!! I then layered up the card starting with a large 4 5/8" by 6 1/2" kraft base, used some of the gorgeous Mariposa Mat Stack from DCWV, and the finishing touches, pretty Prima Roses, ribbon, a stick pin I made, and Kaiserkraft Pearls.


Here is a close up of the sweet little bird in its finished cage..... (the cage is slightly bowed and attached with foam dots)......

Hope you get a chance to play with your Cuttlebug and try some of the fun techniques you've learned this month.....so many different ideas!! Happy Crafting!!

Available at Cutters Creek:
Tim Holtz Sizzix Bigz Die (Caged Bird)
Core'dinations Cardstock (Chocolate Box)
Scor-Tape
Tim Holtz Distress Ink (Walnut Stain)
Prima Roses (coral and poppyfield)
Kaiserkraft Pearls (Chino)
Cuttlebug Embossing Folders (tapestry)
DCWV Mariposa (mat stack)

Sunday, May 22, 2011

Birthday Card by Deanna M

20110521_10

I recently bought one of the 6 X 6 pads of the Echo Park Paper from Cutter’s Creek. As soon as I received the Summer's Day pad I knew the colors in the patterned paper would work great with my All Wrapped Up Cricut Imagine cartridge. All of the solid colored cuts are flooded with colors from the All Wrapped Up Imagine cartridge.

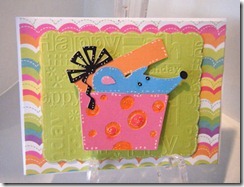
For my card I started with a 9” X 6”Bazzill Simply Smooth white card stock that I scored at 4 1/2” and folded to create a 4 1/2” X 6” card base. I then used a piece of the patterned paper from the Echo Park Summer’s Day paper pad cut the 4 3/4” X 5 7/8”. I really just wanted a very narrow white border on the card. I used my Elegant Edges Cricut Imagine cartridge and using the Oblong feature on the cartridge cut just the shadow of a scalloped rectangle that I flooded with a bright lime green color from the All Wrapped Up cartridge.  I cut this rectangle at 4.4”. Instead of adding stamped sentiment to my card I decided to emboss this green mat with the Happy Birthday cuttlebug A2 embossing folder. I attached this to the card with some foam tape. The mouse image is from the Birthday Bash cartridge and was cut at 3.0” again all flooded with colors from the All Wrapped Up Imagine cartridge. I added some Orange Peel Stickles to the orange dots on the package and some Fruit Punch Stickles to the pink dots on the gift.  I added some white doodle dots with my Sakura Gel Pen. I attached the mouse to the card with an Action Wobble.

The cartridges used on the project are not listed on the Cutter’s Creek store site but Kim may be able to get them for you. The Action Wobble’s are on the site for Pre-order and should be available sometime in June.

Wednesday, May 18, 2011

Melissa's Anime Image

So today, I wanted to show some really simple, lovely cards I made using one of the oriental weave embossing folders from Cuttlebug.  I was trying to think of an image that would compliment the embossing folder.  So I went to my favorite site for anime images; http://www.deviantart.com/

I LOVE this site.  One of my favorite artists is Princess Elemmiriel.  She has the most gorgeous line art to color.  I chose Lady Rose Dragon . . . I can't tell you how many cards and miscellaneous items I have made with this image in particular.  So while I waited for my printer ink to dry - -you can never wait too long - -I embossed a beautiful Jade Green and a Silver Gray paper from Core'dinations Gemstone pack with my oriental weave embossing folder.  I would highly recommend this paper as well!   I centered them on some back cardstock from my stash and started coloring my images.  Bytheway, these cards are the standard A2 size :o)

So I tried to stay with complimentary colors to the papers I chose.  You don't have to use all the colors I did to get the same effect; I just started tossing in colors while I was playing.  I really tried for a dramatic look with the eyes and lined them with a multiliner and with spicas.  What do you think?


Hair: YR000, E50, E21, E11, E97, E99, E37, E29

Skin: E50, E00, E21
Eyes: G20, YG11, YG17
Makeup: R12, R02, R32, Pitch Black Spica, Peach, Clear
Hairband/Trim: Y32, Y35, Y17
Dress: BG10, BG11, BG23, BG13
Flowers: RV02, R12, R02, R32, R35
Shadows: C00, C1


Hair: C00, C1, C2, C4, N4, N6, N9, 0- Blender
Skin: E50, YR000, E00, YR01
Eyes: G20, YG11, YG17
Makeup: R12, RV91, RV93, Pitch Black Spica, Peach, Clear, Silver
Hairband/Trim: N1, N4, N6
Dress: BG10, BG11, BG23, BG13, BG45
Flowers: BV0000, BV00, BV02
Shadows: C00, C1


thanks for looking!!!


Photobucket


Paper: Bazzill Simply Smooth, Core'dination Gemstone,
Embellishments: Liquid Pearls
Stash: Black Cardstock

Monday, May 16, 2011

Tutorial Tuesday With Mindy

Hi, welcome to another tutorial Tuesday featuring Cuttlebug products. Today I want to show you a way to use ink with your cuttlebug folders to get a couple of different looks. Here are the cards I made using this technique.


I used the Rock Princess cricut companion set for my cards. I don't think Kim has these in the store right now, but I'm sure she could get them for you if you asked nicely :)

To make these projects, you will need a Cuttlebug, a Cuttlebug folder, some paper, a brayer, 2 shades of ink, and some baby wipes to clean up with later.


For the larger pale pink card, I stared with the side of the cuttlebug folder that has the cuttlebug writing on it. Get you brayer really inked up and run it all over the inside of the folder. Put your paper in and run it through the Cuttlebug. For this I used pale pink ink. This left all of the embossed areas white and the background areas were all pink. Then I took a black ink pad and rubbed it over the card turning all the raised areas black.

For the smaller card I inked the other side of the folder (without the cuttlebug logo) with hot pink ink. This gives you more of a letter press look and puts the ink down into the debossed areas. As you will see in the video, this does not work well on a folder with words because they will be backwards. I will show the opposite of the light pink skull card in the video. I went over the little high top card with my black ink pad and all the background areas that weren't debossed turned black.

The brayer and the folder can easily be cleaned with baby wipes when you are done. It's a great way to get different colors on your project using only white paper. Be sure to check back this evening for the video.

Howdy Card by Mandie

Howdy, ya'll! Thanks for dropping by the blog today! Since my card has a sort of Western theme I thought I'd get in the spirit of things! LOL! I'd like to share this fun card that I made.


I had so much fun creating this one! I started with a 5x6.5" card blank. I cut a sheet of black card stock to 5"x6.5" to cover the front. Then I used the Echo Park's For the Record 6x6 paper pad and cut my papers down. The floral is 4.75 x 2.5" and the newsprint is 4.75 x 3.75". I stamped out the Cheeky Shooter image using my Memento Tuxedo Black Ink. I didn't have a red marker that matched my papers so I decided to stamp my image on a piece of red and white polka dot paper from the paper pad and cut out the elements that I wanted red (hat, scarf and skirt). Before I glued them down I colored the rest of my image. For the skin tones I used Copics E000, E00 and E11 and the cheeks are R20. I used Bic Mark-It's to color the rest because I'm still trying to build my Copic collection. I used my Quickie Glue Roller Pen to adhere the red paper to my image. Then I trimmed my white sheet to about 3x3.25" and inked the edges with Tim Holtz Walnut Stain Distress Ink. Then I added the black mat to make it pop even more. I also inked all of my papers before adhering them. I decided that I wanted to add a bit more texture to my card and normally I'd grab some ribbon. Since we are talking about Cuttlebug techniques this month I decided to pull out my machine! I used the Gridlock Texture Fades embossing folder and embossed my strip of gold cardstock (I think it's 2" wide). Then I inked up a sponge dauber with more Distress Ink and swirled it over the pattern and the edges. Then I used the alphas from the For the Record Collection (not currently in the store, but I bet if you asked real nice Kim could get it) to spell out "Howdy". I still wanted just a little more... something, so I decided to add some Bling! I pulled out my i-rock and added some black gems under the letters. I am thrilled with how this card turned out!!!

Cutters Creek Shopping List:
Echo Park's For the Record 6x6 paper pad
Cheeky Shooter
Memento Tuxedo Black Ink
Copic Markers: E000, E00,E11 and R20
Quickie Glue Roller Pen
Tim Holtz Walnut Stain Distress Ink
Gridlock Texture Fades
sponge dauber
i-rock Gems

Sunday, May 15, 2011

Graduation Card by Vicki

Spring is here, and that means graduation time!! I have a family member graduating college, from a local regional university, and I know she loves homemade things. I made this card using her school's colors.


I started with a kraft base, half a sheet of 8.5 x 11 inch paper, folded in half with my Scor Pal. Using my Gypsy, I set up and enlarged the mortar board, tassle and sentiment. The black mortar board, and accompanying gold tassle were made using the Everyday Paper Dolls cartridge. The sentiment is from Wild Card. I adjusted the sizing of both of these to fit perfectly on the front of my 4.25 x 5.5 inch space.

Next, I cut a piece of golden yellow card stock to perfectly in the embossing folder Cuttlebug Emboss A2 Border Frills.  I ran this through my Cuddlebug using a standard sandwich. I fired up my iRock tool, and selected a combination of colors that would coordinate well with my design, but still stand out. I picked copper and gold, but I could have easily selected colors from the new iRock glitter Hot Rocks Compact.

Following the directions on the iRock, I adhered one jewel per flower center. As a note, be careful when using this tool, as it is very easy to OVER melt the glue at the bottom of the gem, and that makes your gems an ugly mess that can't be undone!

As I dry fit all my items, the yellow gold I had picked for the floral border was too bright for the rest of the items. So, I pulled out my Ranger Distress Ink in Black Soot and lightly swept the inkpad all over the top of the embossing.

I adhered all the larger pieces to the card using my Glue Glider Pro, and the sentiment's thin letters with the Sakura Quickie Glue Pen.

I am awful at signing my work, so I purchased a stamp set by Image Tree called Handmade that I stamp on the back of my cards, to remind me to put my name on my work.

Graduation cards don't have to be complicated to be appreciated.

Saturday, May 14, 2011

Ecstasy Craft Cards by Kim B

I have had so many birthdays in these last few months, I have depleted my premade stock of birthday cards so I decided to sit down and make some more up.  I had already put these florals together from two different Ecstasy Crafts decoupage sheets and thought I would sit down and use these first.  It doesn't show well in the photo, however on the right card, I used Pearl Glimmer Mist on the flowers to give it a shimmery look.  The sentiments are also from Ecstasy Crafts, as I love hoe easy it is to place a peel off sentiment on my card instead of looking for a stamp.  It sure saves me a lot of extra steps!  These are both pretty plain and simple cards and were very quick and easy to put together, as I usually don't go to a lot of trouble making cards unless it is for a close relative (like mom and dad) who I know save my cards and don't throw them away.  So now I am off to make more cards, so I can get back to scrapbooking!

Products Used:
Cardstock Scraps
Glitter
Butterfly Punch
Ribbon

Wednesday, May 11, 2011

Time To Celebrate with Mindy

It's always great to have some extra birthday cards on hand for when you need them. I try to make at least 1 out of every 4 cards I make a birthday card. I love this Birthday Anya image from The Greeting Farm.


The little cake on her head reminds me of Alice in Wonderland. I colored Anya with my Copic markers. The price on copics will be going up soon , so grab them now while they're still cheap at Cutters Creek. I matted Anya onto to a labels fifteen nestabilitity and then matted it again with a larger size label 15 nestie in a nice dark brown shade. I took two patterns of paper and sewed them onto a dark brown square to serve as the base for the image. I also used one of the patterns for Anya's skirt.

I wanted to keep this card simple and not get too fussy with it. There are levels of birthday cards. The highest level cards (level 4) are the ones that are so fantastic and you spent so much time and money making them that you don't actually want to give them to just anybody. If your neighbor's birthday was the next day, you know you're not giving her that card. This is why when I make birthday cards, I try to make them level 2- cute, but relatively simple. That way I can give it away and not feel like my heart is being ripped out of my chest. When you find out your BFF's birthday is coming up, you don't want to give her a plain card, but since there is so much unembellished space left on the level 2 card, you can add some flowers and bling and take it from drab to fab (otherwise known as level 3).

Cutters Creek Shopping List:

Copic Markers
BG15, BG13, BG11, Y02, Y11, R35, R32 E02, E00, E000, E0000R20,
E35, E33, YR23, YR21, Y11, Y000
Birthday Anya stamp from the Greeting Farm
Spellinbinders labels 15 nestability
Bazzill cardstock


Tuesday, May 10, 2011

Tutorial Tuesday - Faux Leather with Lori

Hi everyone!  It's time for another Tutorial Tuesday, and I'm going to try something a little different today.  I promise that today's technique is really easy, but there are a lot of photos involved.  So, what I'm going to do is post the tutorial here, and post the finished card with all of the other details over on my blog.

Faux leather is an awesome technique, and the look & feel can be totally different depending on the embossing folder and cardstock you choose.  For today, I'm showing you a traditional "country" style.  Here are the supplies you will need to duplicate this technique:
Now, on to the tutorial!  Remember to click on the individual pictures if you need to see things larger.

This step is OPTIONAL!

I first lightly mist both sides of my cardstock with water.  This just seems to make the embossing easier, and makes the embossed areas more crisp.  If you do this step, you can dry it after embossing by quickly heating it with your heat gun on both sides.

Next, place the damp paper inside the embossing folder and run it through your Cuttlebug or other machine.  (After this step, be sure to dry your cardstock if damp.)

This is what the dry embossed cardstock looks like.
Next you need your coordinating brown ink.  It's OK if it's not the exact color; just close.  You will hold the pad in your hand and rub it over the embossed design to darken it.


I went a little dark with my ink to make it easier to see in the photos, but you get the idea.  If you are going to want your leather to look aged, be sure to make your ink coverage uneven, and even leave extra swipes of ink here & there.  I didn't get too worried about perfection on this one (shocking, I know!) because of the country feel I was going for.

OK, now is the time to get together your embossing ink, embossing powder, and craft tray.
Now, you need to press your embossing ink pad over the entire surface of your embossed cardstock.  Make sure you completely cover everything.  (Yes, my ink pad happens to be a Versamark.  Any clear embossing pad, including the Tim Holtz pad in the CC store will work just fine.)  Place the paper in the craft tray and coat it with embossing powder.  Shake off the excess and carefully heat emboss the entire piece.

This image shows the difference in the paper before and after heat embossing.
And here is the finished product!  See, very easy.  Now, what to do with it?  Go check out this post on my blog for one idea; you're sure to come up with more, and we'd love to see them!  You're always welcome to post links to your projects in the comments section here, or send an email to the Cutters Creek Yahoo Group.

Saturday, May 7, 2011

Baby Wall Hanging by Deanna

Baby Wall Hanging
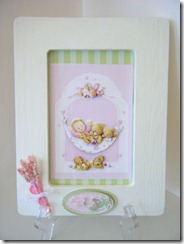
I started my project with an unfinished frame that I picked up at my local craft store for $1. I painted it with some Wicker White acrylic paint and then sprayed it with some Honey Dew Mist Glimmer Mist. After I sprayed on the glimmer mist I rubbed it with a paper towel like you would stain. I did this twice. It doesn’t show up well in the photo but it gave the frame a pretty light pale green color and the gold glimmer shows up in the light and makes the frame just shimmer.
For the picture I put inside the frame I used a Reddy Card image from Baby and Birth Ecstasy Craft .  These are so simple to use and look wonderful when you get done.  All of the images punch out and are numbered in the order you layer them. For my image I layered the images using the Joy Foam Pads between the layers to give that 3d effect.
I covered the chip board backing for the frame with some two toned green striped paper and mounted my  picture to the chipboard piece with my ATG gun. I used a cut from the Cricut Imagine Nursery Tails cartridge. For the flowers, I used some Flower Soft Wires that I covered with the Flower Soft Adhesive and then I sprinkled the adhesive covered wires with the Sweet Pea Flower Soft turning the wires as I sprinkled the  Flower Soft over them to ensure that all sides were coating. I used a 2” square of pink tissue paper to create a cone shape to put the flowers in, tied a narrow sheer white ribbon around the cone and glued it to the frame with the Flower Soft Adhesive. The Ecstasy Craft items are a great way to make a quick project that looks fantastic. I hope you give them a try.

Thursday, May 5, 2011

Paper Pieced Frame by Laura C

This project would be a welcome addition to any mom's picture gallery! It's a paper pieced picture frame, and a great quick project.... and yes you still have time to make it for Mom's Day!!

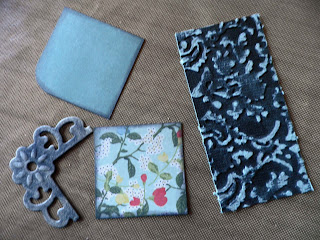
Start with a coordinating paper collection like the 6x6 paper pad Echo Park (For The Record) and add some coordinating cardstock from Core d'nations (Black Magic Hocus Pocus used here....the soft green blue to emboss a piece of the Core d'nations (cut to the size of the folder). The raised area is then sanded to reveal the color beneath. Next I cut 1 & 3/8" squares of one of the patterned and one of the solid colors from the Echo Park paper. I cut pieces of the embossed brocade to fit once I pieced my frame together. The edges on my frame are rounded.....so I used a corner rounder on those four pieces. I also used the new Floral Doily Accents Spellbinders dies to make corners out of black cardstock. The paper pieces were inked with Black Soot Distress Ink, and I used a gold ink on the Doily Accents to make them look like metal. See below:


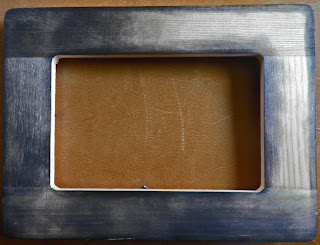
Next I prepped my wooden frame by rubbing it with Black Soot ink to cover anything that might show between my paper "tiles" (I buffed off excess ink with a paper towel). See below:


To finish, each tile was attached with Scor Tape, and once they were all adhered, I sanded around the edges to make them look like they are a part of the frame. I went back and re-inked the edges with the Black Soot (but it looks cool just sanded too!!). A few embellishments from my stash in the bottom right corner (used my Tissue Tape dispenser!) and peeking out from behind is another die from the Floral Doily set. I used regular adhesive to attach the corners, and pic matted in black finishes it off.

A great gift for Mom or anyone on your gift list!! Or, if you don't know what to get Dad.....make one with tiles made only out of the brocade....it looks like tooled leather (you can even shine it up with glossy accents!).

Happy Crafting!

Available at Cutters Creek:

Echo Park 6x6 For the Record paper pad
Core d'nations Cardstock (Black Magic Hocus Pocus)
Spellbinders Dies (Floral Doily)
Tim Holtz Distress Ink (Black Soot)
Ideology Tissue Tape Dispenser
Cuttlebug A2 Embossing Folders (Brocade)
Scor Tape

Tuesday, May 3, 2011

Embossing With A Twist by Chris

This month’s tutorials by the Design Team will focus around the Cuttlebug. Join us as we explore different ways you can use your tool and discover its power!

Embossing with the Cuttlebug is a piece of cake—cut paper, insert into embossing folder, set up your sandwich, roll it through the machine, and voila—an embossed piece of cardstock. But what if you want part of the cardstock to stay blank or flat so you can stamp a sentiment or image or highlight an embellishment? It’s easy and just takes a bit of prep work, but once that’s done, you’ll have templates ready for the next time.

You can cut the templates either with your Cuttlebug using your Spellbinders Nestabilities (or with SCAL or MTC) and chipboard (or scrap cereal boxes). To start decide what size embossing folder you will be using. For this tutorial I used a 5x7 folder (Oriental Weave) and a 4.25x5.5 folder (Divine Swirls). You will have to experiment with your Cuttlebug to determine how many layers of chipboard you will need to stack for the embossing; it will depend on their thickness. For my Cuttlebug I cut three cereal box sides at 5x7. Decide what shape you want “open” within the embossing pattern—I made a set of a circle, square, and oval. Line up where you want the “hole” to be in the embossing. (It is important to measure carefully here as you will cut the oval from the next two rectangles and want them to be in exactly the same place. If you are using SCAL or MTC, you should be good to go once you design the rectangle as long as you tape down the cardstock so it doesn’t move.) Using removable tape, I taped my one of my Nestability Classic Small Ovals down on one piece of cardboard and then layered my sandwich: A plate, thin adaptor plate, my cardboard with attached oval—flip the cardboard so the oval is on the bottom side and its cut side is up—and then my two B plates, and ran it through. Repeat this two more times. You now have three rectangles with an open shape. Glue these together and set aside to dry. I used Scotch Quick Dry Adhesive. I repeated these steps using a Square Nestability Die and a Circle Nestability Die.  Now you have your templates.

I then cut a 5x7 piece of cardstock and used my template to determine where to stamp my image. I put small pencil dots to indicate the corners of the open square and then stamped using Black Memento Ink and colored using my Copics. Okay so here comes the magic. Put your card stock into the embossing folder (colored side up and name side of folder up). Put your template on top of the folder and make sure the opening lines up with your design. To keep it from sliding I again tape, securing the template to the folder. Create your sandwich—A plate, Cuttlebug embossing folder with attached template, and plate B—and roll through. If it is not tight enough, shim with some thin pieces of cardstock. When you remove the template and open your folder your cardstock should be embossed all around your image. (Note: sometimes I do my image after embossing.) I do trim any unembossed cardstock from around the piece using my ScorPal cutting pad and finger trimmer.


It’s now just a matter of finishing your card. Here are two I did. One is simply enhanced with a Cutters Creek Gardenia glued down with some Inkssentials Glossy Accents Precision Tip on a blue mat with its edges inked—Tumbled Glass. The other is matted on green cardstock inked with Forest Moss and trimmed with Flower Soft Silver Peel Off Stickers , a ribbon, ribbon slide (cut out of some silver packing foil), a button, and bakery twine. Copics: Y17, Y15, Y0000, B24, YG23, YG61, E25, YR18, and YG00. Finally I added a few dots of white ink to the flower centers.
Related Posts with Thumbnails