Hi and welcome to Tutorial Tuesday a day late. I'm sure all of you have heard people talking about Smash books. They are the latest thing in scrapbooking and allow you to have fun and not stress about your scrapbooks. The pages don't need to be perfect, just have fun. I have made this brief video to try and explain some of the smash products and hopefully inspire you to smash your memories into a journal.
Wednesday, November 30, 2011
Sunday, November 27, 2011
Simple Christmas Ornaments by Deanna M


First, if I had to do the candy cane again, I think I would paint it white instead of red. For the candy cane I used some Candy Cane stickles to the ribbon. I used the Christmas Red stickles to add some red stripes and used the Frosted Lace stickles for the white stripes. This was a hard one to get a good picture of because of all the sparkle. I added the twine to hang this ornament as well.

Items available at Cutters Creek:
Flower Soft Glue
Vintage Christmas Flower Soft
Pine Ultra Fine Flower Soft
Pearls
Stickles
Peachy Keen Snow Cuties Stamp
Blush Copic Marker
Crop-a-Dile
Twine
Friday, November 25, 2011
Asian Themed Birthday Card by Chris
I decided not only make a gatefold card, which I haven’t done in a while, but also, to use my neglected Copic Markers. I had a free digi image already printed and some paper that had an Asian flavor to it—a perfect match.

I started with a 5.5 x 12 inch piece of plum Bazzill Card Stock and scored it at 2, 4, 8, and 10 inches with my Scor-Pal and creased the folds. On the front panels I layered black Card Stock (1 ¾ x 5 ¼ inches) and decorative Card Stock (1 ½ x 5 inches). Inside I put another piece of decorative Card Stock (3 7/8 x 5 7/16 inches). All the decorative panels were edged with Tim Holtz Milled Lavender Distress Ink.

I colored the geisha; then hand trimmed her and mounted her with my Zig Glue Pen onto some black Card Stock, which I also hand-trimmed with my Cutter Bee Scissors. She was mounted with Pop Up Glue Dots on a two-layer panel. The black piece is 3 1/8x 4 ¼ and the plum piece is 4 1/8 x 3. Using my ATG, I glued one half of the panel she was on and set it on the left front of the card. To finish the card I added some red Twinkle Jewels (Skittles) on the front panel, and used one of my Parisian Accents from the Spellbinders Shapeabilities set to cut a black Card Stock label for inside. The sentiment was printed on my computer using a free font.
The geisha girl is colored with:
Hair: C5, C7, C9
Skin: E00, E000, E50
Teapot: C1, C2, C3
Kimono & hair flower: R29, R39, R46
Flowers and butterflies: YR21, YR23, BG72, G82, YG61
Socks & Cat: C1
Sandals: E13, E35
Shadow: BG000
Thursday, November 24, 2011
Happy Thanksgiving From Us To You!

While cleaning and reorganizing, I came upon this photo of myself and some of the Cutters Creek Design Team Members at CHA Summer 2011. Maybe this would have been better if I found it at Halloween……………lol! From left to right: Laura C, Kim B. Mandie W, and Lori B. We were goofing around a bit and let our hair down! Don’t you just love Laura’s pink hair?
I am thankful for all of you wonderful customers and crafters that come to the Cutters Creek Design Team blog and check out our projects each week. Thank you!

Tuesday, November 22, 2011
Mandie's Tim Holtz Inspired Tags
I will admit, I look forward to seeing what Tim Holtz comes up with each year for the Tags of Christmas Past. So this year, before he begins, I decided to review some of the previous years tags for some inspiration and here are a few of the tags I came up with (please excuse the iPhone photos)

For this first tag I used Walnut Nut Stain, Frayed Burlap and Gathered Twigs Distress Inks. I used the direct to paper method and just kept adding ink, strait from the pad onto the paper, until I was happy. Then I stamped my deer onto Kraft Cardstock and cut it out. I coated it with my Rock Candy Crackle Paint for a bit of bling. Finally I tore some strips of natural denim and stamped the music notes. I stuck them down with some Scor Tape and attached the deer with some foam adhesive. I added a cool strip of fabric (from the remnants section at a fabric store) to the top and called it done!
 For my "Autumn Splendor" tag, I used Festive Berries, Ripe Persimmon and Peeled Paint Distress Inks with my Blending Tool to create the background. Then I used a set of leaf stamps and stamped my images with Distress Inks. On a piece of scrap cardstock I stamped "Autumn Splendor" with Embossing Ink and embossed it with Gold Embossing Powder and my Heat Tool. Then I blended a bit of ink over to top of it. I attached my phrase with some foam adhesive ad added an acrylic acorn.

For this tag I used only my Winter Seasonal Distress Inks for color. I added the Festive Berries and Evergreen Bough to the background. Then I spritzed it all over with my Mini Mister and crumpled the tag. I dried it a bit with my Heat Tool while it was still crumpled up and then carefully smoothed it a little. I used the Iced Spruce and ran it over the top of the tag, catching the raised wrinkles. Then I used my hands to smooth it a bit more. On some scrap paper I stamped my Santa and my "Merry Christmas". I inked Santa with the Evergreen Bough and then coated him with the Rock Candy Crackle Paint. When he dried, I added the Festive Berries to the rest of the piece. I tore it out and then matted it on a piece of torn Kraft Cardstock. I also inked my Merry Christmas with the Festive Berries and Iced Spruce. Then I attached both pieces with foam adhesive. I inked up my piece of mesh ribbon with Festive Berries too!
 My last tag is my favorite. I used Broken China, Evergreen Bough and Seedless Preserves to ink up my background. Using the same colors, I stamped snowflakes all over the background. Then I used some Stickles and smeared them across the background with my finger for a bit of sparkle. I stamped my deer with Evergreen Bough, coated it with Rock Candy Crackle Paint and fussy cut it and attached it with foam adhesive. I had the "Season's Greetings" epoxy sticker in my stash and added some tinsel ribbon.
For clean up when you are done playing with your inks, I HIGHLY recommend the Inkssentials Craft Scrubbie! It get all of that ink off of your fingers!

For this first tag I used Walnut Nut Stain, Frayed Burlap and Gathered Twigs Distress Inks. I used the direct to paper method and just kept adding ink, strait from the pad onto the paper, until I was happy. Then I stamped my deer onto Kraft Cardstock and cut it out. I coated it with my Rock Candy Crackle Paint for a bit of bling. Finally I tore some strips of natural denim and stamped the music notes. I stuck them down with some Scor Tape and attached the deer with some foam adhesive. I added a cool strip of fabric (from the remnants section at a fabric store) to the top and called it done!
 For my "Autumn Splendor" tag, I used Festive Berries, Ripe Persimmon and Peeled Paint Distress Inks with my Blending Tool to create the background. Then I used a set of leaf stamps and stamped my images with Distress Inks. On a piece of scrap cardstock I stamped "Autumn Splendor" with Embossing Ink and embossed it with Gold Embossing Powder and my Heat Tool. Then I blended a bit of ink over to top of it. I attached my phrase with some foam adhesive ad added an acrylic acorn.
For this tag I used only my Winter Seasonal Distress Inks for color. I added the Festive Berries and Evergreen Bough to the background. Then I spritzed it all over with my Mini Mister and crumpled the tag. I dried it a bit with my Heat Tool while it was still crumpled up and then carefully smoothed it a little. I used the Iced Spruce and ran it over the top of the tag, catching the raised wrinkles. Then I used my hands to smooth it a bit more. On some scrap paper I stamped my Santa and my "Merry Christmas". I inked Santa with the Evergreen Bough and then coated him with the Rock Candy Crackle Paint. When he dried, I added the Festive Berries to the rest of the piece. I tore it out and then matted it on a piece of torn Kraft Cardstock. I also inked my Merry Christmas with the Festive Berries and Iced Spruce. Then I attached both pieces with foam adhesive. I inked up my piece of mesh ribbon with Festive Berries too!
 My last tag is my favorite. I used Broken China, Evergreen Bough and Seedless Preserves to ink up my background. Using the same colors, I stamped snowflakes all over the background. Then I used some Stickles and smeared them across the background with my finger for a bit of sparkle. I stamped my deer with Evergreen Bough, coated it with Rock Candy Crackle Paint and fussy cut it and attached it with foam adhesive. I had the "Season's Greetings" epoxy sticker in my stash and added some tinsel ribbon.
For clean up when you are done playing with your inks, I HIGHLY recommend the Inkssentials Craft Scrubbie! It get all of that ink off of your fingers!
Monday, November 21, 2011
A Beautiful Autumn Card by Chris
I am still working on ways to use and reuse many of my cool items from Kim. One that kept looking at was the Cuttlebug Owl Flourish Embossing Folder, which I just didn’t want to do as an embossed card front again and I wanted to try out a new technique I learned, but what to do, to merge them?
I started with a center step card. The base was 11 by 5.5 inches and I had some cute paper that looks like tree bark. I decided to use my Scor-Pal and I cut both sides one inch in from the edges and from 1-inch mark to about 6.5 inches. Both sides were then scored between the cut line and the edge at 1 inch (mountain), 2 inch (valley), and 6.5 inches (mountain) and the center piece was scored at 5.5 inches (mountain). I then folded them to make my card shape.


I used my Cricut cartridge Stretch Your Imagination (check with Kim if she can get you this one) and cut the squirrel and nuts with the shift key at 4 inches. I made a shadow piece and using Pop Up Dots raised the acorns up slightly. I used my ATG to glue it down to one of the side steps. I then took my Owl Flourish and embossed some Core’dinations Cardstock, sandpapered the raised image, and fussy cut the owl and flourish out of the paper. I glued this right along the top of the lower fold in the center and added some Cinnamon Stickles for the eyes. I then cut the word "Autumn" from the Stretch Your Imagination cart at 5 inches and rubbed the edges with some Walnut Stain Distress Ink. The shadow is cut from Chestnut American Crafts Glitter Cardstock. I did a multi-cut of 2 to get this out and inked the cut edges with Walnut Stain. I used my Zig Glue Pen to attach the word to the shadow and then pop dotted the shadow up along the base.
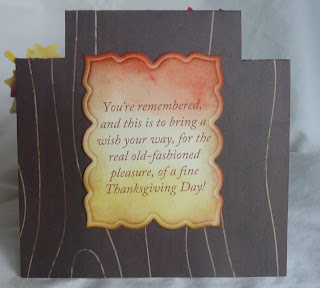
The card needed a sentiment and I decided to use my Spellbinders Labels Twenty Three, printed the sentiment with my computer and inked the edges with Vintage Photo, Mustard Seed, and Ripe Persimmon Distress Inks and glued it to the back of the card.

The card still needed some pizzazz. Taking a fall leaf stamp, a Clear Tim Holtz Distress Ink Pad, my Embossing Magic pad, and some white embossing powder I stamped and embossed the image several times on cream cardstock. I then used several of my Distress Inks (Dried Marigold, Mustard Seed, the Limited Edition of the Fall Colors, Walnut Stain, Spiced Marmalade, and Crushed Olive) and applied them directly to the paper smearing them alongside of each other over the leaves. Then I took my Tattered Angels Dazzling Diamonds and sprayed the heck out of each of the leaves. It looks a mess but be patient. Set them aside and let them dry—totally dry, no rushing. You get a blended, shiny and crisp texture to the cardstock when it dries. (It works terrifically on watercolor paper too.) When the leaves were totally dry, I fussy cut them out and used pop dots to arrange them on the card. I do so hope you can see the shine in the pictures, but if not—take my word for it, it’s great!
I’m thinking that this might look lovely as part of a table centerpiece rather than mailing it out. What do you think?
I started with a center step card. The base was 11 by 5.5 inches and I had some cute paper that looks like tree bark. I decided to use my Scor-Pal and I cut both sides one inch in from the edges and from 1-inch mark to about 6.5 inches. Both sides were then scored between the cut line and the edge at 1 inch (mountain), 2 inch (valley), and 6.5 inches (mountain) and the center piece was scored at 5.5 inches (mountain). I then folded them to make my card shape.

I used my Cricut cartridge Stretch Your Imagination (check with Kim if she can get you this one) and cut the squirrel and nuts with the shift key at 4 inches. I made a shadow piece and using Pop Up Dots raised the acorns up slightly. I used my ATG to glue it down to one of the side steps. I then took my Owl Flourish and embossed some Core’dinations Cardstock, sandpapered the raised image, and fussy cut the owl and flourish out of the paper. I glued this right along the top of the lower fold in the center and added some Cinnamon Stickles for the eyes. I then cut the word "Autumn" from the Stretch Your Imagination cart at 5 inches and rubbed the edges with some Walnut Stain Distress Ink. The shadow is cut from Chestnut American Crafts Glitter Cardstock. I did a multi-cut of 2 to get this out and inked the cut edges with Walnut Stain. I used my Zig Glue Pen to attach the word to the shadow and then pop dotted the shadow up along the base.

The card needed a sentiment and I decided to use my Spellbinders Labels Twenty Three, printed the sentiment with my computer and inked the edges with Vintage Photo, Mustard Seed, and Ripe Persimmon Distress Inks and glued it to the back of the card.

The card still needed some pizzazz. Taking a fall leaf stamp, a Clear Tim Holtz Distress Ink Pad, my Embossing Magic pad, and some white embossing powder I stamped and embossed the image several times on cream cardstock. I then used several of my Distress Inks (Dried Marigold, Mustard Seed, the Limited Edition of the Fall Colors, Walnut Stain, Spiced Marmalade, and Crushed Olive) and applied them directly to the paper smearing them alongside of each other over the leaves. Then I took my Tattered Angels Dazzling Diamonds and sprayed the heck out of each of the leaves. It looks a mess but be patient. Set them aside and let them dry—totally dry, no rushing. You get a blended, shiny and crisp texture to the cardstock when it dries. (It works terrifically on watercolor paper too.) When the leaves were totally dry, I fussy cut them out and used pop dots to arrange them on the card. I do so hope you can see the shine in the pictures, but if not—take my word for it, it’s great!
I’m thinking that this might look lovely as part of a table centerpiece rather than mailing it out. What do you think?
Saturday, November 19, 2011
It's Leftover Time....
 Well, it's time for the end to our series, on the
amazing Echo Park paper packs! I made the
card above with a kraft cardstock base, the
chipboard santa, "tis the season" sentiment,
and button, the "north pole" sticker, and the
"nice list" is a journal box. Some twine and
some Want2Scrap pearls, and it's a quick,
cute card for the holidays.
Then, I just still had so many goodies, I
thought I'd make some tags too.....
 I used a few stamps from my stash, the tags are
inked with Distress Ink in Walnut Stain, the
Happy Holidays is from the journal box sheet,
the noel and poinsettia are from the sticker
sheet. A pretty punched edge on red cardstock,
some red pearls and bling, and yes, my fav, a
bit of twine finish them off.
And in honor of the upcoming Thanksgiving
holiday, I thought it was only fair that I
share my leftovers.....


This week you saw 11 cards and 3 tags....and there is still
this much of the papers and stickers left....to make more
cards, to scrap with....so many options!
Hope you enjoyed this week, I sure did.....but time to
use up my leftovers.....to finish making my holiday
cards!!
Stop by Cutter's Creek to find:
Echo Park paper packs
Echo Park Chipboard
Want2Scrap Bling
Distress Inks
Doodlebug Twine
Friday, November 18, 2011
Are We There Yet? EP Cards day 5!
 Are you tired of me yet??.....lol. I hope not!!
Today these are really two of my fav cards.
And still so easy to make! Both cards are just
a layer of pretty paper from yes, again, the
Echo Park Season's Greetings collection
(the 2nd card, I roughed up the edges a bit),
on a base of kraft cardstock. Both cards have a
second layer of paper, corners rounded, inked
with Vintage Photo ink (the top card, kraft
cardstock, the bottom card, the gorgeous stripe).
For the bottom card....that center piece is just one
of the journal boxes in the collection....it's so
pretty on it's own! A little twine, the wreath
and sentiment from the sticker sheet in the
collection, a bit of glossy accents on the berries
on the journal card and wreath, and it's done.
The finished project is here:

Now the top card....yep, another journal box....
those things, truly make card making a snap!!!
I added crinkle ribbon (I pleat that using score tape)
and bow, and topped it with a snowflake sticker,
the large chipboard snowflake, and a chipboard
button from the collection as well, tied up with twine.
A few of the red Want2Scrap Pearls scattered,
the "happy holidays" sentiment from the alpha
sticker sheet in the kit.....and it's also complete!
Hope you are inspired to get in some crafty fun
time this weekend!
Let me know what you think of the series....
would you like to see something like this again
with a different collection? Was it helpful?
All your cardmaking needs are available at Cutter's Creek:
Echo Park 12x12 paper collections (Season's Greetings)
Echo Park chipboard
Distress Ink (Vintage Photo)
Want2Scrap Bling
Glossy Accents
Ode to Cardmaking Joy.....
 Cardmaking joy, is buying one AWESOME kit from
Echo Park....yes, that wonderful Season's Greetings
Kit, adding a fav punch, a little bling, a little ink, and
making quick, beautiful cards!!
The first card today, used the gorgeous burgundy
swirl paper, on a black cardstock base. Then just
a 1&1/2" strip of black punched with a lacy punch,
the black polka dot banner strip from the border
sheet, the JOY and tree stickers that are in the kit,
the tree layered on the burgundy swirl and then
black cardstock, frames it just right, and then a bit
of Black Soot Distress Ink around the edges, and
a bit of bling, and it's a finished, simple, but very
elegant card!
Next up is this "picture postcard":

Love that swirly background paper, and the pretty
tree stickers from the sticker set! I ripped a piece
of brown paper, and a piece of kraft paper that I then
inked with Vintage Photo Distress ink. The stamp
sticker on a square of brown cardstock, and then
placed in the upper right corner....and how simple
is that??
Hope you enjoyed today's cards.....I've got to say....
I think I saved the best for last....so come back
tomorrow and Saturday, and see what you think!
And remember, I have a giveaway on my blog HERE,
so please stop by to comment....you can't win unless
you comment!!
And while you patiently wait for tomorrow....check
out Cutter's Creek for all your cardmaking/crafting
needs!!
Available at Cutter's Creek:
Echo Park Season's Greetings 12x12 kit
Want2Scrap bling
Distress Inks (Black Soot & Vintage Photo)
Thursday, November 17, 2011
Frosty Fun....EP Cards Day 3
 Wow, day 3 already!! And here are 2 more simple card
ideas!! And both use the EP Season's Greetings 12x12
paper, the EP chipboard, twine, and Want2Scrap bling.
The card above, used a kraft cardstock base, the
stripe and burgundy swirl papers, and a strip of
kraft cardstock punched with a pretty lacy punch.
The "Merry" and the "Christmas" came from the
journal box sheet in the EP set, the 2 ornaments
are from the chipboard set. The bling and twine
bows, add the finishing touch. All papers were
inked with Vintage Photo Distress Ink.
The next card, as cute as it is, is just so simple!!

A soft aqua blue base, layered with the soft swirl
background paper, the stripe is layered on that.
The piece with the holly and the aqua border...
it's a journal box!! It's layered onto a piece of
kraft cardstock, and then the aqua again. Frosty
is a sticker, and the "Seasons Greetings" is a
sticker....I layered it on kraft cardstock cut into
a banner. A punched border from the red swirl
paper, and some Want2Scrap red pearls finish
this one off.
Wow, just gotta say....hope you are seeing how
easy is it to grab one of these Echo Park kits,
and really run with it.....you add a few minimal
embellishments, and get major impact!!
Remember, Kim has all these goodies at
Cutter's Creek:
Echo Park paper collections (Season's Greetings)
Echo Park chipboard (Season's Greetings)
Want2Scrap bling and pearls (red pearls, silver swirls)
Doodlebug Twine
Distress Ink (Vintage Photo)
Tuesday, November 15, 2011
Holiday Cards....Day 2

Today's cards.....more simple easy designs, and
again, all from that same awesome paper set...
the Echo Park (EP) Season's Greetings collection.
These 2 cards are a similar design....but have a very
different look.
The card above, starts with a kraft base. The strip
on the left, with the poinsettias, is from the border
strip paper in the set....I just love the variety on
that sheet for making cards!! The punched edge
adds a bit of elegance to the card, along with the
pretty bling swirl from Want2Scrap. I used the
"Merry Christmas" sentiment, from the EP
Season's Greetings chipboard.
I did "fussy cut" the large poinsettia that is
under the word "Christmas" from the same
poinsettia paper the base piece is cut from.
The papers were inked with Vintage Photo
Distress Ink.
The next card:
 starts with a red cardstock base, I added the green/dot
paper, a rectangle of red in the middle, and then layered
on another piece of the border strip....that pretty holly,
then simply added the Season's Greetings sticker from
the set, a bit of Doodlebug Twine wrapped on the left
side, and Want2Scrap red pearls finish the card off, as
yummy berries, and an accent on the upper left corner.
Hope you enjoy today's cards....and maybe get a little
inspiration to make your own cards this year! It can
be a fun, quick project, and friends and family
will appreciate the special touch!!
Come back tomorrow to see what's in store....and
make sure to leave a comment here AND on my
blog HERE for a chance to win some blog candy
this week!!
Shop Cutter's Creek for all your cardmaking needs!!
Echo Park Season's Greetings 12x12 paper
Echo Park Season's Greetings chipboard
Distress Inks (Vintage Photo)
Want2Scrap Bling (Pearls and Swirls)
Doodlebug Twine
Monday, November 14, 2011
Tutorial Tuesday....and a week of "leftovers".....by Laura C

It never fails, every year I say I'm making my own
holiday cards....and every year....it's Thanksgiving
before I know it.....and then December is a blur.....
and yep.....I end up sending store bought cards!
But not this time! And the difference is a "new" idea
that I've started using. These beautiful collection
packs from Echo Park are AMAZING. Not only do
you get beautiful papers, but also a sheet of journal
boxes, a sheet of border strips, and TWO sticker
sheets....with alphas, and so many great shapes
and designs to play with!
So I am going to show, this entire week, how to
take ONE paper pack, a few embellishments,
(twine, bling, buttons, ribbon, and chipboard)
and make quick and easy, beautiful cards!!
This works great for your holiday cards, but
this can work for ANY of the paper packs, for
ANY type of cards!!
The first card is this beauty:
 Talk about quick and easy!! All cards are the 5&1/2"
by 4&1/4" size. I just made a kraft cardstock base,
and cut 2 of the border strips to fit (5&1/2"), cut a
strip of black cardstock, the "banner" is cut from one
of the papers in the pack, and the "Merry Christmas"
is on the border paper as well. I used the Echo Park
chipboard embellishments (the ornament and the
star "button"), pearls, a button from my stash, and
a bit of twine to finish this card off.
Next card:
 Even more simple....this uses a red cardstock base,
layered with black cardstock (trimmed to see a thin
frame of red), and the poinsettia paper on that (inked
with Black Soot Distress Ink), then one of the journal
boxes, framed on the red cardstock. The "tis" is from
the alpha sheet, "The Season" is from the sticker sheet
(foam dotted) and the corners and poinsettia in the
upper left corner, are from that same chipboard sheet.
And just that easy....2 complete cards....but cards
definitely worthy of giving!!
Stay tuned all week long for more card ideas....all
made with the same Echo Park Season's Greetings
paper pack, the one Echo Park Season's Greetings
chipboard set, Doodlebug Twine, and a little bling!
We can get that task checked off of your holiday
to do list!!
Available at Cutter's Creek:
Echo Park Season's Greetings Collection
Echo Park Season's Greetings Chipboard
Doodlebug Twine
Want 2 Scrap (bling and pearls)
Black Soot Distress Ink
Saturday, November 12, 2011
Honeypop Cards
Honeypop paper is one of my favorite new products. I love pop up cards and this stuff makes some great ones. Honeypop paper is honeycomb tissue paper. There are stamps that are made to coordinate with the honeypop paper and they are adorable. For my first card I chose the stamp set Cupcake Birdy.
![bird outside [1280x768]](https://blogger.googleusercontent.com/img/b/R29vZ2xl/AVvXsEgU5rtOYh67tWV41fQBSrXnxtm38Rj6i4vyYF8lCR_D5GZcm0TYzGPyTV6Pu3swJvJI8d1_NY6vbdIQOaf2arGdfvLAJEexV2y0hPCgOtbuvLev2QNKvCdb11cb8Nle6jal5rTQ2cobj2Y/s1600-h/bird%252520outside%252520%25255B1280x768%25255D%25255B2%25255D.jpg "bird outside [1280x768]")
The paper for this card is from the Echo Park. I stamped the little bird with the cherry in its mouth and colored it with my copic markers. The Happy Birthday sentiment is also from the Cupcake Birdy set. Here is a picture of the inside of the card.
![bird inside [1280x768]](https://blogger.googleusercontent.com/img/b/R29vZ2xl/AVvXsEhS5NDT4iyJAUUXKaxujj-vaK_uFtadopssMLkS-LgXsdMtweIyedK_hn3vAHBk0xOn3IiwoW5NQw5MQ2XlFW4rUOdmLRs0RGXdPjTEBo47MdTDDz6BQJDtnw1_ZG-bbVeG9nAj5V69d8c/s1600-h/bird%252520inside%252520%25255B1280x768%25255D%25255B2%25255D.jpg "bird inside [1280x768]")
When you open the card, the cupcake spreads out. The stamp set also comes with a stamp of half a cupcake to stamp on the honeypop paper. The paper has a black arrow on it to show you which direction to stamp your image. 
I love this technique so much, I wanted to try a Christmas card with it. For the background paper on this card I printed one of the paper patterns from the Santa’s Village imagine cartridge on some kraft cardstock. This gives it a vintage feel which is perfect for the images on this cartridge. I added a poinsettia and an image of Santa checking his list.
![santa outsidde [1280x768]](https://blogger.googleusercontent.com/img/b/R29vZ2xl/AVvXsEgknHS90WkHwSA6PWL6qwO8hcM8xGboUqZ1f3tqRhSEQkjyyHwGbkv4I6RqXnN0HFla3CMVe6TgyVyiI7CD7_jT7gaBgWyxS0WDmUbNuW8_QmC1ImU5_i9bwuMfiodhRhh6cZhd_3XDbYw/s1600-h/santa%252520outsidde%252520%25255B1280x768%25255D%25255B2%25255D.jpg "santa outsidde [1280x768]")
I had a pack of green honeypop paper and thought I would try to make my own Christmas tree. I drew half a Christmas tree on the paper and cut it out. It worked!
![santa inside [1280x768]](https://blogger.googleusercontent.com/img/b/R29vZ2xl/AVvXsEj1HNS5FvTyBHpacv846KEVGKGi23rQCnlrzCMxMeDhfqAhumlKZGVTjchhKs8D4Pi4or1VGloTvo7W_KGeaAnbkB-LWB03k2XQjwlx5oS3siyNMoV221XHFvlxS0uy9DYBGQNwpNjW00s/s1600-h/santa%252520inside%252520%25255B1280x768%25255D%25255B2%25255D.jpg "santa inside [1280x768]")
I had so much fun with these projects. The best tip I have for using the honeypop paper is to have some good scissors. The paper is pretty thick.
Cutters Creek Shopping List
Thursday, November 10, 2011
Teacher Gift with a Sense of Humor from Lori
I will be the first to admit that this is not an appropriate gift for every teacher - heck, probably not even most teachers! But you know the one: the teacher with a great sense of humor, who's probably been around the block a few times... she's the one who will appreciate this.
 (I'm thinking I may keep this one for myself and use it for PTO meeting notes!) I think these papers from Graphic 45 with the oversized images are perfect for covering composition notebooks. After trimming down the main image to fit, I added a "ruler" strip along the binding edge.
 I find this portion of the image pretty hilarious, so I wanted to highlight it. I used an old paper tole technique, and cut around a portion of the image then adhered it using the Kool Tak clear 3-D foam squares.

Finally, I wanted to add a fun touch and cover some extra images on the main paper. I cut out some of the flash card images from a paper, and adhered three of them directly to the paper below. I wrapped the remaining two with Doodlebug Doodle Twine and popped them up using the 3D clear foam squares.
I can't wait to make another of these with the Christmas papers to keep me organized through all the shopping, baking, and entertaining coming up!
Supply List:
- ABC Primer 12x12 paper pad, Graphic 45
- 3D Clear Foam Pads, Kool Tak
- Cutter Bee Scissors, EK Succcess
- Advanced Tape Glider, 3M
- Doodle Twine Assortment in Primary, Doodlebug Design
- Composition Notebook
Wednesday, November 9, 2011
Thanksgiving Place Cards by Chris
I just love my Cricut Cartridge Paper Doll Dress Up and I know you have seen me use it before. I’m sure Kim could help you get this cartridge if you don’t already have it. This time I made place cards for my Thanksgiving Table. I purchased these small, galvanized pails over a year ago and decided it was time to use them. I covered them with Bazzil paper and then wrapped the rims with yarn and the Doodle Twine baker’s twine. I started by using my hot glue gun to attach them, but was all thumbs with it and switched to using Glossy Accents. That worked like a charm and left no unsightly lumps or bumps (LOL).

Using Bazzill Simply Smooth Ivory Cardstock, I cut the paper dolls at 3 inches. The first few I cut, I forgot to select Blackout, so the faces cut; once I realized what I had done, I switched to blackout because I wanted to use my Peachy Keen Face Stamps. I then tinted the faces, hands, and legs with Tattered Rose Distress Ink, stamped the faces and after which I cut out the pilgrim boy and girl outfits from scraps in my stash. I used my Zig Glue Pen to glue the outfits together and adhere to the paper dolls and then adhered them to the pail using Glue Dots Pop Up Dots. I added a few accessories like a bow and arrow, blunderbuss, pies, turkeys, and more, using the function keys and keeping the size at 3 inches (Make sure the "Real Dial Size" key is off). To brighten them up a bit I grabbed my Black Diamond and Golden Rod Stickles — just can’t seem to do a project without Stickles — and added a belt to the boys and buckles to all.

Then I turned to SCAL - Sure Cuts A Lot to create the Pennants in the shape library and I just adjusted the nodes on one end to be straight and lengthened the pennant (be sure to take off the “keep proportions” key). I set my Cricut to outline the pennants with my Cricut Color Inks and then wrote the names in each one, and finally cut them out. I rolled them around a pencil to “wave” them a bit and glued them around the handles. Now all I need to do is fill each pail with candy corn and everyone will know where to sit. How are you decorating your table?
Sunday, November 6, 2011
Fall Thanks by Laura C
 I'm thankful for so many things....family, friends, home, and
so much more!! And then in the crafty realm.....I am sooooo
thankful for Tim Holtz.....ok, silly, I know.....but do you love
his inks as much as I do? And how amazing are these limited
edition fall colors?? I paired these with the awesome Mariposa
papers, and came up with this:
 The soft look of these inks and the colors, are the perfect
match for the Mariposa paper!
The details: Using the 12x12 Mariposa Solid Cardstock,
I made a 4&1/4"x5&1/2" card base. Next was 2 of
the mats from the Mariposa Mat Stack. The peachy
patterned paper was the first layer (cut at 4"x5&1/4"),
Next was plain black cardstock cut to a 3&7/8" square.
The botanical "print" is from the mat stack as well (see
first pic above), I used the Ripe Persimmon and the
Gathered Twigs Distress Ink on this piece, then
trimmed it, rounded the corners and layered it onto
the black cardstock.
Finishing touches, of some seam binding ribbon, a
button, some Doodle Twine, Want2Scrap pearls,
and a stamped sentiment, and it's a sweet little
thank you....or it would make a great card for
any occasion....just depending on the sentiment.
Hope you get some fall scrappy time and can find
some inspiration here on the Cutter's Creek blog!
Available at Cutter's Creek:
Mariposa 12x12 cardstock
Mariposa Mat Stack
Tim Holtz Distress Ink
(Ripe Persimmon and Gathered Twigs)
Doodlebug Twine
Want2Scrap Pearls
(Many in store, Kim can order black)
Thursday, November 3, 2011
KAISERCRAFT Advent Calendar by Deanna M
I am sure by now many of you have received a copy of one of the KAISERCRAFT Workshop Magazines that Kim at Cutters Creek has been including in some orders as she ships them out. I happened to get the one for September and new immediately I wanted to make the Advent Calendar that was in the magazine. Did you also know that Cutters Creek, carries some of the KAISERCRAFT products and that she can special order most of the items that are included in the Workshop Magazines.
 Now that you know how to get the products let me show you what I made.
The kit came with all of the pieces necessary to assemble the wooden box and the chipboard drawers and numbers. All I needed to supply was paint, paper, and embellishments.
To get started I painted all the wooden pieces of the calendar with some green acrylic paint I had on hand. The green was a little too bright for me so after it completely dried I sprayed all the wooden pieces with some Jingle Bells Glimmer Mist which gave me the look I wanted. (It is hard to see in the photos.) I then sprayed it with a sealer to protect the wooden sections. I painted all the pieces before cutting them apart. I used my Tim Holtz Scissors to cut the little sections apart and they worked wonderfully.
I had some help from my son in assembling the wooden part of the box. While he worked on putting that together I went to work on the little drawers. I used Scor-Tape to hold my drawers together and to help hold my paper when I covered the drawers. I used paper from the Graphic 45 Christmas Emporium 8" X 8" paper pad to cover my boxes. I cut my paper in two sections. I cut a piece 1 5/8" X 6" and covered the back and sides of the box and wrapped it around the front to cover the two outer edges of the front. I then cut another piece 1 5/8" X 1 5/8" to cover the front. This gave me enough pieces of 5 boxes from each piece of 8" X 8" sheet of card stock. I had the hardest time with the little U shape on the front of the drawers. I tried measuring it and thought for sure a 1" round punch would work perfectly to punch the holes, nope, just a little too big. I think a 3/4" circle punch might work though. I ended up tracing the cutout on to the back of each piece of paper and hand cut them. Of course some of them ended up slightly off center but that is okay.
Using the Scor-Tape I adhered the paper to the boxes and placed them in the wooden slots. I then decided to run all the numbers through my Xyron upside down so I had the adhesive on the fronts and glitter them with some red and green glitter I had in my stash. I adhered them to the drawer fronts with some Scotch Quick Dry adhesive.
For the center of the calendar I found this piece of We Wish You A Merry Christmas paper in my stash. Sorry there was no name on in it and I don't remember where I got it. But I thought it went great with the calendar so cut a piece 8 3/4" X 8 3/4" and adhered it to the center of my calendar.
Of course while I was working on the project my new Cricut Imagine Santa Village cartridge arrived and I had to use it. I love the buildings in the cartridge and chose what I took for Santa's house. I cut the house at 5" using the layers feature on the Imagine and used the clear 3D foam pads to adhere all the layers together which gave the house some great dimension. To further jazz up the house I applied some Ultra Fine White Flower Soft to the snow on the ground and chimney of the house. Along the roof line I just sprinkled some clear glitter to add some sparkle. What is Christmas Countdown calendar without Santa himself making an appearance. I cut the Sleigh at 2 1/2" using the layers feature and also assembled it with the clear 3D pads. I again used my Ultra Fine White Flower Soft and Flower Soft Adhesive, and applied it to the trim on Santa's coat and hat as well as his beard.
Finally using the flip feature on my Imagine I cut the reindeer in layers and adhered it with the clear foam pads as well. I then cut a short piece of the Doodlebugs Twine from the Christmas Assortment, in a red/green/white pattern and adhered it to the the reindeer just under his harness and also just under Santa's hand so it looked like Santa was holding the reins to his sleigh as he took off for his one night of adventure.
Items available at Cutters Creek:
Jingle Bells Glimmer Mist
Christmas Emporium Paper Pad
Scotch Quick Dry Adhesive
Tim Holtz Scissors
ASI Kool Tak Clear Foam Pads
Flower Soft and Flower Soft Adhesive
Doodlebug Design Twine
Xyron
Also please remember that Cutters Creek can special order most KAISERCRAFT products and many of the Imagine Cartridges.
Subscribe to:
Posts (Atom)


