Saturday, November 27, 2010

2011 Calendar Set With Gift Bags by Sandi


The easiest way to explain how I created these calendars is to list what I used to create each month. I used my Gypsy but they could easily be done with Cricut design studio or Make The Cut Software.


The covers were created with Adirondack Acrylic Paint Daubers and Tim Holtz Grunge elements and bound using the Zutter Bind It System. The Gift Bag Purse buckles were created with Spellbinders Ladies Fashion Buckles and Cuttlebug. The Purse Pattern is from Becky Roberts Purse-onally Perfect Purse. Any stamp image can be used, I do a different them each year.

The following products can be purchased at Cutters Creek:

January:
Cricut Cartridges
George and Basic shapes (Frame)
Wild Card (Cheers)
Plantin School Book (January)
Christmas (Snowflakes)
Gypsy Font (Happy New Year)
Cricut Embossing Folder (D’vine Swirl)
Stickles (Purple, Lavender, Xmas Red, Yellow, Silver)
Tim Holtz Adirondak Paint Daubers (Gold, Purple)
Copics (Skin White, Blush, Lipstick Red, Purple, Prune, Cool Gray No. 1 and No. 3)


February:
Cricut Cartridges
George and Basic shapes (Frame)
Plantin School Book (February)
Gypsy Font (Decorative Ovals)
Gypsy Wanderings (Rabbit)
Glossy Accents (Glaze on Rabbit, etc.)
Copics (Skin White, Blush, Lipstick Red, Sugared Almond Pink, Shock Pink, Prune, Frost Blue, Apricot, Pale Yellow, Golden Yellow)


March:
Cricut Cartridges
George and Basic shapes (Frames)
Plantin School Book (March)
Cricut Sampler (Route 66)
Butterfly (Martha Stewart Combo Punch)
Pan Pastels (Pink and Purple on flower)
Flower and Glaze (George and Basic shapes and Glossy Accents)
Stickles (Lavender, Silver)
Embossing Folder (Diamonds In The Rough)
Copics (Skin White, Blush, Lipstick Red, Purple, Prune, Cool Gray No. 1 and No. 3)


April:
Cricut Cartridges
George and Basic shapes (Frame)
Plantin School Book(April)
Graphically Speaking (Clouds)
Wild Card (Umbrella)
Embossing Folder (Distressed Stripes)
Stickles (Silver and Waterfall)


May:
Cricut Cartridges
George and Basic shapes (Frame)
Plantin School Book (May)
Gypsy Wanderings (Fabulous Friends)
George and Basic shapes (Flower)
Plantin School Book (Leaves)
Stickles (Purple)
Embossing Folder (Perfectly Paisley)
Copics (Skin White, Blush, Lipstick Red, Purple, Prune, Cool Gray No. 1 and No. 3)


June :
Cricut Cartridges
George and Basic shapes (Frame)
Plantin School Book (June)
Graphically Speaking (Queen of Everything)
Gypsy Wanderings (Dress, Shoes, Hat)
George and Basic shapes (Flowers)
Stickles (Lavender)
Glaze (Glossy Accents)
Pan Pastels (Pink, Purple)
Embossing Folder (D’Vine Swirls)


July:
Cricut Cartridges
George and Basic shapes (Frame)
Plantin School Book (July)
Stand and Salute (Liberty & Justice for all)
Stand and Salute (Fireworks)
Butterfly (Martha Stewart Combo Punch)
Glaze (Glossy Accents)
Stickles (Xmas Red)
Embossing Folder (Swiss Dots)
Copics (Skin White, Blush, Lipstick Red, Purple, Prune)


August:
Cricut Cartridges
George and Basic shapes (Frame)
Plantin School Book (August)
Butterfly (Martha Stewart Combo Punch)
Stickles (Yellow, Purple, Xmas Red, Green)
Clouds (Sakura Gelly Roll Stardust Silver Pen)
Copics (Skin White, Blush, Lipstick Red, Purple, Prune, Pale Yellow, Golden Yellow, Mignonette, Pea Green, Apricot)


September:
Cricut Cartridges
George and Basic shapes (Frame)
Plantin School Book (September)
Beyond Birthdays (My Friend)
Wild Card (You’re Simply The Best)
Stickles (Yellow, Copper, Xmas Red, Purple)
Chair (Sakura Gelly Roll Stardust Green Pen)
Bracelets (Sakura Gelly Roll Stardust Silver Pen)
Cigarette holder (Sakura Gelly Roll Stardust Red Pen)
Embossing Folder (A2 Birds and Swirls)
Copics (Skin White, Blush, Lipstick Red, Purple, Light Prawn)


October:
Cricut Cartridges
George and Basic shapes (Frame)
Plantin School Book (October)
Gypsy Wanderings (Pumpkins
Wild Card (Bat, Spider)
Stickles (Black, Purple)
Embossing Folder (Distressed Stripes)
Copics (Skin White, Blush, Lipstick Red, Purple, Apricot, Golden Yellow)


November:
Cricut Cartridges
George and Basic shapes (Frame)
Plantin School Book (November)
Gypsy Font (Warm Winter Wishes)
Stickles (Green, Waterfall, Turquoise, Yellow, Xmas Red, Purple, Diamond)
Embossing Folder (Diamonds In The Rough)
Copics (Skin White, Blush, Lipstick Red, Prune, Mignonette, Apple Green, Pale Yellow, Golden Yellow, Frost Blue, Robin’s Egg Blue, Sugared Almond Pink)


December:
Cricut Cartridges
George and Basic shapes (Frame)
Plantin School Book (December)
Christmas (Tree)
Gypsy Font (Tis The Season)
Stickles (Purple, Xmas Red, Green, Gold, Diamond)
Purse and Bag (Outlined with Sakura Gelly Roll Stardust Silver Pen)
Embossing Folders (A2 Snow Dots and Holly Wreath Combo)
Scent My Card (Christmas)
Copics (Skin White, Blush, Lipstick Red, Prune)

Thursday, November 25, 2010

Homecoming With Vicki & Her Special Daughter

Scrap Project 009

My daughter is one of my favorite subject to scrapbook, because she is very photogenic. I thought it would be nice to highlight her great homecoming outfit...and all the girly 'trimmings' that go along with it!!

I started with some paper from my stash. This paper already has a lot going on with it - so I knew I didn't need a lot of embellishments. However, the black and white design would really serve as a great background for her bright red dress. Since this was an opportunity for the kids to really dress up, what better way to highlight the occaision, than to use some of that great American Crafts foil paper!

Scrap Project 008

The title was cut using the Cricut Locker Talk cartridge, using the "Homecoming" title out of basic black Bazzill cardstock, set on top of the title shadow, cut on the silver foil paper. On the second page, the year was cut out of the same black cardstock from the Gypsy Font from my brand new Gypsy! It turned out that there was a border on the Gypsy Wanderings cartridge that matched the floral pattern perfectly. I cut it at 11.5 inches, which isn't quite a full border, but it worked with the background paper. (If I really wanted a 12 inch border, I could have used my 12x24 mat on my Expression.)

Scrap Project 007

I set my photos before adding my embellishments, as I wanted to layer some of the fun Petaloo Color Me Crazy flowers on top of the pictures. I colored my two flowers with my Copic markers, using R24 (Prawn) for the base, and R29 (Lipstick Red) for some highlight lines and edges. Using Copics on these flowers is really easy - the blending occurs naturally because the paper is so porous. (HINT - always color on a mat or scrap paper because the color WILL bleed through these flowers!) The flowers were placed with a drop of Glossy Accents, and then a simple Twinkle Jewel was added to the centers of each flower. It still needed a little BLING - so I accented the inside edges of the "2010" using a simple silver metallic Sharpie. I also added dots around each of the Petaloo flowers to make them stand out. Finally, I used some Liquid Pearls in Pewter to add centers to several of the floral shapes on the background paper, just to make them stand out a little bit more.

So get out there and step outside the 'boxy' look of layouts. Place your pictures at fun angles, overlap embellishments, and don't be afraid to draw a little bit!

Cutters Creek Items Used:
Locker Talk Cartridge
Cricut Gypsy
Cricut Expression
Petalloo Color Me Crazy Flowers
Copic markers - R24, R29
American Crafts Foil Paper
Liquid Pearls - Pewter
Twinkle Jewels - Clear
Glossy Accents

Wednesday, November 24, 2010

Mandie says "Can You Imagine..... "

...winning your very own Cricut Imagine??? Remember the Empty Brown Paper Bag that Kim has for sale in the store? If you haven't picked up a couple you really should consider it! On Black Friday a Cricut Imagine Machine will accidentally fall into one of the Empty Bags... rumor is that other things *may* fall into some of the other bags as well!


In honor of the Empty Brown Paper Bag Sale, I decided to use my Cricut Imagine to highlight what you can do with this awesome machine! For those of you that follow my blog, Mandie’s Scrappin you may know that Monday was the first time I've actually broken down and made a real project with my Imagine.


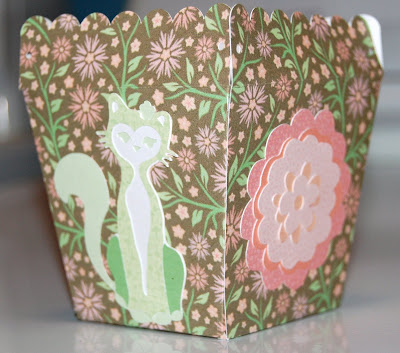
If you don't have an Imagine you can also make this project very easily with patterned paper, card stock and your Cricut Expression Machine . I used the Cindy Loo Cricut cartridge to first cut the Flower Pot Box. I thought this was such a cute little box! I used my Imagine Nursery Tales cartridge to add the pattern to the box (and the colors and patterns to all of my cuts) but you can use patterned paper or cardstock. I'm not sure what size this is because I used Fit to Page but I'm guessing it would be about 7", after folding it ends up about 3 1/2" tall.


Then I cut my flower, squirrel, deer and cat all from the Cindy Loo cartridge. This was a super simple project and would be cute to put a little gift inside. My idea is a gift card and some paper shred for teachers or neighbors or maybe as a hostess gift when you go to holiday parties!


Now that you are inspired, don't forget to go buy an Empty Brown Paper Bag and maybe you will be the lucky one! Can you Imagine?

Friday, November 19, 2010

Snow Forts 101 by Laura C.

OLYMPUS DIGITAL CAMERA

This scrapbook page is made using a technique called "faux silk" and the new Tim Holtz "Snowflurries" texture fade. I cut 3 mats from white cardstock: 4"x6&1/2", and two 4 1/2"x5 1/2". These were run thru the cuttlebug using the TH snowflurries folder. The technique is then to take white tissue paper, cut about 1" larger than the above pieces, and then crumple it up. Gently flatten it out (not too much!). Now, using a glue stick, doing only ONE piece at a
time, generously cover the snowflake embossed piece (make sure to get in all the nooks and crannies as best you can!).

PB040069

Then put the tissue paper on top and smooth it over.....again, you WANT WRINKLES!! Finish
all three pieces of cardstock, then use a heat gun to help dry the glue. Once dry, cut the excess tissue down to about 1/2", then adhere to the back with your favorite adhesive (this is like "wrapping a present" and you can miter the corners (clip the point off) to make it a bit easier). Next step.....use TH distressing ink in stormy sky (or whatever color matches your project!) with a touch of forest moss, applied with a foam applicator.

PB040073

I then centered red cardstock pieces--I cut 2 smaller red 3 1/2" by 4 1/2" and one larger red 3 1/2" by 5 1/2". The pics were trimmed to fit the red exactly lengthwise and they are all 3" high. The strip on the left is 2" wide and there is a strip of red under the ribbon that is 1 1/2". I embellished with buttons and bling from my stash. My letters are thickers....but a perfect touch would also be letters cut out on the cricut, using AC glitter paper in rouge!!

The faux silk technique is wonderful.....try just sponging backgrounds, whatever.....you can get so many looks from this, whether you are making pages, or cards.

Available at Cutter's Creek:
Tim Holtz Texture Fades (snowflurries/snowman set)
Tim Holtz alcohol ink applicator tool
Inkssentials foam applicator pads
Tim Holtz distress ink (forest moss and stormy sky)

Wednesday, November 17, 2010

Ecstasy Crafts Free Style Wreaths with Kim B

ecstasy craft wreath rev

This was one easy and fast card! I used the Ecstasy Craft Free Style Wreaths and American Crafts Foil card stock on my card blank. You should be able to see the dimension of the wreath on this card. All the pieces were popped out of the sheet and layered with foam squares (also from Ecstasy Crafts). Then I cut a piece of American Crafts foil card stock and put that on my card blank. I popped out one of the borders on the Free Style Wreath sheet and gave it a little trim to fit along the edge of my card. I then attached the wreath. Then upon scoping out what else was available on the sheet, I punched out the pine cones with leaves and attached that. And for my final item. I picked a little festive background and sentiment and attached the sentiment with foam squares and then put that on top of my pine cones. Trust me, it took me longer to type up what I did, than make the actual card. Is is so sparkly and shimmery and I hope someone will love getting this holiday card!

Items required: Foam Squares, American Crafts foil card stock, Ecstasy Crafts Free Style Wreaths, and your personal touch!

Friday, November 12, 2010

Glass Etching with Chris

givethanks

I finally tried etching glass and am wondering whatever took me so long. I wanted to make a dish for my sister and fill it with snacks that go with the Thanksgiving Blessing. I found a free png file online with several Thanksgiving sayings and using Scal I imported the file “Give Thanks”, adjusted the size to about 3 inches and simplified the number of nodes so it would cut better. I made sure that I moved my blade about a half-inch in from the edge so I would have a border around the saying when I lifted it from the mat. I then set my cricut at a blade depth of 3, speed and pressure at 3 and cut. It cut perfectly. I did not have transfer tape, but was able to easily lift the outline of the words. I did have to use tweezers to move the inside piece of the “g” and the “a” onto the glass, but it worked out alright. (For more complicated cuttings I would recommend using transfer tape.)

I laid the vinyl on the dish and used my fingernail and an ice cream stick to rub around each letter, making sure the vinyl was pressed firmly down so no cream could get underneath. Using an old paintbrush, I put a thick coat of Armour Etch cream over the letters. While the bottle says to remove it after 5 minutes, everything I’ve read and watched online said to leave it on longer. I left it on 35 minutes. I scooped the excess cream back into the bottle using the paintbrush (learned that online too) and rinsed both the brush and the bowl under warm running water. I let it air dry and worked on the Blessing Card.

blessingframe

To make the Blessing Frame I used an old frame painted it with distress crackle ink; cut apart some old silk flowers and using my glossy accents glued them around the edges. The saying was printed on my computer and the title I embossed with gold embossing powder. Added a few gems and just need to fill with the snacks—and another hostess gift done!

Cutters Creek Resources:

SCAL

Glass Etching Cream: Armour Etch

Vinyl Roll (color doesn’t matter for this project)

Antique Linen Distress Ink

Inkssentials Glossy Accents

Super Fine Embossing Powder--Gold

Tuesday, November 9, 2010

Place Tags by Chris

P1040229

P1040230

This project is a piece of cake. All you need is the Cuttlebug Embossed Tags, chipboard letters, and some distress inks. The embossed tags die not only cuts and embosses, but also has a plastic sleeve that you lift and can ink the embossed area and not get any on the rest of your tag. Just wipe it off with a baby wipe after you remove the tags. The set has 5 tags. (There are also embossed labels and Vintage collage sets that I love.)

Using fired brick, scattered straw, rusty hinge, walnut and spiced marmalade distress inks, I randomly colored my chipboard letters and the tags, glued my letters down with glossy accents, wrap some twine around the napkins, tucked in some bits of silk flower parts and have a hostess gift for Thanksgiving! Easy-peasy as Kim says!

Cutters Creek Resources:

Cuttlebug Embossed Tags (Labels & Vintage Collage)

Tim Holtz Distress Inks: fired brick, scattered straw, rusty hinge, walnut and spiced marmalade

The Tim Holtz applicator

Inkssentials Ink Blending Foam

Glossy Accents

Sunday, November 7, 2010

A Card for All Seasons - by Lori B.

Let me preface this post by saying that I am a Copic newbie.  I've only used them a couple of times & still have trouble with shading.  However, I LOVE how forgiving they are.  I totally thought I had ruined one of my cards by getting color WAY outside a line, but that colorless blender saved the day and allowed me to push it all right back in (it took about three times of pushing it back then letting it dry).

So, since I'm new to Copics, I only have a few colors so I wanted to see if I could use the same markers for more than one thing.  Flower Soft to the rescue!  I used the same Flower Soft stamp and Copic markers for all three cards (oh, 2 different greens), and just changed the Flower Soft colors I used with it.


I used the Wishing Well stamp from Flower Soft for these cards.  My first card, a Spring/Summer option, uses the sentiment that comes with it.  Because of a stamping mishap, I decided to cut out the stamped image for this one, and I decided I like that the best!

I stamped my image using a Memento Black stamp pad.  I colored all of the flowers on the stamped image with a YG07 Acid Green marker prior to gluing down my Flower Soft.  That way, any places that show through look like foliage instead of seeing white.  I used Fuschia Flower Soft for this card, which I think would be great for a Spring or Summer Wedding.

For my Fall card, I grabbed a sentiment stamp from my stash, but I stick with the "wish" theme.  I can add a Happy Birthday to the inside and be all set.

For this card, I switched to a G99 Olive marker to color my foliage, and Autumn Flower Soft.  After it was partially dry, I rubbed some of it off, and added in some Nut Brown to darken up the colors a bit.

Finally, I HAD to make a Christmas card.  Another stamp from my stash, and it says Wishing You Happy Holidays.  I again used my G99 Olive marker for my foliage.  I used Vintage Christmas Flower Soft, then added on some Polar White Diamond Range Flower Soft for a little Christmas snow.

This technique would look great with any of the  Flower Soft outdoor "accessory" stamps, or similar stamps you may have in your stash.  I love that these neutral Copic markers are made so much more versatile by using them like this!

Supplies Available at Cutters Creek:

Friday, November 5, 2010

Holiday Card & Thickers with Kim B

thicker card rev

This card was so simple and fast to put together! I cut out the image from Graphic 45’s popular Christmas Past collection and added some Glimmer Mist and some ink around the edges. I found this pretty shimmery corrugated card stock in my stash and also found this shimmery gold ribbon in my stash. I added the Dear Lizzy Christmas thickers in Sparkling Pine, and voila! A new holiday card was made! And to finish it off, I used my Chomper from WRMK.

Items needed:

Cardstock, ribbon, American Crafts Sparkling Pine Thickers, WRMK Chomper, Graphic 45 Christmas Past, Glimmer Mist, and your imagination.

Tuesday, November 2, 2010

Tissue Box Cover by Laura C

OLYMPUS DIGITAL CAMERA

You can turn a plain ordinary tissue box, into a work of art! When I saw the directions on how to make this tissue box cover, I knew I had to make one! And even better.....you get a sneak peek at a project made with the new Tim Holtz, soon to be released snowflurries/snowmantexture fade set!!

OLYMPUS DIGITAL CAMERA

You need to cut out a "base" set first, and then you will decorate your plain box. You need the following sizes to make your base box:

Two 9&1/2" x 5&1/8" pieces and these need to be scored at 1/2" and 5". I used a soft blue cardstock that I inked with chipped sapphire distress ink after scoring.

One piece that is 6 & 9/16" square. Score this at 1" on all 4 sides. Trace and cut out an oval in the center and make one cut out of each corner to make a "tab" on each corner (see black lines in photo).

OLYMPUS DIGITAL CAMERA

The decorated panel pieces on the box are:

Four 4&1/2" x 4&1/4" pieces for the sides These are embossed with the new snowflake folder, and inked with chipped sapphire ink. Four 4&1/4" x 3/4" pieces for the lid sides. These are embossed with the cuttle bug as well. One 4&1/4" square piece for the top. This is embossed with the snowflake folder, inked and then a center opening cut out using labels 6. I also cut additional pieces for one side using spellbinders rectangles (out of a piece embossed with the swiss dot folder) and small labels (I then stamped snowflakes in chipped sapphire and added some crystal stickles and twinkle jewels for centers). I punched thin strips of scrap paper for the "lace" edges around the lid.

OLYMPUS DIGITAL CAMERA

Once you have all the pieces ready, it's time to assemble. I formed the sides and the lid, using scor tape applied to the "tabs" on the lid corners and the 1/2" tab on the sides. Then, before attaching the lid to the base, I put on the embossed side panels on the box sides and the embossed lid sides and top on the lid of the box. Now is when you would adhere the "lace" edges if you did those as well. A tip here: Remember to "center" your side panels toward the bottom (they are placed about 1/8" from the bottom and corners.....they will be much further from the top, but this portion is partially covered by the lid!). To finish assembly, USE THE TISSUE BOX YOU ARE COVERING! Slide the cover over the box, then apply scor tape around outside top edges, and carefully position the lid over the top of the tissue box......once in place rub to make sure it's firmly in place with the adhesive. Now you can embellish.....add the extra side panel, some buttons and bling, ribbon, whatever you'd like.

If anyone has trouble with the instructions, let me know, but I have no doubt, once you get the pieces in front of you, you'll understand every instruction, it will
make sense, and go together easy breezy!! This is a wonderful item for home decor or an amazing gift for the holidays! Enjoy crafting these great little boxes!

Available at Cutters Creek:
Tim Holtz Texture Fades (snow flurries/snowman set--pre-order)
Tim Holtz distress ink (chipped sapphire)
Inkssentials Blending tool and foam
Cuttlebug A2 folder (swiss dots)
Spellbinders Dies (Rectangles, Small Labels, Labels 6)
Stickles (crystal)
Twinkle Jewels (beaches)

Monday, November 1, 2010

Featured Artist-Margaret

Boy with stocking

Angel with horn

Boy with stocking:
This card is a digital image from Mo's, just love her work. I used my Copic markers to color the image and a sheet of double sided paper by American Crafts to make my card. The paper was also a two sided paper by K&Company. I find that these make nice simple cards. One side was solid and the other stripped. I did not have single stamps to make the Happy Holidays so I only inked one side at a time. The Copic markers used were E11, E13, E25, B21, B24, B32, B34, B99, V15, R29, YR09, G28.


Angel with horn:
This card was made also by using the Copic markers and one of Mo's digital stamps. On this card I popped out a snowflake and added Stickles to her wings. I also added Stickles to the background paper and the snowflake. The Copic markers used were E11, E13, E25, Y17, Y38, RV11, RV34. The Stickles used was Crystal.

Margaret
Blog: http://margaret-ilovecrafting.blogspot.com

Related Posts with Thumbnails