Showing posts with label Flower Soft. Show all posts

Sunday, July 27, 2014

Happy Birthday Issy! by Kim Bush

My youngest grand daughter, Isabeau will be one on August 3rd.  My, how time does fly!  I made her a cute and quick card using Charlie's Ark toppers by Flower Soft.  Here is the completed card. 


All elements (except the card base) were Flower Soft products.  It was so simple and went together so quickly.  The longest time I spent was waiting for the Flower Soft to dry that I used, on that sweet little lamb.  I used Ultra Fine in kola grey and white.  I also used a matching card with a pic of Jess in the corner, to leave her a special message from Grandma in the interior of the card.  This line is so sweet for children's cards and scrapbook pages.  You can find these super cute Charlie's Ark Toppers and products HERE and all products by Flower Soft HERE

Everything in the store is now 50% off so this is a great time to stock up on not only Flower Soft, but many more products at cutterscreek.com. 

Wednesday, November 6, 2013

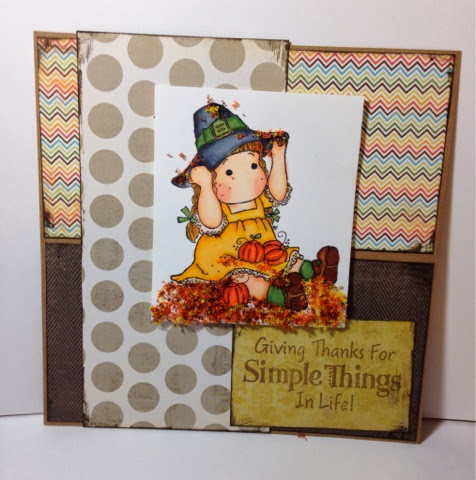
Giving Thanks

This time of year we all think about what we're thankful for. It's easy to be thankful for the big things like family, friends,  and our health, but sometimes we forget about the simple things that make us happy every day. When I found this sentiment stamp from House Mouse it made me think about how thankful I am for simple things like having the time to craft.

I think this image of Tilda playing in the leaves is perfect for this sentiment.  I colored her with copic markers and added some Flower Soft to make it look like she's sitting in a pile of leaves. I love how sweet she looks. I kept my papers from My Mind's Eye simple as well and didn't add any embellishments. 

Take some time this holiday season to remember the simple things in life that make you happy. 

Sunday, June 2, 2013

Masculine Project With Kim B

I hope everyone has enjoyed our Design Team bringing you some wonderful masculine projects.  As crafters and a large majority of us being women, I know a lot of us struggle to make these type projects because we are drawn to the "pretty" and things like florals, pinks, frilly, etc...  Some of you crafters out there only have males to craft and scrap for so I am sure it is a bit easier for you to accomplish what a lot of us struggle to do.  I still use flowers, ribbon, glitter, etc... when doing masculine projects, I just try and tone it down a bit..............lol!  I just can't give up my bling!

So here are two Father's Day cards I created for a new friend if mine who has recently started purchasing cards from me.


I should have taken photos of the inside, however I forgot to do that so you could see how I completed the interior of the cards.  I used Ecstasy Crafts products for the front and some Flower Soft Peel Offs for the corners.  The ribbon was from my stash and the papers were scraps in my stash.  These cards went together so quickly because I used Ecstasy Crafts so the thinking was removed for me.  I just had to match up the rest of the items to complete my cards. 
 
Thank you for looking and I hope you enjoyed our projects!  Please leave the team a comment on the items you liked and tell us what you would like to see more of.  Thank you!


Thursday, September 13, 2012

Winter Wonderland Card by Deanna M


My card for you today is a 5" X 7" white card stock base. I added a black mat cut a 4 3/4" X 6 3/4". I then added some snowflake paper from the My Minds Eye Winter Wonderland  6" X6" paper pad. I then cut some white card stock to look like a snow mound and added some Flower Soft Glitter Frosting Hint of Green. I wanted to cut my pond from some of the Tim Holtz Mirror Sheets. I will tell you it did not cut well with my Cricut. I cut the pond from the Create a Critter cartridge at 1 1/2" and used my Gypsy to hide the little ripples that cut. (The pond is found under the accessory feature on the hippo cut). I used a multi cut of 4 and did that twice so 8 times but it still didn't cut. I did use the line cut by my cricut and my Tim Hotlz scissor to cut out my pond. I cut my ice skater at 4 1/2". I used paper from my stash for her. I then stamped my sentiment. Sure hope you like her. It was a bit hard to photograph the mirrored paper and it is picking up the reflection from the "white snow".


Tuesday, July 31, 2012

Ecstasy Craft Sneak Peak-Part 2 by Deanna

I have another sneak peak for you of some of the awesome holiday Ecstasy Craft items that Kim has just added to the store.


These are called Reddy Die-Cuts and this is Popcorn the bear. As you can see I got 4 cards from one package. As you can see they come with a background paper to build your image on. Building the image is easy as 1,2,3. All of the punch out items are numbered in the order that you layer them. It took me just about an hour to make all 4 cards which is fast for me. The individual card toppers measured just under 4" so I cut 4 white card stock card bases at 4 1/4" X 8 1/2" and scored and folded them to make four 4 1/4" square cards and rounded the corners. These will fit in a standard size A2 envelope so you won't have to pay extra postage to mail a square card.

On this little guy I added some Frosted Lace Stickles between the snowline and the sky and also on the 4 larger snowflakes. (sorry it doesn't show up better in the photo).

On this one I again added some Frosted Lace Stickles to the snowline and I also added some Stardust Stickles to the stars by the moon.

For this one I added some Ultra Fine White Flower Soft to the snow along the top of the fence and also to some of the snow on the tree limbs.

On this one I again added some Stardust Stickles to the fireworks in the sky.

Check out the dimension you get with these wonderful little layered images.These were quick and easy to make and are beautiful as is without any additions. It is a fun and quick way to make some cards to give as gifts or to mail to family and friends.


There are some great new Flower Soft products that have been added to the store just in time for your holiday crafting so be sure to check them out. Also be sure to check the  new CHA 2012 Release section of the store to find out the latest and greatest additions including these wonderful Ecstasy Craft items.


Thursday, July 12, 2012

I'll be Home for Christmas Card by Deanna M


To help with your planning there are just 165 days left until Christmas. I can't believe we are almost halfway through July and it just is never to early to start working on your Holiday Cards, and Craft sale items. To help get you in the mood, I have for you this fun Christmas card.

I used the Handyman Cricut Lite cartridge and welded two shadows of this house together and cut it from white card stock. I cut one additional shadow layer from white and adhered it to the front of the card. I cut the card base and all the layers at 5". I cut the layers for the house out of patterned paper from My Minds Eye. While there isn't any of this paper left, check out what is in the store from Echo Park, it would work perfect. I used some Polar White Flower Soft on the roof edge. I then cut a snowman at 2 1/4" from the Winter Frolic cartridge (need this cartridge? Kim can special order it for you, just ask) and stamp his face with  the Snow Cuties Peachy Keen Stamp Face. I also cut a tree topiary from the Joys of the Season cartridge also at 2 1/4". I used some Sugar Can Glimmer Glaze (Yes, Kim can special order this for you) to glaze my pot on the tree to give it a brassy look. Finally I used some Rouge Liquid Pearls to added some decorations to the tree and the buttons on the Snowman. Finally I added a black nail head for the doorknob.

I hope I have inspired you to get out those papers and get a jump start on  your holiday crafting!!

Friday, June 1, 2012

Father's Day Blog Hop

Welcome to the Cutters Creek Design Team Fathers Day Blog Hop! We want you to hop along with us and play for the Grand Prize The objective for our Blog Hop this weekend is to inspire you to create something beautiful for all of the "Fathers" in your life! We have a bit of everything, from cards to gift ideas to layouts about our fathers!


Take an old pink and white frame, a bit of paint, and Graphic 45 paper and turn it into a Father’s Day gift. The first bit of transformation was painting the whole frame with black acrylic paint and then slathering it with Vintage Photo Distress Crackle Paint. Once it dries and cracks, rub some Black Soot Distress ink into the cracks and rub off the excess with a soft cloth. Next take your chipboard letters and glue them to Graphic 45 paper. These used two sheets from the Olde Curiosity Shoppe pads and some Aleene’s Quick Dry Tacky Glue. Once they were dry I inked the edges using Gathered Twigs for the word Pappy and Peacock Feathers for the We and U, and I used Glossy Accents to add some shine to the bottom letters.

I then chose a coordinating cardstock (also from the Olde Curiosity Shoppe set) and covered the mat. I used Scor-Tape to adhere it to the backside. To add a bit more depth I stuck a piece of Inkssentials Foil tape sheets to a remnant piece of cardstock and cut it with Tim Holtz’s On the Edge Steampunk.  I used several different alcohol inks to age it and then glued to the mat with Glossy Accents. Next I took one of the Kaisercraft Wood Flourishes (hearts) and covered it with Ruby Diamond Range Flower Soft using the Flower Soft Glue.

While everything was drying, I punched a few butterflies out of leftover foil tape and Graphic 45 papers, layered them and glued them around the mat. I used mini glue dots to hold Pappy angled from the frame to the mat, Glue Dots pop dots for the letter w, and on everything else I used glossy accents again.  I needed one more embellie and turned to my Tim Holtz tickets and his stick pins, colored them with all three of the new Distress Inks (Peacock Feathers, Shaded Lilac, and Squeezed Lemonade—these are absolutely gorgeous colors!), and pushed it into the mat.

Now for the details about the Grand Prize I mentioned at the beginning of my post. Check it out! What an awesome prize don't you think???


To qualify you must leave a comment at every stop along the way. Comments should be made by Midnight, June 3rd. We will use Random.org to select a winner so be sure to check back with us on Monday to find out if you have won!

Don't forget to leave a comment here before you hop along to  Kim's Blog! Thanks for hopping by!

Thursday, April 5, 2012

Tiptoe Through the Tulips! by Deanna M


I have a fun home decor project for you today. This is the Tulip Photo Display from Kaisercraft. Isn't it just too cute! (Want one for yourself, just ask Kim at Cutter's Creek to order you one.

I painted each tulip with a different color of acrylic paint, I painted the base with green and the fence in brown. The  Adirondack Paint Dabbers would work great for this project. I used some Flower Soft Adhesive and  Meadow Flower Soft on the front of the base. I covered the tulips in different polka dotted patterned paper from the My Minds Eye 6" X 6" paper packs.  I used my white gel pen to add some faux stitching to the tulips and the leaves on the flowers.


I used the new Spring Cottage Seasonal Cartridge and some scrap paper to cut some ferns at 1 1/2" and some grass(really flower leaves) and some flowers at 3/4". I added some Key Lime Liquid Pearls to the center of my flowers. I cut some birds at 1" also from the Spring Cottage cartridge (ask Kim if she can get this for you). Finally I cut Tiptoe Through the Tulips from the Bloom Lite Catridge and colored the different layers with the Bubblegum Stripes Imagine cartridge. I used the Key Lime Liquid Pearls for the dot over my "I" in Tiptoe. This cute little photo display comes with 3 mini clothes pins which I adhered behind each tulip and used to display my little sentiment from the middle tulip. Sure hope you like it. And don't forget to join us in the No Foolin' Contest that is going on through April 15th!

Tuesday, April 3, 2012

Easter Calla Lily Card by Chris


I saw these lilies on two different blogs and decided to mix and match the directions to make my own. I sketched three hearts—two small and one large and cut them out of grungepaper. (Check with Kim; she got me my pack. J) I painted them with a metallic pearl white acrylic paint, but I think Snow Cap Adirondack Dabber would have been better; they are a bit silvery instead of white.

Once they dried I used Butterscotch Adirondack Dabber to dry brush the lower-to-center inside of the heart shape and the green Earthtone Adirondack Dabber to dry brush the lower-to-center backside of the hearts. [Note that the pointed end of the hearts will be the bottom of the flower.] 


I set those aside and took my Flower Soft wires, Flower Soft glue, and some Citrus Crush Flower Soft to make the stamens. (Just drizzle some glue all around one end of the wire and sprinkle the flower soft over it. I dry let mine dry by sticking the other end of the wire in an old nail buffer.)

When all was dry, I cut three thin strips of green cardstock and tapered one end to lay inside the lower part of the heart with a drop of quick drying glue to hold it in place. I then cut a Glue Dot in half and stuck it over the cardstock and a bit above the pointy end of the heart, and pushed the wired end of the stamen into it. (Trim off any excess wire that sticks below the heart’s tail.) Then. I began rolling the left side of the lower half of the heart towards the center and the right side towards the center and the edges around the heart towards the back, shaping it to look like a calla lily. (Grungepaper is great for this as it is flexible and takes a lot of punishment.) When I liked how it looked, I put some quick drying glue on the rolled in left side, pinched the right side down onto it and used a clothespin to hold it together ‘til it dried. 


While it the three lilies dried, I made a double loop bow using seam tape that I colored with Scattered Straw Distress Ink and the card base. This card is 5x7, but as I wanted the 7-inch side to be the vertical, I cut two pieces of ivory cardstock. One measured 5x8 inches and the other 5x7 inches. I scored and folded the larger piece at one inch and then, using ScorTape, glued the small piece so the seam was on the inside. To make the border around the card I cut four pieces of yellow-orange cardstock with the border from Spellbinders Shapeabilities Parisian Accents. I laid it out and glued it down with Scor Tape and trimmed off the excess from each side.

I cut the largest of my new Spellbinders Nestabilities Splendid Circles from yellow cardstock and cut a the square shape from  yellow-orange cardstock using the Spellbinders Shapeabilities Parisian Accents. I glued the square into the center of the circle and the circle a bit above the center of my card front. I then used Glue Dots to adhere the lilies to the front and Glue Dots to raise and join the stems and Glue Dots to center my bow over the stems and hold the tails just where I wanted them. To finish the front I added some pearl accents.


To finish off the inside of the card and hide the seam I cut another Parisian Accent border and using Scor Tape covered the seam. The sentiment was a free one I printed with my computer and cut with Spellbinders Nestabilities Labels Twenty-Five, which I edged with Rusty Hinge Distress Ink. And not to leave the inside corners out, I cut the two corner pieces from the Parisian Accents set. The card is done and all I need to do now is figure out how to mail it to my mom—LOL.

Sunday, March 25, 2012

Just Saying Hello Card by Deanna M


I have a fun spring card for you today. My card base is white smooth Bazzill card stock cut and  scored to 4 1/4" X 5 1/2". I added a mat from the My Minds Eye Fiddlesticks 6" X 6" paper pad. The new My Minds Eye paper pads are fabulous. I cut the wood grain mat (don't you just love it!) at 4" X 5 1/4". Then I added a strip of the reverse side of the paper cut at 1 1/2" X 4". I cut my image from the Kate's ABC cartridge at 3". I used the Cricut Imagine Nursery Tails cartridge for my pattern on the watering can and my flowers. I used a white gel pen to add some doodle dots to my flowers and some faux stitching to the watering can and the polka dot mat. I then adhered everything to my card front and used some Flower Soft Adhesive and some Meadow Flower Soft around the edge of my watering can. I wanted it to look like it was sitting in the grass. Finally I added my sentiment with some Memento Rich Cocoa Ink and added some stickles to my flower centers.

Sunday, January 15, 2012

A Valentine Tag with Chris


The tag background is colored with Barn Door, Broken China, and Antique Linen Distress Inks. I smeared them on my Bazzill Splat Mat and spritzed them with a bit of water before dragging my tag through it. Once it was dry I used Distress Embossing Pad (Clear) and inked up a quote stamp. I stamped it three times down the card with some of the quote going off the edges. I embossed with Gold Super Fine Embossing Powder. I put that aside and cut a piece of acetate to about the size of the tag and ran it through an embossing folder (any design would work). I flipped it to the debossed side and used Gold Stickles to fill in a few of the spots. While that dried, I painted my chipboard letter with some gesso so it would have some texture—and again waited for that to dry. Once it was dry I inked the edges with Barn Door and Aged Mahogany Distress Inks and set it aside.

I layered the acetate onto the tag hiding two Super Strength Glue Dots under where the letter V was going. I glued the V down using Glossy Accents and added a scrap border along the bottom. It still needed some pizazz so I cut a heart, smeared it with a lot of flower soft glue and then thickly layered on Ruby (from the Diamond Range collection—wow—it absolutely shimmers!). I had some silver twigs that I broke off and sprayed with some Gold Metallic Glimmer mist and used glossy accents to adhere to the “V”. I finally layered on the hear using a Glue Dot Pop Dot; cut a ribbon from my stash and finished off the tag.

What are you making for Valentine’s Day?


Resources from Cutters Creek:

Tim Holtz Distress Inks—Broken China, Antique Linen, Barn Door, Aged Mahogany, Clear
Super Fine Embossing Powder—Gold
Acrylic Sheets
Embossing Folders—Cuttle Bug or Sizzix
Gold Stickles
Glossy Accents
Glue Dots—Pop Up, Craft Dots
Flower Soft Adhesive
Diamond Range Flower Soft—Ruby
Tattered Angels Glimmer Mist—Gold Metallic

Sunday, November 27, 2011

Simple Christmas Ornaments by Deanna M

20111121_2
To help get your holiday decorating started, today I have for you some ornaments for your tree. I found these wooden ornaments at a local store and picked up several. I started by painting them, the tree and wreath I painted green and the candy cane I painted red. The gingerbread man I did not paint.  I used my Crop-a-dile to punch a hole in the top of each ornament.
20111121_11
For the tree ornament, I covered it with some Flower Soft glue and generously covered it with some Pine Ultra Fine Flower Soft. I used some Gold Stickles on the star and then added a bunch of different sizes and colors of pearls to the tree for decorations. I added a piece of red and white striped twine to hang the tree and it was finished.
20111121_8
The wreath ornament was done similarly to the tree. However I used some Vintage Christmas Flower Soft on the wreath. I added some Candy Cane Stickles to the ribbon and finished it with some tiny red pearls that I applied in groups of three and again added the twine to hang the ornament from my tree.
20111121_4

First, if I had to do the candy cane again, I think I would paint it white instead of red. For the candy cane I used some Candy Cane stickles to the ribbon. I used the Christmas Red stickles to add some red stripes and used the Frosted Lace stickles for the white stripes. This was a hard one to get a good picture of because of all the sparkle. I added the twine to hang this ornament as well.
20111121_6
This little gingerbread man is probably my favorite. Instead of painting this guy I sprayed him with some Sugar Maple and Coffee Shop Glimmer Mist. He sure does sparkle. I then added some faux stitching with my gel pen. I stamped his face using the Snow Cuties Peachy Keen stamps. I added some little pink cheeks with a Copic marker. I gave him a little bow tie and used some black pearls as buttons.
Items available at Cutters Creek:
Flower Soft Glue
Vintage Christmas Flower Soft
Pine Ultra Fine Flower Soft
Pearls
Stickles
Peachy Keen Snow Cuties Stamp
Blush Copic Marker
Crop-a-Dile
Twine

Thursday, November 3, 2011

KAISERCRAFT Advent Calendar by Deanna M

I am sure by now many of you have received a copy of one of the KAISERCRAFT Workshop Magazines that Kim at Cutters Creek has been including in some orders as she ships them out. I happened to get the one for September and new immediately I wanted to make the Advent Calendar that was in the magazine. Did you also know that Cutters Creek, carries some of the KAISERCRAFT products and that she can special order most of the items that are included in the Workshop Magazines.

Now that you know how to get the products let me show you what I made.

The kit came with all of the pieces necessary to assemble the wooden box and the chipboard drawers and numbers. All I needed to supply was paint, paper, and embellishments.

To get started I painted all the wooden pieces of the calendar with some green acrylic paint I had on hand. The green was a little too bright for me so after it completely dried I sprayed all the wooden pieces with some Jingle Bells Glimmer Mist which gave me the look I wanted. (It is hard to see in the photos.) I then sprayed it with a sealer to protect the wooden sections. I painted all the pieces before cutting them apart. I used my Tim Holtz Scissors to cut the little sections apart and they worked wonderfully.

I had some help from my son in assembling the wooden part of the box. While he worked on putting that together I went to work on the little drawers. I used Scor-Tape to hold my drawers together and to help hold my paper when I covered the drawers. I used paper from the Graphic 45 Christmas Emporium  8" X 8" paper pad to cover my boxes.  I cut my paper in two sections. I cut a piece 1 5/8" X 6" and covered the back and sides of the box and wrapped it around the front to cover the two outer edges of the front. I then cut another piece 1 5/8" X 1 5/8" to cover the front.  This gave me enough pieces of 5 boxes from each piece of 8" X 8" sheet of card stock.  I had the hardest time with the little U shape on the front of the drawers. I tried measuring it and thought for sure a 1" round punch would work perfectly to punch the holes, nope, just a little too big. I think a 3/4" circle punch might work though. I ended up tracing the cutout on to the back of each piece of paper and hand cut them. Of course some of them ended up slightly off center but that is okay.

Using the Scor-Tape I adhered the paper to the boxes and placed them in the wooden slots. I then decided to run all the numbers through my Xyron upside down so I had the adhesive on the fronts and glitter them with some red and green glitter I had in my stash. I adhered them to the drawer fronts with some Scotch Quick Dry adhesive.

For the center of the calendar I found this piece of We Wish You  A Merry Christmas paper in my stash. Sorry there was no name on in it and I don't remember where I got it. But I thought it went great with the calendar so cut a piece 8 3/4" X 8 3/4" and adhered it to the center of my calendar.

Of course while I was working on the project my new Cricut Imagine Santa Village cartridge arrived and I had to use it. I love the buildings in the cartridge and chose what I took for Santa's house. I cut the house at 5" using the layers feature on the Imagine and used the clear 3D foam pads to adhere all the layers together which gave the house some great dimension. To further jazz up the house I applied some Ultra Fine White Flower Soft to the snow on the ground and chimney of the house. Along the roof line I just sprinkled some clear glitter to add some sparkle. What is Christmas Countdown calendar without Santa himself making an appearance. I cut the Sleigh at 2 1/2" using the layers feature and also assembled it with the clear 3D pads. I again used my Ultra Fine White Flower Soft and Flower Soft Adhesive, and applied it to the trim on Santa's coat and hat as well as his beard.

Finally using the flip feature on my Imagine I cut the reindeer in layers and adhered it with the clear foam pads as well. I then cut a short piece of the Doodlebugs Twine from the Christmas Assortment, in a red/green/white pattern and adhered it to the the reindeer just under his harness and also just under Santa's hand so it looked like Santa was holding the reins to his sleigh as he took off for his one night of adventure.

Items available at Cutters Creek:

Jingle Bells Glimmer Mist
Christmas Emporium Paper Pad
Scotch Quick Dry Adhesive
Tim Holtz Scissors
ASI Kool Tak Clear Foam Pads
Flower Soft and Flower Soft Adhesive
Doodlebug Design Twine
Xyron

Also please remember that Cutters Creek can special order most KAISERCRAFT products and many of the Imagine Cartridges.

Friday, October 14, 2011

Elegant Edges Christmas Cards

One of my favorite things to do with my Cricut for cards is to make nice mats or frames for images.  So, I thought I would show you one of each on some Christmas cards I made.  Just a quick note: I use my Gypsy for this purpose, but if you have Design Studio or Cricut Craft Room, you can use them in the same manner.

First up, an elegantly simple card using papers from Graphic 45's Christmas Emporium paper pad.
5x7 card base

I started with a kraft card base.  I chose my design from the "Santa Express" sheet of images, cut it out, and measured its height & width.  Using my Cricut Gypsy, I chose a frame I liked from the Elegant Edges cartridge that had a similar height/width ratio. (Remember, Kim can special order just about any cartridge you want!)  I then "unlocked" the height and width fields so they wouldn't adjust together.  I then adjusted the height and width independently until the inner opening of the frame was approximately the same size as my cutout design.  (Slightly larger is great!)  I then cut the frame using some coordinating cardstock.

I then cut a 4.5"x6.5" mat from the green side of the "Merry and Bright" sheet.  I distressed the edges of all of my papers and my card bases using a sponge tool.  I adhered the green paper to the card, then layered on the frame using the ASI Kool Tak clear foam squares.  Next, I adhered the cutout design within the frame.  Finally, I added a touch of Polar White Flower Soft to my holly for added dimension.  VERY easy!

My second card takes a bit more time, but totally worth the effort for its beauty!

5x7 card base
I began with my vintage Santa stamp.  Mine is from my stash, but you can find a similar feel using the Crafty Secrets Vintage Christmas clear art stamp set.  Using the transparent ruler in my Cricut Tool Kit, I measured the approximate size of my stamp image.  I then chose a doily mat I liked from the Elegant Edges Cricut cartridge, and used my Gypsy to resize it until it was an appropriate size for my image, and cut it out.

I stamped my Santa image with Memento Tuxedo Black, colored it with Copic markers, then added his hat band and pom pom using white Liquid Applique sprinkled with clear glitter.  Note: to get this effect, sprinkle the glitter while the Liquid Applique is wet, then let it dry for a couple of hours before you heat it with your embossing gun.  I then distressed the entire image by sponging on some distress ink.  I also used the ink on my Doodle Bug twine so it would match better.  I stamped a small holly image on scrap as well, and colored & cut it out to use as an accent.

I used papers from Echo Park Paper's Season's Greetings 6x6 paper pad to create my background.  I used a brick Texture Fades embossing folder to create my accent piece on coordinating cardstock, then added additional dimension by distressing with multiple colors of ink.  I edged all of my paper pieces in black ink, since my image was stamped in black - it helps tie everything together.  I assembled the card, and popped up the image using the Kool Tak clear foam squares.

If you're interested, here's a list of specific Copic colors used in the Santa image:
E000, E00, E11, R20, R24, C2, Y17, YR04, YG63, G99, R29, R35, R39, and 0 colorless blender

Sunday, August 28, 2011

Flower Soft Can Make Your Project Bloom

Today I bring you my latest project using Flower Soft.  I must admit I had no clue what I was going to do until I started pulling out some paper, ink,  a stamp, etc.  I was lucky that things started to fall in to place for me.  And at this time I only have a handful of  flower soft options so that also guided me to what I was going to do.  I am definitely going to be buying some pastel shades next. I have my fall mix, winter shades, and today I used my Heather Mix.  I have to say that it is my favorite.   Another medium I used on my card was Ranger (TH) Distress Ink Pads, Spun Sugar.   I love the colors and used the ink pads on most of my projects that I automatically buy the ink refills when I purchase a new color ink pad.  This way I am assured I have more of my favorite shades in case the color retires.  Since the stamp I used was on the small side I wanted it to pop so I got out my Spellbinder’s Nestabilities and cut out two sizes of the Classic Scalloped Square, Small using my Cuttlebug to place behind the stamp.
There are small amounts of Stickles Glitter Glue on the flower in Little Emma’s hair & in the center of the potted flowers (Spun Sugar & Turquoise). In addition to adding the flower soft to the flowers in the flower pot (Little Emma is holding) I also colored the ribbon on the card with Spun Sugar Distress Ink Pad to match. It looks so pretty and you wouldn’t even guess that I ran the seam binding over the ink pad.  Sometimes you just have to be frugal and save your money on some things so you can buy important items like  Flower Soft, Spellbinder’s Nestabilites,  a Cuttlebug  and TH Distress Ink Pads.  The rest of the elements used on my project came from my personal supplies.
Here’s my card!  Let me know what you think.
Meet Little Emma
LittleGirl with Potted Flowers_Flower Soft
FlowerSoftCard2_CuttersCreek
See the flower soft.  A little goes a long way
(my camera’s flash does not go off when I do close-ups hence different color from top photo)

Thank you for taking the time to read all the details about my project.   I hope you have a wonderful day.
Fran

Saturday, August 27, 2011

Flower Soft, Echo Park Paper, and Copic Christmas Card with Lori

I see by the calendar that I am a day late posting this - oops!  Good thing no one else was scheduled for today...

Anyway, I have a fun little project for you today.  I always like to look for new uses for existing products, and today I did something a little different with my Flower Soft.  Here's a Christmas card I made:


I decided to use the Raspberry Fizz ultra-fine Flower Soft on the girl's umbrella and scarf.  You know that material that has dimensional fuzzy stuff on it?  That's what I was going for here, and I rather like the way it turned out.  I also used Polar White for my snowflakes - don't they look nice and fluffy?

Now, just a couple of other things to note: My card is 5x7, and I covered the front using a paper from the 6x6 Country Drive paper pad from Echo Park Paper.  I just covered the seam with my ribbon.  My doily mat is from the Elegant Edges Cricut cartridge.  (Remember, Kim may not have a cartridge listed in the store, but she can probably get you the one you want!)

I colored my image (sorry, not available at Cutters Creek) using Copic Markers.  I swear, the more I play with them, the more fun they are and the better I get at using them!  Here's the list of colors I used:
  • Skin - E000, E00, E11, E13, R20, R29(lips)
  • Hair - E37, E59
  • Scarf & Umbrella - YG07, YG09
  • Jacket - RV29
  • Jeans - B32, B34
  • Boots - C2, C6
  • Bird & Holly - RV29, R29, Y17, YG63, YG67
Thanks for stopping by today and checking us out!  Hope to see you again soon.

Thursday, August 25, 2011

Summer Memories by Laura C

Yep, summer is nearly history.....but I've got a great idea for
remembering the fun! The above is the finished result of a
project that started here:

Yes, a silly sign I got in the clearance aisle for $2 at Target!
Do you just pass this stuff by? Who would have thought
that was where this project started?.....lol!!

It really started with the yummy Graphic 45 12x12 paper
On The Boardwalk collection, and I traced the shape of
the sign onto the blue swirl paper and adhered that to the
front of the sign with Scor Tape. I sanded down the edges
to get a good fit, and give it a beachy feel.

Next I took this printed paper from the collection, and
distressed it.....you can see the "before and after" here:

I sanded the edges AND the actual paper, then used Vintage Photo
Distress Ink....it makes it look wispy and sand-washed.

Then for the Flower Soft fun! I got out my Bazzill Splat Mat,
used the Flower Soft wires, glue,and Flower Soft Ultra Fine
Sage color. I dipped the wires in the glue, then rolled them
in the Flower Soft. You can see the result here:

I let them dry really well (about an hour) and then I shaped them
into the beach grass you can see in the close up here:

The sandy beach is kraft cardstock torn and inked with the
Vintage Photo Distress Ink, and I also used a sandy type
embossing powder from my stash.

The beach sign is cut from the Graphic 45 papers,
distressed, and then inked up with Vintage Photo ink.
I applied Rock Candy Distress Crackle Paint and
after it dried, used more ink to hi-light the cracks.
If you look closely at the sign post in the above
pic, I used a small piece of white cardstock, scored
it lightly, then inked it with the Vintage Photo. It
looks just like a piece of weathered beach wood,
don't you think? Two small brads fasten the sign.

Finishing touches....a pic of my guys at the beach, a few
of the actual shells we collected, some pretty bling from
Want2Scrap, a bit of gauzy ribbon and twine, and it's
a finished project:

A beautiful memento of our beach vacation.....it's a gift
for my MIL, because they go with us every year!
Shhhh, don't tell.....it's a secret!!

Hope you enjoyed this project!! Remember to think
outside the box when you see those goodies on
clearance in the store, they could be your latest
and greatest project, especially when they are
topped off with goodies from Cutter's Creek!!

Available at Cutter's Creek:
Graphic 45 12x12 paper (On The Boardwalk)
Scor Tape
Distress Ink (Vintage Photo)
Distress Crackle Paint (Rock Candy)
Flower Soft (Ultra Fine Sage)
Flower Soft Wires
Flower Soft Glue
Bazzill Splat Mat
Want2Scrap Rhinestones


Related Posts with Thumbnails