Friday, March 29, 2013

A New Techinque with Patterned Paper by Deanna M


So I recently signed up for an online card class that was taught by Kristina Werner and Jennifer McGuire called Pattern Play. It was a class about how to use patterned paper.

I wanted to share with you one of the techniques I learned in the class. For this technique the goal is transform patterned paper to give it an entirely new look.

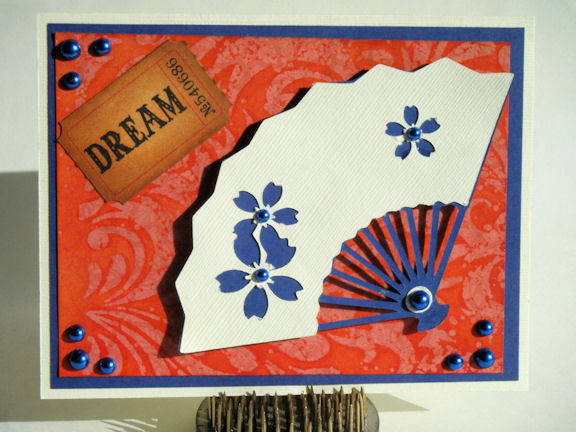
To make my card, I stared with a piece of white card stock cut and scored to make a 4 1/4" X 5 1/2" card. I added a dark blue mat cut at 4" X 5 1/4". For the orange mat, I stared with a piece of patterned paper cut to 4 1/4" X 5 1/2".  I used a Hero Arts Leaf and Branch background stamp (yes, Kim can get Hero Arts products, just ask) and stamped it on my patterned paper with some Versamark. I added some Clear WOW! embossing powder. Here is a before and after shot of the paper I used.

Next I used some Distress Inks in Rusty Hinge, Spiced Marmalade, and Ripe Persimmon and my blending tool to apply some ink to my embossed patterned paper. The embossed areas will resist the ink.  On the left is the paper I started with, on the right is what I ended up with after I embossed it and added the ink. The other step that I did based on what I learned in the class was to take my iron set on dry, medium heat and some printer paper and I laid the printer paper over my embossed patterned paper and ironed it a couple of times, moving the printer paper as I did this to take off the glossy embossing powder.


To finish my card, I cut a fan from the Cricut Pagoda cartridge (yes, Kim can special order this for you, just ask) at 3". I added it to my card front with some foam tape. Then I took a Tim Holtz ticket that said Dream and inked it with some Tea Dye and Vintage Photo distress ink ad added it to my card. Finally I added some dark blue pearls from my stash. Kim has a wide selection of pearls in multiple colors and sizes here in the store.

I hope you will give this technique a try. It is a great way to change up a patterned paper that may now be working for you.


Thursday, March 28, 2013

Wedding Card with Lori

Hello! Seems it's been a while since I've been here; the germs have been rocking our house a little hard this month.  Anyway, today I have a pretty wedding easel card to share with you.  The hubs came home last week and told me he needs a card for a coworker getting married.  Since he'll be delivering it in person, I was happy to make it thick and chunky because I don't have to deal with mailing it, lol.  Here's what I came up with:


I pulled out one of my few wedding stamps (I think it's Bildmalarna) and my Copic Markers.  I knew I wanted to use that beautiful doily die again, so I cut a circle from Xpress Blending Card to fit the center. I stamped my image on the circle and colored it with my Copics.


I made my 6x6 easel card using CTMH cardstock and Authentique papers from my stash.  I placed the stopper for my easel near the top of the inside instead of the traditional placement near the bottom so it would stand up almost straight. I made sure to pop up the top strip with foam adhesive to keep it from popping closed.  I also added some rhinestone brads for bling.


I raised the doily off the card front using more foam adhesive for added depth and interest.  I embellished using Prima Fairytale Roses and Cutters Creek branded flowers.  I inked the CC flowers to darken them a bit since they were the same shade as the darker Fairytale Roses, and I wanted to add a little more color variety. The flowers are all adhered using Glossy Accents.


It's hard to see in the pictures, but I added sparkle to the eyelet areas of the wedding dress using a clear Copic Spica pen. 


Supplies available at Cutters Creek:
Other Supplies Used:
  • Cardstock
  • Pattern Paper (I used Authentique)
  • Ink to sponge flowers & paper edges (the Tim Holtz Distress Ink pads in the store would work great)
 

Monday, March 25, 2013

Cricut Easter Basket by Tee

For my last project at the Cutters Creek I wanted to share with you an Easter Basket I made using the Spring Cottage and Easter Magic (CCR Exclusive).

I cut the basket at fit to page and the rabbit at about 3" I inked the edges of the rabbit with some pink ink then covered in Glossy Accents then dipped in some super fine glitter.  Finished it of with some Ribbon and aged the basket a bit. Love Love how it turned out!!


Hope you all have a wonderful Easter! I also want to take a moment to thank Kim for having me on her Design Team and each of you, the readers, for all our your support. I will miss you!

~~Tee

Sunday, March 24, 2013

Happy Easter by Fran


My project today is something I’ve been wanting to do for some time now.  I’ve seen so many other projects using silhouettes of their images and I really love the look.  So I went just a little outside the box with my Easter project.  Not your typical pretty Easter colors. I chose to use  black and white.   I really didn’t know how it would look in those colors but I surprised myself and I really like it.  Details about my project are below the photo.
Final
(you can click on the photo to get a larger view)
Details:  Glossy Accents; Stickles (Black Diamond);  all embellishments created with my Silhouette Portrait;  Silhouette of Bunnies (Silhouette Store); Background paper & white paper (my stash); Frame (Dollar store).
I want to mention that Kim Bush of Cutters Creek special ordered my Silhouette Portrait for me and I was able to place it on layaway.  If you are interested in buying a Silhouette Die cutting machine check with Kim here.

Thank you for stopping by and I hope I gave some creative incentive.
Black heel sparkle-Fran 

Friday, March 22, 2013

Ahh the Country.....

Graphic 45 French Country that is!!  I've made a mini album
using the 8x8 pad, sticker sheet, and the two 12x12 sheets,
"A La Carte" and "Bon Appetit".   Another option from this
 collection (or any G45 collection) is matching chipboard pieces,
you can find them HEREG45 collections are great
to use for a mini album.....so many options!

I've included a picture of each page....this is a simple
6x6 album, that I made from a 12x12 chipboard sheet. 
You get 4 pages  from one sheet if you cut carefully, 
and I added a couple of die cut tag pockets too.
Instead you can use a paper lunch bag folded in half, 
it works great....folds to almost a perfect 6x6, and the 
opening of the bag serves as the pockets.  The album is ring
bound. Just two holes punched in the left side, bound with
metal book rings, then dressed up with ribbon.

So starting with the cover:


I like having a lot of tabs sticking out to give it interest....some
ribbon, some stickers, some paper folded and staples using
the Tiny Attacher.  They give it a lot of texture and fun!

Pages one and two....you can see the tag pocket on
the right.....next picture.....

shows the card pulled out of the pocket....just made with 
cardstock and decorated on each side, here is the back:

And the pic of the full page:
 

Pages 5 and 6.....and leading into the next tag pocket:


And the slide out....it's a good idea to keep a low profile
and minimal embellishment on the pocket pages to make
them easy to slide in and out:


And yep, you guessed it....back of the pocket page:


Pages 7 and 8:
 

Pages 9 and 10:


And last but not least.....the back cover....


I did add a bit of Want2Scrap pearls here and there....
always a nice, but low profile embellishment for a mini.
Also distressed all the edges with Black Soot Distress Ink.
I also used Scor-Tape to put these together....because 
even with people paging thru them over and over, they
will stay together....Scor-Tape holds really well!

Do you have a special event to make a mini album for?
Or just want to try one for fun?  Check out the G45 
collections....there is probably one that will work perfectly!

Thanks for stopping by today! 

Wednesday, March 20, 2013

A Ladies Diary–Graphic 45 Paper Collection


I get this 8x8” paper pack in my mailbox from Cutters Creek.  The paper is by Graphic 45 (one of my favs) called A Ladies Diary.  I look at each sheet of paper and the prints are beautiful on both sides.  Yep it is double sided.  A card makers dream.
I ponder a while and wonder what papers will I use.  And what image will I need to find that will go with the theme.  And then color it.  Then it hit me!  I will fussy cut one of the images from the paper and it will be my focal point.
I chose three prints to make my card.  And added black paper from my stash as the accent color.
Surprisingly what I thought would be a hard task to pull it all together started to flow so easily.  It took me a long time to make the card because I added die cuts, flowers,  butterflies,flourishes  using only the 3 pieces of paper from A Ladies Diary and the black paper from my stash.
Below the photo will be all the details on what I used to make the card.  And you can click on the photos to get a closer view.
Sidebar:  It couldn’t happen at the worse time but the battery to my digital camera died.  No it didn’t need re-charging it died and was not fixable.  New one ordered.  So Kim of Cutters Creek reminded me I could take pictures with my iPad Mini.  My first time for this but what made it worse I had to sync it to my computer first Sad smile.  When it rains it pours.  The photo images do not do the card justice but you still see how awesome the card turned out.  I don’t think I will be able to let go of this one Smile
LD1
LD2
LD3-inside
Recipe:  Graphic 45 A Ladies Diary Designer Paper,  All items in black is Neenah Paper  (Classic Linen in Black),  Spellbinders Nestabilities Timeless Rectangle (Front & Inside), We R Memory Corner Chomper (Deco Corners), EK Success Retro Flower Punches, Martha Stewart Butterfly Punch, Silhouette Portrait (black flourishes and leaves),  Black Diamond Stickles, Scotch Quick-Dry Adhesive, and Kool Tak Double-sides Permanent Tape (awesome).
Remember if there is something you need or want and its not available in the Cutters Creek Store just contact Kim.
Thank you for stopping by,
fran_cheer_karyn

Tuesday, March 19, 2013

Quick and Easy Easter Basket by Deanna M


Welcome Tutorial Tuesday! Hope your week is off to a great start.  Today I have for you a quick and easy Easter basket. Perfect for a hostess gift, gift for co-workers, friends, just about anyone, or the center of your Easter table.

I happened to come across this great tutorial at Scor-Pal on making a box. I knew I wanted to make a simple basket and wanted it 4" across the bottom and I wanted 3" sides. Based on the formula in this tutorial (4+3+3 which is the box size plus two times the height size) I knew I needed to cut a 10" square to make my box and then score each side at 3". I then cut the flaps as indicated in the tutorial.

This picture is from the tutorial

I adhered my box using scor-tape. My handle which was just the 2" X 12" strip of patterned card stock I cut off to make my 10" square. I attached my handle to my box behind the outside flap so the bottom of my handle was hidden.

Now that the basket was together, it was time to decorate it. I cut my rabbit from the Easter 2010 Cricut cartridge at 2 1/2".  I ran the rabbit through my Xyron sticker maker upside down so the sticky was on the front of my bunny.

Okay so now I have a confession to make. I thought that at some time in the past I had purchased the Earth colored Ultra Fine Flower Soft. However, if I did, I sure couldn't find it and was not where I store my flower soft. So now I had a dilemma. I wanted to make my rabbit furry, so what to do? I took some of white Ultra Fine Flower Soft and added several drops of  ginger alcohol Ink to it in a plastic sandwich bag and rubbed it around in the bag to get the color I ended up with. However, I also ended up with ginger colored hands and it had a bit of an odor to it from the alcohol ink. So while it worked in a moment of panic I plan to get some of the Earth colored Ultra Fine Flower Soft when Kim has it back in the store. Just much simpler to us.Once I had my bunny sticky and the flower soft the color I wanted I added it to the front of the bunny and pressed down on the flower soft (that's how I got the colored hands) to be sure it stuck to the adhesive. I then added a bow at his neck and a google eye to him and adhered him to my basket.


Next I cut the grass. The grass is also from the Easter 2010 cartridge and was cut at 1 1/4". Each strip is actually 2 of the images that I flipped and welded together on my Gypsy. You could do the same thing with the Cricut Craft Room if you don't have a Gypsy or Design Studio. I cut my grass out of some Core' denations paper and the light green is actually the back side of the card green. I adhere the grass to my box at the bottom and then fluffed up the grass to give it some dimension

For my Easter eggs, I cut these from the Doodlecharms cartridge using real dial size and 3/4" and 1". Before cutting the eggs I grabbed some scraps of card stock in pink, yellow and lavender. I used my WOW! Funky Border Strips clear stamps and several colors of distress ink to create some patterned paper to cut my eggs from. If you haven't tried any of these clear stamps you should. WOW! makes them so they work really well with their embossing powders (just a suggestion all you WOW! club members). Kim carries several of their stamps sets. It is worth checking out.


On the lavender paper I used the Peacock Feathers Distress ink and the small dot border stamp. On the Yellow paper I used Shaded Lilac and the small squares border stamp. On my pink paper I used the Squeezed Lemonade and the Pickled Raspberry distress ink and the single row of dots border stamp. I first stamped the Raspberry and left about an 1" between the two rows, then went back and stamped the Lemonade between the Raspberry.

Once I had the eggs cut out I used my Spica Pens to add a little glitter to the eggs and then adhered them to the front of my basket.

I hope you enjoyed seeing my basket and will check out the awesome products used from Cutters Creek. And remember if something is ever out of stock just contact Kim through the Customer Service link and ask if she can order it for you. She is great about special ordering so never hesitate to ask.

I hope you all of a great rest of your week. I would love to know what you think of my basket.

Sunday, March 17, 2013

Mickey and Friends

It’s a lot of work preparing for a Disney trip. I’ve always tried to make a special autograph book for my daughter to take with her when we go to Disney.  This time I’m starting early so I have to time to finish it without killing myself and running out of time.  I’m using my cricut and my cinch to make the book.  I love the cinch, I find it much easier to use than my bind it all. 
The book is going to be 8 x 8 and each page will feature a certain character with their name and a space for their autograph.  I’m using my Imagine with a list of Disney RGB codes I found online to fill in each individual layer.  This makes it much easier than trying to find the right color of cardstock for each little piece. 
Here are a few of the pages I have done so far. 
photo(19)
photo(20)
photo(21)
I’m cutting the characters at 4.5 inches.  This allows them to fit on the page, but most of the layers are big enough to work with.  The size of the borders and the titles vary, but most of them are around 2 inches.  After I have all the pages finished, I will bind the book with my cinch.
I’m off to a good start, but I still have a long way to go. 

supplies used for this project
cricut cartridge Mickey and Friends
various patterned papers
cardstock
Cinch

Friday, March 15, 2013

Quick Cards by Laura C

One of the best ways to build a stash of cards to have on hand
is to grab a paper kit and enjoy an hour or two of creative bliss!

I absolutely love Echo Park paper collections....they contain
stickers (usually 2 sheets, one with alphas) and of course,
the gorgeous and versatile Echo Park paper!  I'm a huge
fan of their journal boxes too....they are great starting
points as inspiration for quick and easy cards!

This particular set was made using the "Note to Self" collection
from Echo Park....many to choose from at Cutter's Creek,
and a great quick craft if you only have a little creative time,
 but are itching to have some crafting fun!!

 And here are the close ups:


Just a few Want2Scrap pearls, a bit of twine and Black Soot
Distress Ink, is all I added to this kit....they are great for
card making, in addition to scrap booking--give it a try
sometime....it's definitely a great way to use your scraps too!

Remember, it's National Craft Month....grab a kit and get crafting!

Thursday, March 14, 2013

Birdcage Card - Cricut French Manor

Hi Everyone!!! Today I want to share a new card I made using the Cricut Cartridge "French Manor"


I cut the bird cage out at 5.5 inches and put it on a 5.5x4.25 piece of folded cardstock to make a card. I wanted my bird cage to look rounded against the paper so I added one layer of popdots to the outer edges but two popdots stacked high in the middle. Hard to see in this picture but totally adorable in person..

I inked my pink with some soft pink chalk ink and then added star dust stickles then glossy accents on my bird.

Hope you like it!

~Tee


Wednesday, March 13, 2013

Scrapbooking With Kim B

I have finally made it to the end of 2011 in my scrapbooking!  I can't wait to start 2012 and hopefully get more caught up.  It seems like I am getting more caught up each year, however those pictures just keep stacking up.......................lol!  AND, I have a new grand child on the way this year, so that means even more photos!  So once again, here is one of my favorite subjects my youngest grand daughter.
 
 
Do you find yourself using the same colors over and over all of a sudden?  I seem to be doing that lately.  I was using a ton of orange and now it seems I am using a lot of purple.  The background paper is dotted swiss and the accent paper is Anna Griffin which I used a decorative punch on.  The photos were matted using Perfect Layers (there is a coupon code on the right sidebar to order this awesome product!), thickers for the title, and some embellishments from my stash.
 
I sure would like to hear how you are accomplishing your crafting New Year's resolution, so please leave me a comment.


Sunday, March 10, 2013

Altered mini frame by Ms. Pebbles

Hello everyone! The last project I did (Altered Nesting Boxes), I used some Distress Crackle paint and I really like how it turned out. So I decided to give it a try on mini frame that I have had sitting in my craft room for a couple of years now that I purchased from the dollar store!


This 3x5 frame started with a silver, shiny almost chrome like finish on it. I applied a coat of white Gesso first to prep it for the acrylic paint and let it dry completely. Then I painted a coat of pink acrylic paint over the entire frame and allowed it to dry. Now comes the fun part! I painted the frame with Distress Crackle paint and set it aside to dry. Waiting for it to dry was the hardest part! :) I really love how this turned out! The pink barely showing through the cracks really makes it pop! Then to embellish it, I just grabbed a flower from my stash and stick pin to match and hot glued them in place.
Thanks for looking! :)

Saturday, March 9, 2013

Ye Olde St. Patty's Decor by Laura C

Have you enjoyed our National Craft Month posts this week?
Hopefully you are inspired to get crafty this month!!

One of my favorite things to do is altered art projects, so for
our special National Craft Month posting, I mixed the fun of
altered art with the idea of home decor for one of my favorite
holidays.....St. Patrick's Day!  And so,  St. Paddy's Pub was born:


This project is the kind of thing National Craft Month is about,
to me....just playing!!  With paper, and ink, and tools....it's
all about fun!  I have a few close ups of the steps along the way:


I started with a divided box I picked up on clearance, it's
similar to a Tim Holtz Configurations Box, the edges are
 painted with an Adirondack Paint Dauber (I used Lettuce)

And here is the side view:


I covered the sides and the B&W strip in each cubby
using Core d'nations embossed cardstock, you can do
this yourself or use a pre-embossed type, then sand to
bring out the embossing.  And then I started the cubby
decorations, using bits and pieces of different items:


I used a lot of different Idea-Ology products.....everything
you see here plus a few others on the finished project.
Lost & Found Paper pad, Cash Keys (charm on the calendar
with shamrock sticker inside),Clock Keys (lantern "hanger"),
Corked Vials (small glass jars in small cubby), Game Pieces
 (bingo #17 in red), Plaquettes (porcelain looking #17) , 
Ornate Plates (in lower cubby with Ruler Ribbon inside),
Locket Keys (metal piece on Pub Sign under shamrock),
 Ruler Ribbon (inside ornate plate), Memo Pins (stuck into
wooden spools lower right cubby) and Hanger Clips (holds
small piece of burlap with shamrock sticker in lower cubby),
Salvage Stickers--Crowded Attic (label on mini vial).
  Kim can order you any and all of these fun goodies!
The vials are colored using Adirondack alcohol inks
in Meadow and Sunshine, the calendar is distressed
with a Tonic distress tool, and Distress Ink in Walnut Stain
and Black Soot.  Tiny Attacher staples finish it.

In the close up of this cubby, you'll see I added one of the 
Idea-Ology Woodlands Miniatures dyed with re-inker in a
Mini Mister bottle mixed with water, accented with Paper Twine,
and you can see the Mini Lantern hanging from the clock key
(Yes it's lit up....the battery pack is attached to the back!):


A close up of the left side....
 

I used saved corks (love to recycle!) in addition to the
Tim Holtz goodies.....each cubby is outlined with
Tinsel Twine.....this is FUN stuff....so many different uses!

The top of my little "pub" is a medallion stamped on black
cardstock and embossed with WOW embossing powder 
(the Metalline Green color), the letters are cut out of the the 
Lost and Found pad, inked with Black Soot Ink, layered onto 
chipboard and then painted with Rock Candy Crackle Paint to 
give them an old antique tile look, you can see in the close up:
 

And a close up of the last two cubbies....a little twine,
and Glossy Accents on the bottle cap....and Distress
Stain in Peeled Paint on the wooden spools:


And a final look from a different angle at the finished project:


My "go to" adhesives for a project like this are Scor-Tape
and Glossy Accents.  They really hold, and are both
available in Cutter's Creek. Same goes for the products
used in my project....many are already in-store, and the
others can be ordered any time!  

Hope we have inspired you this week to join in our
National Craft Month fun with some projects of your own!

Tell us what you are inspired to make!! 
Related Posts with Thumbnails