Showing posts with label Twinkle Jewels. Show all posts

Saturday, December 17, 2011

Baby Shower Card by Chris


I love my Nestabilities Labels Four and have used 3 graduated sizes here to make this shower card. I cut four labels—2 from the largest die, skipped a size and did one each of the next two dies. All edges were inked with Tattered Rose Distress Inks.

To assemble the card base I scored the back piece straight across the top of the side parentheses. I then used my ATG gun to glue above the score line and glue the two pieces together and trimmed off the bottom of the card so it would stand as an easel. The yellow layer was glued down next and the green swiss dot layer was mounted with pop ups. I wrapped the bakers twine around the top and bottom.

To make the stork and baby I used New Arrival Cricut Cartridge and cut the baby at 2 inches. The face is one of Peachy Keen stamps. (I used Just Baby Face Assortment which I bet Kim can get for you if you want.) The stork was cut at 3 inches. To make this stork I cut 2 extra body pieces because I wanted to make the wings look as if they were flapping in flight. All three pieces went through my Cuttlebug D'vine Swirls embossing folder. I didn’t want the neck and face to have the swirls so I left those parts hanging out as it went through my Big shot. I glued the first layer down. The next two layers I trimmed off the neck and head and glued down only the part closest to the neck. I inserted pop ups between the wings to raise them up and then layered the baby bundle over his beak. The top of the bundle is glued down, but the bottom is raised on another pop up. (Lots and lots of dimension in this card.)


To finish off the card I made a rosette using Tim Holtz Alterations Paper Rosette (which Kim had special ordered for me) and a Winter Twinkle Jewel on the outside and a sentiment on the inside.

These Products can be found at Cutters Creek:
Spellbinder Dies
Tim Holtz Distressed Inks
Twinkle Jewels
Peachy Keen Stamps
Doodlebug Bakers Twine

Friday, November 25, 2011

Asian Themed Birthday Card by Chris

I decided not only make a gatefold card, which I haven’t done in a while, but also, to use my neglected Copic Markers. I had a free digi image already printed and some paper that had an Asian flavor to it—a perfect match.


I started with a 5.5 x 12 inch piece of plum Bazzill Card Stock and scored it at 2, 4, 8, and 10 inches with my Scor-Pal and creased the folds. On the front panels I layered black Card Stock (1 ¾ x 5 ¼ inches) and decorative Card Stock (1 ½ x 5 inches). Inside I put another piece of decorative Card Stock (3 7/8 x 5 7/16 inches). All the decorative panels were edged with Tim Holtz Milled Lavender Distress Ink.


I colored the geisha; then hand trimmed her and mounted her with my Zig Glue Pen onto some black Card Stock, which I also hand-trimmed with my Cutter Bee Scissors. She was mounted with Pop Up Glue Dots on a two-layer panel. The black piece is 3 1/8x 4 ¼ and the plum piece is 4 1/8 x 3. Using my ATG, I glued one half of the panel she was on and set it on the left front of the card. To finish the card I added some red Twinkle Jewels (Skittles) on the front panel, and used one of my Parisian Accents from the Spellbinders Shapeabilities set to cut a black Card Stock label for inside. The sentiment was printed on my computer using a free font.

The geisha girl is colored with:
Hair: C5, C7, C9
Skin: E00, E000, E50
Teapot: C1, C2, C3
Kimono & hair flower: R29, R39, R46
Flowers and butterflies: YR21, YR23, BG72, G82, YG61
Socks & Cat: C1
Sandals: E13, E35
Shadow: BG000

Saturday, March 26, 2011

Cutters Creek Spring Blog Hop!

Welcome to the Cutters Creek Spring Blog Hop! All of our designers have created some wonderful Spring projects featuring products that you can purchase at the Cutters Creek Store! The Cutters Creek Design Team Blog is the first and last stop in the hop! Each blog along the way will have a link to the next blog in the chain. Don't forget to make sure you are following each of our personal blogs and leaving comments along the way to enter to win a box full of CHA Swag and maybe a few other goodies along the way!!!!

On the Cutters Creek Design Team blog we are featuring a gorgeous Accordion Fold Spring Card created by Chris! Take it away, Chris.....

What better way to celebrate spring than with flowers? Or even better, flowers in a garden? I wish I had a green thumb to create this in my yard or even a picket fence with which to begin, but alas my garden lives in paper—LOL.


Starting with a 6"x12" piece of white cardstock, I rounded one edge and scored it with my Scor Pal at 4" and 8". Using my cloud-maker and Tim Holtz Distress Ink in Tumbled Glass and Scattered Straw I inked my sky on the front panel and the outside panel that showed behind it. The two inside panels are covered with cardstock cut at 4"x6" from the Prima Fairy Flora 6"x6" Paper Pad. I used Scor Tape to adhere them. I then cut Flower #12 and its shadow at 4 inches from Cricut Lite Botanicals cartridge and mounted it on the inside left panel. My sentiment is printed on ivory cardstock and cut with Spellbinders Shapeabilities Fancy Tags. I also cut and embossed a piece of translucent paper with Nestabilities Labels Four (#6), which I glued down with Vellum Glue Dots then mounted the Tag on top of the label using pop dots.


To make the front of the card, I stamped several flower stamps on cardstock and cut them out. One flower was colored with Copics colors Y08, YR65 and YG23. I colored the rose with Copic color RV66. I used Flower Soft Glue and Flower Soft to highlight the different flowers. For the rose I used Peony Pink. The Dianthus is accented with Ocean and Baby Pink. And the for the Daisy I used Marigold and Citrus Crush. I set those aside to dry and took some scraps of acetate, cut them with my Tim Holtz Alterations Tattered Florals; using Staz-On Black ink I stamped the two larger pieces with a background stamp and then flipped them and colored with Copic Markers B02, B06, RV66, and RV63. Once they dried, I used my Crop-A-Dile to punch a center hole and add a rivet to each. Going back to the Flower Soft flowers, I glued a Cherry Twinkle Jewel in each center to two of the pink Dianthus flowers and a pearl in the center of the Daisy. I had one last flower to make and I used a French White Prima Rose sprayed with Perfect Pearl Mists Forever Red.


While that was drying, I used my On the Fence Tim Holtz Alterations Die to cut American Crafts White Glitter Paper and trimmed it to the width of the front panel (4 inches). I put pop ups on the back along the two railings and up each side, but didn’t glue it down yet. I started arranging the flowers behind it and decided that some grass needed to be both behind the fence and along its base for that I used—you guessed it—Meadow Flower Soft. While that was drying, I adhered the two acetate flowers using Glossy Accents and my Zig Glue Pen to put down the rose and two daisies. I decided to use a scrap of wire to create a “vine” around one fencepost and used Glossy Accents to adhere the 3 small flowers to the fence. I mounted the fence and then again using Glossy Accents added the Prima rose. The final addition was a butterfly stamp that I colored with Sand, Lilac, and Peach from the Copic atyou Spica Set B.

See, didn't I tell you her card was gorgeous??? When you complete the hop, come back here show your love for Chris and all of our designers! Leave one comment at every blog along the way and make sure you are following the Cutters Creek Design Team blog and the designer's blogs too! Now hop on over to my blog HERE! Oh, and check out the AWESOME prize we have for one lucky winner:


You will get that Springy looking tote, the Creative Options Box, Graphic 45's A Proper Gentleman, and look at all the little things in the Creative Options box! You get those too!!!

Here's a complete line up of all of the blogs in the hop in case you get lost along the way:
Cutters Creek Design Team Blog - You are Here!
Mandie's Blog - http://mandiesscrappin.blogspot.com
Kim's Blog - http://kreativekim.blogspot.com
Mindy's Blog - http://www.scrappyandpiggy.blogspot.com
Laura's Blog - http://scrapaddict4life.blogspot.com
Melissa's Blog - http://www.ourmadhouseof4.blogspot.com
Lori's Blog - http://savingmine.blogspot.com
Vicki's Blog - http://scrappyleopard.blogspot.com

Thursday, February 10, 2011

Cupid's Arrow by Laura C

This card starts with a 5&1/2" by 4&1/4" base of kraft cardstock.  I centered a Spellbinder Classic Heart Die in the middle of one side, taped it down to hold it in place, and ran thru my Cuttle Bug.  Then I used Tim Holtz Distress Embossing Ink to stamp the flourish from the Stampers Anonymous "Fairytale Frenzy" set, and embossed it in pink.  Then I inked this base in Distress Ink in Vintage Photo. The ticket is from the Stampers Anonymous "Love Struck" set, and is also embossed in pink, and then inked with Vintage Photo.  Cupid is also from the "Love Struck" set and is stamped in Vintage Photo Distress Ink on kraft. I added a little more Vintage Photo ink to fill in the image a bit, and then I sprayed it with Iridescent Gold Glimmer Mist.  I put a 5&1/4" by 4" piece of pink  patterned paper that was distressed with Vintage Photo Ink, on the inside of the card.  Then I layered in Cupid so his arrow was hitting the heart on the flourish stamp, and used foam tape to raise up one edge of the ticket....and added some Kaiserkraft
rhinestone bling. Cherry Chocolate Twinkle Jewels add a nice accent in each corner, and a bow and extra bling from my stash finish it off.  

So with a card this pretty....which special Valentine would you send it too??  

Available at Cutter's Creek:

Spellbinder Dies (Classic Heart)
Stampers Anonymous (Fairytale Frenzy and Love Struck)
Tim Holtz Distress Ink (Vintage Photo and Embossing Ink)
Tattered Angels Glimmer Mist (Iridescent Gold)
Kaiserkraft Rhinestones (Light Pink)
Twinkle Jewels (Cherry Chocolate)

Friday, January 7, 2011

Simple Thank You Card by Vicki

Here is a simple but pretty card made with my Cricut and a few simple embellishments. I used some coordinating papers from my stash to make the card & envelope. When making cards with Wild Card, I always make my envelope first and set my Cricut to the 'Fit to page' option. If you watch the display screen as it calculates the correct size, you will see what size to make your cards to coordinate the remainder of your cuts for the card. In my case, the largest size envelope I could make on a full sheet of paper was 6.10. When I started cutting the card base, I turned off the 'Fit to Page' option and set the dial size to that size. I cut the liner and the words in the small window at that same size. Many people get frustrated with the phrases on this cartridge because they often get confused with the odd sizing. Just keep the dial size set the same as your card base and you'll be ok!


My paper didn't have enough sparkle, so I took out my Frosted Lace Stickles and accented all the little dots on my paper. While that was drying, I cut a few snowflakes from the Gypsy Wanderings cartridge. I cut the base of each snowflake from solid red cardstock and the tops from vellum. I used a Twinkle Jewel in the center of each snowflake. I find that these stick best with either a Mini Glue Dot or Glossy Accents.

Now I have a nice Thank You card for a very special holiday gift!

Cutters Creek items used:
Cricut Expression Machine
Frosted Lace Stickles
Twinkle Jewel
Glossy Accents
Mini Glue Dot

Saturday, October 16, 2010

Holiday Card with Vicki


I can't believe it's October already! Time to start thinking about Christmas cards!! I have created a simple and geometric holiday card, using just a few products, and a little imagination!

Thickers are great sticker letters, but they are large. I wanted to highlight the letters, but not overpower them. I cut a simple frame of red cardstock. Instead of keeping it plain, I used my Scor-Pal to highlight each of the corners, on an angle. I then marked two additional spots on each side of the original angle, and scored a line from the hash mark, back to the center of the corner, creating a sunburst effect. To highlight this sunburst, I brushed it with Pixie Dust Blingz. I adhered the frame to the front of the card.

Next, I attached the Thickers letters. It took a few tries to line everything up, but the stickers don't stick hard until you press them down, so I was able to move them around several times until I got it just right! To finish everything off, I added a clear Twinkle Jewel at the inside corners of the red frame, and added one to the dot of the 'i' for a whimsical effect.

Cutters Creek Items Used:
Twinkle Jewels
Scor-Pal
Dear Lizzy/American Crafts Foam Thickers
Shimmerz Blingz Pixie Dust

Tuesday, September 28, 2010

Rosettes 101 by Laura C.

Rosettes: 101

Well, ask and you shall receive!! My second project this month was rosettes as well (if you haven't noticed, they are HOT in everything paper crafting!!).  I've included more detailed pics on the how to's this time, so hopefully you will all try this fun new technique!!

Step #1: Cut a strip of paper to the size of rosette you'd like.  I used a 1" x 12" and 1& 1/2" x 12" (which I
punched with a lace punch for a funedge!). 


Step #2: Fold one end of the strip over about 3/16" to start accordion, then continue to fold back and forth
until the entire strip is folded. 


A side note here: take your time to make sure you keep your folds even.....it will take a few minutes, but you'll love the end result!  Some people have used a paper crimper to "start" the accordion--but it is tricky to get the paper thru perfectly straight, also, Tim Holtz has a new a die that does this, it comes out soon.....you can always ask our wonderful store owner (Kim, of course!).

Step #3: adhere ends of your rosette together with a bit of your favorite adhesive.


Step #4: cut a circle to fit your rosette (I used a 2" circle for the 2&3/4" rosette and a 1&1/2" circle for the 2&1/4").  Then cover the circle with adhesive....I used a layer of my favorite regular adhesive, and then 4 or 5 glue dots spread out on top of that.


Step #5: Push the center of the rosette down, then holding it slightly pinched, pick it up and place it on the circle with the adhesive. Ta Da!!  You have a complete rosette!


Step #6: Embellish!!  I used twinkle jewels and Stickles, and they are also a perfect fit with the brand new Spellbinders Beaded Circles dies--the larger sizes for the base, and the the smaller sizes for the centers! I added an additional center circle (1 & 1/4") that I wrote in and inked.  This center could be ANYTHING--stamped or printed from the computer)


These can decorate scrapbook pages, cards, anything you can think of!  Attach them to a small stick, and make a bunch of "flowers".  The "Boo to You" example I have here, would be perfect if you attach it to a big lollipop, for a gift, or for a child's class. Remember, you can do this for any holiday, any event (think wedding or baby showers, graduations, any party!) you can make them in any color and decorate anyway you'd like.....the only limit is your own imagination!

Happy Creating!!


Available at Cutter's Creek:

Spellbinders Dies (Beaded Circles)
Stickles (Purple)
Twinkle Jewels (Many!)
Tim Holtz Distress Ink (Rusty Hinge)

Wednesday, August 18, 2010

Oriental Weave Card by Sandi


When I received this Cuttlebug embossing folder -Oriental Weave  from Kim I knew just what I wanted to do.  I used colored cardstock with a white core center, which I lightly sanded to bring out the core.  I thought it looked oriental, so I searched for an appropriate stamp design and added dimension by using Super Fine Gold Embossing Power. I stamped it twice the second on red card stock and used only  the center  flower  to create more dimension and completed it by placing a Kaisercraft  Pearls in the center.  Behind the image I placed a Spellbinders Scallop Frame on a slightly different green cardstock  and again I sanded it to bring out the white core.  I cut four small flowers using a Cricut cartridges and covered them with Gold Stickles. After they dried I glued clear Twinkle Jewels (skittles) to  the centers.  I finished the card with an oriental looking patterned ribbon.

You can purchase the products listed below at Cutters Creek:

Tuesday, August 10, 2010

Christmas in July/August Chipboard Book by Chris P.


Here’s a simple project using Bo Bunny word books, left over wrapping paper, and stickles. I covered the word BELIEVE with several different Christmas wrapping papers and some red mulberry paper I had in my scrap bin. I also had some leftover strips of the AC glitter paper and cut them to back each page. I then used my fingertip craft knife to trim around the letters, sprayed all the pages using gold glimmer mist, and then inked all the edges, using Tim Holtz’s Barn Door Distress Ink and Ink foam applicator.


I made and matted cardstock photomats for each page. To give them a bit more of a finished look I tied ribbon around some and added several photo corners from the Storybook cartridge. I used my cricut markers to outline them at 1 and 1.25 inches and then cut. Next I rubbed each into the versamark inkpad and heated using clear embossing ink to give them some dimension and shine.

It needed some more glitz so I used my silver stickles to outline silver stars, the Christmas red to decorate the tree, pickett fence to outline the snowflakes and added two cardstock snowflakes with a clear Twinkle Jewel in each center. I used my Crop-a-Dile punch and 3 snowflake eyelets to finish off the front page. I had some leftover stickers that I randomly placed and, then, tied bits of ribbon here and there on the letters along with 3 larger bows on the metal rings. Now I have a stocking gift for one of my DDILs. I have never been this prepared before. I just hope I remember where I hide it when putting out the gifts in December—LOL.


Cutters Creek Resources:


Versamark Ink Pad

Sunday, July 11, 2010

Fairy Card by Mandie


Today I have created this adorable fairy card using one of my favorite stamps sets and my much neglected Cuttlebug! I always forget how much I love the texture that it adds to my projects. So I dusted off my Cuttlebug and pulled out the folders and was inspired by the texture of the one from this Cuttlebug Plum Blossom Embossing Folders Set.

I embossed a piece of 4” x 4” Core’dinations Cardstock and then sanded to reveal the green underneath. Next I stamped my fairy from the Enchanted Lily Stamp Set onto a sheet of white card stock with my Memento Tuxedo Black Ink and colored her using some markers from my stash as well as my favorite flesh toned Copics. I bought the flesh colors first because they are so hard to get right. The colors I used here were: E00 and E11 for the flesh and R20 for her cheeks.


After I had her colored just right I added a little bling with my favorite Sakura Jelly Roll Pen! I use it to add a little sparkle to a lot of my projects! Then I used a oval cutter and cut out my image and used the next size up to cut the frame from the reverse side of my cardstock.

Then I cut a 1 ½” x 4” strip of patterned paper from the Basic Grey Origins Paper Pack. I am in LOVE with the gorgeous papers in this pack! Then I adhered it all to the card base along with that gorgeous green ribbon. Then I stamped my sentiment and added the little brackets around it by hand. Then for the finishing touch I added a few Twinkle Jewels along the side of my card with some Glue Dots. I hope I will inspire you to dust of your Cuttlebug and play with those embossing folders!


Products Featured:

Cuttlebug Plum Blossom Embossing Folders Set
Core’dinations Cardstock
Enchanted Lily Stamp Set
Memento Tuxedo Black Ink
Copic Marker E00
Copic Marker E11
Copic Marker R20
Sakura Jelly Roll Pen
Basic Grey Origins Paper Pack
Twinkle Jewels
Glue Dots

Thursday, July 1, 2010

Birthday Treats by Laura C.


Give a special someone an extra Happy Birthday, with a handmade gift set! The card is a 5”x5” base in sky blue with a dark pink 4 ¼” x 4 ¼” layer next, a light pink 4”x4” piece embossed (I used the Cuttlebug Victoria A2 folder), then the dark pink and white cut with Spellbinders Scalloped Square and Classic Square. The cupcake was stamped on the American Crafts Pink Glitter paper and sky blue cardstock and cut out. Then the card was assembled, adding finishing touches of a candle, bow and bling, and the happy birthday sentiment framed by the Spellbinder Fancy Tag die cut made with pink cardstock.


The box is a recycled ribbon package. (Mine was from Cosmo Cricket.) The lesson here: never throw out your packaging! It could be your next project base. I cut my cardstock pieces to fit this package specifically, and “blinged” it up with Twinkle Jewels, Rhinestones, a Sakura Stardust pen (LOVE!!) and Sakura Glaze pens in blue, red, and yellow. I used the same Spellbinder Fancy Tag die cut to top off this box of chocolately treats!

This is another great way to recycle. Anyone would love such a wonderful gift!

Cutters Creek Resources:

Cuttlebug Folder - Victoria
American Crafts Glitter Paper
Spellbinders Die Sets (Scalloped Square, Classic Square & Fancy Tags)
Sakura Stardust Pen
Sakura Glaze Pens (Blue, Red, and Yellow)
Twinkle Jewels
Rhinestones

Thursday, June 24, 2010

Monogram Sign Project by Melissa


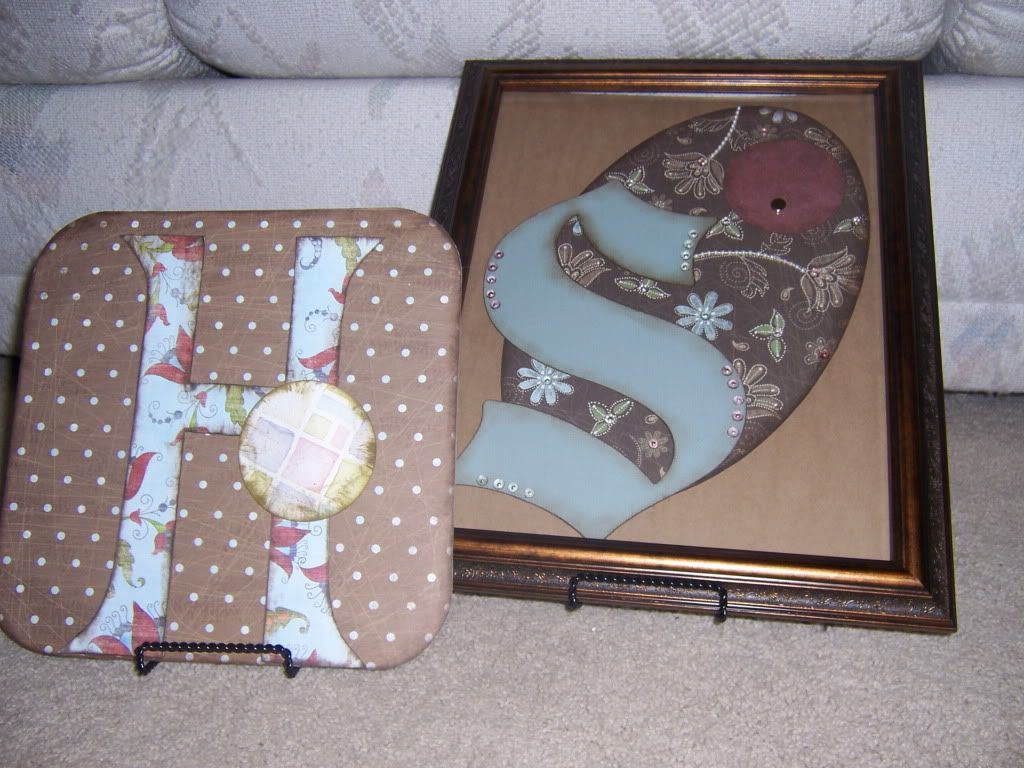
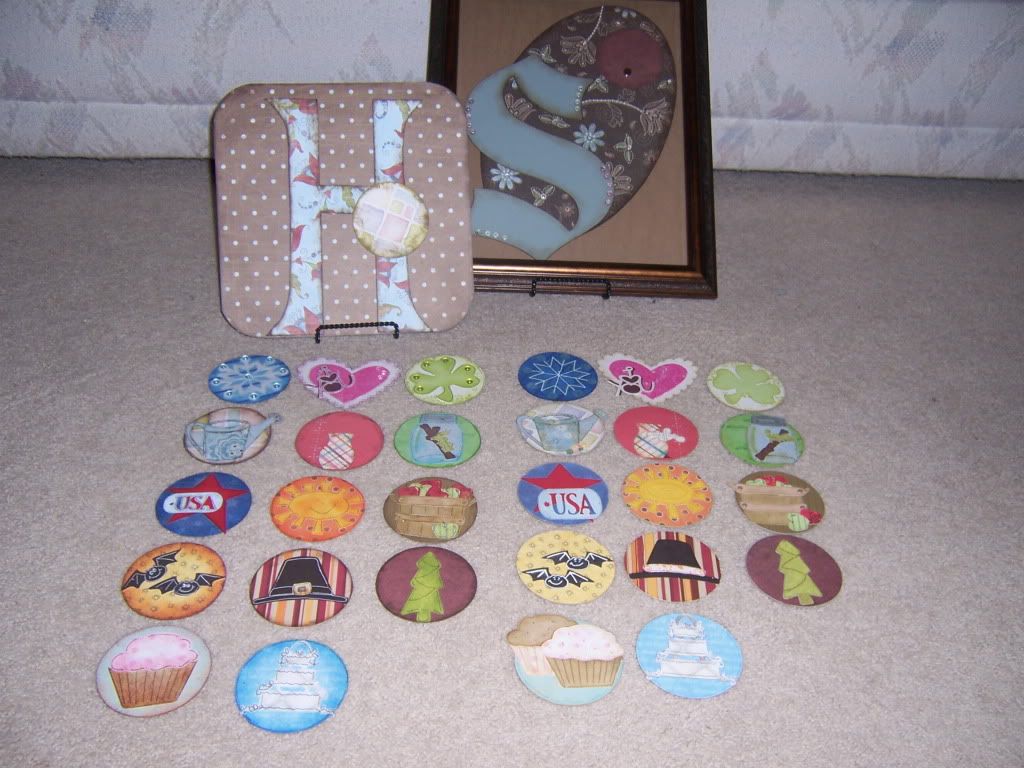
Here is another project I have been pushing off for a while at my house. Months ago, my mom and I had made Monogram signs to use as home decor. She finished hers; mine has been sitting on my craft shelf in the "to do" pile. I decided that it needed to be completed :o) The Letters were cut out with Make The Cut first as paper and than as two layers of chipboard. Mom chose a square background (H) while I did an elongated oval (S). Mom's is on a plate stand while I framed mine to hang on the wall. I attached a magnet to the front of the glass so I won't have to open the picture frame all the time to update the images. I haven't completed it yet as I still haven't found a background I like to go with my letter. I might eventually get a shadow frame with glass on both sides so I don't have to worry about it .. . .hmmmm . . . . .
100_3744.jpg
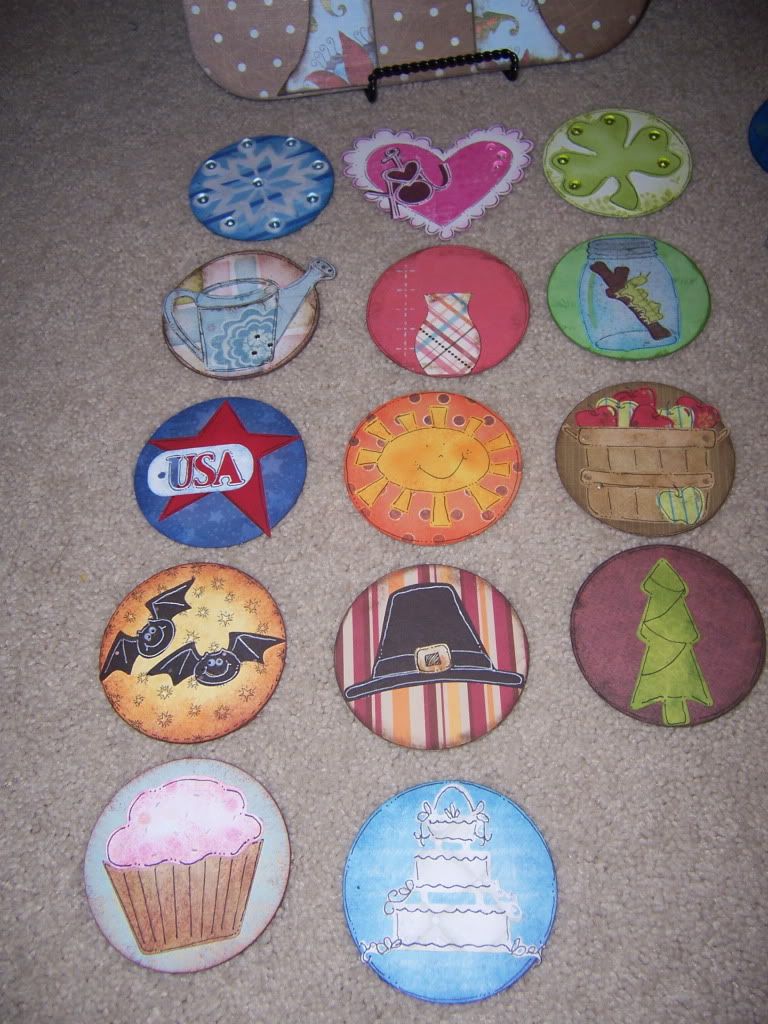
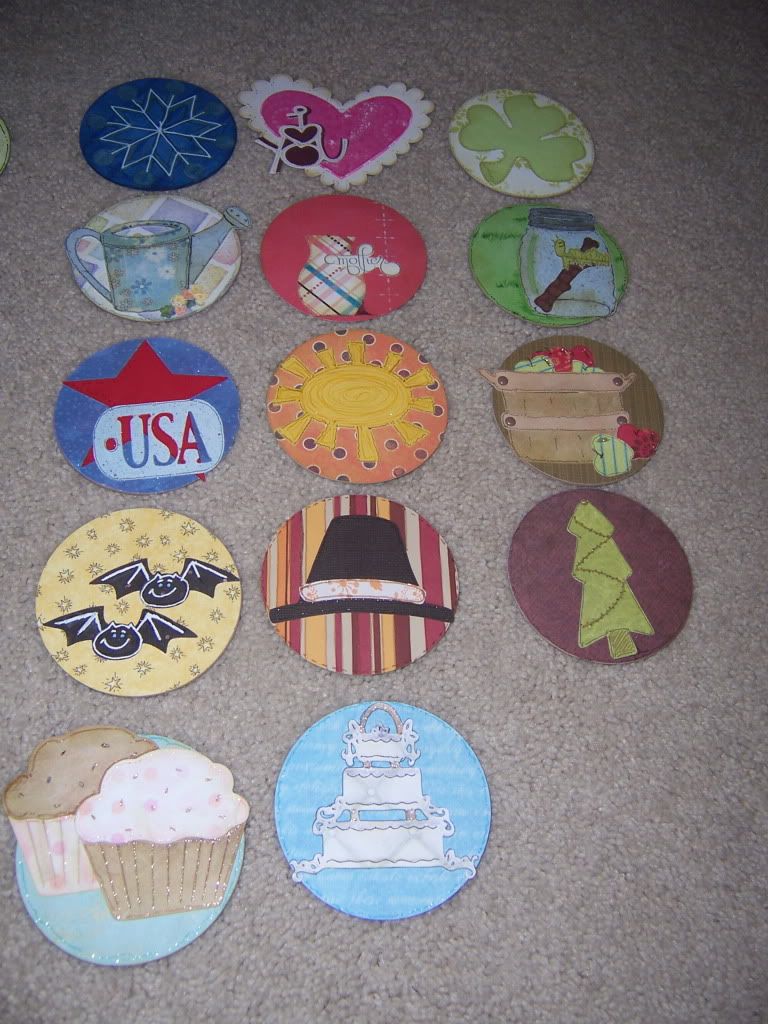
We than cut out 3 1/4" circles from chipboard and coordinating papers for backgrounds for the months and holidays. We only did 14 total circles but I know this something I can create new ones any time I want to! With Design Studio, I cut out multiple images for the coordinating month/holiday. I also listed alternatives or additional circles below- I am already thinking of other circles to create and design!
January-Snowflake/Winter/New Year's
February-Heart/Valentines
March-Spring/St Patrick's Day
April- "showers"/ gardening/Easter
May-"flowers"/Mother's Day
June-June Bugs/Father's Day
July-Popsicles/Fourth of July
August-water/sun
September-Back to School/Autumn/Harvest
October-Halloween
November-Fall/Thanksgiving/Veteran's Day
December-Winter/Christmas/Hanukkah
Birthdays-cupcakes/balloons/name
Anniversary-Heart/Cake/Wedding Bells/Rings
100_3747.jpg
I assembled all of the circles adding my own personal touch to them. In fact, in this picture my circles are on the right and my mom's are on the left. Can you tell where my creativity comes from? By the way, all of the paper used is from my stash and scrap pile - -this is a great way to use those scraps!! All other supplies can be purchased at Cutters Creek. Let me know if you need any measurements or picture close-ups. Thanks for looking!
100_3748.jpg 100_3749.jpg
Supplies Used:
Design Studio
Make The Cut
Chipboard
Adhesive
Atyou Spicas
Copics
Multiliner Pen 0.1
Inkssentials Pen
Twinkle Jewels
Quickie Glue Pen
Basic Grey Small Magnets
Carts-Blackletter, Home Decor, Doodlecharms, Paperdolls, Christmas Cheer, Accent Essentials, Walk in My Garden

Friday, May 21, 2010

Baby Card by Lori

I needed a new baby card for a friend, and immediately thought of the Mother's Day mini cartridge. There's a really sweet and simple baby carriage on there along with all the other good stuff, and I knew it would be perfect!
I created a 5"x7" card layered with a 5"x5" piece and a 2"x5" piece of patterned papers. Using my Cricut and the Plantin Schoolbook cartridge, I cut a circle to 4.25" with Real Dial Size turned on (you can also use George or any other cart with a circle). Next I switched to the Mother's Day cartridge and turned OFF Real Dial Size. I cut the baby carriage and its shadow at 3.5" from two shades of pink CS. I cut the lace strip at 1.25", large enough to be able to cut the ends off after I adhered it to the card so it looks more like a piece of lace or eyelet ribbon. I lightly sponged the edges of both carriage layers with matching pink stamping ink.
After adhering the paper lace strip, I adhered my circle, then the shadow layer of the carriage. I applied foam adhesive to the back of the top carriage layer and adhered it to the shadow layer. Finally, I adhered some Dew Drops to the wheel hubs using Glossy Accents and stamped a sentiment across the bottom. Quick & easy!

Products available at Cutters Creek:
Mother's Day Mini Shape Limited Edition Mini Cartridge
Ranger Glossy Accents
Dew Drops from The Robin's Nest
Tombow Adhesive

Monday, February 22, 2010

Quick Cards by Laura

We all have those times when we just need a quick card to say, "Thinking of you". That is why I am so grateful for digital stamps and free images! We are lucky to have some amazing designer over at Cutters Creek Design Team Blog who create fantastic images like the one I used in this card which are often available free! What could be better than that??

Anyway, back to the card. We all run into times we need a quick card and digital images like these can be a real life saver. You print them out onto your card stock using your laser or ink jet printers. Before coloring them, be sure to quickly heat set the ink with your heat tool.

I like to keep a basket of scrap papers just for quick cards like these. The leftover scraps from scrapbook pages can be perfect for your cards. Why waste those beautiful papers? Reuse strips for wording and accents.


For this card I used a free digi image from Sher over at Cutters Creek. I colored it using my Copic Markers, and then I added a little bit of Diamond Stickles for the nose to give it a little pop. I hand lettered some leftover strips of card stock, and added more Diamond Stickles to the heart on my lettering.

For quick cards, I always have big stack of white card stock in 8.5" x 11" in my stash. That way I always have the perfect background. I cut my card stock in half and then folded it for my card base. I cut one piece of card stock at 4" x 5.25 inches for my background, so I could leave some white card stock showing. Next I cut another piece of coordinating card stock at 3.5" x 4.75 inches for layering. Then I cut another coordinating piece at approximately 3.0" by 2.25" and rounded the corners with my corner rounder. I chalked all of the edges using my Pebbles chalks.

I layered my card stocks onto my card base using my Glue Glider and then attached my colored digi stamp. I added my sentiment, and then my Skittles using my 3/16 Glue Dots.

In less than 20 minutes I had the perfect quick spring themed card ready to send to my friend to let her know I was thinking of her.

The products used in this project are available for purchase at Cutters Creek are:

Copic Sketch Markers ( 0 Colorless Blender, E42, E09, E70, E30, RV02, 100 and R01)
Stickles Glitter Glue - Diamond
Glue Glider
Glue Dots
Pebbles Chalks
Sher's Free Digi Image
Twinkle Jewels

Wednesday, February 17, 2010

Kim B's Love U Card


I made this card for my husband Joel for Valentine's Day, but we have love moments all year around. Special days, special anniversaries, and just because. I bought the Hello Kitty Font Cartridge some time ago for the chunky font and the few Hello Kitty images, and am just now cutting the clam shell open and using the cartridge. So, off I went to make a card for my husband. This card was mostly Cricut. I also used Twinkle Jewels for the eyes, stickles for the nose and heart wand, and my WRMK corner chomper to round the corners. I used one of the phrases and cut that in glitter paper along with the letters on the front of the card, and added the shadow feature to the back of the phrase. The card stock is embossed with little hearts and all I need to do now is add my private message and stamp the back with my personal stamp. This card was so easy peasy to make and you can find items to make this same card at my store, Cutters Creek. Happy Cricutting!


Supplies:

Hello Kitty Font Cricut Cartridge
Stickles
Twinkle Jewels
WRMK Corner Chomper
Card Stock
Glitter Paper
Adhesive


Thursday, January 21, 2010

Angela's Warm Winter Wishes


Before moving onto Valentine's Day cards I decided to stamp one more Lily! I just love these stamps from Pink Cat Studios. The great thing about the Lily hot cocoa image is that she doesn't have to be used strictly for Christmas. And unfortunately, winter is going to be around for a little while so why not make the best out of it? I'm going to use this card as a thank you card, most likely.

I stamped Lily onto some of the new Prism cardstock (which I just LOVE) and colored her with Copic markers. I cut her out with a square Nestabilities die and then layered the image onto a scalloped square that I cut with another die. A card is not complete without a little sparkle right? I used twinkle jewels on the scalloped square corners, glossy accents on her mittens and boots, Stickles to make the fur on her hood stand out, and a Atyou Spica glitter pen on her hot cocoa mug! I finished it off with a border punch and some patterned paper from my stash.

If you have any questions for Angela about this fun card project just ask! She or another member of the Design Team will be happy to answer.

Angela's Warm Winter Wishes was created using the following products:
These products can be purchased from Cutters Creek!

Tuesday, January 19, 2010

Wendy's Sweet Moment with Santa

Just look at that sweet boy! Oh! Don't you just want to get those little cheeks! So stinkin cute!

With this picture Wendy has managed to capture a moment that has eluded me up to this point. You see, there comes a time every year when Santa sets up shop all over town. His big red chair stuffed and primed, basket of mini candy canes packed to brimming, and happy helpers lined up to man the camera. As mothers we then dress up our little ones and drag them out in the cold to catch that one perfect moment of our sweet child perched happily upon Santa's knee.......at least that's the idea! In reality most of the kids run screaming in the other direction (my daughter among them) as the fat man in the red suit tries to pry them out of Mommy's arms. We laugh it off (although a bit frazzled) just to repeat the process all over again 12 short months later.


Wendy has used this gorgeous layout to capture this precious moment with her son. And. by using the Fancy Pants Magic Paper kit everything went together in a snap! All she had to do was use one piece of cardstock and one of the transparent overlays and she has a quick and easy layout ready to go.

To accent her page Wendy used Twinkle Jewels. I love how they give just a kiss of bling that adds interest and fun to the project as a whole. For her journaling Wendy used Copic Atyou Spica Glitter Pens. Much like the Twinkle Jewels, Copic's Glitter Pens give a light kiss of sparkler that is perfect for accenting. You can use them for journaling or to add color to a stamped image or sticker. I love these pens and find myself reaching for them again and again!

I love the simplicity of this layout and how each element really adds to the whole rather than distracts from the sweet pic.

Thank you Wendy for once again sharing your beautiful work with us!

The products used to create Wendy's Sweet Moment with Santa can be purchased from Cutter's Creek!

Sunday, January 17, 2010

Vicki's Warm Winter Wishes!

This card went thru many alterations as I created it. My original sketch was significantly different, but as I started putting it together, it called me in a different direction. You know what they say about 'best laid plans'... Sometimes, you just have to go where the creative juice pulls you!

The base of this card is from
Cricut Wild Cart. I used the Father's Day card, because I liked the deckled edge. I used the blackout feature, so that I didn't get the frame cutout that comes with the basic card. I finally broke out my Cricut 12x24 paper to get a large enough card for what I was after. I used the envelope that matches the card, and I cut that FIRST...using the "Fit toPage" feature. By clicking on that button on my Expression, when I hit "Cut", I kept an eye on my digital screen on the Cricut - and watched what size it said the envelope was - which turned out to be 7 1/2".

After the envelope cut, I set my Cricut to the size it cut the envelope...so I had a perfect fit! I also cut a liner for my envelope, so that the little circles on the envelope flap would show up as a different color and POP! Finally, I made a second 'front' of my card out of vellum, to look more 'cloudy'. I was going to use the snow background from ZooBalloo...but after I cut it, I realized that the shape was all wrong...so I set it aside to use some other time! Instead, I used the same card, but put it in Design Studio, making it the correct 7 1/2". I dragged the back of the card OFF the design mat, so that it would not cut...only the front, with the pretty deckle edge, would actually cut. It made a perfect fit.


To create my winter scene, I used multiple cut sizes of the Snow Drift in Paper Doll Dress Up. Two were cut from plain white paper, and the center was cut from a vellum swirl print. To make it more dimensional, and keep with the swirl theme, I then ran the vellum thru my Cuttlebug, using the Emboss A2 D'Vine Swirl folder. The white on white didn't appear as dimensional as I wanted, so I inked the edges of each white drift with some light teal ink I had on hand...but it could just have easily been done with a Copic Sketch like BG18 - Teal Blue. Then, using the score lines that my Cricut added to the drifts, I heat embossed white glitter to accent.

The trees were made from ZooBalloo. I used the same tree background in two different sizes, using two different papers. I simply 'flipped' one of them around to appear like a different cut. I then accented the front trees with marker to give the appearance of pine needles. I adhered each layer down, starting with the vellum, the back trees, the front trees, and then the three layers of snow drifts. I loved the way this looked, and scrapped my plans to add additional shapes and words to the front of the card! Instead, I used dimentional snow effects to make it look like there was snow on the trees and along the ground. This could have been accomplished with Glossy Accents, Flower Soft, or even Liquid Pearls! Then I used my new
Ocean Twinkle Jewels to be the centers of snowflakes! They needed more bling, so I added silver Stickles to the snow flakes and top layers of some of the trees.

I was going to put a cutout on the front of the card, which I made using Design Studio showing "Happy Birthday", created from the Lyrical Letters cartridge. I cut it on Core'Denations Black Magic paper so that the edges would show the blue in my card theme. Unfortunately, this cut turned out a little delicate, and fell apart when I pulled it off the mat. However, I really wanted to use it...so I improvised. I glued the pieces down on the page piece by piece, putting them together as if they had stayed together...and once it's all glued down, you can't even tell that it fell apart! But then I ran into a problem...and how many times has this happened to you? You cut a word with a dotted letter like an "i" or "j" and by the time you get ready to put it on the page, the "dot" to your letter just disappears! I improvised, and brought the theme inside the card, and used another Twinkle Jewel inside the card for the dot of my "i" with some additional Stickles!

The primary focus of the front of the card was supposed to be the snow lady from the Limited Edition Snow Friends cartridge, which was my holiday gift from my best friend whom I was making the card for! By the time the front of the card was complete, I realized that she was now totally out of place...but not to worry...I put her on the INSIDE of the card for a little extra carry forward of my snow theme.

Cutters Creek Items Used:
  • Copic markers
  • Twinkle Jewels - Ocean
  • Stickles - Silver
  • Cuttlebug Emboss A2 D'vine Swirl folder
  • Cricut Expression
  • Design Studio software
  • Cartridges:
  • ZooBalloo
  • Paper Doll Dress Up
  • Snow Friends
  • Lyrical Letters
All of these items can be purchased from Cutters Creek!
Related Posts with Thumbnails