Wednesday, March 30, 2011

Simple Card with Lori

For today, I thought I'd show you one more Flower Soft idea.


Using the Echo Park Springtime Collection, I cut a 4.75" x 6.75" rectangle 'sky'.  Then I cut & tore a 4.75" x  about 2" 'ground' and adhered it to the sky piece.  I adhered both pieces to a 5" x 7" card base made from some dark pink cardstock from my stash.  Next, I pulled a basic tree stamp from my stash, and stamped it directly on the background.  Using my fingernail, I rolled the top edge of the green piece up away from the blue, being sure to leave the piece with the tree flat.


Next, I pulled out my Flower Soft PVA glue and filled in some circles around the branches.  Then I sprinkled on some Fuschia Flower Soft and shook off the excess.  I peeled off one of the stickers from the Springtime collection and adhered it to the bottom of my card.  That's it!  Try it for yourself.

Products available at Cutters Creek:

Tuesday, March 29, 2011

Tutorial Tuesday-Peel Offs With Kim B. & A WINNER


I hope you enjoyed my tutorial and here are two examples of cards using peel offs. You can also use peel offs on scrapbook pages to frame titles, mats, pages, etc…


This first card, I made it up a while ago however put it aside as I thought it was missing something. And then I thought, peel offs! So I used the silver corners and borders sheet and added the corners and then added the borders and now I think this card looks done and elegant. This card was made from Flower Soft Toppers, Scenic Windows. I think this turned into a gorgeous Spring card, adding the peel offs to it!

This next example, I did something very simple and turned this simple card from drab into elegant using peel offs. The pansies are from an Ecstasy Crafts Decoupage Book, the sentiment is from the Ecstasy Crafts peel offs (and I used a Y15 copic marker to color the sentiment to tie it in with the yellow of the pansies), the corners from the gold Flower Soft peel offs, and gold borders from another gold peel off sheet option.

I have enjoyed taking you through using peel offs today and hope you enjoyed learning all about these little gems. They will take any paper craft project you made from drab to fab, in a matter of minutes! Please go to the Cutters Creek store website and check out these products and many more!

Products Used:
Flower Soft Peel Offs
Ecstasy Crafts Peel Offs
Flower Soft
Flower Soft Glue
Flower Soft Scenic Windows Toppers
Stickles
Foam Squares
Pink ATG
Ecstasy Crafts Decoupage Book
Copic Markers
Card Stock


We's also like to announce our WINNER of the CHA swag bag is....


And that commenter was....


Congratulations, Bradleysgirl!!!!!!!!!! I will be emailing you for your information shortly! I would also like to say THANK YOU to all of the people who came and hopped for all of the lovely comments, and to all of the design team members for their hard work!

Saturday, March 26, 2011

Cutters Creek Spring Blog Hop!

Welcome to the Cutters Creek Spring Blog Hop! All of our designers have created some wonderful Spring projects featuring products that you can purchase at the Cutters Creek Store! The Cutters Creek Design Team Blog is the first and last stop in the hop! Each blog along the way will have a link to the next blog in the chain. Don't forget to make sure you are following each of our personal blogs and leaving comments along the way to enter to win a box full of CHA Swag and maybe a few other goodies along the way!!!!

On the Cutters Creek Design Team blog we are featuring a gorgeous Accordion Fold Spring Card created by Chris! Take it away, Chris.....

What better way to celebrate spring than with flowers? Or even better, flowers in a garden? I wish I had a green thumb to create this in my yard or even a picket fence with which to begin, but alas my garden lives in paper—LOL.


Starting with a 6"x12" piece of white cardstock, I rounded one edge and scored it with my Scor Pal at 4" and 8". Using my cloud-maker and Tim Holtz Distress Ink in Tumbled Glass and Scattered Straw I inked my sky on the front panel and the outside panel that showed behind it. The two inside panels are covered with cardstock cut at 4"x6" from the Prima Fairy Flora 6"x6" Paper Pad. I used Scor Tape to adhere them. I then cut Flower #12 and its shadow at 4 inches from Cricut Lite Botanicals cartridge and mounted it on the inside left panel. My sentiment is printed on ivory cardstock and cut with Spellbinders Shapeabilities Fancy Tags. I also cut and embossed a piece of translucent paper with Nestabilities Labels Four (#6), which I glued down with Vellum Glue Dots then mounted the Tag on top of the label using pop dots.


To make the front of the card, I stamped several flower stamps on cardstock and cut them out. One flower was colored with Copics colors Y08, YR65 and YG23. I colored the rose with Copic color RV66. I used Flower Soft Glue and Flower Soft to highlight the different flowers. For the rose I used Peony Pink. The Dianthus is accented with Ocean and Baby Pink. And the for the Daisy I used Marigold and Citrus Crush. I set those aside to dry and took some scraps of acetate, cut them with my Tim Holtz Alterations Tattered Florals; using Staz-On Black ink I stamped the two larger pieces with a background stamp and then flipped them and colored with Copic Markers B02, B06, RV66, and RV63. Once they dried, I used my Crop-A-Dile to punch a center hole and add a rivet to each. Going back to the Flower Soft flowers, I glued a Cherry Twinkle Jewel in each center to two of the pink Dianthus flowers and a pearl in the center of the Daisy. I had one last flower to make and I used a French White Prima Rose sprayed with Perfect Pearl Mists Forever Red.


While that was drying, I used my On the Fence Tim Holtz Alterations Die to cut American Crafts White Glitter Paper and trimmed it to the width of the front panel (4 inches). I put pop ups on the back along the two railings and up each side, but didn’t glue it down yet. I started arranging the flowers behind it and decided that some grass needed to be both behind the fence and along its base for that I used—you guessed it—Meadow Flower Soft. While that was drying, I adhered the two acetate flowers using Glossy Accents and my Zig Glue Pen to put down the rose and two daisies. I decided to use a scrap of wire to create a “vine” around one fencepost and used Glossy Accents to adhere the 3 small flowers to the fence. I mounted the fence and then again using Glossy Accents added the Prima rose. The final addition was a butterfly stamp that I colored with Sand, Lilac, and Peach from the Copic atyou Spica Set B.

See, didn't I tell you her card was gorgeous??? When you complete the hop, come back here show your love for Chris and all of our designers! Leave one comment at every blog along the way and make sure you are following the Cutters Creek Design Team blog and the designer's blogs too! Now hop on over to my blog HERE! Oh, and check out the AWESOME prize we have for one lucky winner:


You will get that Springy looking tote, the Creative Options Box, Graphic 45's A Proper Gentleman, and look at all the little things in the Creative Options box! You get those too!!!

Here's a complete line up of all of the blogs in the hop in case you get lost along the way:

Cutters Creek Design Team Blog - You are Here!
Mandie's Blog - http://mandiesscrappin.blogspot.com
Kim's Blog - http://kreativekim.blogspot.com
Mindy's Blog - http://www.scrappyandpiggy.blogspot.com
Laura's Blog - http://scrapaddict4life.blogspot.com
Melissa's Blog - http://www.ourmadhouseof4.blogspot.com
Lori's Blog - http://savingmine.blogspot.com
Vicki's Blog - http://scrappyleopard.blogspot.com

Friday, March 25, 2011

Spring Blog Hop Prize Package

Here is the prize package we are giving away during our blog hop! You will get that Springy looking tote, the Creative Options Box, Graphic 45's A Proper Gentleman, and look at all the little things in the Creative Options box! You get those too!!! The winner will be announced during our last Tutorial Tuesday for March featuring Flower Soft with yours truly! (And don't forget, at the end of March we are giving away a Flower Soft package (by random draw) to someone who left a comment during the month of March also!)

Plant A Flower by Guest Designer Deanna M.


My card is a 4 1/4” X 5 1/2” Kraft card stock base. I added a white mat sized to 4” X 5 1/4”. I then used my Imagine and the 1:2 proportional rectangle sized at 2.5” and my Hopscotch Colors and Patterns Imagine cartridge to create the sky and the green “grass” section of the cards. I cut these down to 1 7/8” X 5”. I added some olive green ribbon from my stash over the seam where the two papers met. For my flowers I used my Freshly Picked Cricut cartridge and colors from my faulty Audrey Imagine cartridge for the colors of the flowers and the planter box and from the Imagine More Cards cartridge for the green leaves of the flowers. I cut the tulips and the layers at 2.7”. I pop dotted the flowers to the card for some dimension to the card. The sentiment I added is from The Greeting Farm Because of You sentiment I bought at Cutters Creek and says "Everyone needs a Friend like you".

I hope everyone loves Deanna's card, as I think it turned out beautifully!

Thursday, March 24, 2011

Vicki's ISSMA Layout

I got some inspiration from my favorite sketch site... Page Maps. This sketch is from February 2011. The one thing I really like about sketches is that you can adjust them to meet your needs.


I used espresso colored paper for the base. The center print band on the sketch reminded me of sequins, so I pulled out some leftover Bazzill Bling in a cranberry color leftover from my holiday crafting! The bottom print is from my musical paper stash. I mounted each photo on black card stock to help them stand out.


Most of my embellishments are cut with my Cricut, so I used my Gypsy to arrange everything I wanted for my page on a single mat. The tall musical notes and gold title frame were cut using the Disney Hannah Montana cartridge. The title "ISSMA" was cut from Blackletter, which came with my Gypsy. Finally, the tiny tag that is hanging on the ribbon was cut from Tags, Bags, Boxes and More...not everything on this cartridge has to be cut BIG!


I finished this up using some cute brads and ribbon in my stash. I used Scor Tape to adhere the ribbon...this ribbon is somewhat sheer, and the Scor Tape hides nicely. All the delicate pieces always stick well with the Sakura Quickie Glue Pen!

So don't be afraid to take a sketch...and make it yours!

Tuesday, March 22, 2011

Tutorial Tuesday - Flower Soft with Mandie

Welcome to another Tutorial Tuesday here on the Cutters Creek Blog! We all hope that you are enjoying learning about ways to use Flower Soft in so many projects! Make sure you keep checking back because we still have LOTS of great projects in the works. This weekend will be the Cutters Creek Spring Blog Hop! Make sure you don't miss it!

For today's project I decided to show you that you can use other images besides the Flower Soft Toppers with your Flower Soft. I chose to make a card with one of the three adorable images from the Wedding Bears & Cats diecut set from Ecstasy Crafts. Here's a look at my finished card:


To begin I cut out the backing image and began punching out all of the shapes that belong with it. I love that I'm not trying to cut these shapes, you just need to punch them out (and they punch out great)! Then you add the Ecstasy Crafts Joy! Foam Squares to the back. These are really cool because they are thin and give just enough lift for really nice dimension.


Notice I only added the very first layer to my card before I added my Flower Soft. I thought it would be easier to add my Flower Soft with out the other stuff on there... and there would be less chance of me making a boo-boo :) So I grabbed my Flower Soft Adhesive and a jar of Polar White Flower Soft to add to my tree.


Next I added small dots of glue to the flowers on the trees. You want to make sure you keep the bottle upside-down the entire time you are using the glue. And you really don't need a ton, just make small dots. Then just sprinkle your Flower Soft over the top. You can either use a small spoon or just pinch it with your fingers.


Here you can see I divided my tree in thirds. On the left is the Flower Soft added to the glue, in the middle is just my glue dots and the right is waiting to be done.


Yes, Flower Soft should be "fluffed up" a bit before you use it. Notice how fluffy it gets... yep, I just stuck the lid on top and it went right back on! And no, this isn't a brand new jar! I've actually used this on several projects! You can get a LOT for mileage out of one jar!


Here's the image at an angle, you probably want to click on it to make it larger so you can see the layering. Notice I decided to add some of the Baby Pink Flower Soft to the brides headband and bouquet too.


To finish off my image I added stars to the sky with my Gelly Roll Stardust Pure Glitter Pens. I just made little dots all over. I also added a little glitter to the inside of the flowers but it didn't show up in the photos... it looks great in person tho! Then I simply stuck it to a plain white A2 card base with my Pink ATG!


Here's one more look at the finished card! Don't be afraid to try your Flower Soft on ANYTHING!

Don't forget that every comment this month will be entered into the drawing for the Flower Soft prize package. If you missed the reveal click HERE to see what you could win! You can comment once per post so you actually have a LOT of chances to win if you are commenting on every post this month!!!

Monday, March 21, 2011

Pinwheel Card with Melissa

So today I am sharing a super easy card with no stamping involved; took me less than 10 minutes from start to finish!  You absolutely have to try this!  It is simple and quick for mass production or just a quick card on the go.  I got the idea from my good friend KellyRae.  She got it from here (video included).  


Here is what I started with:
A base card of 3.5" x 5" -slightly smaller than the standard A2 card already run through my big shot with the Swirls Embossing Folder.
8- 1 1/4" squares in two different patterns
2- 2 5/8" squares as my base
Embellishment -Prima Say It In Pearls


Start with putting your adhesive on the papers; make sure the tape goes in the same corner for the 1 1/4" squares on the back side of the paper.  As you can see in my pic, I didn't follow the steps on the first try :o)

Next add tape to one 2 5/8" square and place the other square across it, twisted.  


Now add your first square.  The rest is easy!  Just alternate the color or pattern papers aligning it with the corner of the base card stock.  For the last piece, you simply lift the edge of the first piece you laid down and work the last piece in so it is layered.  Very, very easy to do.

And here is the end result of the layering.  Hmm, I think I need to change my trimmer blades . . . . . 


I than added an embellishment in the center and used Scor-Tape again to adhere it to the card base.  I chose the smaller card base of 3 1/2" x 5" as I wanted the Pinwheel to dominate the card front so all of my stamping can be on the inside.  Think it worked?  


Photobucket

Stamps: none!
Ink: none!
Other: Scor-Tape, Paper Trimmer

Saturday, March 19, 2011

Blog Candy Reveal-Flower Soft


This month, the Cutters Creek Design Team has been focusing on one of my most favorite products that Cutters Creek carries, Flower Soft. I emailed Flower Soft (thank you Mark & Jeanne!) and told them what we were doing and sent some links and photos. I asked if they would be interested in donating to our blog candy for this month that one of you followers will receive, and the answer was yes! AND they donated the entire package! THANK YOU FLOWER SOFT!!! I love this company and the owner, Susan, is so nice. So here is a picture of the items that one lucky follower will get this month! I can't wait to find out who is going to win!!


Thursday, March 17, 2011

Happy St. Patty's Project by Laura C

Hope you all are enjoying our Flower Soft projects this month!! I know we are having a blast creating them for you!! I've added a bit to my St. Patty's Day decor with this project:


This project was made with those awesome Flower Soft Display Globes, and the pre-cut Oval Aperture Cards. It makes this soooo easy!!

I started by tracing the ovals, using the template they provide with the cards, on a basic olive green cardstock and my yellow background pattern paper. The ovals were cut out, and the yellow oval serves as the background for the scene, and the green is the cover for the front of the card. Copics lend their gorgeous colors to the scene.....the leprechan was colored with black (100), cool gray (C3), olive (G99), pale olive (YG95), new leaf (YG23), honey (Y38), apricot (YR16), and powder pink (YR00). I free handed the rainbow (the chisel tip of the Copics makes it easy!), those colors are cadmium red (R27), orange (YR68), golden yellow (Y17), emerald green (G05), holiday blue (BG05), and amethyst (V17).

The little "pot o' gold" was made by cutting a 1&1/4" circle from black cardstock twice, and white cardstock once. I then trimmed just 1/8" off one black circle, and about 1/4" of both the other two circles. I used the 1/4" trimmed off to give me the "rim" of the pot, and also to give me the place to put the "gold".


I used Flower Soft Glue on the white part of the pot, and sprinkled and gently patted down some of the new Gold Flower Soft (gorgeous stuff!!), and then let it dry. In the meantime, I made the left side panel of the card....I printed the sentiment on my computer, trimmed and inked, cut out the green tag using the Spellbinders "Fancy Tags" die, and layered these on a 5" by 2" piece of black cardstock, followed by a 4&7/8" by 1&7/8" piece of the yellow patterned paper. I finished it off with some Fresh Mowed Grass Dew Drops. I then used Mini Glue Dots to adhere more of the Fresh Mowed Grass Dew Drops around the card opening. To finish the card, I used foam tape to adhere the leprechan, pot and rainbow, then I added some extra Gold Flower Soft to the "globe" before sealing the card up with score tape. The finished project is a cheerful addition to our St. Patty's decor!!

If you would like more specifics on the assembly of the card and globe.....check out Mindy's tutorial from Tuesday of this week by clicking HERE....she did a rockin' job!!

Hope you're enjoying our "Flower Soft" month here at Cutter's Creek!! Remember to leave a comment for a chance to win an AMAZING prize this month!! We may have a peek at the prize coming up next week....

Available at Cutter's Creek:

Flower Soft Products - Gold Flower Soft, Globes, Oval Aperture Cards and Glue
Copic Markers
Dew Drops - Fresh Mowed Grass
Spellbinders Dies - Fancy Tags
Scor Tape
Glue Dots Mini Dot n' Go Dispenser

Wednesday, March 16, 2011

St. Patrick's Day Card with Chris

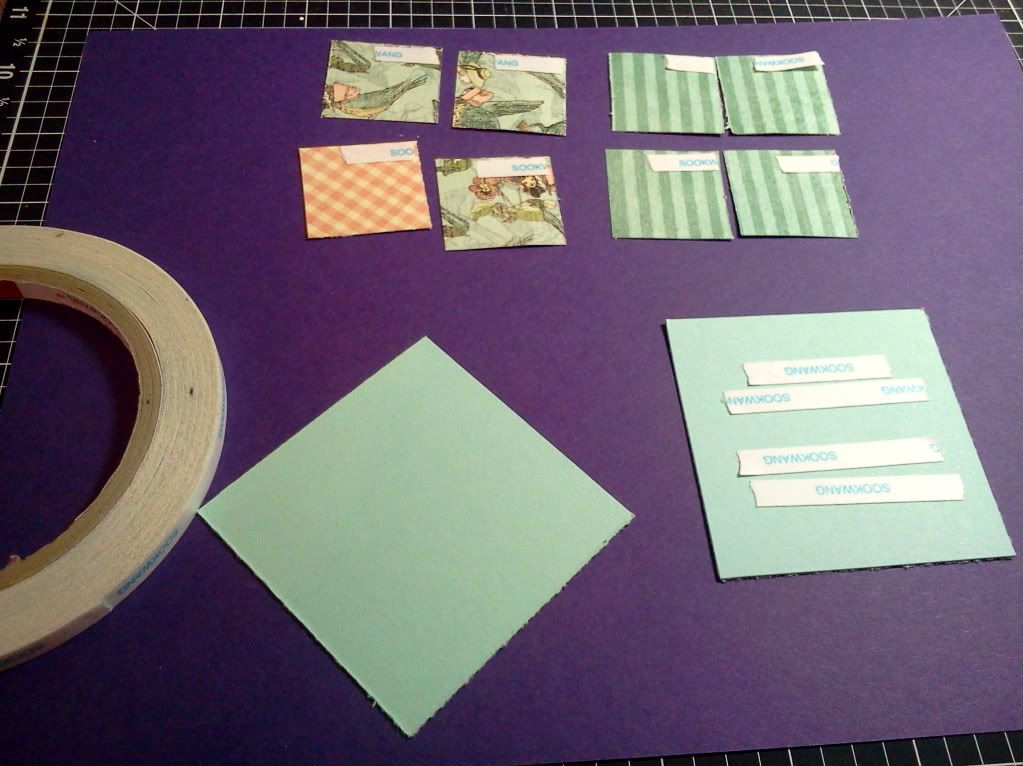
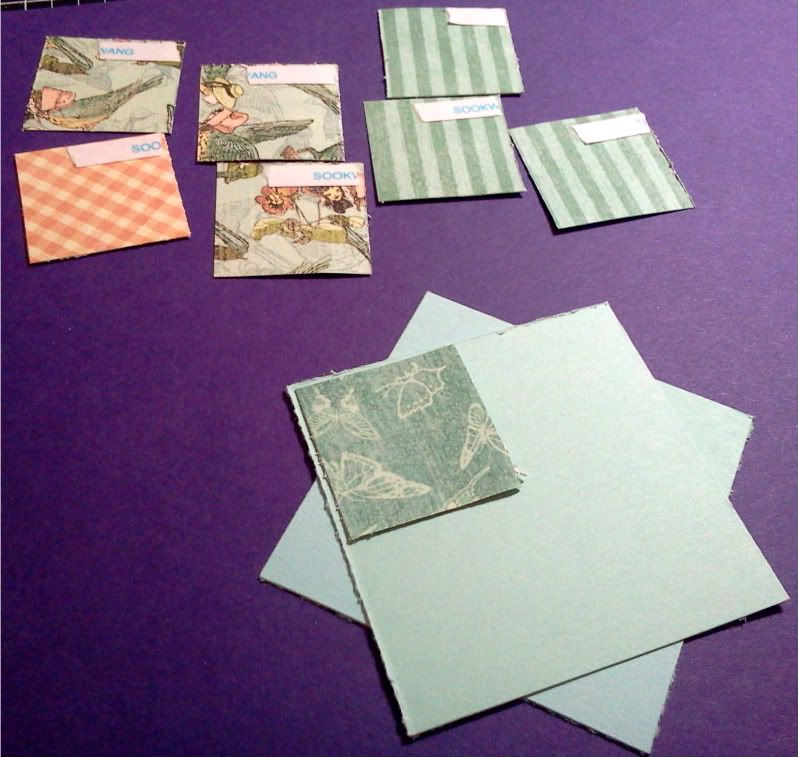
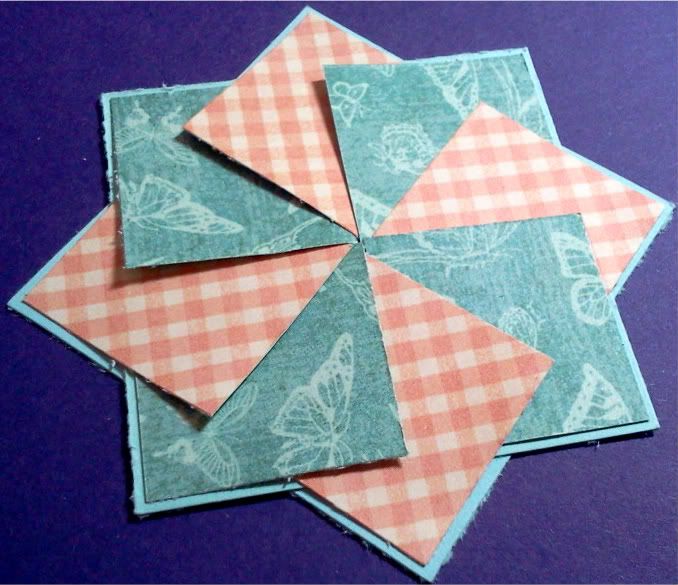
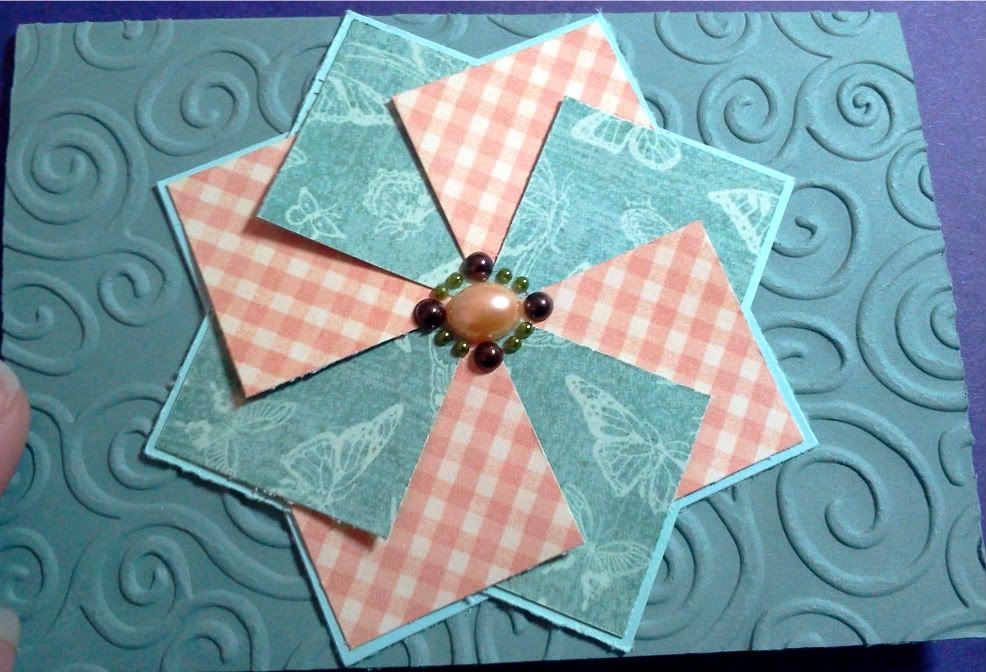
I wanted to make a special St. Patrick’s Day card for a very special friend. I knew it had to have two elements—a step card and another stained glass embellishment—and it had to fit in an A2 envelope (4.25x5.5 inches).


I started with the step card. Taking a piece of cream cardstock and my Scor Pal, I measured out a center step card. Laying the card on my Scor Pal I scored and folded as shown below. (Note the red-dotted lines should be folded as mountain peaks and the blue ones as valley folds.)


My stained glass element is the rainbow. I found a coloring book page that had one I liked and shrunk it down to a 5.5 width and then printed it out. I took a sheet of acetate and taped it over the rainbow and filled in the colors with my Stickles. I used Christmas Red, Orange Peel, Yellow, Green, Midnight Blue, Dark Blue, and Lavender. The cloud was colored with Icicle Stickles. I set this aside to dry for the night and moved on to making my background paper for the rainbow. To make this I took a scrap of cream paper and cut it 4.25x 5.5 and my homemade cloud-maker. To make your own just cut several scalloped circles at different sizes and tape the smaller ones around the largest one at varying depths.


Then using Broken China Distress Ink and my Tim Holtz blending tool, I laid it near the bottom of the paper and inked the edges. I then shifted the cloud-maker slightly to the right and slightly up the paper, inking as I covered the sheet. (Save the cloud-maker; it can be reused.) Once done, I trimmed it to the shape of the front of the card and glued it down with Scor Tape.


Going back to my computer, I found the Wish for a Friend , printed and mounted it on a piece of cardstock 2 7/8 x 3.5. Edges were inked with Shabby Shutters Distress Ink. I also put a small strip of magnetic tape on the back so it could be put on her refrigerator. I put this aside and took out my Copics and colored in a Phee McFaddell image from the internet: Greens: G05, G07, G09; Browns: E13, E17; Shirt: E0000; Skin: E000, E01. I used the Paper Doll Dress Up Cricut Cartridge to cut the pot at the end of the rainbow (4 inches) and the shamrock (2 inches). The leprechaun and the shamrock are attached to the middle step using Glue Dots. Then using SCAL and my Cri-kits pens I wrote Happy St. Patrick’s Day (1.75x.5). I used the same label from the Embossing Plus Fanciful Labels to cut both the sentiment and a piece of cardstock. I used my Cutter Bee Scissors to trim out the middle of the cardstock tag, so I could layer them and glue them together. This was mounted on the front of the card using Glue Dots. Then I trimmed around the rainbow and used Glossy Accents to glue it to the step card and used Glue Dots to put the pot over the end of the rainbow.

May you all find a pot of gold at the end of your rainbow, Happy St. Patrick’s Day!!!

Don't forget, all comments for the month of March will be entered into a drawing for a GREAT Flower Soft prize package! You can enter once per post so the more you comment the better your odds of winning!!!

Tuesday, March 15, 2011

Flowersoft Globe Tutorial

It's my turn to host Tutorial Tuesday and teach you how to make a fun project using flowersoft products. Be sure to leave a comment on this and all the Tutorial Tuesday projects for your chance to win an awesome Flowersoft prize pack donated by Flowersoft themselves!!!

I thought I would show you how you can use the Flowersoft Globes for stuff other than flowersoft. I have made an Easter egg shaker box card using the flowersoft globe and filling it with tiny plastic Easter Eggs.

tutorial7 [1280x768]

The first step I took was to lay my card base down on my patterned paper (printed from the Imagine More cartridge) and trace the oval opening.

tutorial1 [1280x768]

Then I cut the oval out of the polka dot paper and attached it to the card front.

tutorial2 [1280x768]

Next, I traced the outline of the globe onto another piece of paper that would be the back of my globe and cut it out.

tutorial3 [1280x768] The actual opening of the globe is a little smaller than the back and I wanted to make sure my entire bunny was visible in the globe. To do this, I laid the oval I cut out of the pattern paper onto the paper I was using for the back and made little marks as a guide so I would know where to put the bunny. tutorial5 [1280x768] Once I was sure my bunny was inside the marks, I added an egg I cut with my cricut and then ran through my Cuttlebug for her to sit on.

Now it’s time to attach the globe. I laid the globe down and added the little plastic Easter eggs. I put scor tape all around the edge of the globe. tutorial6 [1280x768] It’s best to make your pieces smaller, the scor tape doesn’t like to bend. I laid the piece of paper with my bunny and egg attached to it face down onto the sticky side of the scor tape. Then I put scor tape all over the inside of the piece of the card where the globe was placed and pushed it firmly to make sure the globe was tucked neatly inside. Then it was time to embellish my card.

I have made a short video showing the embellishments and what the finished card looks like in action.

Don’t be afraid to use your flowersoft globes with stuff other than flowersoft- butttons, pearls, confetti, or whatever your heart desires.

Thursday, March 10, 2011

Melissa's Fairy Tale Card

So I wanted to show some new products that Cutters Creek now has and what better way than making a card! I started with the Graphic 45 Once Upon A Springtime Paper. I have never used their paper before and I can honestly say I cannot wait to buy more! This card was a learning curve for me and I loved it!!

I have a tendency to lean towards mythical in stamps and papers and this just fell right into my element. I loved the fairy and butterfly theme in this collection and was trying to find the perfect stamp set to complement it. I came across a new stamp set from In Style Stamps; Fairy Tales. Perfect! There is an image of Thumbelina that would work perfectly with the fairy theme.


I wanted to make the wings pop from the paper and also just add a shimmer effect to the stamped image but I wanted something more popping than the subtlety of Spicas; Stickels! They were the product of the month for February and I have never used them before. I really like how it gave the fairy wings a realistic look and added a fantastic feel to the Thumbelina image.

I love how I was able to blend the Graphic 45 paper with some from my stash for the inside of the card.


Let me know what you think!!

Don't forget the chance for the FlowerSoft blog candy!  A random comment will be chosen from one of the posts for March.  Good Luck!!!

Stamps: In Style Stamps Fairy Tales, SU! Well Scripted (No longer available)
Embellishments: Stickles -Tropical Tangerine, Diamond
Other: Glue Dots, ATG
Stash: corner rounder, green background paper
Skin: E50, E00, R12, Peach, Sky Blue Spica
Dress: BV0000, BV00, BV11, Lavender Spica
Hair: E42, E31, E34
Leaves: YG11, YG13, YG17, YG63
Flower: YR000, YR01, E02

Wednesday, March 9, 2011

Spring Scene Card with Lori

Update: Don't forget, one lucky commenter this month will be winning a fabulous Flower Soft prize, so be sure to check out all of the projects this month and leave a comment!

I had great fun making this cute card!  As usual, it took me a while to think through what I wanted to do, but actually making the card did not take long at all.  My finished card is 8"x3.5", perfect for a gift of money, or just a card that's easy to mail.


To begin, I pulled out the new Spring collection from Echo Park and a set of cute little hedgehog stamps from my stash.  Using my Make The Cut software, I imported a Vector PDF for the "hill" piece from a sketch pattern book.  (I love that I don't have to print PDFs and cut them by hand!)  I will point out that if I were making this card again, I would have found a scrap piece of a different green for the straight piece, as they blend together a little too much.  I did define the edges some by sponging some green ink on the top edges.

I cut one of the trees from the paper that has the strips of various patterns, and placed it on my hill.  I selected my hedgehog stamp and stamped him once directly on the card, and once on a scrap of white CS.  I colored in his body, then adhered it over the stamped outline on the card.  I filled in the quill area with my Flower Soft glue, then covered him with Nut Brown Flower Soft.  While I let that dry, I stamped the kite portion of the image on various patterns of the paper, cut them out, then adhered them to the kite stamped on the card front.


Once the Flower Soft glue was dry, I rubbed off any excess Flower Soft and returned it to the container.  Lastly, I peeled off a sticker sentiment from the sticker sheet and stuck it to my card front.  I'm currently thinking this will make a cute birthday card for my daughter (she turns 8 near the end of March), but if I change my mind I'm sure I will find something else fun to use this for!

Products available at Cutters Creek:
Cutters Creek is also an affiliate of Make The Cut.
Related Posts with Thumbnails