Saturday, December 31, 2011

New Year's Eve Place Cards with Chris


Need place cards quickly? Want fancy ones? You can make them in less than an hour using your POW Glitter paper and Tim Holtz Rosette Die. I made 3 black and 3 silver rosettes; used my Scor Tape (1/8 inch size) to join the strips and then a bit of glossy accents in the center to hold the circles so they don’t pop. I cut the hands of the clock freehand out of the remnants, glued them on the top circle (again using Scor tape).

I then cut six 3.5x4.25 rectangles from black cardstock; scored & folded them at 2 1/8 inches and used a Glue Dots super strength dot to adhere the clock face to one corner. Then just using a silver pen I handwrote the names and the year—and voila—snazzy place cards for New Year’s Eve.

Happy New Year to each and every one of you!

Resources from Cutters Creek:

American Craft POW Glitter Paper: Silver and Black
Tim Holtz Rosette Die
Scor Tape
Glossy Accents
Glue Dots
Scor Pal

Friday, December 30, 2011

Paper Scrap Jewelry with Lori

If you're like me, by the time you've made several projects with your favorite papers, you have a bunch of scraps left that you can't BEAR to part with because it's SO COOL.  One of my new favorite paper scrap projects is jewelry.  There are plenty of ways to go here, from fast & simple to the limits of your imagination.

So today, I wanted to share a recent jewelry project I made using some of MY favorite papers - Steampunk Debutante from Graphic45.  This paper is currently sold out at Cutters Creek, but I KNOW you have your own favorite to work with already!  Here's the centerpiece of my project:


While this project is super easy, it is a little time consuming, just because of drying time.  Here's what I did: I smashed a bottle cap using a No More Shims mat in my Sizzix Big Kick (this was actually the inspiration for this project, as seeing the smashed bottle cap sitting there the shape reminded me of a gear).  Next, I colored/distressed the bottle cap "frame" area using various inks and embossing powders.  (Distress inks will NOT work for this project as they bead up.)  You can randomly sprinkle on the embossing powders and heat them with a heat tool, then once cool add your ink color(s) and heat again to dry the ink.

Next, I chose the image I wanted to frame, and adhered it to the center of the bottle cap with Glossy Accents and let it dry.  Once dry, I squeezed on more Glossy Accents around the outer edge and sprinkled in a micro bead mixture I had in my stash.  Suze Weinburg's Beadazzles are a great option for this!  I filled the rest of the frame with the Glossy Accents and let it dry over night.  IMPORTANT: If you do this all at once, your Glossy Accents will crack as it dries (what I wanted and got for this piece, but for most you will not) - if you want a clean & smooth surface, be sure to fill in layers, letting it dry completely in between each layer.

Finally, I just needed to decide how to attach the piece to my project.  For this necklace, I chose to drill holes in the sides where I wanted to attach it to the rest of the piece.  An even easier option is to attach a pendant bail to the back of the bottle cap and string it right on to your chain.  Here's a view of my finished project:


If you'd like to see a super easy bracelet project I made for my Mom for Christmas, I've got a post today over on my blog.  Thanks for stopping by!  Be sure to let us know if you have any questions about this fun technique.

Wednesday, December 28, 2011

Happy New Year!

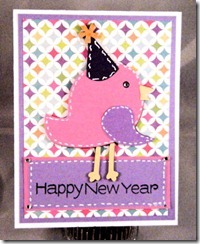
I sure hope everyone has been having a great holiday season. I had a little time to craft and put together this New Year’s card to send to a friend.
New Years
My card is 4 1/4” x 5 1/2” portrait card made from Smooth Bazzill Card stock. The solid colored paper is from my scrap bin. I cut a purple mat at 4” X 5 1/4” and the patterned paper is cut at 3 3/4” X 5” and is from the Echo Park Summer Days paper pad. Finally I cut a pink mat 1 1/2” X 3/3/4” and a purple mat at 1 1/4” X 3 1/2”. I used my ATG Gun to adhere the layers together. I cut the bird at 4” from the 3 Birds on Parade Cricut cartridge and adhered the layers and added some white stitching with my gel pen. This image has a cupcake it cuts out in the birds hand but I didn’t want the cupcake so I cut it off and did not cut the other cupcake layers. To finish off my card, I added some Want2Scrap Rhinestones to the birds eye and the four corners of the sentiment layer. I stamped the sentiment in some Memento Tuxedo Black ink. I added the bird to the front of my card with some foam tape. I hope every had a great and prosperous new year!
Items from Cutters Creek:
Smooth Bazzill Card stock
Echo Park Summer Days
ATG
Want2Scrap Rhinestones
Memento Tuxedo Black

Monday, December 26, 2011

Mini Album by Chris

A KaiserCraft Beyond the Page album and lots of goodies from my art room came together as a Grandma album. (Check out these catalogue and idea magazines that Kim has been putting in her packages.)

Albums are a piece of cake to do; you just need some imagination (which every one of you has!), glue, and a variety of supplies. All the pages in this album are covered with Echo Park paper, sanded, coated with some Picket Fence Distress Stain and edged with either Tattered Rose Distress Ink or Mustard Seed Distress Ink. The gems adorning the different pages are I-Rocks and Silver Pearl Liquid Pearls. I used my Alcohol Inks—willow and Citrus to color the metallic letters (grandchildren) and Xmas Red Stickles to outline one rose. The white photomats on the last two pages are edged with Ripe Persimmon Distress Ink and run through either the swiss dot cuttlebug embossing folder or the Tim Holtz Regal Flourish one and the flourish is using the flourish die and white glitter cardstock. To finish it off, I sprayed each page with Tattered Angels Old Lace Mist and used 1/8 inch scor tape to adhere the green ribbon around the edges of the largest page.


What’s on your shelves that you could combine with a Beyond the Page project?

Supplies from Cutters Creek:
KaiserCraft Beyond the Page Album
Echo Park paper
Tim Holtz Distress Stain—Picket Fence
Tim Holtz Alterations—Elegant Flourishes
Tim Holtz Distress Inks—Ripe Persimmon, Tattered Rose, Mustard Seed
Ranger Liquid Pearls—Silver Pearl
IRock
Stickles
AC Glitter Cardstock
Tattered Angels—Old Lace
Scor Tape

Friday, December 23, 2011

Merry Christmas & Happy Holidays From Cutters Creek


Merry Christmas and a Happy New Year from the Cutters Creek Design Team!  Your business this year is so appreciated and the Design Team has had a blast bringing you beautiful projects all year long.  Have a safe holiday and a wonderful time with your loved ones.  And as you celebrate remember, it is not the presents you receive but the presence of those in your life both family and friends.

Tuesday, December 20, 2011

Taking your Scrapbook Supplies off the page

We all spend a lot of time collecting scrapbook supplies and most of us got started with scrapbooking because we loved crafts in general.  I thought I would share a few ways I use my scrapbook supplies to make things other than paper crafts.  Also I would like to apologize for the lateness of this Tutorial Tuesday.  I accidentally washed my iphone in my jeans pocket the other day and I didn’t know how to function.  I had my calendar in there, all my contacts and everything so I’ve  been a little out of sorts for the past few days.

This first project is a flower I made for my daughter to wear in her hair. 

photo(1)

I printed the Santa image from Santa’s Village on my Imagine and then punched it out with a 1 inch circle punch.  I added it to a bottle cap with a glue dot and sealed it with an epoxy sticker. 

My next project and the tutorial part of this post is how to make a glass tile pendant.  First, I picked some paper that had a nice small repeating pattern.  You pick paper because you think it’s pretty so why wouldn’t you like jewelry made out of it ?  I chose this pattern from Echo Park and punched a 1 inch square you could also use your paper cutter if you don’t have a 1 inch square punch. 

Here is a picture of my paper square and my glass tile  ( you can also use a scrabble tile if you have those laying around).

paper and tile

Next you take some glossy accents and kind of dot it all over the front of the piece of paper.  Move slowly and don’t shake it you don’t want to get bubbles. 

crystal effects

Then you lay your tile on top of the paper and center it.  Let it dry for quite a while.  I laid mine of wax paper so I didn’t glue it down to my desk. 

photo(2)

After it is good and dry, you need to turn it over.  If you have any excess paper, gently sand it off around the edges and put a coat of glossy accents over the back of the paper too. When both of your coats are dry, you need to add a bail to the tile with some really good strong glue  so that you can attach it to a necklace.  My paper tile isn’t done yet, so I’m using Miss Piggy as an example for this step.

photo(3)

Now I’m ready to add it to some chain or a ribbon and wear it as a necklace. 

Cutters Creek Shopping List

Glossy Accents

Scrapbook paper

Saturday, December 17, 2011

Baby Shower Card by Chris


I love my Nestabilities Labels Four and have used 3 graduated sizes here to make this shower card. I cut four labels—2 from the largest die, skipped a size and did one each of the next two dies. All edges were inked with Tattered Rose Distress Inks.

To assemble the card base I scored the back piece straight across the top of the side parentheses. I then used my ATG gun to glue above the score line and glue the two pieces together and trimmed off the bottom of the card so it would stand as an easel. The yellow layer was glued down next and the green swiss dot layer was mounted with pop ups. I wrapped the bakers twine around the top and bottom.

To make the stork and baby I used New Arrival Cricut Cartridge and cut the baby at 2 inches. The face is one of Peachy Keen stamps. (I used Just Baby Face Assortment which I bet Kim can get for you if you want.) The stork was cut at 3 inches. To make this stork I cut 2 extra body pieces because I wanted to make the wings look as if they were flapping in flight. All three pieces went through my Cuttlebug D'vine Swirls embossing folder. I didn’t want the neck and face to have the swirls so I left those parts hanging out as it went through my Big shot. I glued the first layer down. The next two layers I trimmed off the neck and head and glued down only the part closest to the neck. I inserted pop ups between the wings to raise them up and then layered the baby bundle over his beak. The top of the bundle is glued down, but the bottom is raised on another pop up. (Lots and lots of dimension in this card.)


To finish off the card I made a rosette using Tim Holtz Alterations Paper Rosette (which Kim had special ordered for me) and a Winter Twinkle Jewel on the outside and a sentiment on the inside.

These Products can be found at Cutters Creek:
Spellbinder Dies
Tim Holtz Distressed Inks
Twinkle Jewels
Peachy Keen Stamps
Doodlebug Bakers Twine

Sunday, December 11, 2011

Ho Ho Ho Garland


I have a garland or banner that I made to decorate my office at work. All of the colors and patterned paper were printing and cut on my Imagine using the Snow Angel Imagine Cartridge and the Mr Frosty Patterned Imagine Cartridge. The stocking is cut at 5" using the Simply Charmed Cartridge. This picture was taken with my cell phone at work hanging on my white board in my office.

Here is a close up of one of the stockings. I adhered all the layers with some Scotch Quick Dry Adhesive. The letters were added with some ASI Kool Tac Clear Foam Pads. I cut the patches for the toe and heel of the stocking out of white card stock as well as the top cuff. I used my Xyron to add some adhesive to the top of each of these white pieces and then covered them with Ultra Fine White Flower Soft. Finally I used my Crop-a-Dile to punch a hole at the top of each stocking. I ran someDoodlebug Twine through the holes to hang my stockings. Below are close ups of the other stockings.


Friday, December 9, 2011

Telescope Card by Chris


I used my Spellbinders Nestabilities to cut three graduated circles. The smallest (3 inches) is the large circle of the Nestabilities Standard Circle set; the second circle (3.5 inches) is the second to largest of the Petite Scallops set; and the largest one (4.25 inches) is the largest of the Lacey Circles set. I inked up the recessed side of the Cuttlebug Snowflakes embossing folder with Tim Holtz embossing ink and after running it through my big shot I sprinkled it with white embossing powder that I heat set and then sanded. It gave it a nice glossy finish and (I hope) looked a bit like snow. I edged the circle with iced spruce ink from the Limited Edition set. The 3D snowflake is from Joys of the Season cricut cartridge, cut at 2 inches. (I bet Kim can get it for you if you don’t have it.) Both layers were sprayed with Tattered Angels Pearl Mist, mounted using ASI’s Kool Tak 3D Clear Foam pads and a Twinkle Jewel (Winter) added to the center with a Mini Glue Dot.

Next I used Spellbinders Fancy Tags Two and a Let It Snow stamp that I had in my stash. I embossed it using Tim Holtz’s embossing pad and white embossing powder. I glued this with my zig pen across the center of the second circle. For the third circle I again used the embossing pad and covered it with silver powder. I didn’t worry about keeping the inside edges neat as I knew I would cover this with another white circle (3.5 inches) on which I again stamped with the embossing pad, but this time I used clear embossing powder and heat set it. I made a second snowman on a scrap piece of paper and cut it out and used as a mask. With the mask covering my stamped image, I brayered on layers of distress ink, starting with Tumbled Glass, then Broken China, and finally, Faded Jeans. I used a wet watercolor brush to blend the inks a bit more and create some shadows inside the snowman. To give it some more dimension I cut one more 3.5 circle and tore off the top edge of it to set before the snowman. It’s edges were also inked with Tumbled Glass.


To put it together I centered the medium circle so the image was upside down over the large circle with its image right side up and pierced a hole. I put aside the large circle and centered the top circle (again upside down) over the middle one (right side up) and pierced it. The final hole at the top was made through the circle and a ribbon loop to pull it open. After all holes were punched, I lined the holes back up and used small brads to join them and voila—folded it looks like a stacked circle, open--a tiered card.

These products can be found at Cutters Creek:


Wednesday, December 7, 2011

Quick & Easy Cards with Lori

So, we're getting closer to Christmas here - who else needs some quick & easy cards?  Ecstasy Crafts to the rescue!  Some of my favorite images are "Gorjuss Girls", and Cutters Creek carries a beautiful sheet of "Winter Friend" images to make two cards.  Best of all, they are currently on sale for 15% off - but you better hurry, there are only 4 left in stock as I type this!  Of course, if those are all gone, there are lots of other awesome choices from Ecstasy Crafts available; just have a look around.

Here are the two cards I made, keeping it simple:

Using a white 5"x7" card base, I assembled my EC image.  Then I used a pin clip to hold my "title" like a sign, and added a little bow of Doodle Twine to it.  I added some black organdy ribbon beneath the image, then layered on some ribbon printed with a sentiment from my stash.  I colored over a few little details in the image using a Copic Atyou Spica glitter pen in Black for a tiny bit of bling, but it doesn't show well in the photo.

Again I chose a 5"x7" white card base and layered my image onto it.  I repeated the layered ribbon and added an accent made of white & black paper flowers and a blue plastic flower, held together with a black brad center.  I again posted my "title card" in a pin clip and tied it with some Doodle Twine.  This time, I highlighted some areas of the image using a Sakura Jelly Roll Stardust pen in clear.

Thanks for stopping by and checking out my quick Gorjuss Girls!  I have a more time-intensive, stamped and colored image over on my personal blog today if you'd like to check it out.

Monday, December 5, 2011

Do You Play??? Tutorial Tuesday by Laura C

Today's "Tutorial Tuesday" is really going to be
"Tim Holtz Tuesday"....lol. Many people play
along with his "12 Tags of Christmas". Do you?

I love the inspiration, and I love trying to use
my "stash", but ok, I always need to pick up a
FEW new goodies too.....lol.

Now it IS day 5.....but I just had my Thanksgiving
company leave yesterday! So my take on Tag #1
is above. Now Tim can give you the directions much
better than I....lol....you can see them HERE.

But I can tell you....don't be overwhelmed, it's fun
to improvise! I love bling, not really the mess of
glitter, tho'....but I do love Stickles!! So the Noel
chipboard letters are done with Silver Stickles.
I made my own music paper also....using the
Holiday Wishes Stamp Set from Stampers
Anonymous....by stamping the sheet music in
the set twice, right next to each other, and
centering the banner die over the notes.

I hope you all are inspired to play today....
maybe go and get a little inky....just pick a
tag and have fun! And if you do know you
just can't live without one of the cool products
on this or another tag.....Kim's got your back
over at Cutter's Creek.....just let her know,
and she'll help you out! She's awesome that
way, ya know!

Items from Cutter's Creek:

Stampers Anonymous Holiday Wishes Set
Silver Stickles
Rock Candy Distress Stickles
Paint Daubers in Snow Cap
Limited Edition Winter Distress Inks
(this tag used Iced Spruce)
and Kim is glad to special order items
for ya too--just ask!!
Related Posts with Thumbnails