Showing posts with label Gift Making Projects. Show all posts

Thursday, March 29, 2012

At the Movies - Goodwill Upcycle with Lori

I'm a regular shopper at Goodwill, and I always have to cruise through the aisles of home decor and storage.  I fell in love with this tin immediately, because it's larger around and shorter than the round tins I usually see, and because of its finish (a slightly pinkish gold color with a rough feel).  I've been looking for the perfect tin for a project I've had in mind for a while and this was it.

Here's what I pulled out to work with at home:

I had my bargain tin, my At The Movies stamp set, Copic markers, and Faux Metal Peel & Stick (Duck brand).  I had all the makings of a perfect movie night gift.


First, I used my Make The Cut software (and my electronic cutter that shall not be named) to cut a movie reel image slightly smaller than the size of my tin.  (You can also trace an image on the back of the Peel & Stick and cut by hand.)  After weeding out the leftover Peel & Stick, I used Copic markers in C3, C5, and E37 to make it look duller & older.  I colored all over with C3, then I added random spots of C5 near the edges, and some small areas of E37 to look like the beginnings of rust.  When I finished, I stuck my movie reel cut to the lid of my tin.

Next, I pulled out the At The Movies stamps and some black Staz On ink.  I stamped the film strip leader onto a report cover (a transparency would work too).  I carefully used my Copic E37 marker to add brown spots to the "film strip" to make it look aged.  Remember that Staz on is also alcohol based, so things will start bleeding and blending if you let the marker ink touch the stamped image.  A little is OK in this case, but not something you normally want.  Using Memento black ink, I stamped the movie listing and a couple of tickets on cardstock and sponged on some brown ink for an aged look.  I tore out the movie listing and cut out the tickets, added some folds, and used more ink direct to paper.  I adhered everything to the tin lid using Scor Tape and Kool Tak clear foam squares.

Lastly, I made a popcorn wrap using the popcorn stamp, Memento ink, and a Copic marker in Y11 on the X-Press blending card.  I stamped the image a second time in red and cut out the "pop corn" center and adhered it.  I layered it on black CS some old Graphic 45 paper I had from the Playtimes Past line, and adhered the ends with Scor Tape.  This will make a great gift by adding a classic movie and some more snacks.  I think I'm saving mine for a Father's Day gift!

Items available at Cutters Creek:
Other:
  • pattern paper of your choice
  • brown ink of your choice, for distressing
  • round tin
  • Faux Metal Peel & Stick  (I think I found it at Lowe's near the Contact Paper)
  • plastic report cover or transparency

Thursday, May 5, 2011

Paper Pieced Frame by Laura C

This project would be a welcome addition to any mom's picture gallery! It's a paper pieced picture frame, and a great quick project.... and yes you still have time to make it for Mom's Day!!

Start with a coordinating paper collection like the 6x6 paper pad Echo Park (For The Record) and add some coordinating cardstock from Core d'nations (Black Magic Hocus Pocus used here....the soft green blue to emboss a piece of the Core d'nations (cut to the size of the folder). The raised area is then sanded to reveal the color beneath. Next I cut 1 & 3/8" squares of one of the patterned and one of the solid colors from the Echo Park paper. I cut pieces of the embossed brocade to fit once I pieced my frame together. The edges on my frame are rounded.....so I used a corner rounder on those four pieces. I also used the new Floral Doily Accents Spellbinders dies to make corners out of black cardstock. The paper pieces were inked with Black Soot Distress Ink, and I used a gold ink on the Doily Accents to make them look like metal. See below:


Next I prepped my wooden frame by rubbing it with Black Soot ink to cover anything that might show between my paper "tiles" (I buffed off excess ink with a paper towel). See below:


To finish, each tile was attached with Scor Tape, and once they were all adhered, I sanded around the edges to make them look like they are a part of the frame. I went back and re-inked the edges with the Black Soot (but it looks cool just sanded too!!). A few embellishments from my stash in the bottom right corner (used my Tissue Tape dispenser!) and peeking out from behind is another die from the Floral Doily set. I used regular adhesive to attach the corners, and pic matted in black finishes it off.

A great gift for Mom or anyone on your gift list!! Or, if you don't know what to get Dad.....make one with tiles made only out of the brocade....it looks like tooled leather (you can even shine it up with glossy accents!).

Happy Crafting!

Available at Cutters Creek:

Echo Park 6x6 For the Record paper pad
Core d'nations Cardstock (Black Magic Hocus Pocus)
Spellbinders Dies (Floral Doily)
Tim Holtz Distress Ink (Black Soot)
Ideology Tissue Tape Dispenser
Cuttlebug A2 Embossing Folders (Brocade)
Scor Tape

Sunday, April 24, 2011

Cutters Creek Treat & My Fabulous Design Team!

A couple weeks ago, I sent my entire Design Team a little "treat" from me and asked all of them if they would be kind enough to create something and let me show off their talent.  They were all so very excited and I told them that they could use anything they wanted to use and my only stipulation was they used the product and do something geared to all those Moms out there, as Mother's Day is quickly approaching.  My hope is all their moms will be getting the gorgeous things they came up with!

As a side note, I would like you to take a moment to think of one of our Designers, Laura.  She is dealing with and ailing parent and she felt horrible that she did not get a project done.  In my book, family ALWAYS comes first and I know she would have something wonderful to show me and all of you.  The entire Design Team sends you hugs Laura, and we are all here for you and hoping you are well........

So what did I send the Cutters Creek Designers?  I sent them each a set of Cutters Creek Branded Flowers!!  They all got the Micro Roses and I sent each one of them a different color.  So here are your Cutters Creek Designers!!!  Please leave them all a comment to let them all know that they did an awesome job.  I know I think so!!!!

Mandie:

Vicki:

Lori:

Chris:

Melissa:

Mindy:

Deanna:

Laura:


Didn't they do a wonderful job?  I know I am so very proud of each and everyone of them!  Cutters Creek Branded Flowers come in many colors and the Micro Roses have 15 stems (grouped in three bunches of five) that you can pull apart or leave them together with three complimentary bows.  To see them, please click HERE!  I hope everyone enjoyed the challenge I gave the Cutters Creek Design Team!!!

(Laura's project added 4/28/11)

Wednesday, December 29, 2010

New Year's Hostess Gift by Laura C

Start the New Year off right, ring it in with a fun set of wine/drink charms, that can be a great hostess gift, or you may want to keep them for yourself!


Start with shrink plastic (I used white), a small stamp of your choice (I had the word "cheers"), Staz-On Black Ink (must be a good permanent ink), Ranger alcohol inks or Copic Markers, an Tim Holtz Ink Applicator and felt and a Crop a Dile hole punch. I used a 1&1/2" circle punch to make my "stencil". Then I traced and cut out 8 circles from the shrink plastic. Then I stamped my image on the disc—some people will sand the shrink plastic to make this easier.....I did not....but it might slip a bit so don't push down too hard. Then use the Crop a Dile to punch a hole......I stacked them all up and did it with one punch (the larger hole)—love the Crop a Dile!! Then using the Tim Holtz Ink Applicator and felt....I brushed the edges of each disc with a different color of alcohol ink. You can get a similar effect with Copic Markers as well. Here is a look at the disks before shrinking:


Now, on your Bazzill Splat Mat or other heat safe surface, use a toothpick in the hole to keep the disc from blowing away, and use your embossing Heat Gun to shrink it. It will curl all up, but will return to a flat disc when it's done. Now you can do these up anyway you choose. You can use a thin ribbon or twine, I had a good wire in my craft stash, so I strung on some small beads that complimented the disc color, and I used a needle nose pliers to form each end into hooks. I used a jewelry ring to attach the shrink plastic charm so it will lay flat.


To make the "matchbook" to hold them, use a 8&1/2" by 5" piece of cardstock. Score it at 3&1/2", 4", and 7&1/2" on the Scor Pal, and fold to create match book. I used a small piece of Velcro to secure it closed. You can decorate for any holiday, I chose New Year's, used a celebrate stamp that I embossed using Tim Holtz embossing ink, and Super Fine Embossing Powder on a 1&3/4" by 2&1/4" piece of black cardstock, I then used Flower Soft glue around the edge, and applied Beadazzles in the Waltz color. I used American Crafts glitter cardstock (a 1&1/4" x 5" strip) and layered a 2&3/4" by 2&1/2" square and foam dotted the dry "celebrate" square on top. A 1/2" x 5" strip on the small flap finishes it off. On the inside, I used plain white cardstock and a ribbon slot punch to make the card to hold the charms. I fastened this piece on the bottom edge only, to hold it in place, but allow easy access to the charms.

This is a gift any hostess would love to receive!

Available at Cutter's Creek:

Suze Weinberg Beadazzles (waltz)
Tim Holtz Ink Applicator
Super Fine Embossing Powder (silver)
American Crafts Glitter Cardstock (silver)
Staz-On Black Ink
Bazzill Simply Smooth white cardstock
Bazzill Splat Mat
Copic Markers
Crop a Dile
Scor Pal
Flower Soft glue

Friday, December 17, 2010

Featured Artist-Deb S. (Holiday Home Decor)


I have a BFF who is going through a tough time. I wanted to perk her up and let her know I care, so I made her this plaque for her for the holidays. I focused on the theme "Joy" and used Tilda angels to show her she is loved. The wooden frame is 18" x 5". I painted the frame and the letters with a metallic colored acryllic paint from my stash. The background paper is Bo Bunny. Because the paper was only 12" and the frame was 18", I matched the seams as carefully as I could and then covered those seams with green scrolls cut from TH's "On the Edge" die. I also used TH tissue tape to embellish the paper. I used matte mod podge as my glue for this portion and then put a layer on top of the Tildas and paper. I had colored my Tildas with copics and the mod podge had no effect on the colors. On the Tilda that is "sitting" on the edge of the frame, I glued her on chipboard and then cut her out. I wanted her to be strong enough to sit up straight! The rosettes were made using TH's rosette die. I wanted the rosettes to be a little smaller, so before folding them, I cut about 1/4" from the non-scalloped portion. At this point, I used either hot glue or Scotch Quick Dry Adhesive. The flowers on the rosettes are tiny little primas. The flowers in the "O" were cut from my stash of old silk flowers, and the copper key was also from my stash. The charm holder is from 7 gypsies, and the charms are from my stash. The metal snowflake was an old tree ornament, blinged up with gold sticky crystals.


Wednesday, December 8, 2010

Deanna M (Featured Artisit) Advent Calendar


Last Christmas I made my mom an Advent Calendar so this year she asked if I was making one for her this year. So, I thought why not. So off to Google I went and did a search for Cricut Advent Calendars. Here is the site I found for inspiration: http://www.bubblyfunk.co.uk/tracie-hudson-christmas-advent-a-39.html.

This calendar was made using small matchboxes. Of course I thought I can make those. I used the Tags, Bags, Boxes and More, Cricut Cartridge and cut 24 matchboxes. I cut the drawer part at 3" but had to enlarge the box part so the drawers went in easier. I resized the box part of the cut on my Gypsy and cut them at 3.08". The boxes were scored and assembled using Score-Tape. I added green and red brads from American Crafts. Directions on how to create this project can be found on the link above. I used two 6" X 6" pieces of chipboard for the top and bottom portions of the "cabinet". For the top I cut Christmas Wishes from the Winter Frolic Cartridge at 2 1/2". Cuts for the sides were cut at 1 1/2". I cut the numbers for the drawers at .45" using the Roly Poly font from the Plantin Schoolbook Cartridge.

The mittens were so small when I cut them I couldn't use the snowflakes that were cut to go on top of them. Instead, I used my white gel pen to draw in the snowflakes and then used my Quickie Glue Pen to apply glue and Martha Stewart Sugar Cube glitter. I also used the same glue and glitter for the white cuff's of the mittens.


Supplies:
Patterned Paper: DCWV Christmas Stack
Paper: Bazzill Card Stock, and Scraps from Stash
Cartridges:
Winter Frolic -Sentiment
Simply Charmed - Santa and Chimney
Jolly Holidays - Mittens, Noel Banner, Gingerbread Man
Doodlecharms - Stocking
Tree and Snowflake Buttons
Adhesive:
Beacons 3 in 1 Glue (buttons)
Scor Tape (boxes and cabinet)
ATG Gun
Scotch Quick Dry Adhesive
Quickie Glue Pen (numbers)
Foam Tape
Stickles:
Lime Green
Christmas Red
Stardust
Brads - American Craft Burgundy and Leaf Green
Martha Stewart Sugar Cube fine glitter

Saturday, November 27, 2010

2011 Calendar Set With Gift Bags by Sandi


The easiest way to explain how I created these calendars is to list what I used to create each month. I used my Gypsy but they could easily be done with Cricut design studio or Make The Cut Software.


The covers were created with Adirondack Acrylic Paint Daubers and Tim Holtz Grunge elements and bound using the Zutter Bind It System. The Gift Bag Purse buckles were created with Spellbinders Ladies Fashion Buckles and Cuttlebug. The Purse Pattern is from Becky Roberts Purse-onally Perfect Purse. Any stamp image can be used, I do a different them each year.

The following products can be purchased at Cutters Creek:

January:
Cricut Cartridges
George and Basic shapes (Frame)
Wild Card (Cheers)
Plantin School Book (January)
Christmas (Snowflakes)
Gypsy Font (Happy New Year)
Cricut Embossing Folder (D’vine Swirl)
Stickles (Purple, Lavender, Xmas Red, Yellow, Silver)
Tim Holtz Adirondak Paint Daubers (Gold, Purple)
Copics (Skin White, Blush, Lipstick Red, Purple, Prune, Cool Gray No. 1 and No. 3)


February:
Cricut Cartridges
George and Basic shapes (Frame)
Plantin School Book (February)
Gypsy Font (Decorative Ovals)
Gypsy Wanderings (Rabbit)
Glossy Accents (Glaze on Rabbit, etc.)
Copics (Skin White, Blush, Lipstick Red, Sugared Almond Pink, Shock Pink, Prune, Frost Blue, Apricot, Pale Yellow, Golden Yellow)


March:
Cricut Cartridges
George and Basic shapes (Frames)
Plantin School Book (March)
Cricut Sampler (Route 66)
Butterfly (Martha Stewart Combo Punch)
Pan Pastels (Pink and Purple on flower)
Flower and Glaze (George and Basic shapes and Glossy Accents)
Stickles (Lavender, Silver)
Embossing Folder (Diamonds In The Rough)
Copics (Skin White, Blush, Lipstick Red, Purple, Prune, Cool Gray No. 1 and No. 3)


April:
Cricut Cartridges
George and Basic shapes (Frame)
Plantin School Book(April)
Graphically Speaking (Clouds)
Wild Card (Umbrella)
Embossing Folder (Distressed Stripes)
Stickles (Silver and Waterfall)


May:
Cricut Cartridges
George and Basic shapes (Frame)
Plantin School Book (May)
Gypsy Wanderings (Fabulous Friends)
George and Basic shapes (Flower)
Plantin School Book (Leaves)
Stickles (Purple)
Embossing Folder (Perfectly Paisley)
Copics (Skin White, Blush, Lipstick Red, Purple, Prune, Cool Gray No. 1 and No. 3)


June :
Cricut Cartridges
George and Basic shapes (Frame)
Plantin School Book (June)
Graphically Speaking (Queen of Everything)
Gypsy Wanderings (Dress, Shoes, Hat)
George and Basic shapes (Flowers)
Stickles (Lavender)
Glaze (Glossy Accents)
Pan Pastels (Pink, Purple)
Embossing Folder (D’Vine Swirls)


July:
Cricut Cartridges
George and Basic shapes (Frame)
Plantin School Book (July)
Stand and Salute (Liberty & Justice for all)
Stand and Salute (Fireworks)
Butterfly (Martha Stewart Combo Punch)
Glaze (Glossy Accents)
Stickles (Xmas Red)
Embossing Folder (Swiss Dots)
Copics (Skin White, Blush, Lipstick Red, Purple, Prune)


August:
Cricut Cartridges
George and Basic shapes (Frame)
Plantin School Book (August)
Butterfly (Martha Stewart Combo Punch)
Stickles (Yellow, Purple, Xmas Red, Green)
Clouds (Sakura Gelly Roll Stardust Silver Pen)
Copics (Skin White, Blush, Lipstick Red, Purple, Prune, Pale Yellow, Golden Yellow, Mignonette, Pea Green, Apricot)


September:
Cricut Cartridges
George and Basic shapes (Frame)
Plantin School Book (September)
Beyond Birthdays (My Friend)
Wild Card (You’re Simply The Best)
Stickles (Yellow, Copper, Xmas Red, Purple)
Chair (Sakura Gelly Roll Stardust Green Pen)
Bracelets (Sakura Gelly Roll Stardust Silver Pen)
Cigarette holder (Sakura Gelly Roll Stardust Red Pen)
Embossing Folder (A2 Birds and Swirls)
Copics (Skin White, Blush, Lipstick Red, Purple, Light Prawn)


October:
Cricut Cartridges
George and Basic shapes (Frame)
Plantin School Book (October)
Gypsy Wanderings (Pumpkins
Wild Card (Bat, Spider)
Stickles (Black, Purple)
Embossing Folder (Distressed Stripes)
Copics (Skin White, Blush, Lipstick Red, Purple, Apricot, Golden Yellow)


November:
Cricut Cartridges
George and Basic shapes (Frame)
Plantin School Book (November)
Gypsy Font (Warm Winter Wishes)
Stickles (Green, Waterfall, Turquoise, Yellow, Xmas Red, Purple, Diamond)
Embossing Folder (Diamonds In The Rough)
Copics (Skin White, Blush, Lipstick Red, Prune, Mignonette, Apple Green, Pale Yellow, Golden Yellow, Frost Blue, Robin’s Egg Blue, Sugared Almond Pink)


December:
Cricut Cartridges
George and Basic shapes (Frame)
Plantin School Book (December)
Christmas (Tree)
Gypsy Font (Tis The Season)
Stickles (Purple, Xmas Red, Green, Gold, Diamond)
Purse and Bag (Outlined with Sakura Gelly Roll Stardust Silver Pen)
Embossing Folders (A2 Snow Dots and Holly Wreath Combo)
Scent My Card (Christmas)
Copics (Skin White, Blush, Lipstick Red, Prune)

Wednesday, November 24, 2010

Mandie says "Can You Imagine..... "

...winning your very own Cricut Imagine??? Remember the Empty Brown Paper Bag that Kim has for sale in the store? If you haven't picked up a couple you really should consider it! On Black Friday a Cricut Imagine Machine will accidentally fall into one of the Empty Bags... rumor is that other things *may* fall into some of the other bags as well!


In honor of the Empty Brown Paper Bag Sale, I decided to use my Cricut Imagine to highlight what you can do with this awesome machine! For those of you that follow my blog, Mandie’s Scrappin you may know that Monday was the first time I've actually broken down and made a real project with my Imagine.


If you don't have an Imagine you can also make this project very easily with patterned paper, card stock and your Cricut Expression Machine . I used the Cindy Loo Cricut cartridge to first cut the Flower Pot Box. I thought this was such a cute little box! I used my Imagine Nursery Tales cartridge to add the pattern to the box (and the colors and patterns to all of my cuts) but you can use patterned paper or cardstock. I'm not sure what size this is because I used Fit to Page but I'm guessing it would be about 7", after folding it ends up about 3 1/2" tall.


Then I cut my flower, squirrel, deer and cat all from the Cindy Loo cartridge. This was a super simple project and would be cute to put a little gift inside. My idea is a gift card and some paper shred for teachers or neighbors or maybe as a hostess gift when you go to holiday parties!


Now that you are inspired, don't forget to go buy an Empty Brown Paper Bag and maybe you will be the lucky one! Can you Imagine?

Tuesday, September 28, 2010

Rosettes 101 by Laura C.

Rosettes: 101

Well, ask and you shall receive!! My second project this month was rosettes as well (if you haven't noticed, they are HOT in everything paper crafting!!).  I've included more detailed pics on the how to's this time, so hopefully you will all try this fun new technique!!

Step #1: Cut a strip of paper to the size of rosette you'd like.  I used a 1" x 12" and 1& 1/2" x 12" (which I
punched with a lace punch for a funedge!). 


Step #2: Fold one end of the strip over about 3/16" to start accordion, then continue to fold back and forth
until the entire strip is folded. 


A side note here: take your time to make sure you keep your folds even.....it will take a few minutes, but you'll love the end result!  Some people have used a paper crimper to "start" the accordion--but it is tricky to get the paper thru perfectly straight, also, Tim Holtz has a new a die that does this, it comes out soon.....you can always ask our wonderful store owner (Kim, of course!).

Step #3: adhere ends of your rosette together with a bit of your favorite adhesive.


Step #4: cut a circle to fit your rosette (I used a 2" circle for the 2&3/4" rosette and a 1&1/2" circle for the 2&1/4").  Then cover the circle with adhesive....I used a layer of my favorite regular adhesive, and then 4 or 5 glue dots spread out on top of that.


Step #5: Push the center of the rosette down, then holding it slightly pinched, pick it up and place it on the circle with the adhesive. Ta Da!!  You have a complete rosette!


Step #6: Embellish!!  I used twinkle jewels and Stickles, and they are also a perfect fit with the brand new Spellbinders Beaded Circles dies--the larger sizes for the base, and the the smaller sizes for the centers! I added an additional center circle (1 & 1/4") that I wrote in and inked.  This center could be ANYTHING--stamped or printed from the computer)


These can decorate scrapbook pages, cards, anything you can think of!  Attach them to a small stick, and make a bunch of "flowers".  The "Boo to You" example I have here, would be perfect if you attach it to a big lollipop, for a gift, or for a child's class. Remember, you can do this for any holiday, any event (think wedding or baby showers, graduations, any party!) you can make them in any color and decorate anyway you'd like.....the only limit is your own imagination!

Happy Creating!!


Available at Cutter's Creek:

Spellbinders Dies (Beaded Circles)
Stickles (Purple)
Twinkle Jewels (Many!)
Tim Holtz Distress Ink (Rusty Hinge)

Tuesday, August 31, 2010

Back to School Teacher Gift by Laura C

Back to School Teacher Gift by Laura C


It's back to school time!  I always have mixed emotions, but one thing I love to do is give the
teacher(s) a little "welcome back" gift.  I think it's a great way to start off the year!  This
project was made using an inexpensive (less than $3!!) supply set with paper clips, rubber bands,  push pins.


I just dressed it up with paper and ribbons from my stash!!  Of course, you would "size" this project to the containers you find, but I used layers of red and black cardstock, and some school ribbon (any ribbon would work!).  For the top, I used Spellbinders dies to cut and layer circles for the top, and I embossed the top circle with the Cuttlebug A2 swiss dot folder to add  texture.  I used sticker letter for the word "supplies", but you Cricut users could do that as well!  The "topper" is made using one of the heavy metal clips.  I traced and cut the apple out  of AC glitter paper (rouge and cricket) and a second apple in black cardstock.  I used score tape to attach the apple to each side of the clip.  The cardstock "chalkboard" slips in between the clip.  It can be used as a note holder during the year! 

It's always great to let the teacher know you appreciate them, and a simple, inexpensive, but heartfelt gift, can
really start the year off right!

Available at Cutter's Creek:

Cuttlebug embossing folders (A2 swiss dot)
American Crafts glitter cardstock (rouge and cricket)
Spellbinders dies (circles and scalloped circles)  

Tuesday, August 10, 2010

Christmas in July/August Chipboard Book by Chris P.


Here’s a simple project using Bo Bunny word books, left over wrapping paper, and stickles. I covered the word BELIEVE with several different Christmas wrapping papers and some red mulberry paper I had in my scrap bin. I also had some leftover strips of the AC glitter paper and cut them to back each page. I then used my fingertip craft knife to trim around the letters, sprayed all the pages using gold glimmer mist, and then inked all the edges, using Tim Holtz’s Barn Door Distress Ink and Ink foam applicator.


I made and matted cardstock photomats for each page. To give them a bit more of a finished look I tied ribbon around some and added several photo corners from the Storybook cartridge. I used my cricut markers to outline them at 1 and 1.25 inches and then cut. Next I rubbed each into the versamark inkpad and heated using clear embossing ink to give them some dimension and shine.

It needed some more glitz so I used my silver stickles to outline silver stars, the Christmas red to decorate the tree, pickett fence to outline the snowflakes and added two cardstock snowflakes with a clear Twinkle Jewel in each center. I used my Crop-a-Dile punch and 3 snowflake eyelets to finish off the front page. I had some leftover stickers that I randomly placed and, then, tied bits of ribbon here and there on the letters along with 3 larger bows on the metal rings. Now I have a stocking gift for one of my DDILs. I have never been this prepared before. I just hope I remember where I hide it when putting out the gifts in December—LOL.


Cutters Creek Resources:


Versamark Ink Pad

Tuesday, July 20, 2010

Lantern Shaker Box Card by Laura C.


Have you seen the new Oriental Weave A2 folders from Provo Craft?? So many options so little time!! This card wasmade using the lantern folder from the set. It's embossed on vellum and then I brushed/dabbed it with a sponge loaded with the Tim Holtz distressing inks "Dusty Concord" and "Bundled Sage". Then I cut them out and put them aside while I made the shaker box.

The shaker box was made in the following layers: It's attached to a 5 1/2" x 4 1/4" purple cardstock base. Next, a 5 1/4" x 4" piece of glossy cardstock that was dabbed with purple and green alcohol inks. While that dried, I made the top frame, which is cut from the Labels 8 Spellbinder die, trimmed to 5 1/4" x 4" and then dabbed with the Tim Holtz distressing inks (see above). The "window" is made with a piece of acrylic from one of my Cricut cartridge clamshells (I ALWAYS save this!) and I used regular adhesive to attach it to the back of the frame. To put it together, I used 3M foam tape around the edges of the glossy cardstock layer (on top of ink side make sure the foam tape forms a complete sealed rectangle). The lantern strings are stuck to this 1st layer. The second layer of foam tape goes directly on top of the first. Then I added the glass beads--remember to do this BEFORE you remove the backing on the foam tape....otherwise, you can get beads stuck! So then remove the backing, place the window frame on top, then add a few embellishments to finish it off.

This is actually a super simple project, that has a BIG impact if you give it as a gift. You can even make it into a picture frame!! Enjoy!!

Available at Cutters Creek:

Ranger Alcohol Inks & applicators
Cuttlebug A2 folder (Oriental Weave set)
Tim Holtz Distressing Inks (Dusty Concord & Bundled Sage)
Spellbinders Dies (Labels 8)
3M Foam Tape

Thursday, June 24, 2010

Monogram Sign Project by Melissa


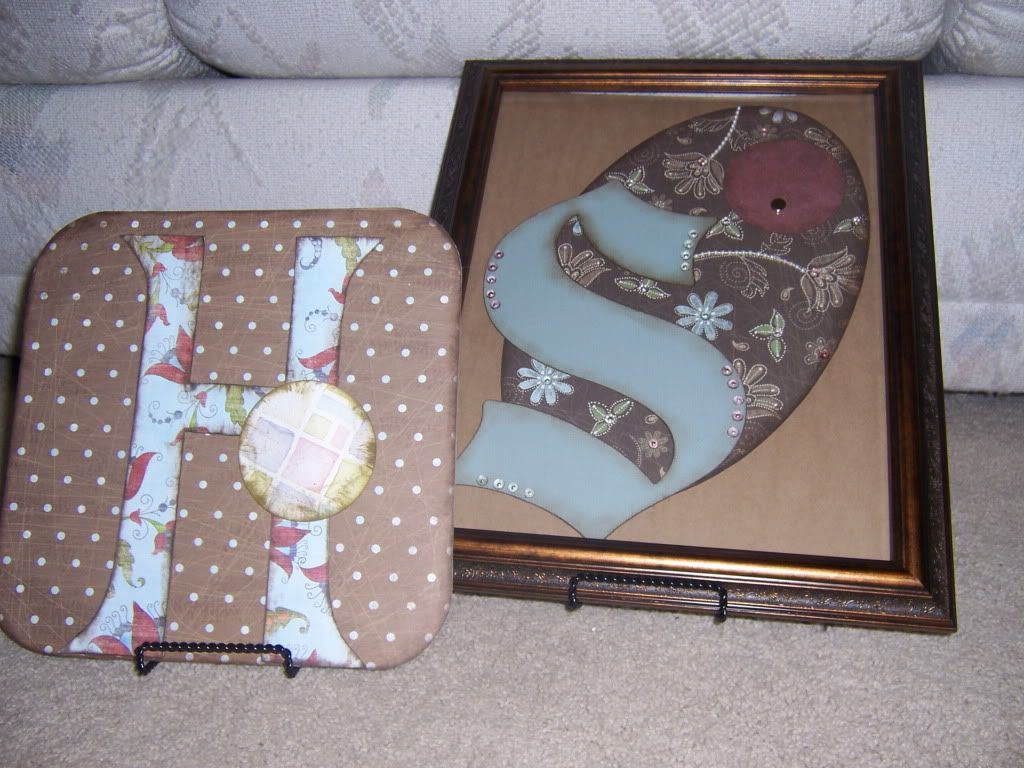
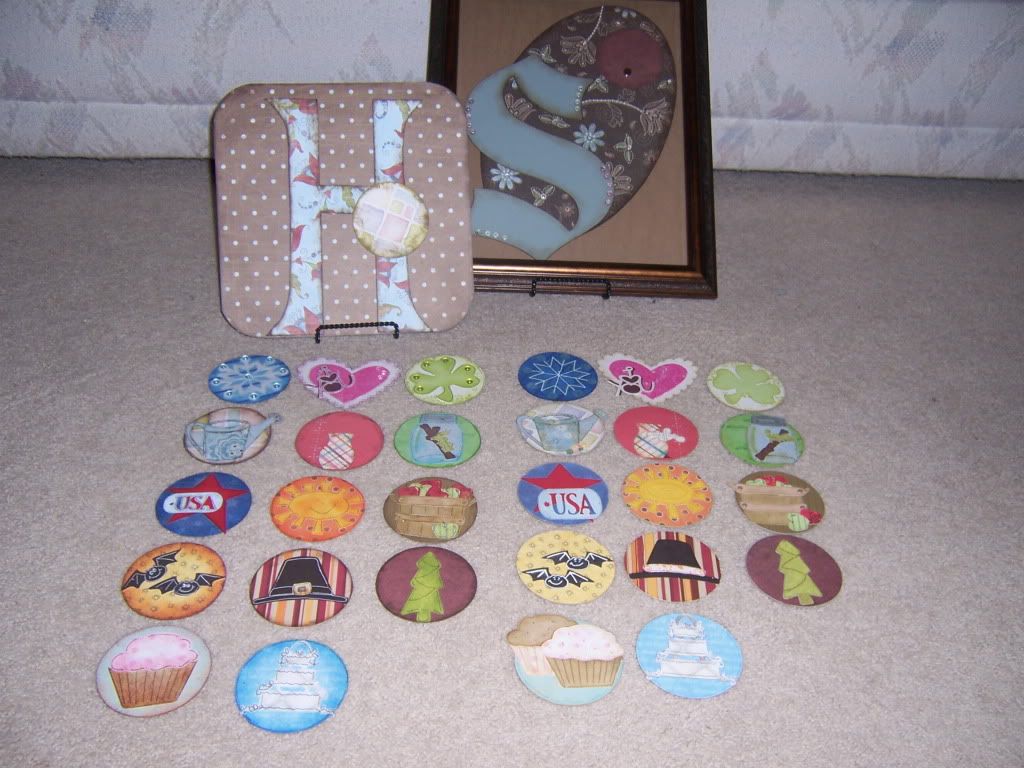
Here is another project I have been pushing off for a while at my house. Months ago, my mom and I had made Monogram signs to use as home decor. She finished hers; mine has been sitting on my craft shelf in the "to do" pile. I decided that it needed to be completed :o) The Letters were cut out with Make The Cut first as paper and than as two layers of chipboard. Mom chose a square background (H) while I did an elongated oval (S). Mom's is on a plate stand while I framed mine to hang on the wall. I attached a magnet to the front of the glass so I won't have to open the picture frame all the time to update the images. I haven't completed it yet as I still haven't found a background I like to go with my letter. I might eventually get a shadow frame with glass on both sides so I don't have to worry about it .. . .hmmmm . . . . .
100_3744.jpg
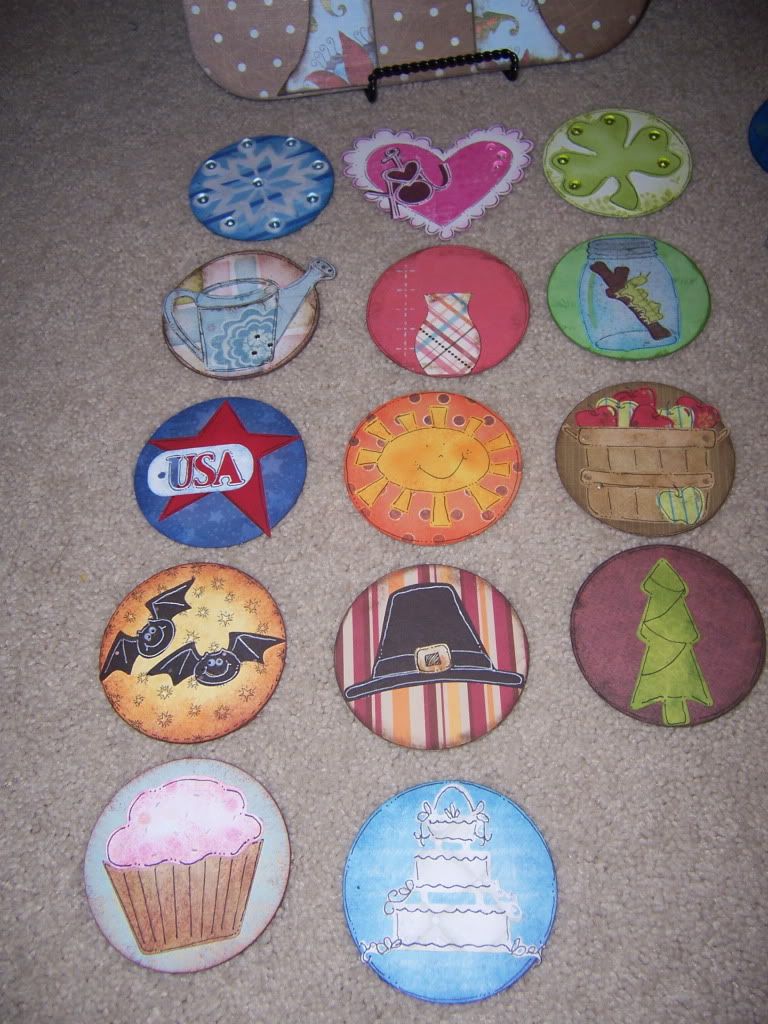
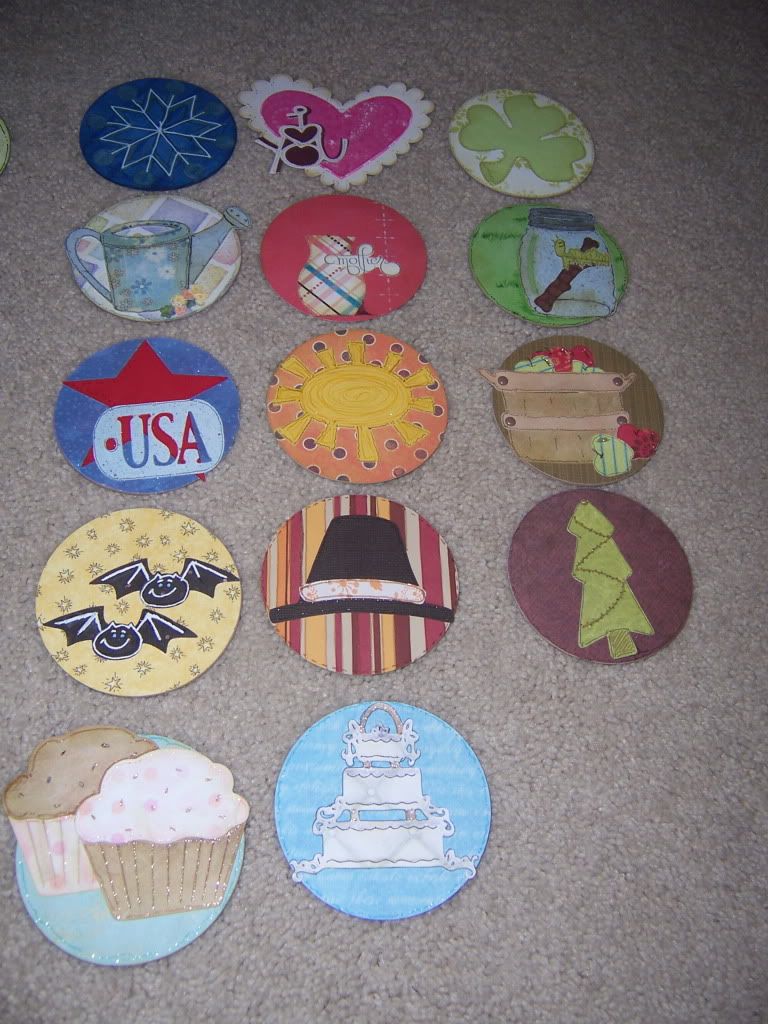
We than cut out 3 1/4" circles from chipboard and coordinating papers for backgrounds for the months and holidays. We only did 14 total circles but I know this something I can create new ones any time I want to! With Design Studio, I cut out multiple images for the coordinating month/holiday. I also listed alternatives or additional circles below- I am already thinking of other circles to create and design!
January-Snowflake/Winter/New Year's
February-Heart/Valentines
March-Spring/St Patrick's Day
April- "showers"/ gardening/Easter
May-"flowers"/Mother's Day
June-June Bugs/Father's Day
July-Popsicles/Fourth of July
August-water/sun
September-Back to School/Autumn/Harvest
October-Halloween
November-Fall/Thanksgiving/Veteran's Day
December-Winter/Christmas/Hanukkah
Birthdays-cupcakes/balloons/name
Anniversary-Heart/Cake/Wedding Bells/Rings
100_3747.jpg
I assembled all of the circles adding my own personal touch to them. In fact, in this picture my circles are on the right and my mom's are on the left. Can you tell where my creativity comes from? By the way, all of the paper used is from my stash and scrap pile - -this is a great way to use those scraps!! All other supplies can be purchased at Cutters Creek. Let me know if you need any measurements or picture close-ups. Thanks for looking!
100_3748.jpg 100_3749.jpg
Supplies Used:
Design Studio
Make The Cut
Chipboard
Adhesive
Atyou Spicas
Copics
Multiliner Pen 0.1
Inkssentials Pen
Twinkle Jewels
Quickie Glue Pen
Basic Grey Small Magnets
Carts-Blackletter, Home Decor, Doodlecharms, Paperdolls, Christmas Cheer, Accent Essentials, Walk in My Garden

Related Posts with Thumbnails