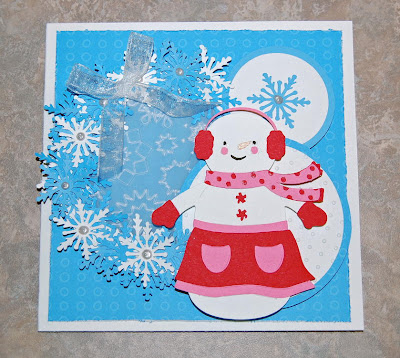


This is so stinking cute! Thanks Mandie! Here is how to make this card, and remember (!), change anything you want to make this card your own!
Snowman Card Instructions:
Form a 5 1/2" x 5 1/2" side fold card from white card stock using Scor-Pal to score the fold. Cut a piece of double-sided patterned card stock to 5 1/4" x 5 1/4" and distress edges. Adhere to card front with Scor-Tape.
Using the Plantin Schoolbook Cartridge and your Cricut Expression Machine cut the following:
1 - 2" Circle - Solid Card stock
1 - 3" Circle - Patterned Card stock
1 - 3 3/4" Circle - Vellum
1 - 1 3/4" Circle - White Card stock
For the next cuts you will be creating a circle and a ring from White Card stock and will use both. Turn on the "Center Point" function. Position your blade at least 2" from the edges of your mat (both vertical and horizontal). Cut a 2 3/4" Circle, the blade will return to the center of the circle. Without moving the blade position or unloading the mat, change the dial size and cut a 3 3/4" circle. Now you have a 2 3/4" Circle and a 3 3/4" ring.
Emboss the 2 3/4" White Circle using the Swiss Dots A2 Cuttlebug Folder
Emboss the 3 3/4" Vellum Circle using the Snowflakes A2 Cuttlebug Folder
Use the Winter Wonderland Cartridge to cut a bunch of snowflakes. Set the dial to 1" and turn on the "Real Dial Size" Function and the "Layers" Function. Select snowflake 4 and cut it from the White Card stock, Patterned Card stock, and Solid Card stock (about 10 of each).
Adhere the Vellum circle to the back of the White Card stock Ring with your Quickie Glue Roller Pen. Adhere the embossed White Circle to the Patterned Card stock Circle. Adhere one solid blue snowflake to the plain White Card stock Circle, then adhere to the Solid Blue Circle. Referring to the photo, adhere the circle to the the right side of the ring.
Use Zip Dry Paper Glue to adhere snowflake to the ring, creating a wreath. Embellish with Liquid Pearls™ White Opal. Adhere to card front with Glue Dots 1/2" Pop Up Dots.
Using the Snow Friends Limited Edition Mini Cricut Cartridge, Cut out Snowman 7 and all of her layers. Assemble with your Quickie Glue Roller Pen. Adhere to the card front with Glue Dots 1/2" Pop Up Dots.
Make a bow out of sheer white ribbon and apply to the upper left side of wreath using a Glue Dots 3/16" Mini Dot.
For the Inside of the card cut Patterned Card stock to 4 1/4" x 3 1/4". Cut the Solid Card stock to 3 1/2" x 2 1/2". Adhere together with Scor-Tape and write "Warm Winter Wishes using Inessentials White Pen. Add some snowflake to lower right corner and embellish with Liquid Pearls™ White Opal to finish.
All these products can be found at Cutters Creek. If you have any questions, for out talented Mandie, please post a comment and Mandie will be happy to assist you!


Super cute card Mandie! Love the Pop of the pink against the blue card!
ReplyDeleteMandie is at it again... creating really cute stuff!
ReplyDeleteMandie,
ReplyDeleteYour card is simply adorable! I love it and think you did a fabulous job!
I wish I knew how to use my Cricut this well and I thank you for sharing all the detailed instructions!
Awesome!
Mandie this is the cutest card! Love everything about it!
ReplyDeleteWow, Mandie this is awesome! And I know our bugs make all the cutting faster, but this still must have take a good while to put together!
ReplyDeleteMandie - this is SOOO cute!! What a great idea! I think I'll try this one!
ReplyDelete