Monday, September 30, 2013

“Thanks” Card Using Distress Stickles by Fran


For those that do not know Kim of Cutters Creek Online Store runs a Yahoo Group for her customers.  And as a member of the group you can join Clubs that Kim offers on a 6 month basis.  This allows you to build up your crafting supplies at a very reasonable monthly fee.   I have joined many of Kim’s clubs but the one I am currently in is the Distress Glitter club.  If you haven’t seen these glitters in person you are missing out on some beautiful distressed, chunky glitter.

Today I want to show you what I did on my card using three of my favorite colors I have received so far.  The three bands of glitter are Seedless Preserves, Spiced Marmalade and Tarnished Brass. 

OLYMPUS DIGITAL CAMERA

Details:  Distress Glitters were applied using sticky paper and Glossy Accents.  The sentiment “thanks” was cut using my Silhouette Portrait and glued to the card using a Quickie Glue Roller pen.  The butterflies are outline stickers applied to sticky paper and then I used a very fine glitter by Martha Stewart.  I used Scotch Quick-Dry Adhesive to glue the butterflies to my card.  The card base is made from  Neenah Card Stock.  And my card measures 5” by 5” square.


Cutters Creek Supplies: Scotch Quick-Dry Adhesive, Glossy Accents, Quickie Glue Pinpoint Roller Pen.

If you have any questions about the products I used you can contact Kim here.

Thank you for stopping by and I hope my project inspired you in some way. 

Fran

Friday, September 27, 2013

Halloween Card by Cindy

HI everyone!

My Cutters Creek Design Team post today is a fun (not scary!) Halloween card.
I used my Cricut cartridge Teddy Bear Parade. I used the Graphic 45 Steampunk Spells 6x6 paper pad for my background paper and the paper that I used for my teddy bear's clothes. I also used the new Tim Holtz glitter on the broom and the hat buckle. Be sure to visit the Cutter's Creek store to get any of the items that I used today.

Graphic 45 Steampunk Spells 6x6 paper pad
Memento Ink in Tuxedo Black
Tim Holtz Distress Glitter

I hope that you like my card today, thanks for visiting.

Wednesday, September 25, 2013

Happy Halloween by Deanna M

Today I have for you a Halloween card that I made using the new Tim Holtz Stamps and Framelit dies.

For my card I started with a 4 1/4" X 5 1/2" black card stock base. I used my Graphic 45 Steampunk Paper for my card as well. The rust color mat is cut at 4" X 5 1/4" and the black dotted paper is cut at 3 3/4" X 5". (the dotted paper is the reverse of the rust paper, got to love two sided paper)! Even though it is sold out in the store, just ask, and Kim can order you some and there are some other great pads, check out the 12 Days of Christmas paper pad.

For my web, I embossed each layer with some WOW! embossing powder in  Black Glint embossing powder. The spider was embossed with the Black Ebony embossing powder. I stamped and cut the web out of white card stock. To age it just a bit I sprayed it with some Old Lace Glimmer Mist.

I layered the cuts of the web with some foam dots between the layers. I then added a foam dot to the very center of my layered spider web and then adhered it to my card front with some Scotch Quick Dry Adhesive. To finish the spider I added some purple stickles to his body. My sentiment is from the same stamp and die set. I stamped it with some Memento Tuxedo Black ink.

I used my eBosser and the Magnetic Shim to cut my die images out.  One of Kim's customers asked if we could do a video showing how to use this shim and the embossing mat. So while working on this project I shot a short video to show you how I use the shim. I hope it will help answer some of your questions.


Monday, September 23, 2013

Getting Organized (and a little washi tape)

While watching a ton of videos about how to organize my scrapbook room, I came across several videos about Filofaxes. I started watching them and decided it would be a good thing for me to try. My purse is always full of notes I write at work and they're always getting lost. I have a calendar in my purse,but it's not big enough to hold everything I need.  A filofax founded like the perfect solution.

In the videos people were decorating their planner pages and they looked adorable.  One of the main things they used to decorate is washi tape.  I just joined the Cutters Creek monthly washi tape club , so the timing was perfect. I used some washi and a few of my other scrapbooking supplies to start personalizing  my filofax.  I just started so it's still pretty lame compared to others I've seen, but I think I'll get there.  
Here is a video showing how I used my supplies in my filofax to help get you started. Now, filofax is just one brand of planner, you can use these techniques with any planner you have, you can even print out some of your own pages to use. For me, gettting organized is a must, but using all the supplies I already have to make getting organized cute and fun is a total bonus. Cutters Creek Shopping List Double sided paper Washi Tape- club item ask Kim

Saturday, September 21, 2013

Halloween project by Michele

Hello, This week for my project I wanted to start my Halloween projects so I can decorate my office space. I made this project at a near by scrapbook store. We used the cricut and out of black cardstock paper and thin chip board I cut out a cauldron from the Paper Doll Dress Up cartridge. I cut out 2-black cauldron and 1 from the chip board. The size was at 5inches using the real dial size.  I also cut out from cream color paper the bones and from grey the cat and the bats(cut 2) all at 3inches. I cut the frog from green paper at 3 inches. I did the purple bubbles at 2 inches.  I on the bones I used some brown ink to chalk around the edges. The cat I used a black pen to outline some of it's features of the face and legs, and then took some black ink and went around the cat to give it some depth. On the frog I used some brown ink around him and black ink for his mouth. I used my Pearl Pen black for the eyes on the frog and cat and bats.


To put it together I covered the chipboard with the black and then I put the bones on in different positions on the top. I got some black wire, wrapped it around a pencil to give it that cur effect. I then added the bats, by putting a pop up dot in between with the wire and stuck them together. I  took some black pop up dots and  put them on one side and then added the  other black cauldron on top. I arranged the purple bubbles on top of the cauldron, added some orange bias tape around and made a bow. I used some purple stickles to give it some bling on the bubbles. I added my cat and frog to the front with black pop up dots.  I added some black string so I can hang it up.

I hope you enjoyed this Halloween project. You can find all of these items at Cutters Creek store and if not just ask Kim and she will happy to find it for you.

Wednesday, September 18, 2013

Creative Embossing

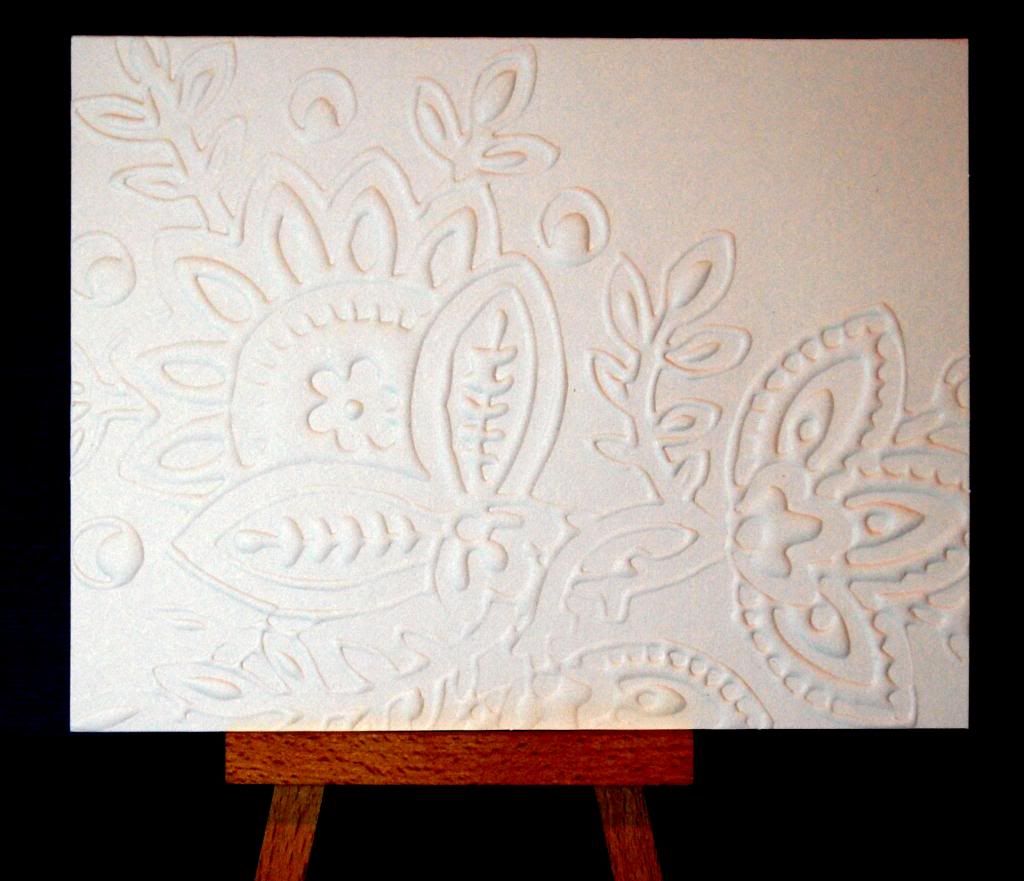
I went on a buying spree awhile back and bought a stack, okay two stacks, of embossed white cards. Now I have to decide what to do with them all so I started getting creative.

Here is the way the card looked in the beginning.
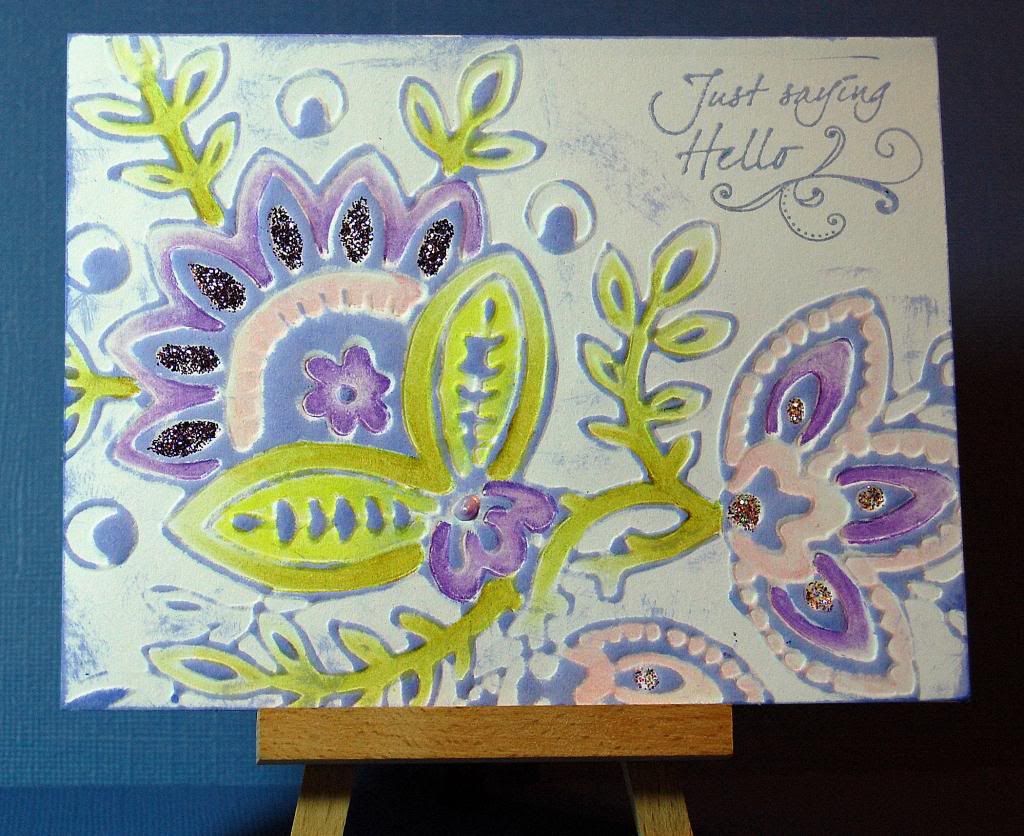
And this is the finished card.

The big player in doing this card was my Tim Holtz Distress Ink Pad in Shaded Lilac. It glides on relief much easier than a sponge ink pad because of the material over the sponge. I used my colored pencils to color certain areas but I used my Stickles glitters to add that extra sparkle. We all love our sparkle!

One card done and only about 50 more to go. Yup, I bought that many but thank goodness for the Tim Holtz Distress Ink Pads. I have a feeling I'll be using a lot of them in many different colors. :)

Tuesday, September 17, 2013

EEEEEEEK

Hi, it’s Mindy and  I have a Halloween card to share with you all.  My copic markers and I have a love hate relationship. I love to color with them and then I hate how what I just colored looks.  I’m trying to just have fun and color, not worry about light sources and shadows and all that.  It worked this time.  I started doubting the image and almost started over, but I made myself stick with it.    I also have a love hate relationship with my scrapbook room.  I love having a room devoted to scrapbooking, but I hate going in there because it’s such a mess I can’t find anything including my desk.   I decided it was time to tame the beast and get it organized.  I’m not all the way done, but it’s 90% better than it was.  Also, since I’ve been so busy organizing and rearranging my supplies, I’ve found all kinds of things I haven’t used in forever.  So enough with all that, let’s get to the project. 

I used the My MInd’s Eye Mischievous paper pack.   I love this paper because it’s Halloween paper, but it’s not too Halloweeny.  I colored my image with my copic markers.    I wanted the image to match the distressed look of the paper so I dulled down all the color by going over them with a pale warm grey or light tan color. 
photo (31)
After I finished coloring the image, I went over the entire thing with some old paper distress ink then I edged it with some black soot distress ink.  I went over some parts of the image with my copic spica pens, but it’s too hard to capture in the picture.  For the sentiment I used some black Wow embossing glitter.  It was great to reconnect with some of my old supplies.  Sometimes you need to deep clean your scrapbook room to remind yourself of what you have (and what you don’t have but you really really need).
One thing I discovered while cleaning was that I had a problem with my 6 x 6 pads.  I have them stored vertically in a little drawer.  When I use a pad, I put all the scraps back inside the pad.  I’ve found when I pull the pad out by the top, the scraps were falling out.  I saw this idea on Youtube and it worked great.  I put the scraps in a clear envelope and attach that to the back of the pad so the scraps and the full pieces are all together.  In this case since the pad was pretty empty, I put the pad and the scraps down in the envelope.  This has been working great. 
photo (32)   photo (33)
I hope you have enjoyed my Halloween card and that I have encouraged you to reconnect with some of your older supplies. 
Cutters Creek Shopping List
Distress Ink
Copic Markers
Wow Embossing Glitter
My Mind’s Eye paper
Clear envelopes

Saturday, September 14, 2013

Happy Birthday from Michele

Hello, This week I needed to make a birthday card. So I grabbed some paper from my stash I had at home and whipped up this card, for a masculine person in my life. I started with brown as my base 4.5 x 6 then I added some striped paper and matted that on my brown cardstock. The middle I used the same brown that was about  two inches and matted white paper on the brown card stock.  I used my Scotch liquid adhesive to put everything together.


I used my pearl pen in light blue to add three dots and used a stamp I had in my stash to stamp Happy Birthday using my Memento Black ink. Inside I added some white paper so I could write a little something and other co-workers could add something too. This was just a simple and clean card I made for a man.  I hope you enjoyed my project!


The memento ink pad was from a club that I am in. Kim has many clubs going on.  They are wonderful products from embossing folders to spellbinder dies. It is great to get items and you just pay a little each month and you get great items.  Please stop by the Cutters Creek yahoo store group and check it out.  All the items I used can be purchased at the store and if you need something and you don't see it just ask Kim and she will do anything she can to get that item for you.

Thursday, September 12, 2013

Halloween Card

Fall is in the air, so it's time to start making those Halloween Cards!!!  This was a quick card I made up last night.  Thanks to Kim's fabulous paper choices, I was able to use the following from the Cutter's Creek Store:

Wednesday, September 11, 2013

Mini Album Tutorial using Bohemian Bazaar by Cindy

Hi everyone, Today, is my post for Cutters Creek. This week, I have a tutorial on how to make an envelope mini album using Bohemian Bazaar by Graphic 45. I bought my paper from Cutter's Creek in a pre-order. I also used Tattered Angels glimmer mist spray and paint (from a Tattered Angels paint club I am in through Cutter's Creek). I put the album together using Scor-tape. I hope that you all have time to watch the videos and make an album of your own!


If you are interested in any of the supplies that I used be sure to visit Cutters Creek Store.

Monday, September 9, 2013

We’re Lick This Together by Fran


Today I bring you a card designed for Cutters Creek Online Store.

I really thought this stamp was so cute and the sentiment that comes with it “We’ll lick this together” can be used for so many things in one’s life.  I’ve been doing a lot of coloring using my Paint Shop Program but this time I dusted off my Prisma Colored Pencils and colored the image. Coloring can be so relaxing especially if it goes smoothly, lol.

And I did it again!  I just started coloring not even thinking if I had paper that matched the colors I used on the image.  Well I didn’t!!  But I improvised and I thought it still turned out nicely.  But it really makes more sense and easier to select your papers first and then match your colored pencils to the paper.  But I have to do things the hard way :)


OLYMPUS DIGITAL CAMERA


Card Details:  All papers used are from my stash:  Neenah, DCWV, and Recollections.  Card base and frames (Decorative Artisan) were cut using my Silhouette Portrait. The rolled rose (3D Paper rose); leaves (Leaf); and flourish (Miss Kate Flourishes) were also cut using the Silhouette.  The glitter dots were created using two colors of stickles to match the dress on the image.  The pearls are by KaiserCraft.  The one on the rose was left white to balance out the white card base.  The colored pearls were colored using a Copic marker V06, lavender.  I really thought it was a good match. Everything is held together using Glossy Accents and Tombow Mono Adhesive. The card measures: 4-3/4” wide (including the flourish).  And 5-3/4” long (including the leaves).

OLYMPUS DIGITAL CAMERA

Note:  Once I rolled the rose I took a pair of tweezers and curved the ends to give it more of a rose look.


Product Details Purchased from Cutters Creek Online Store

Stickles by Ranger (Lavender & Cranberry)

KaiserCraft Pearls (Champagne)

Copic Sketch Marker (Lavender-V06)

Inkssentials Glossy Accents

Tombow Mono Permanent Adhesive


There are so many awesome products sold by Cutters Creek.  Plus the owner, Kim has various clubs selling the most popular items.  The cost to join the clubs that normally run for 6 months depends on the product(s).

If you want to learn more about the clubs you can contact Kim here.  Or you can join the Cutters Creek Yahoo Group.


Thank you for visiting, Fran

Friday, September 6, 2013

Party Hardy by Deanna M

I have another masculine birthday card for you today. This card is for  my son who will turn 23 on Saturday.


I was actually working on a different project for today's post but when I received my new 6" X 6" paper pads from Cutters Creek from the paper club I am in, I had to use some. We received two new Bo Bunny paper pads, the one that these papers are from is Trail Mix and the other pad is called Key Lime. Don't these names just call out to you? They sure did to me. Interested? Join the Cutters Creek Yahoo group to find out more about the clubs or contact Kim through the customer service link in the store to ask about doing a special order.

On to my card. I started with a piece of kraft card stock cut and scored to make a 4 1/4" X 5 1/2" card base. I cut a brown mat at 4 1/8" X 5 3/8", I just wanted a little of the card base to show. I wanted the patterned papers to be the star. The green patterned paper was cut at 4" X 5 1/4". When I saw this herringbone wooden pattern, I thought it would be perfect to serve as an anchor for my mug, to act like a table top. That piece is cut at 2 1/2" X 4".

My mug is from the Silhouette store and was cut at the  default size. I adhered all the layers together using my Scotch Quick Dry adhesive. Before adding the foam to the top of the mug, I first added some white liquid applique and then lightly covered that with some clear glitter from my stash. I set it aside to dry. Once it was dry I used my heat tool to heat up the liquid applique which causes it to puff up. I thought it really brought the foam to life. I then added the foam to my mug using some clear foam tape.

I then adhered my mug to my card from also using the clear foam tape. To finish my card I stamped my sentiment using some Memento Morocco ink. I received this particular color while in the Memento Ink Pad club through Cutters Creek.

I bought my son a couple of bottles of beer for his birthday along with a beer stein and then a gift certificate to a local restaurant so he and his girlfriend can go have dinner together. I am hoping to etch his name on the stein if I get a chance. I thought the card went along with the theme of his gifts. Thanks for visiting today. I would love if you left a comment letting me know what you thought.

Cutters Creek Products Used:

Scotch Quick Dry Adhesive 
Liquid Applique
Memento Ink Pad
ASI Kool Tak Foam Pads

Wednesday, September 4, 2013

Flower Pot Box by Jearise

Today I have a flower pot box that I designed and made for a friend's birthday and then filled with her favorite candy.
Here is a close up of the glimmer mist and the twine that I used.


Here is a close up of the flower. I love the way I did this. I used Distress Ink to ink the outside of the flower and then when that dried I sprayed my flower with Perfect Pearls Mist. The Perfect Pearls looks like it's still wet when it's not.


Products Used:

Graphic 45 paper
Tim Holtz Distress Ink pad in  Shaded Lilac
Perfect Pearls Mists - Forever Violet 
From Kim's Perfect Pearls Mist club. You can email her about the club and her many different clubs where new releases come first.
ATG Tape dispenser
Scotch Quick Drying Adhesive
Doodle Twine

Thanks for stopping by today and I look forward to next time.

HOPE card by Jearise

This month is National Breast Cancer Awareness and we here at Cutter's Creek are promoting that and reminding all women to remember to get your yearly mammogram.

Today, for this special month, I have designed a card and would like to share with you my creation. A friend, who is a breast cancer survivor, asked me to make a special card for her and this is what I came up with.

(Insert Pictures here)

Products used and where:

Scotch Quick-Dry adhesive to hold it all together
Perfect Pearls Mists in "forever red" on hearts and "pink gumball" on HOPE ribbon
Stickles in Cotton Candy on background ribbon
Tim Holtz Distress Ink in tea dye color for edges

Thank you so much for joining me and until next time...Best of everything to you.
Related Posts with Thumbnails