Thursday, December 6, 2012

Easy Christmas Decor with Lori

I don't know about you, but I feel Christmas sneaking up on me FAST! We always like to add something new every year, but we are starting to run out of room for anything too large.  So this cute little decor piece was the perfect answer - small and quick.  I started with a wood block, originally intended for a rubber stamp, that I had in a little stash of mine.  It's about 5 something inches by about 6.5" or so.

Next I painted it with some green craft paint I had on hand.  I think it would have looked awesome with a Distress Stain instead, but I haven't started collecting those yet!


 I painted it on in a very thin coat, using a dry brush, so the grain shows through the paint.  I pulled out my Echo Park Season's Greetings Collection kit and got to assembling.  ALERT!: Kim has only two of this collection left in stock, so if you want it you better jump on it fast.


I cut a piece of pattern paper smaller than the block, leaving a nice border, and distressed the edges.  I then pierced holes all the way around and added pen stitching between the holes using a Copic Multiliner 0.5 tip.  I attached it to my block using ATG tape, but if you're concerned about lifespan you can use Scor Tape.


I selected a large tree sticker for my focal image, and added some details with a Copic Spica pen in Clear.


Finally, after adhering the sticker to the block, I added more details.  The border and ornament banner are also from the sticker sheet, and the "sign" is cut from one of the other papers in the collection. I added sparkly details ont eh word "trees" with a Copic Spics pen in Mint, matted it on black cardstock and adhered it with foam adhesive. I removed the prongs from a brad in my stash and attached it to the top of the tree with a Glue Dot, then added ornaments with Christmas Red and Gold Stickles.

This will make a cute little addition to our Christmas decorations and, other than drying time for the paint and Stickles, only took about 10 minutes to put together!

Items available at Cutters Creek:

Wednesday, December 5, 2012

Christmas Configuration Box by Deanna M


I picked up a small Tim Holtz configuration box and decided to do it up for Christmas. I started with the Idea-Ology Woodlands Miniatures. I sprayed these with some Meadow Adirondack Color Wash spray. This is a special order item but just ask. Once they were dry I used some Glossy Accents to adhere some of the Ranger Tinsel to my trees. I then added some "ornaments" to my trees and red "berries" to my wreath. My ornaments are beads and are adhere also with Glossy Accents.

While that dried I covered my box. I used the Tim Holtz Pap(er Stash Holiday Past paper pack. (Looks like Cutters Creek is out of this but please ask if you want it.)  I used Inksenntials Glue and Seal to adhere my paper. I then used some Tissue Tape to cover all the seams. I inked the tape with some Festive Berries and Evergreen Bough Distress ink.

Once everything was dry I used some Glossy Accents to adhere my trees and wreath in my box. I also cut the word JOY out at 3/4" and inked it with some distress stains in barn door and brushed pewter (another special order item but don't hesitate to ask). I adhered them to my box as well with Glossy Accents. I also added the mini lantern to my box. Doesn't it look cute all lit up?

For my corners I used some WOW! Silver Ultra embossing powder to create several layers and then etch them with a damask stamp from my stash. (Here is a link to the video I did showing this technique.)

I also applied some foil to some white card stock and die cut some snowflakes using my eBosser. I adhered the snowflakes and the corners with some Glossy Accents. Finally for my feet, I took some wooden beads and stained them with some Brushed Pewter Metallic Distress Stain (another special order item but please ask) and applied them with some Glossy Accents. I cut the Christmas Blessing from the Tis the Season Cartridge and applied it with Glossy Accents. I covered the word Blessing alos with the Pewter Metallic Distress Stain.

Sunday, December 2, 2012

Merry Christmas Card


Can you believe Christmas in in 22 days? Where has this year gone? I wish I could say I have all my Christmas cards done and mailed out but sadly, that isn't the case.


I created this card which is a another quick and simple card to make using Joy of the Season Cricut Cartridge (or any cartridge that has Christmas Ornaments).  I gut them at 3.5". Inked with distressed ink then stamped the card with Merry Christmas. Very simple card to make.

~Tee


Saturday, December 1, 2012

Quick and Easy Holiday Cards by Laura C

Do you promise yourself you will make
Christmas/Holiday cards and then the
proverbial "life happens" gets in the way?

It seems to happen for me anyway!....lol.

So this year....I decided to keep it Clean
and Simple!  Hope this post might give
you a jump-start to making your holiday
cards, and to save some stress!!

This simple design:

and a close up:
 
These can be duplicated quickly and easily
yet still look great!  I used the Echo Park
Season Greetings paper, a basic green
cardstock, a simple holly stamp (I used
a Tim Holtz stamp)....Kim has a lot of
choices in store....or can order, buttons
from my stash, and some cute red and
white twine (Doodlebug Twine is great!)
Lastly, a simple sentiment stamped and
embossed with WOW embossing powder
in Cable Car Red.  I did add a little emphasis
to the holly leaves with some Black Soot Ink.
Another great touch would be a sugared
look using Rock Candy Stickles....hmmm,
might need to try that!....lol.  But I was
going for very quick and easy!

Remember....homemade cards don't have
to mean stress!!  You can keep it simple...
and still be more than proud to send them.
The fact they are done and sent is the best
part!....lol.

Happy holiday crafting!! 

Friday, November 30, 2012

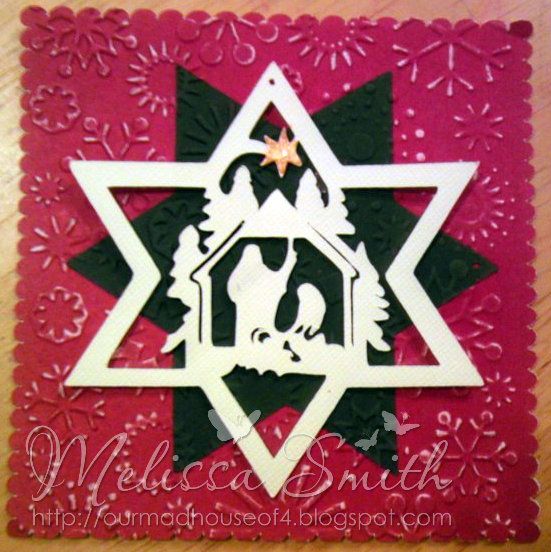
Nativity Card

Hi!  With Christmas right around the corner, I have been feeling a little overwhelmed with the daily schedule my family has and have been dreading making my cards this year.  I found myself trying to find alternatives to my usual elaborate cards as I just don't have the time with an active infant trying to crawl everywhere!

Here is a very simple Christmas Card I made using scraps found in my paper drawer with an SVG image I found here.  I love all of his designs and they are so versatile with every project I have been making lately.  I than used my cutting machine to cut out the base, the star and the nativity scene.  

I adhered the star to my base and ran it through my Big Shot with the Cuttlebug Snowflakes folder and than used a file to make the white stand out a little more.  I used clear mounting tape to place my image for a 3D effect.  I thought about lining up the image with the green star, but I found I liked the layered look better.  I think it makes it pop a little more.  For the final touch, I added Liquid Pearls for the star.


thanks for looking!


Embellishments: Snowflakes, Liquid Pearls
Other: ATG, Big Shot, File Set, Kool TAC
Stash: Paper

Wednesday, November 28, 2012

Down On the Farm With Lori

I know, everyone seems to be Christmas crafting lately.  But even with Christmas coming, other events continue to happen.  And I hope since I made this now, I will remember to mail it to my sister for her birthday in early January!  Since we lived on a farm, I thought this sweet Country Girl stamp by Sarah Kay was perfect.


I matched her up to some great papers from the Miss Caroline Dilly Dally 6"x6" paper pad from My Mind's Eye.  The frame is cut with my Cricut using the Fancy Frames cartridge.  I added a felt ribbon, paper flowers, buttons, & a brad from my stash to complete my card. I sure hope she likes it!


She was a lot of fun to color with my Copic markers.  Here is a list of the colors I used:
  • R29, R39
  • Y11, Y13, Y15, Y21
  • YR000
  • BG11, BG15, BG18
  • B000
  • E00, E02, E11, E13, E15, E37
  • C1
  • W1, W3, W5
These items are all available at Cutters Creek:
Thanks for stopping by today!  I hope you enjoyed this project.

Sunday, November 25, 2012

Snowflakes–No Two Are Alike!


I was looking through one of my craft magazines for inspiration.  And there it was a beautiful snowflake card.  I read how it was made so I gathered what I had in my crafting supplies  to create my own snowflake card.   Although I followed the instructions closely I wanted mine to look a little different so I chose to decorate it using red and gold.   Now the star of this card is my eBosser.  I could not have made this card as easily as I did without my eBosser.  It created the finest detail on my snowflake with just a push of a button.

I started out with a snowflake die and a folded piece of card stock.  I laid the top portion of the snowflake just over the folded edge of the card stock.  I ran it through  the eBosser and what came out at the other end was the cutest snowflake card. 

Snowflake Card_Inside

It’s a very small card that also could be used as a gift tag.   I took the snowflake die and ran it through the eBosser to cut out one complete, single snowflake.  I glued it to the front of the card.   I used two circle dies (different sizes) to form the front of the card for the stamped greeting.  Then I decorated the snowflake with Red Rhinestones by Kaisercraft.

Snowflake Card_Front View

I wish you could see it in person because it really is the cutest card.  My camera just did not like me today and I could not get a real nice close-up.  But I hope you can see how nicely the eBosser cut out the snowflake.  Thank you for stopping by Cutters Creek Design Team Blog today.

Remember that Kim has so many beautiful items to help you create your own designs.  Stop by the Cutters Creek Store and shop ‘til you drop!

Fran

Related Posts with Thumbnails