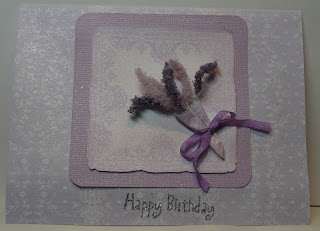
This first card took less than 30 minutes and 20 of those minutes were waiting for the Flower Soft sprays to dry! I started with an 8 1/2" x 5 1/2" lavender print paper from the kit and scored it at 4 1/4" and folded over. I then used my Cutter Bee Scissors to cut one of the 2 3/4" squares from the kit and inked the edges with Milled Lavender Distress Ink. I also cut a 3 1/4" lavender square (from my stash), rounded its corners with my Corner Chomper and inked the edges with Milled Lavender. I centered both squares and adhered them to the card base. I then took one of the wire stems from the kit and cut it into seven 2" lengths. I dripped Flower Soft glue over one end and then sprinkled Light Lavender (in the kit) on 3 of the wires and Dark Lavender (in the kit) on 4. I stuck the other end of the wires in a piece of foam so they could dry without being flattened. While they were drying, I cut out one of the cone pieces in the kit, inked it, and rolled the cone and glued it together. When the sprays were dry, I gathered them together, did a bit of rearranging, clipped the ends of the wires so they were of equal length, dabbed some Flower Soft glue on them and pushed them into the cone. I added a ribbon bow to finish it off and glued it to the card-base. Once this was dry, I bent the sprays to make them look more realistic. There are step-by-step directions for this right in the kit! The sentiment is a Happy Birthday stamp I have; I used a glue pad and sprinkled glitter over it. To give a little extra glam to my card I spritzed the whole card with Old Lace Glimmer Mist.

This next card is just as easy! Using the same card base measurements and scoring, I took a 4 1/4" x 51/2" piece of pink Core’dinations Cardstock, put it through my Cuttlebug with Tim Holtz’s Regal Flourish f (any folder would work here), and sanded the design to reveal the core. I then used a border punch to trim the 4 1/4" x 3" rectangle from the Lavender and Lace kit. The flowers were very small here, so I poured some Flower Soft adhesive on waxed paper and used a toothpick to put the glue where I wanted it. I sprinkled the Light Lavender Flower Soft over the glue and pressed it down lightly. Once I tapped off the excess (very gently), I sprinkled some dark glitter over the flowers. I then cut out the two ovals from the kit. On the bottom oval I used used Purple Stickles to outline the oval and some of its design. To highlight the sentiment that’s already printed on the top oval, I used a Purple Sakura Gel Pen and just traced over it to give it some dimension. I wrapped a piece of gauzy pink ribbon around the middle of the card front, layered the rectangle and base oval, and used Pop Up Glue Dots to lift the Happy Birthday layer. The base rectangle has the image of two bows between the flower soft sprays, so I took some of the ribbon from the kit and made tiny bows that I used Glossy Accents to glue to the card. I still wanted to add a bit more so I made a paper rose (the spiral rolled kind) and spritzed it with Pearl Glimmer Mist and glued down with a Glue Dot.
Two gorgeous cards done and I still have tons more Flower Soft and card mounts to work with. Check these kits out and you can make some fast beautiful cards too!


Looks great Chris!
ReplyDeleteGreat cards Chris. Love flower soft and purple is my favorite color.
ReplyDeleteOhhhhhhhhhhhhhhhh Chris...SO VERY PRETTY!!!!! Love them all!!!!!
ReplyDeleteThey are both quite beautiful Chris!
ReplyDeleteFantastic cards!!
ReplyDeleteBeautiful cards done with the flower soft! I love both, Chris! Diann
ReplyDelete