Do any of you love Pinterest? It's one of those things,
once you start....it's a wonderful source of inspiration
and ideas....but you can really get lost in time!....lol.
One thing I have found...is a lot of great crafting
tutorials....not always something new, but so
many that make you go "oh yeah...I forgot
about that technique", or...."I never did try that cool
tutorial".
This is the inspiration for this post...3 great techniques
for embossing powder, that give 3 completely unique
looks.
This technique is using embossing powder to make
a piece that looks like embossed metal. You just
use a piece of foil cardstock (I used gold) and
stamp the image you'd like in your favorite
embossing ink and sprinkle with embossing
powder in the same color (gold/gold, silver/silver).
I used the Stampers Anonymous Holiday Wishes
stamp set for this card for a little "Christmas in July":
The gold piece is mounted on AC white glitter paper
and used a Spellbinders Edgeabilities die to finish it
off (Kim can order these dies!).
The next technique can give a stamped image a
patina, or a distressed look. You simply stamp
an image in a color, then after you clean off the
stamp, randomly apply some embossing ink to
the same stamp, and re-stamp over the same
area, sprinkle with embossing powder in a
contrasting color (I used Stormy Sky Distress
Ink and white embossing powder).
This pic is of the stamped image (top) and then
the embossed image (bottom):
It really changes the look of your project!
And I finished off the card by stamping the
circle image in Festive Berries Distress Ink
and added some Kaiserkraft bling:
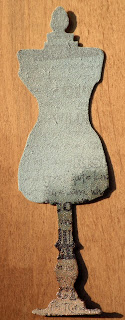
The last idea, is to used embossing powder
to make your own embellishments. This is
a chipboard cut out made with a Tim Holtz
die--Kim can order....or she has several in
the store that are fun!
After cutting it out, it's sprayed with two
colors of Glimmer Mist (I used Coffee
Shop and Dragonfly):
Next step, once it was dry, was to stamp an
image with black archival ink, I used a stamp
from the Tim Holtz Urban Tapestry set):
Then you apply embossing ink directly to this
piece, sprinkle with clear embossing powder,
and this is the "look in progress":
And then the final piece:
This would be a great piece for a card, scrapbook
page, or a mixed media piece.
So are you ready to break out that embossing powder?
So many different looks, and fun techniques out there...
hope I've given you or at least reminded you of, some
fun things to try next time you craft, to give your
project a little more texture and fun!
Subscribe to:
Post Comments (Atom)


I love how all of those came out!
ReplyDeleteLaura your techniques are amazing. I haven't been to Pinterest but your tutorials have given me the inspiration to look in to it. My fav that you demonstrated is the Stampers Anonymous Holiday wishes embossing technique. Amazing! Hugs, Fran
ReplyDeleteThis comment has been removed by the author.
ReplyDeleteLaura, I haven't embossed in ages.. My last attempted didn't come out as well as I hoped... You have inspired me!
ReplyDeleteThese all look terrific ! I also love Pinterest...so many good ideas and reminders there.
ReplyDeleteGood ideas Laura.
ReplyDeleteI always forget to emboss, I really should do it more often.
They are all awesomebut my favorite is the Holiday one.....gorgeous!!!!
ReplyDelete